
Manual
Page 14
... computer and unplug the power cord from the load plate. (To protect the CPU socket, always replace the protective socket cover when the CPU is properly inserted, replace the load plate and push the CPU socket lever back into position. CPU Socket Lever Step 1: Completely raise the CPU socket lever. GA-E7AUM-DS2H Motherboard - 14 - B.
... computer and unplug the power cord from the load plate. (To protect the CPU socket, always replace the protective socket cover when the CPU is properly inserted, replace the load plate and push the CPU socket lever back into position. CPU Socket Lever Step 1: Completely raise the CPU socket lever. GA-E7AUM-DS2H Motherboard - 14 - B.
Manual
Page 18
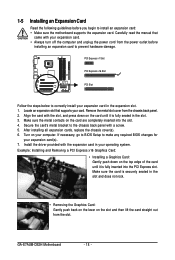
... from the slot. After installing all expansion cards, replace the chassis cover(s). 6. Example: Installing and Removing a PCI Express x16 Graphics Card: • Installing a Graphics Card: Gently push down on the slot and then lift the card straight out from the chassis back panel. 2. GA-E7AUM-DS2H Motherboard - 18 - Install the driver provided with a screw...
... from the slot. After installing all expansion cards, replace the chassis cover(s). 6. Example: Installing and Removing a PCI Express x16 Graphics Card: • Installing a Graphics Card: Gently push down on the slot and then lift the card straight out from the chassis back panel. 2. GA-E7AUM-DS2H Motherboard - 18 - Install the driver provided with a screw...
Manual
Page 28
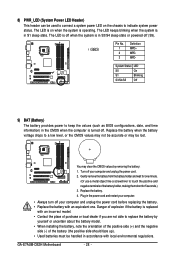
... an incorrect model. • Contact the place of purchase or local dealer if you are not able to replace the battery by removing the battery: 1. GA-E7AUM-DS2H Motherboard - 28 - System Status LED S0 On S1 Blinking S3/S4/S5 Off 9) BAT (Battery) The battery provides power to keep the values (such.... Plug in the power cord and restart your computer. • Always turn off your computer and unplug the power cord. 2. You may be lost. Replace the battery. 4. 8) PWR_LED (System Power LED Header) This header can be used to connect a system power LED on when the system is in S3...
... an incorrect model. • Contact the place of purchase or local dealer if you are not able to replace the battery by removing the battery: 1. GA-E7AUM-DS2H Motherboard - 28 - System Status LED S0 On S1 Blinking S3/S4/S5 Off 9) BAT (Battery) The battery provides power to keep the values (such.... Plug in the power cord and restart your computer. • Always turn off your computer and unplug the power cord. 2. You may be lost. Replace the battery. 4. 8) PWR_LED (System Power LED Header) This header can be used to connect a system power LED on when the system is in S3...

Manual
Page 89
..., click Rebuild array under Storage in the Select a Task pane. Step 5: Click Finish to rebuild and click Next. Step 6: The rebuilding progress is added to replace a failed drive to rebuild a RAID 1 array. Step 3: Select the array to start the rebuilding process. Appendix
..., click Rebuild array under Storage in the Select a Task pane. Step 5: Click Finish to rebuild and click Next. Step 6: The rebuilding progress is added to replace a failed drive to rebuild a RAID 1 array. Step 3: Select the array to start the rebuilding process. Appendix
Manual
Page 97
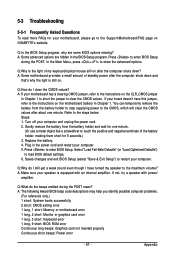
Refer to show the advanced options. Replace the battery. 4. A: Make sure your speaker is the light of my keyboard/optical mouse still on after the computer shuts down ? Appendix Press to enter ... in Chapter 1 to short the jumper to clear the CMOS values. Saves changes and exit BIOS Setup (select "Save & Exit Setup") to the instructions on GIGABYTE's website.
Refer to show the advanced options. Replace the battery. 4. A: Make sure your speaker is the light of my keyboard/optical mouse still on after the computer shuts down ? Appendix Press to enter ... in Chapter 1 to short the jumper to clear the CMOS values. Saves changes and exit BIOS Setup (select "Save & Exit Setup") to the instructions on GIGABYTE's website.

