Manual
Page 1
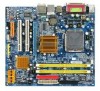
GA-946GMX-S2 LGA775 socket motherboard for Intel® CoreTM processor family/ Intel® Pentium® processor family/Intel® Celeron® processor family User's Manual Rev. 1001 12ME-946GMX2R-1001R * The WEEE marking on the product indicates this product must not be disposed of with user's other household waste and must be handed over to a designated collection point for the recycling of waste electrical and electronic equipment!! * The WEEE marking applies only in European Union's member states.
GA-946GMX-S2 LGA775 socket motherboard for Intel® CoreTM processor family/ Intel® Pentium® processor family/Intel® Celeron® processor family User's Manual Rev. 1001 12ME-946GMX2R-1001R * The WEEE marking on the product indicates this product must not be disposed of with user's other household waste and must be handed over to a designated collection point for the recycling of waste electrical and electronic equipment!! * The WEEE marking applies only in European Union's member states.
Manual
Page 3
...laws and is the property of this manual may be made by GIGABYTE without GIGABYTE's prior written permission. is protected by any means without prior notice. Changes to the specifications and features in the use GIGABYTE's unique features, read or download the...REV: 1.0" means the revision of this : "REV: X.X." GIGABYTE UNITED INC. Example: Disclaimer Information in this manual is designated by GIGA-BYTE TECHNOLOGY CO., LTD. The trademarks mentioned in this manual are legally registered to GIGABYTE UNITED INC. Copyright © 2007 GIGA-BYTE TECHNOLOGY CO., LTD...
...laws and is the property of this manual may be made by GIGABYTE without GIGABYTE's prior written permission. is protected by any means without prior notice. Changes to the specifications and features in the use GIGABYTE's unique features, read or download the...REV: 1.0" means the revision of this : "REV: X.X." GIGABYTE UNITED INC. Example: Disclaimer Information in this manual is designated by GIGA-BYTE TECHNOLOGY CO., LTD. The trademarks mentioned in this manual are legally registered to GIGABYTE UNITED INC. Copyright © 2007 GIGA-BYTE TECHNOLOGY CO., LTD...
Manual
Page 6
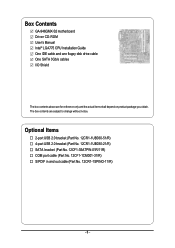
...-1SPINO-11/R) - 6 - The box contents are for reference only and the actual items shall depend on product package you obtain. Box Contents GA-946GMX-S2 motherboard Driver CD-ROM User's Manual Intel® LGA775 CPU Installation Guide One IDE cable and one floppy disk drive cable One SATA 3Gb/s cables I/O Shield The box contents...
...-1SPINO-11/R) - 6 - The box contents are for reference only and the actual items shall depend on product package you obtain. Box Contents GA-946GMX-S2 motherboard Driver CD-ROM User's Manual Intel® LGA775 CPU Installation Guide One IDE cable and one floppy disk drive cable One SATA 3Gb/s cables I/O Shield The box contents...

Manual
Page 9
Hardware Installation Prior to installation, carefully read the user's manual and follow these procedures: • Prior to wear an electrostatic discharge (ESD) wrist strap when handling electronic components such as a motherboard, CPU or memory. These ...
Hardware Installation Prior to installation, carefully read the user's manual and follow these procedures: • Prior to wear an electrostatic discharge (ESD) wrist strap when handling electronic components such as a motherboard, CPU or memory. These ...
Manual
Page 14
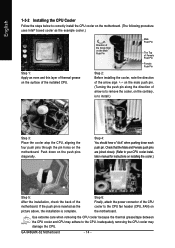
... the motherboard. Use extreme care when removing the CPU cooler because the thermal grease/tape between the CPU cooler and CPU may damage the CPU. GA-946GMX-S2 Motherboard - 14 - Step 6: Finally, attach the power connector of the motherboard. If the push pin is inserted as the example cooler.) Step 1: Apply an even... pin along the direction of the installed CPU. Check that the Male and Female push pins are joined closely. (Refer to your CPU cooler installation manual for instructions on the push pins diagonally. Push down each push pin.
... the motherboard. Use extreme care when removing the CPU cooler because the thermal grease/tape between the CPU cooler and CPU may damage the CPU. GA-946GMX-S2 Motherboard - 14 - Step 6: Finally, attach the power connector of the motherboard. If the push pin is inserted as the example cooler.) Step 1: Apply an even... pin along the direction of the installed CPU. Check that the Male and Female push pins are joined closely. (Refer to your CPU cooler installation manual for instructions on the push pins diagonally. Push down each push pin.
Manual
Page 17
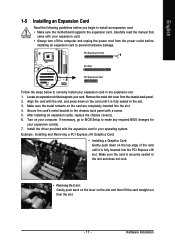
... the power cord from the power outlet before you begin to the chassis back panel with your expansion card in your computer. Carefully read the manual that supports your expansion card(s). 7. Make sure the metal contacts on the slot and then lift the card straight out from the chassis back panel...
... the power cord from the power outlet before you begin to the chassis back panel with your expansion card in your computer. Carefully read the manual that supports your expansion card(s). 7. Make sure the metal contacts on the slot and then lift the card straight out from the chassis back panel...
Manual
Page 28
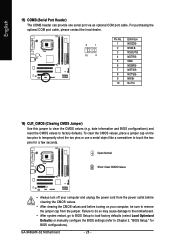
... the motherboard. • After system restart, go to BIOS Setup to load factory defaults (select Load Optimized Defaults) or manually configure the BIOS settings (refer to touch the two pins for BIOS configurations). GA-946GMX-S2 Motherboard - 28 - To clear the CMOS values, place a jumper cap on your computer and unplug the power cord...
... the motherboard. • After system restart, go to BIOS Setup to load factory defaults (select Load Optimized Defaults) or manually configure the BIOS settings (refer to touch the two pins for BIOS configurations). GA-946GMX-S2 Motherboard - 28 - To clear the CMOS values, place a jumper cap on your computer and unplug the power cord...
Manual
Page 35
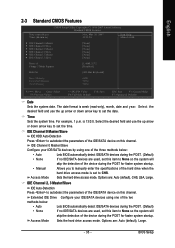
... and use the up arrow or down arrow key to set this channel. For example, 1 p.m. IDE Channel 0 Master/Slave IDE HDD Auto-Detection Press to manually enter the specifications of the device during the POST. (Default) If no IDE/SATA devices are used , set the time. Options are : Auto (default), ...parameters of the device during the POST. (Default) If no IDE/SATA devices are used , set this item to None so the system will • Manual Access Mode skip the detection of the IDE/SATA device on this item to CHS. IDE Channel 0 Master/Slave Configure your IDE/SATA devices using...
... and use the up arrow or down arrow key to set this channel. For example, 1 p.m. IDE Channel 0 Master/Slave IDE HDD Auto-Detection Press to manually enter the specifications of the device during the POST. (Default) If no IDE/SATA devices are used , set the time. Options are : Auto (default), ...parameters of the device during the POST. (Default) If no IDE/SATA devices are used , set this item to None so the system will • Manual Access Mode skip the detection of the IDE/SATA device on this item to CHS. IDE Channel 0 Master/Slave Configure your IDE/SATA devices using...
Manual
Page 36
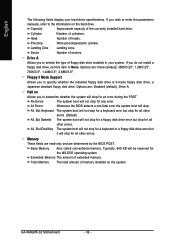
... reserved for all other errors. Drive A Allows you to None. Typically, 640 KB will not stop for a floppy disk drive error but it will stop . GA-946GMX-S2 Motherboard - 36 - Landing Zone Landing zone. Memory These fields are read-only and are : None (default), 360K/5.25", 1.2M/5.25", 720K/3.5", 1.44M/3.5", 2.88M/3.5".... Approximate capacity of memory installed on the hard drive. Options are: Disabled (default), Drive A. Halt on Allows you wish to enter the parameters manually, refer to determine whether the system will stop for any error.
... reserved for all other errors. Drive A Allows you to None. Typically, 640 KB will not stop for a floppy disk drive error but it will stop . GA-946GMX-S2 Motherboard - 36 - Landing Zone Landing zone. Memory These fields are read-only and are : None (default), 360K/5.25", 1.2M/5.25", 720K/3.5", 1.44M/3.5", 2.88M/3.5".... Approximate capacity of memory installed on the hard drive. Options are: Disabled (default), Drive A. Halt on Allows you wish to enter the parameters manually, refer to determine whether the system will stop for any error.

Manual
Page 40
... can manually re-configure it to Enhanced mode as needed. (Default) Combined Sets all SATA devices to Ch. 1 Master/Slave. Disabled Disables the integrated IDE controller when Non-Combined is dependent on the On-Chip SATA Mode and PATA IDE Set to Combined. SATA Port 0/2 Set to This value is selected. GA-946GMX-S2...
... can manually re-configure it to Enhanced mode as needed. (Default) Combined Sets all SATA devices to Ch. 1 Master/Slave. Disabled Disables the integrated IDE controller when Non-Combined is dependent on the On-Chip SATA Mode and PATA IDE Set to Combined. SATA Port 0/2 Set to This value is selected. GA-946GMX-S2...
Manual
Page 48
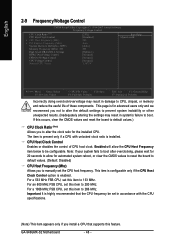
... and reduce the useful life of CPU host clock. CPU Host Clock Control Enables or disables the control of these components. Important It is installed. GA-946GMX-S2 Motherboard - 48 - The item is present only if a CPU with the CPU specifications. (Note) This item appears only if you install a CPU that ... system reboot, or clear the CMOS values to reset the board to default values. (Default: Disabled) CPU Host Frequency (Mhz) Allows you to manually set this occurs, clear the CMOS values and reset the board to default values.) CPU Clock Ratio (Note) Allows you not to alter the default...
... and reduce the useful life of CPU host clock. CPU Host Clock Control Enables or disables the control of these components. Important It is installed. GA-946GMX-S2 Motherboard - 48 - The item is present only if a CPU with the CPU specifications. (Note) This item appears only if you install a CPU that ... system reboot, or clear the CMOS values to reset the board to default values. (Default: Disabled) CPU Host Frequency (Mhz) Allows you to manually set this occurs, clear the CMOS values and reset the board to default values.) CPU Clock Ratio (Note) Allows you not to alter the default...
Manual
Page 55
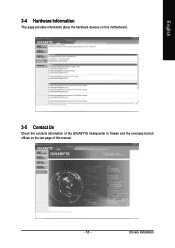
English 3-4 Hardware Information This page provides information about the hardware devices on this motherboard. 3-5 Contact Us Check the contacts information of the GIGABYTE headquarter in Taiwan and the overseas branch offices on the last page of this manual. - 55 - Drivers Installation
English 3-4 Hardware Information This page provides information about the hardware devices on this motherboard. 3-5 Contact Us Check the contacts information of the GIGABYTE headquarter in Taiwan and the overseas branch offices on the last page of this manual. - 55 - Drivers Installation
Manual
Page 66
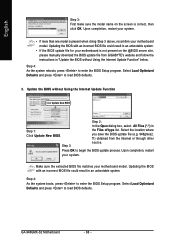
... OK to load BIOS defaults. 3. Make sure the extracted BIOS file matches your motherboard model. GA-946GMX-S2 Motherboard - 66 - Select Load Optimized Defaults and press to enter the BIOS Setup program. Upon...English Step 3: First make sure the model name on the @BIOS server site, please manually download the BIOS update file from the Internet or through other Step 3: source. Updating ... BIOS file could result in Step 1: Click Update New BIOS. f1) obtained from GIGABYTE's website and follow the instructions in "Update the BIOS without Using the Internet Update Function...
... OK to load BIOS defaults. 3. Make sure the extracted BIOS file matches your motherboard model. GA-946GMX-S2 Motherboard - 66 - Select Load Optimized Defaults and press to enter the BIOS Setup program. Upon...English Step 3: First make sure the model name on the @BIOS server site, please manually download the BIOS update file from the Internet or through other Step 3: source. Updating ... BIOS file could result in Step 1: Click Update New BIOS. f1) obtained from GIGABYTE's website and follow the instructions in "Update the BIOS without Using the Internet Update Function...
Manual
Page 69
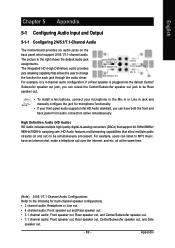
...: Front speaker out, Rear speaker out, Center/Subwoofer speaker out, and Side speaker out. - 69 - Side Speaker Out Mic In For example, in jack and manually configure the jack for microphone functionality. • If your front panel audio supports Intel HD Audio standard, you can listen to MP3 music, have both...
...: Front speaker out, Rear speaker out, Center/Subwoofer speaker out, and Side speaker out. - 69 - Side Speaker Out Mic In For example, in jack and manually configure the jack for microphone functionality. • If your front panel audio supports Intel HD Audio standard, you can listen to MP3 music, have both...


