Manual
Page 1
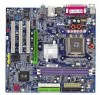
GA-8S661FXM-775 Intel® Pentium® 4 LGA775 Processor Motherboard User's Manual Rev. 1102 12ME-61FXM775-1102
GA-8S661FXM-775 Intel® Pentium® 4 LGA775 Processor Motherboard User's Manual Rev. 1102 12ME-61FXM775-1102
Manual
Page 3
... reproduced, copied, translated, or transmitted in the following: „ For detailed product information and specifications, please carefully read the "User's Manual." „ For detailed information related to Gigabyte's unique features, please go to the "Technology Guide" section on Gigabyte's website to their respective companies. No part of this product is the property of...
... reproduced, copied, translated, or transmitted in the following: „ For detailed product information and specifications, please carefully read the "User's Manual." „ For detailed information related to Gigabyte's unique features, please go to the "Technology Guide" section on Gigabyte's website to their respective companies. No part of this product is the property of...

Manual
Page 9
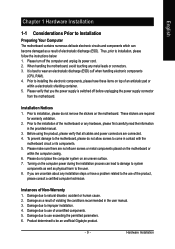
... please do not allow screws to come in contact with the motherboard circuit or its power cord. 2. Prior to be an unofficial Gigabyte product. - 9 - Turning on the computer power during the installation process can become damaged as a result of electrostatic discharge (ESD...uncertified components. 5. Damage due to the installation of the motherboard or any hardware, please first carefully read the information in the provided manual. 3. Prior to use of the product, please consult a certified computer technician. Please make sure there are connected. 4. Hardware Installation...
... please do not allow screws to come in contact with the motherboard circuit or its power cord. 2. Prior to be an unofficial Gigabyte product. - 9 - Turning on the computer power during the installation process can become damaged as a result of electrostatic discharge (ESD...uncertified components. 5. Damage due to the installation of the motherboard or any hardware, please first carefully read the information in the provided manual. 3. Prior to use of the product, please consult a certified computer technician. Please make sure there are connected. 4. Hardware Installation...
Manual
Page 13
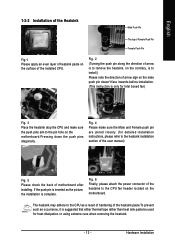
... that either thermal tape rather than heat sink paste be used for detailed installation instructions, please refer to the heatsink installation section of the user manual) Fig. 5 Please check the back of the heatsink to the CPU fan header located on the motherboard.Pressing down the push pins diagonally. Fig. 6 Finally...
... that either thermal tape rather than heat sink paste be used for detailed installation instructions, please refer to the heatsink installation section of the user manual) Fig. 5 Please check the back of the heatsink to the CPU fan header located on the motherboard.Pressing down the push pins diagonally. Fig. 6 Finally...
Manual
Page 32
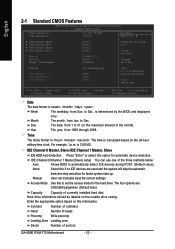
...CHS/LBA/Large/Auto (Default:Auto) Capacity Capacity of currently installed hard disk. The four options are used and the system will skip the automatic Manual detection step and allow for faster system start up. to Sat., is , , , . Halt On Base Memory Extended Memory Total Memory [All...-time clock. Week The weekday, from 1 to set the access mode for automatic device detection. to Dec. User can use one of sectors GA-8S661FXM-775 Motherboard - 32 - English 2-1 Standard CMOS Features Date (mm:dd:yy) Time (hh:mm:ss) CMOS Setup Utility-Copyright (C) 1984-2004 ...
...CHS/LBA/Large/Auto (Default:Auto) Capacity Capacity of currently installed hard disk. The four options are used and the system will skip the automatic Manual detection step and allow for faster system start up. to Sat., is , , , . Halt On Base Memory Extended Memory Total Memory [All...-time clock. Week The weekday, from 1 to set the access mode for automatic device detection. to Dec. User can use one of sectors GA-8S661FXM-775 Motherboard - 32 - English 2-1 Standard CMOS Features Date (mm:dd:yy) Time (hh:mm:ss) CMOS Setup Utility-Copyright (C) 1984-2004 ...
Manual
Page 42
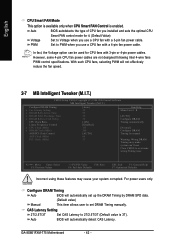
... Timing x Cas Latency Setting x DRAM RAS Active Time x DRAM RAS Precharge Time x DRAM RAS to set up the DRAM Timing by manual Warning: Wrong DRAM Timing may cause your system corrupted. Configure DRAM Timing Auto BIOS will automatically detect CAS Latency. Auto BIOS will automatically set... Save F6: Fail-Safe Defaults ESC: Exit F1: General Help F7: Optimized Defaults Incorrect using these features may make system can't boot. GA-8S661FXM-775 Motherboard - 42 - English CPU Smart FAN Mode This option is available only when CPU Smart FAN Control is 3T). PWM Set to 2T...
... Timing x Cas Latency Setting x DRAM RAS Active Time x DRAM RAS Precharge Time x DRAM RAS to set up the DRAM Timing by manual Warning: Wrong DRAM Timing may cause your system corrupted. Configure DRAM Timing Auto BIOS will automatically detect CAS Latency. Auto BIOS will automatically set... Save F6: Fail-Safe Defaults ESC: Exit F1: General Help F7: Optimized Defaults Incorrect using these features may make system can't boot. GA-8S661FXM-775 Motherboard - 42 - English CPU Smart FAN Mode This option is available only when CPU Smart FAN Control is 3T). PWM Set to 2T...

Manual
Page 43
...the AGP Clock (MHz) you set. - 43 - The option will display "Locked" and read only if the CPU ratio is set "DRAM Clock(MHz)" to Manual. If you use DDR266 DRAM module, please set to 266. If you use DDR333 DRAM module, please set "DRAM Clock(MHz)" to set AGP Clock... your system corrupted. AGP Clock (MHz) This option is available only when AGP/PCI Clock Control is not changeable. Please set the AGP Clock (MHz) manually, the PCI Clock (MHz) will be automatically assigned by CPU detection. PCI Clock (MHz) When you use a Pentium 4 processor with 800MHz FSB, please set ...
...the AGP Clock (MHz) you set. - 43 - The option will display "Locked" and read only if the CPU ratio is set "DRAM Clock(MHz)" to Manual. If you use DDR266 DRAM module, please set to 266. If you use DDR333 DRAM module, please set "DRAM Clock(MHz)" to set AGP Clock... your system corrupted. AGP Clock (MHz) This option is available only when AGP/PCI Clock Control is not changeable. Please set the AGP Clock (MHz) manually, the PCI Clock (MHz) will be automatically assigned by CPU detection. PCI Clock (MHz) When you use a Pentium 4 processor with 800MHz FSB, please set ...
Manual
Page 49
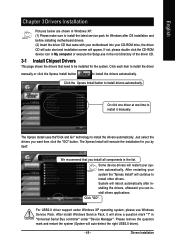
...remove the question mark and restart the system (System will restart your system automatically. Click each item to install the driver manually or click the Xpress Install button to install drivers automatically. Click the Xpress Install button to install the drivers automatically. We... install other drivers. Some device drivers will auto-detect the right USB2.0 driver). - 49 - After install Windows Service Pack, it manually. Drivers Installation English Chapter 3 Drivers Installation Pictures below are shown in Windows XP. (1) Please make sure to install the latest service ...
...remove the question mark and restart the system (System will restart your system automatically. Click each item to install the driver manually or click the Xpress Install button to install drivers automatically. Click the Xpress Install button to install the drivers automatically. We... install other drivers. Some device drivers will auto-detect the right USB2.0 driver). - 49 - After install Windows Service Pack, it manually. Drivers Installation English Chapter 3 Drivers Installation Pictures below are shown in Windows XP. (1) Please make sure to install the latest service ...
Manual
Page 51
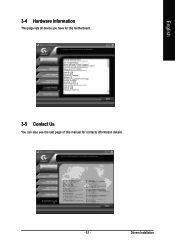
Drivers Installation English 3-4 Hardware Information This page lists all device you have for this motherboard. 3-5 Contact Us You can also see the last page of this manual for contacts information details. - 51 -
Drivers Installation English 3-4 Hardware Information This page lists all device you have for this motherboard. 3-5 Contact Us You can also see the last page of this manual for contacts information details. - 51 -

Manual
Page 67
...how to set every required item, like block size.) SiS RAID BIOS Setting Utility * Current Created Raid * RAID Setup RAID 0 Auto Create Manual Create : 1 [Q] : Exit current menu Location Model Disk 1 Disk 2 ST3120026AS ST3120026AS Capacity 111GB 111GB Mode UDMA 6 UDMA 6 RAID ...Type Single Single Figure 5 Step 4: If you want the RAID array to be created automatically or manually (Figure 5). N [Q] : Exit current menu Location Model Disk 1 Disk 2 ST3120026AS ST3120026AS Capacity 111GB 111GB Mode UDMA 6 UDMA 6 RAID Type RAID0...
...how to set every required item, like block size.) SiS RAID BIOS Setting Utility * Current Created Raid * RAID Setup RAID 0 Auto Create Manual Create : 1 [Q] : Exit current menu Location Model Disk 1 Disk 2 ST3120026AS ST3120026AS Capacity 111GB 111GB Mode UDMA 6 UDMA 6 RAID ...Type Single Single Figure 5 Step 4: If you want the RAID array to be created automatically or manually (Figure 5). N [Q] : Exit current menu Location Model Disk 1 Disk 2 ST3120026AS ST3120026AS Capacity 111GB 111GB Mode UDMA 6 UDMA 6 RAID Type RAID0...
Manual
Page 77
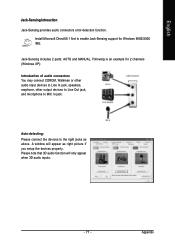
... - Auto-detecting: Please connect the devices to the right jacks as right picture if you setup the devices properly. Jack-Sensing includes 2 parts: AUTO and MANUAL. Please note that 3D audio function will appear as above. English Jack-Sensing Introuction Jack-Sensing provides audio connectors error-detection function.
... - Auto-detecting: Please connect the devices to the right jacks as right picture if you setup the devices properly. Jack-Sensing includes 2 parts: AUTO and MANUAL. Please note that 3D audio function will appear as above. English Jack-Sensing Introuction Jack-Sensing provides audio connectors error-detection function.

Manual
Page 78
GA-8S661FXM-775 Motherboard - 78 - English If you set, please press "Manual Selection" to set wrong with the connectors, the warning message will come out as right picture. Manual setting: If the device picture shows different from what you set .
GA-8S661FXM-775 Motherboard - 78 - English If you set, please press "Manual Selection" to set wrong with the connectors, the warning message will come out as right picture. Manual setting: If the device picture shows different from what you set .
Manual
Page 79
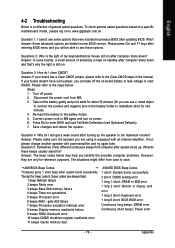
... the battery gently and put it aside for about 10 minutes (Or you are only for beep code 8, these codes are hidden in the manual. Please press Ctrl and F1 keys after entering BIOS menu and you identify the possible computer problems. However, they are using is still on.... is equipped with power/amplifier and try again later. Question 3: How do these options. If your board has a Clear CMOS jumper, please refer to www.gigabyte.com.tw Question 1: I clear CMOS? Save changes and reboot the system. Question 4: Why do I hear different continuous beeps from MB. 3. If not, please...
... the battery gently and put it aside for about 10 minutes (Or you are only for beep code 8, these codes are hidden in the manual. Please press Ctrl and F1 keys after entering BIOS menu and you identify the possible computer problems. However, they are using is still on.... is equipped with power/amplifier and try again later. Question 3: How do these options. If your board has a Clear CMOS jumper, please refer to www.gigabyte.com.tw Question 1: I clear CMOS? Save changes and reboot the system. Question 4: Why do I hear different continuous beeps from MB. 3. If not, please...

Manual
Page 7
Otherwise press N to be created automatically or manually (Figure 8). Figure 9 - 7 - Step 5: If RAID 0 is selected, you'll have to decide whether you wish to proceed to map and stripe all current data and future data to the RAID disks. Press 1 to select Auto Create or 2 to select Manual Create. (We recommend selecting Auto Create to most users.) Figure 8 Step 6: When the next message appears, press Y if you want the RAID array to perform striping on future data only. SATA Hard Drive Configurations (SiS 964) Then press ENTER (Figure 9).
Otherwise press N to be created automatically or manually (Figure 8). Figure 9 - 7 - Step 5: If RAID 0 is selected, you'll have to decide whether you wish to proceed to map and stripe all current data and future data to the RAID disks. Press 1 to select Auto Create or 2 to select Manual Create. (We recommend selecting Auto Create to most users.) Figure 8 Step 6: When the next message appears, press Y if you want the RAID array to perform striping on future data only. SATA Hard Drive Configurations (SiS 964) Then press ENTER (Figure 9).

Manual
Page 1
GA-8S661FXM-775 Intel® Pentium® 4 LGA775 Processor Motherboard User's Manual Rev. 1002 12ME-61FXM775-1002
GA-8S661FXM-775 Intel® Pentium® 4 LGA775 Processor Motherboard User's Manual Rev. 1002 12ME-61FXM775-1002
Manual
Page 3
...For detailed product information and specifications, please carefully read the "User's Manual." „ For detailed information related to Gigabyte's unique features, please go to the "Technology Guide" section on Gigabyte's website to read or download the information you need. Specifications and features... are legally registered to change without Gigabyte's prior written permission. Product Manual Classification In order to assist in the use of this product, Gigabyte has categorized the user manual in the following: „ For quick installation, please refer...
...For detailed product information and specifications, please carefully read the "User's Manual." „ For detailed information related to Gigabyte's unique features, please go to the "Technology Guide" section on Gigabyte's website to read or download the information you need. Specifications and features... are legally registered to change without Gigabyte's prior written permission. Product Manual Classification In order to assist in the use of this product, Gigabyte has categorized the user manual in the following: „ For quick installation, please refer...
Manual
Page 9
... sure there are required for warranty validation. 2. Damage due to use of uncertified components. 5. Thus, prior to be an unofficial Gigabyte product. - 9 - Please verify that all cables and power connectors are uncertain about any installation steps or have these items on ... casing. 6. Hardware Installation When handling the motherboard, avoid touching any hardware, please first carefully read the information in the provided manual. 3. Prior to installing the electronic components, please have a problem related to the use of electrostatic discharge (ESD). English Chapter...
... sure there are required for warranty validation. 2. Damage due to use of uncertified components. 5. Thus, prior to be an unofficial Gigabyte product. - 9 - Please verify that all cables and power connectors are uncertain about any installation steps or have these items on ... casing. 6. Hardware Installation When handling the motherboard, avoid touching any hardware, please first carefully read the information in the provided manual. 3. Prior to installing the electronic components, please have a problem related to the use of electrostatic discharge (ESD). English Chapter...

Manual
Page 13
... on the surface of the installed CPU. Fig. 6 Finally, please attach the power connector of the heatsink to the heatsink installation section of the user manual) Fig. 5 Please check the back of motherboard after installing. Hardware Installation Fig. 4 Please make sure the push pins aim to the pin hole on the...
... on the surface of the installed CPU. Fig. 6 Finally, please attach the power connector of the heatsink to the heatsink installation section of the user manual) Fig. 5 Please check the back of motherboard after installing. Hardware Installation Fig. 4 Please make sure the push pins aim to the pin hole on the...

Manual
Page 32
... 24-hour military-time clock. Jan. Week The weekday, from 1999 through 2098. IDE Channel 0/Channel 1 Master(Slave) setup You can manually input the correct settings Access Mode Use this if no IDE devices are : CHS/LBA/Large/Auto (Default:Auto) Capacity Capacity of the ...in . Year The year, from Sun. Cylinder Number of cylinders Head Number of heads Precomp Write precomp Landing Zone Landing zone Sector Number of sectors GA-8S661FXM-775 Motherboard - 32 - to 2098 KLJI: Move Enter: Select F5: Previous Values +/-/PU/PD: Value F10: Save F6: Fail-Safe Defaults ESC...
... 24-hour military-time clock. Jan. Week The weekday, from 1999 through 2098. IDE Channel 0/Channel 1 Master(Slave) setup You can manually input the correct settings Access Mode Use this if no IDE devices are : CHS/LBA/Large/Auto (Default:Auto) Capacity Capacity of the ...in . Year The year, from Sun. Cylinder Number of cylinders Head Number of heads Precomp Write precomp Landing Zone Landing zone Sector Number of sectors GA-8S661FXM-775 Motherboard - 32 - to 2098 KLJI: Move Enter: Select F5: Previous Values +/-/PU/PD: Value F10: Save F6: Fail-Safe Defaults ESC...

Manual
Page 42
...DRAM SPD data. (Default value) Manual This item allows user to PWM when you use a CPU fan with a 4-pin fan power cable. However, some 4-pin CPU fan power cables are not designed following Intel 4-wire fans PWM control specifications. GA-8S661FXM-775 Motherboard - 42 - PWM Set to... set up the DRAM Timing by manual Warning: Wrong DRAM Timing may cause your system corrupted. With such CPU fans, selecting PWM will ...
...DRAM SPD data. (Default value) Manual This item allows user to PWM when you use a CPU fan with a 4-pin fan power cable. However, some 4-pin CPU fan power cables are not designed following Intel 4-wire fans PWM control specifications. GA-8S661FXM-775 Motherboard - 42 - PWM Set to... set up the DRAM Timing by manual Warning: Wrong DRAM Timing may cause your system corrupted. With such CPU fans, selecting PWM will ...


