Manual
Page 5
Chapter 3 Drivers Installation 49 3-1 Install Chipset Drivers 49 3-2 SoftwareApplications 50 3-3 Driver CD Information 50 3-4 Hardware Information 51 3-5 Contact Us ...51 Chapter 4 Appendix ...53 4-1 Unique Software Utility 53 4-1-1 Xpress Recovery2 Introduction 53 4-1-2 BIOS Flash Method Introduction 55 4-1-3 Serial ATA BIOS Setting Utility Introduction 64 4-1-4 2 / 4 / 6 Channel Audio Function Introduction 71 4-2 Troubleshooting 79 - 5 -
Chapter 3 Drivers Installation 49 3-1 Install Chipset Drivers 49 3-2 SoftwareApplications 50 3-3 Driver CD Information 50 3-4 Hardware Information 51 3-5 Contact Us ...51 Chapter 4 Appendix ...53 4-1 Unique Software Utility 53 4-1-1 Xpress Recovery2 Introduction 53 4-1-2 BIOS Flash Method Introduction 55 4-1-3 Serial ATA BIOS Setting Utility Introduction 64 4-1-4 2 / 4 / 6 Channel Audio Function Introduction 71 4-2 Troubleshooting 79 - 5 -
Manual
Page 15
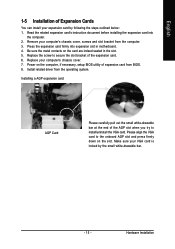
... expansion card firmly into the computer. 2. Be sure the metal contacts on the computer, if necessary, setup BIOS utility of the expansion card. 6. Install related driver from the computer. 3. Read the related expansion card's instruction document before installing the expansion card into expansion slot in the slot. 5. Remove your expansion card...
... expansion card firmly into the computer. 2. Be sure the metal contacts on the computer, if necessary, setup BIOS utility of the expansion card. 6. Install related driver from the computer. 3. Read the related expansion card's instruction document before installing the expansion card into expansion slot in the slot. 5. Remove your expansion card...

Manual
Page 16
......etc. If your OS or device(s) vendors. have a standard USB interface. LAN Port The LAN port provides Internet connection. can be connected to Serial port. GA-8S661FXM-775 Motherboard - 16 - Serial Port Devices like CD-ROM, walkman etc. Parallel Port The parallel port allows connection of a printer, scanner and other peripheral devices.... For more information please contact your OS does not supportUSB controller, please contact OS vendor for possible patch or driver upgrade. Line In Devices like mouses, modems, and etc.
......etc. If your OS or device(s) vendors. have a standard USB interface. LAN Port The LAN port provides Internet connection. can be connected to Serial port. GA-8S661FXM-775 Motherboard - 16 - Serial Port Devices like CD-ROM, walkman etc. Parallel Port The parallel port allows connection of a printer, scanner and other peripheral devices.... For more information please contact your OS does not supportUSB controller, please contact OS vendor for possible patch or driver upgrade. Line In Devices like mouses, modems, and etc.
Manual
Page 21
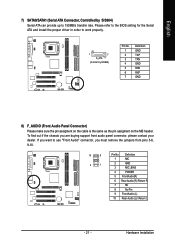
... is the same as the pin assigment on the MB header. Please refer to the BIOS setting for the Serial ATA and install the proper driver in order to work properly. 1 7 S_ATA (Control by SiS964) Serial ATA can provide up to use "Front Audio" connector, you are buying support front audio...
... is the same as the pin assigment on the MB header. Please refer to the BIOS setting for the Serial ATA and install the proper driver in order to work properly. 1 7 S_ATA (Control by SiS964) Serial ATA can provide up to use "Front Audio" connector, you are buying support front audio...
Manual
Page 49
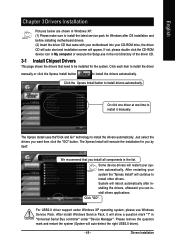
... Bus controller" under Windows XP operating system, please use Windows Service Pack. System will auto-detect the right USB2.0 driver). - 49 - Click "GO". Please remove the question mark and restart the system (System will reboot automatically after OS installation and... before installing motherboard drivers. (2) Insert the driver CD that need to install it will show a question mark "?" English Chapter 3 Drivers Installation Pictures below are shown in Windows XP. (1) Please make sure to install...
... Bus controller" under Windows XP operating system, please use Windows Service Pack. System will auto-detect the right USB2.0 driver). - 49 - Click "GO". Please remove the question mark and restart the system (System will reboot automatically after OS installation and... before installing motherboard drivers. (2) Insert the driver CD that need to install it will show a question mark "?" English Chapter 3 Drivers Installation Pictures below are shown in Windows XP. (1) Please make sure to install...
Manual
Page 50
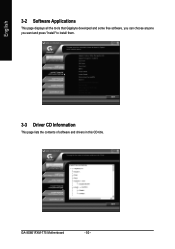
English 3-2 Software Applications This page displays all the tools that Gigabyte developed and some free software, you can choose anyone you want and press "install" to install them. 3-3 Driver CD Information This page lists the contents of software and drivers in this CD-title. GA-8S661FXM-775 Motherboard - 50 -
English 3-2 Software Applications This page displays all the tools that Gigabyte developed and some free software, you can choose anyone you want and press "install" to install them. 3-3 Driver CD Information This page lists the contents of software and drivers in this CD-title. GA-8S661FXM-775 Motherboard - 50 -
Manual
Page 51
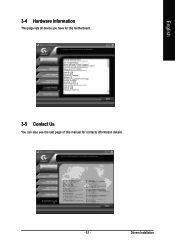
Drivers Installation English 3-4 Hardware Information This page lists all device you have for this motherboard. 3-5 Contact Us You can also see the last page of this manual for contacts information details. - 51 -
Drivers Installation English 3-4 Hardware Information This page lists all device you have for this motherboard. 3-5 Contact Us You can also see the last page of this manual for contacts information details. - 51 -
Manual
Page 53
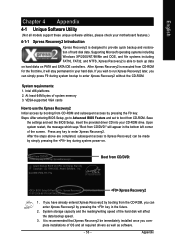
...the F9 key: Steps: After entering BIOS Setup, go to Advanced BIOS Feature and set to enter Xpress Recovery2. Insert the provided driver CD into your hard disk. It is able to startup XpressRecovery2..... Save the settings and exit the BIOS Setup. Boot from CD/...drive. After the steps above are completed, subsequent access to Xpress Recovery2 can simply press F9 during system power-on PATA and SATA IDE controllers. GA-8S661FXM-775 F5a . . . . :BIOS Setup/Q-Flash, : Xpress Recovery2, For Boot Menu 11/07/2006-661FX-6A79HG0GC-00 Xpress Recovery2 1. After Xpress...
...the F9 key: Steps: After entering BIOS Setup, go to Advanced BIOS Feature and set to enter Xpress Recovery2. Insert the provided driver CD into your hard disk. It is able to startup XpressRecovery2..... Save the settings and exit the BIOS Setup. Boot from CD/...drive. After the steps above are completed, subsequent access to Xpress Recovery2 can simply press F9 during system power-on PATA and SATA IDE controllers. GA-8S661FXM-775 F5a . . . . :BIOS Setup/Q-Flash, : Xpress Recovery2, For Boot Menu 11/07/2006-661FX-6A79HG0GC-00 Xpress Recovery2 1. After Xpress...
Manual
Page 54
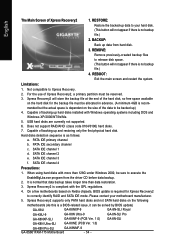
... primary partition must be solved by BIOS update) GA-K8U GA-K8NXP-9 GA-8N-SLI Royal GA-K8U-9 GA-K8N Ultra-9 GA-8N-SLI Pro GA-K8NXP-SLI GA-K8NF-9 (PCB Ver. 1.0) GA-8N-SLI GA-K8N Ultra-SLI GA-K8NE (PCB Ver. 1.0) GA-K8N Pro-SLI GA-K8NMF-9 GA-8S661FXM-775 Motherboard - 54 - REMOVE: Remove previously-created ...advance. (A minimum 4GB is normal that data backup takes longer time than 128G under Windows 2000, be backed up data from the driver CD before data backup. 2. REBOOT: Exit the main screen and restart the system. Not compatible to execute the EnableBigLba.exe program...
... primary partition must be solved by BIOS update) GA-K8U GA-K8NXP-9 GA-8N-SLI Royal GA-K8U-9 GA-K8N Ultra-9 GA-8N-SLI Pro GA-K8NXP-SLI GA-K8NF-9 (PCB Ver. 1.0) GA-8N-SLI GA-K8N Ultra-SLI GA-K8NE (PCB Ver. 1.0) GA-K8N Pro-SLI GA-K8NMF-9 GA-8S661FXM-775 Motherboard - 54 - REMOVE: Remove previously-created ...advance. (A minimum 4GB is normal that data backup takes longer time than 128G under Windows 2000, be backed up data from the driver CD before data backup. 2. REBOOT: Exit the main screen and restart the system. Not compatible to execute the EnableBigLba.exe program...
Manual
Page 65
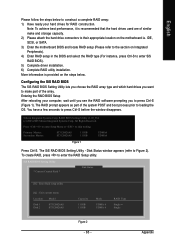
... the section on the motherboard ie. The RAID prompt appears as part of the array. You have a few seconds to enter SiS RAID BIOS). 5) Complete driver installation. 6) Complete RAID utility installation. All Rights Reserved. Disk Status window appears (refer to loading the OS. Appendix
... the section on the motherboard ie. The RAID prompt appears as part of the array. You have a few seconds to enter SiS RAID BIOS). 5) Complete driver installation. 6) Complete RAID utility installation. All Rights Reserved. Disk Status window appears (refer to loading the OS. Appendix
Manual
Page 70
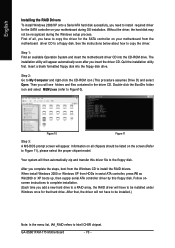
...steps, boot from HDDs in the driver CD. Step 1: Find an available Operation System and insert the motherboard driver CD into the floppy disk drive. Insert a blank formatted floppy disk into the CD-ROM drive. Step 2: Go to copy the driver. GA-8S661FXM-775 Motherboard - 70 - The installation ...utility will have to be listed on the screen (Refer to Figure 11), please select the proper chipset model. After you insert the driver CD. When install Windows 2000 or Windows XP...
...steps, boot from HDDs in the driver CD. Step 1: Find an available Operation System and insert the motherboard driver CD into the floppy disk drive. Insert a blank formatted floppy disk into the CD-ROM drive. Step 2: Go to copy the driver. GA-8S661FXM-775 Motherboard - 70 - The installation ...utility will have to be listed on the screen (Refer to Figure 11), please select the proper chipset model. After you insert the driver CD. When install Windows 2000 or Windows XP...

Manual
Page 71
Line Out STEP 2: After installing the audio driver, you use speakers with amplifier to get the best sound effect if the stereo output is for stereo speaker output check box. - 71 - Click the ...
Line Out STEP 2: After installing the audio driver, you use speakers with amplifier to get the best sound effect if the stereo output is for stereo speaker output check box. - 71 - Click the ...
Manual
Page 72
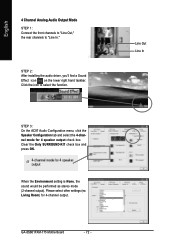
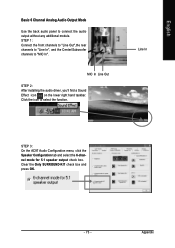
... sound would be performed as stereo mode (2-channel output). STEP 2: After installing the audio driver, you'll find a Sound Effect icon on the lower right hand taskbar. Clear the Only SURROUND-KIT check box and press OK. GA-8S661FXM-775 Motherboard - 72 - English 4 Channel Analog Audio Output Mode STEP 1: Connect the front channels to...
... sound would be performed as stereo mode (2-channel output). STEP 2: After installing the audio driver, you'll find a Sound Effect icon on the lower right hand taskbar. Clear the Only SURROUND-KIT check box and press OK. GA-8S661FXM-775 Motherboard - 72 - English 4 Channel Analog Audio Output Mode STEP 1: Connect the front channels to...
Manual
Page 73
MIC In Line Out STEP 2: After installing the audio driver, you'll find a Sound Effect icon on the lower right hand taskbar. Click the icon to connect the audio output without any additional module. Appendix ...
MIC In Line Out STEP 2: After installing the audio driver, you'll find a Sound Effect icon on the lower right hand taskbar. Click the icon to connect the audio output without any additional module. Appendix ...
Manual
Page 75
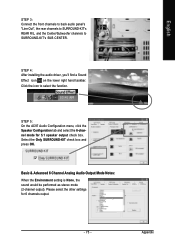
STEP 4: After installing the audio driver, you'll find a Sound Effect icon on the lower right hand taskbar. Please select the other settings for 5.1 speaker output check box. Appendix Select the ...
STEP 4: After installing the audio driver, you'll find a Sound Effect icon on the lower right hand taskbar. Please select the other settings for 5.1 speaker output check box. Appendix Select the ...
Manual
Page 1
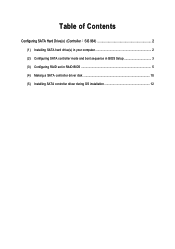
Table of Contents Configuring SATA Hard Drive(s) (Controller SiS 964 2 (1) Installing SATA hard drive(s) in your computer 2 (2) Configuring SATA controller mode and boot sequence in BIOS Setup 3 (3) Configuring RAID set in RAID BIOS 5 (4) Making a SATA controller driver disk 10 (5) Installing SATA controller driver during OS installation 12
Table of Contents Configuring SATA Hard Drive(s) (Controller SiS 964 2 (1) Installing SATA hard drive(s) in your computer 2 (2) Configuring SATA controller mode and boot sequence in BIOS Setup 3 (3) Configuring RAID set in RAID BIOS 5 (4) Making a SATA controller driver disk 10 (5) Installing SATA controller driver during OS installation 12

Manual
Page 2
... below: ¤å (1) Install SATA hard drive(s) in RAID BIOS. (4) Make a floppy disk containing the SATA controller driver. (5) Install the SATA controller driver during OS installation. Before you may check the name of the SATA hard drive and the other end to available SATA port(s)... on the motherboard. (If there are more than one hard drive. (b) An empty formatted floppy disk. (c) Windows XP/2000 setup disk. (d) Driver CD for your motherboard. (1) Installing SATA hard drive(s) in your motherboard, you begin Please prepare: (a) Two SATA hard drives (to ensure optimal performance...
... below: ¤å (1) Install SATA hard drive(s) in RAID BIOS. (4) Make a floppy disk containing the SATA controller driver. (5) Install the SATA controller driver during OS installation. Before you may check the name of the SATA hard drive and the other end to available SATA port(s)... on the motherboard. (If there are more than one hard drive. (b) An empty formatted floppy disk. (c) Windows XP/2000 setup disk. (d) Driver CD for your motherboard. (1) Installing SATA hard drive(s) in your motherboard, you begin Please prepare: (a) Two SATA hard drives (to ensure optimal performance...
Manual
Page 9
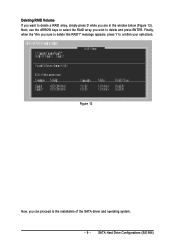
Figure 12 Now, you can proceed to delete this RAID?" Finally, when the "Are you sure to the installation of the SATA driver and operating system. - 9 - SATA Hard Drive Configurations (SiS 964) Deleting RAID Volume If you want to delete and press ENTER. Next, use the ARROW keys to select the RAID array you wish to delete a RAID array, simply press D while you are in the window below (Figure 12). message appears, press Y to confirm your selections.
Figure 12 Now, you can proceed to delete this RAID?" Finally, when the "Are you sure to the installation of the SATA driver and operating system. - 9 - SATA Hard Drive Configurations (SiS 964) Deleting RAID Volume If you want to delete and press ENTER. Next, use the ARROW keys to select the RAID array you wish to delete a RAID array, simply press D while you are in the window below (Figure 12). message appears, press Y to confirm your selections.
Manual
Page 10
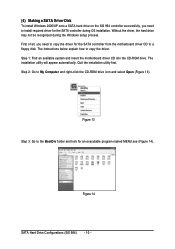
...controller successfully, you need to the BootDrv folder and look for the SATA controller from the motherboard driver CD to a floppy disk. The installation utility will appear automatically. Without the driver, the hard drive ¤¤ may not be recognized during OS installation. The instructions below... and select Open (Figure 13). Step 2: Go to copy the driver. Step 1: Find an available system and insert the motherboard driver CD into the CD-ROM drive. Figure 13 Step 3: Go to install required driver for the SATA controller during the Windows setup process. ¤å...
...controller successfully, you need to the BootDrv folder and look for the SATA controller from the motherboard driver CD to a floppy disk. The installation utility will appear automatically. Without the driver, the hard drive ¤¤ may not be recognized during OS installation. The instructions below... and select Open (Figure 13). Step 2: Go to copy the driver. Step 1: Find an available system and insert the motherboard driver CD into the CD-ROM drive. Figure 13 Step 3: Go to install required driver for the SATA controller during the Windows setup process. ¤å...
Manual
Page 11
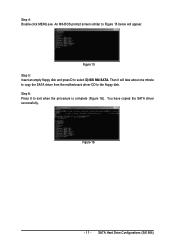
Step 6: Press 0 to select D) SiS 964 SATA. Figure 16 - 11 - SATA Hard Drive Configurations (SiS 964) Step 4: Double-click MENU.exe. An MS-DOS prompt screen similar to Figure 15 below will take about one minute to copy the SATA driver from the motherboard driver CD to the floppy disk. Then it will appear. Figure 15 Step 5: Insert an empty floppy disk and press D to exit when the procedure is complete (Figure 16). You have copied the SATA driver successfully.
Step 6: Press 0 to select D) SiS 964 SATA. Figure 16 - 11 - SATA Hard Drive Configurations (SiS 964) Step 4: Double-click MENU.exe. An MS-DOS prompt screen similar to Figure 15 below will take about one minute to copy the SATA driver from the motherboard driver CD to the floppy disk. Then it will appear. Figure 15 Step 5: Insert an empty floppy disk and press D to exit when the procedure is complete (Figure 16). You have copied the SATA driver successfully.


