Manual
Page 5
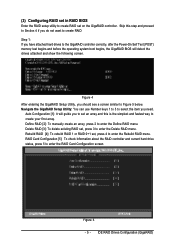
... your first array. Auto Configuration [1]: It will detect the drives attached and show the following screen. Figure 4 After entering the GigaRAID Setup Utility, you need. Delete RAID [3]: To delete existing RAID set, press 3 to enter the RAID Card Configuration screen. Navigate the GigaRAID Setup Utility:...On Self Test (POST) memory test begins and before the operating system boot begins, the GigaRAID BIOS will guide you do not want to Figure 5 below. Step 1: If you have attached hard drives to create RAID set on the GigaRAID controller. IDE RAID Drives Configuration (GigaRAID)
... your first array. Auto Configuration [1]: It will detect the drives attached and show the following screen. Figure 4 After entering the GigaRAID Setup Utility, you need. Delete RAID [3]: To delete existing RAID set, press 3 to enter the RAID Card Configuration screen. Navigate the GigaRAID Setup Utility:...On Self Test (POST) memory test begins and before the operating system boot begins, the GigaRAID BIOS will guide you do not want to Figure 5 below. Step 1: If you have attached hard drives to create RAID set on the GigaRAID controller. IDE RAID Drives Configuration (GigaRAID)
Manual
Page 11
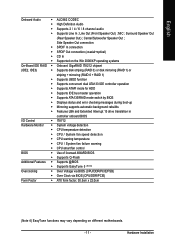
...; Supports IDE bus master operation Š Supports ATA133/RAID mode switch by BIOS Š Displays status and error checking messages during boot-up Š Mirroring supports automatic background rebuilds Š Features LBA and Extended Interrupt 13 drive translation in controller onboard BIOS I/O Control Š IT8712 Hardware Monitor Š System voltage detection Š CPU temperature detection Š...
...; Supports IDE bus master operation Š Supports ATA133/RAID mode switch by BIOS Š Displays status and error checking messages during boot-up Š Mirroring supports automatic background rebuilds Š Features LBA and Extended Interrupt 13 drive translation in controller onboard BIOS I/O Control Š IT8712 Hardware Monitor Š System voltage detection Š CPU temperature detection Š...
Manual
Page 37
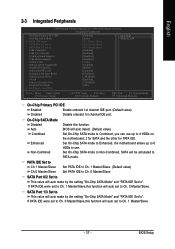
... Mode x ECP Mode Use DMA [Enabled] [Auto] Ch.1 Master/Slave Ch.2 Master/Slave Ch.3 Master/Slave [Enabled] [Enabled] [Disabled] [Disabled] [Auto] [Enabled] [RAID] [Enabled] [Disabled] [3F8/IRQ4] [Enabled] [378/IRQ7] [SPP] 3 Item Help Menu Level` KLJI: Move Enter: Select F5: Previous Values +/-/PU/PD: Value F10...Slave Set PATA IDE to Ch. 1 Master/Slave. - 37 - Auto BIOS will auto make by the setting "On-Chip SATA Mode" and "PATA IDE Set to". Enhanced Set On-Chip SATA mode to Enhanced, the motherboard allows up to use. SATA Port 0/2 Set to This value will auto detect. (Default ...
... Mode x ECP Mode Use DMA [Enabled] [Auto] Ch.1 Master/Slave Ch.2 Master/Slave Ch.3 Master/Slave [Enabled] [Enabled] [Disabled] [Disabled] [Auto] [Enabled] [RAID] [Enabled] [Disabled] [3F8/IRQ4] [Enabled] [378/IRQ7] [SPP] 3 Item Help Menu Level` KLJI: Move Enter: Select F5: Previous Values +/-/PU/PD: Value F10...Slave Set PATA IDE to Ch. 1 Master/Slave. - 37 - Auto BIOS will auto make by the setting "On-Chip SATA Mode" and "PATA IDE Set to". Enhanced Set On-Chip SATA mode to Enhanced, the motherboard allows up to use. SATA Port 0/2 Set to This value will auto detect. (Default ...
Manual
Page 58
...IDE channel 4 Precautions: 1. For the use of Xpress Recovery2 1. Hard disks detection sequence is no backup file.) 2. It is no backup file.) 4. The Main Screen of Xpress Recovery2, a primary partition must be solved by BIOS update) GA-K8U GA-K8U-9 GA-K8NXP-SLI GA-K8N Ultra-SLI GA-K8N Pro-SLI GA-K8NXP-9 GA-K8N Ultra-9 GA...-K8NF-9 (PCB Ver. 1.0) GA-K8NE (PCB Ver. 1.0) GA-K8NMF-9 GA-8N-SLI Royal GA-8N-SLI Pro GA-8N-SLI GA-8I945PL-G Motherboard - 58...
...IDE channel 4 Precautions: 1. For the use of Xpress Recovery2 1. Hard disks detection sequence is no backup file.) 2. It is no backup file.) 4. The Main Screen of Xpress Recovery2, a primary partition must be solved by BIOS update) GA-K8U GA-K8U-9 GA-K8NXP-SLI GA-K8N Ultra-SLI GA-K8N Pro-SLI GA-K8NXP-9 GA-K8N Ultra-9 GA...-K8NF-9 (PCB Ver. 1.0) GA-K8NE (PCB Ver. 1.0) GA-K8NMF-9 GA-8N-SLI Royal GA-8N-SLI Pro GA-8N-SLI GA-8I945PL-G Motherboard - 58...


