Manual
Page 1
Table of Contents Configuring IDE RAID Hard Drive(s) (Controller GigaRAID (IT8212 2 (1) Installing IDE hard drive(s) in your system 2 (2) Configuring GigaRAID controller mode and boot sequence in BIOS Setup 3 (3) Configuring RAID set in RAID BIOS 5 (4) Making a IDE RAID controller driver disk 14 (5) Installing IDE RAID controller driver during OS installation 16
Table of Contents Configuring IDE RAID Hard Drive(s) (Controller GigaRAID (IT8212 2 (1) Installing IDE hard drive(s) in your system 2 (2) Configuring GigaRAID controller mode and boot sequence in BIOS Setup 3 (3) Configuring RAID set in RAID BIOS 5 (4) Making a IDE RAID controller driver disk 14 (5) Installing IDE RAID controller driver during OS installation 16
Manual
Page 2
... IDE RAID hard drive(s), follow the steps below ¤å (1) Install IDE hard drive(s) in your computer. (2) Configure GigaRAID controller mode and boot sequence in BIOS Setup. (3)* Configure RAID set in your system Attach one hard drive. (b) An empty formatted floppy disk. (c) Windows XP/2000 setup disk...
... IDE RAID hard drive(s), follow the steps below ¤å (1) Install IDE hard drive(s) in your computer. (2) Configure GigaRAID controller mode and boot sequence in BIOS Setup. (3)* Configure RAID set in your system Attach one hard drive. (b) An empty formatted floppy disk. (c) Windows XP/2000 setup disk...
Manual
Page 16
...you are ready to that you have prepared a floppy disk with the IDE RAID controller driver and adjusted BIOS settings, you see the next screen. Ác (5) Installing IDE RAID controller driver during OS installation Åé Now that below appears (Figure 21), insert the ...floppy disk containing the IDE RAID driver and press S. After pressing F6, there will be a few moments of Windows ...
...you are ready to that you have prepared a floppy disk with the IDE RAID controller driver and adjusted BIOS settings, you see the next screen. Ác (5) Installing IDE RAID controller driver during OS installation Åé Now that below appears (Figure 21), insert the ...floppy disk containing the IDE RAID driver and press S. After pressing F6, there will be a few moments of Windows ...

Manual
Page 1
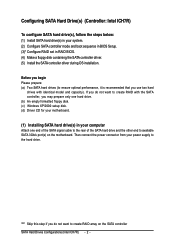
Table of Contents Configuring SATA Hard Drive(s) (Controller: Intel ICH7R 2 (1) Installing SATA hard drive(s) in your computer 2 (2) Configuring SATA controller mode and boot sequence in BIOS Setup 3 (3) Configuring RAID set in RAID BIOS 5 (4) Making a SATA Driver Disk ...9 (5) Installing SATA controller driver during OS installation 11
Table of Contents Configuring SATA Hard Drive(s) (Controller: Intel ICH7R 2 (1) Installing SATA hard drive(s) in your computer 2 (2) Configuring SATA controller mode and boot sequence in BIOS Setup 3 (3) Configuring RAID set in RAID BIOS 5 (4) Making a SATA Driver Disk ...9 (5) Installing SATA controller driver during OS installation 11
Manual
Page 2
Then connect the power connector from your motherboard. (1) Installing SATA hard drive(s) in RAID BIOS. (4) Make a floppy disk containing the SATA controller driver. (5) Install the SATA controller driver during OS installation. If you do not want to create RAID with identical model and capacity). "*" ...your system. (2) Configure SATA controller mode and boot sequence in BIOS Setup. (3)* Configure RAID set in your computer Attach one hard drive. (b) An empty formatted floppy disk. (c) Windows XP/2000 setup disk. (d) Driver CD for your power supply to available SATA 3Gb/s port(s) on...
Then connect the power connector from your motherboard. (1) Installing SATA hard drive(s) in RAID BIOS. (4) Make a floppy disk containing the SATA controller driver. (5) Install the SATA controller driver during OS installation. If you do not want to create RAID with identical model and capacity). "*" ...your system. (2) Configure SATA controller mode and boot sequence in BIOS Setup. (3)* Configure RAID set in your computer Attach one hard drive. (b) An empty formatted floppy disk. (c) Windows XP/2000 setup disk. (d) Driver CD for your power supply to available SATA 3Gb/s port(s) on...
Manual
Page 5
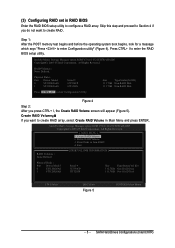
...which says "Press to Non-RAID 4. Press CTRL+ I , the Create RAID Volume screen will appear (Figure 5). Physical Disks : Port Driver Model 0 ST3120026AS 1 ST3120026AS Serial # 3JT354CP 3JT329JX Size Type/Status(Vol ID) 111.7GB Non-RAID Disk 111.7GB Non-RAID Disk Press...Configuration Utility Figure 4 Step 2: After you press CTRL+ I to enter the RAID BIOS setup utility. Delete RAID Volume 3. Exit RAID Volumes : None Defined. [ DISK/VOLUME INFORMATION ] Physical Disks : Port Driver Model 0 ST3120026AS 1 ST3120026AS Serial # 3JT354CP 3JT329JX Size Type/Status(Vol ID) ...
...which says "Press to Non-RAID 4. Press CTRL+ I , the Create RAID Volume screen will appear (Figure 5). Physical Disks : Port Driver Model 0 ST3120026AS 1 ST3120026AS Serial # 3JT354CP 3JT329JX Size Type/Status(Vol ID) 111.7GB Non-RAID Disk 111.7GB Non-RAID Disk Press...Configuration Utility Figure 4 Step 2: After you press CTRL+ I to enter the RAID BIOS setup utility. Delete RAID Volume 3. Exit RAID Volumes : None Defined. [ DISK/VOLUME INFORMATION ] Physical Disks : Port Driver Model 0 ST3120026AS 1 ST3120026AS Serial # 3JT354CP 3JT329JX Size Type/Status(Vol ID) ...

Manual
Page 8
...Volumes : ID Name 0 Volume0 [ DISK/VOLUME INFORMATION ] Level RAID(Stripe) Strip 128KB Size Status Bootable 223.6GB Normal Yes Physical Disks : Port Driver Model 0 ST3120026AS 1 ST3120026AS Serial # 3JT354CP 3JT329JX Size Type/Status(Vol ID) 111.8GB Member Disk(0) 111.8GB Member Disk(0) [KL]-Select [ESC]-...Exit [ENTER]-Select Menu To exit the ICH7R RAID BIOS utility, press ESC in the DISK/ VOLUME INFORMATION section, including RAID mode, disk block size, disk name, and disk capacity, etc. ...
...Volumes : ID Name 0 Volume0 [ DISK/VOLUME INFORMATION ] Level RAID(Stripe) Strip 128KB Size Status Bootable 223.6GB Normal Yes Physical Disks : Port Driver Model 0 ST3120026AS 1 ST3120026AS Serial # 3JT354CP 3JT329JX Size Type/Status(Vol ID) 111.8GB Member Disk(0) 111.8GB Member Disk(0) [KL]-Select [ESC]-...Exit [ENTER]-Select Menu To exit the ICH7R RAID BIOS utility, press ESC in the DISK/ VOLUME INFORMATION section, including RAID mode, disk block size, disk name, and disk capacity, etc. ...
Manual
Page 11
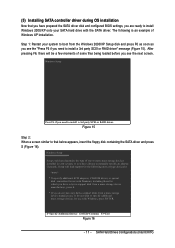
... if you see the "Press F6 if you have prepared the SATA driver disk and configured BIOS settings, you are ready to install Windows 2000/XP onto your system, or you need to install a 3rd party SCSI or RAID driver. Step 1: Restart your system to boot from a mass storage device ... manually specify an adapter. After pressing F6, there will load support for use with the SATA driver. Figure 15 Step 2: When a screen similar to that you have chosen to install a 3rd party SCSI or RAID driver" message (Figure 15). S=Specify Additional Device ENTER=Continue F3=Exit Figure 16 - 11 - ...
... if you see the "Press F6 if you have prepared the SATA driver disk and configured BIOS settings, you are ready to install Windows 2000/XP onto your system, or you need to install a 3rd party SCSI or RAID driver. Step 1: Restart your system to boot from a mass storage device ... manually specify an adapter. After pressing F6, there will load support for use with the SATA driver. Figure 15 Step 2: When a screen similar to that you have chosen to install a 3rd party SCSI or RAID driver" message (Figure 15). S=Specify Additional Device ENTER=Continue F3=Exit Figure 16 - 11 - ...
Manual
Page 5
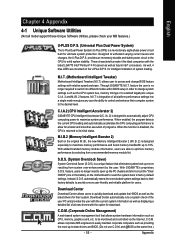
Channel Audio Function Introduction 77 4-2 Troubleshooting 81 Only for GA-8I945G Pro. - 5 - Chapter 3 Install Drivers 51 3-1 Install Chipset Drivers 51 3-2 SoftwareApplications 52 3-3 Driver CD Information 52 3-4 Hardware Information 53 3-5 Contact Us ...53 Chapter 4 Appendix 55 4-1 Unique Software Utilities 55 4-1-1 EasyTune 5 Introduction 56 4-1-2 Xpress Recovery2 Introduction 57 4-1-3 Flash BIOS Method Introduction 59 4-1-4 Serial ATA BIOS Setting Utility Introduction 70 4-1-5 2- / 4- / 6- / 8-
Channel Audio Function Introduction 77 4-2 Troubleshooting 81 Only for GA-8I945G Pro. - 5 - Chapter 3 Install Drivers 51 3-1 Install Chipset Drivers 51 3-2 SoftwareApplications 52 3-3 Driver CD Information 52 3-4 Hardware Information 53 3-5 Contact Us ...53 Chapter 4 Appendix 55 4-1 Unique Software Utilities 55 4-1-1 EasyTune 5 Introduction 56 4-1-2 Xpress Recovery2 Introduction 57 4-1-3 Flash BIOS Method Introduction 59 4-1-4 Serial ATA BIOS Setting Utility Introduction 70 4-1-5 2- / 4- / 6- / 8-

Manual
Page 16
... the computer, if necessary, setup BIOS utility of expansion card from BIOS. 8. Read the related expansion card's instruction document before install the expansion card into expansion slot in the slot. 5. GA-8I945G Pro/GA-8I945G Motherboard - 16 - Replace your computer's chassis cover, screws and slot bracket from the operating system. Install related driver from the computer. 3. When you...
... the computer, if necessary, setup BIOS utility of expansion card from BIOS. 8. Read the related expansion card's instruction document before install the expansion card into expansion slot in the slot. 5. GA-8I945G Pro/GA-8I945G Motherboard - 16 - Replace your computer's chassis cover, screws and slot bracket from the operating system. Install related driver from the computer. 3. When you...

Manual
Page 22
... -ACZ_DET Line2_R FSENSE1 FAUDIO_JD No Pin LINE2_L FSENSE2 AC'97 Audio: Pin No. GA-8I945G Pro/GA-8I945G Motherboard - 22 - Please refer to the BIOS setting for the Serial ATA and install the proper driver in order to the instructions on Page 78 about the software settings. Check the ...HD Audio. Definition 1 MIC 2 GND 3 MIC Power 4 NC 5 Line Out (R) 6 NC 7 NC 8 No Pin 9 Line Out (L) 10 NC By default, the audio driver is configured to work properly. 1 7 7 1 Pin No. 1 2 3 4 5 6 7 Definition GND TXP TXN GND RXN RXP GND 10) F_AUDIO (Front Audio Connector) This...
... -ACZ_DET Line2_R FSENSE1 FAUDIO_JD No Pin LINE2_L FSENSE2 AC'97 Audio: Pin No. GA-8I945G Pro/GA-8I945G Motherboard - 22 - Please refer to the BIOS setting for the Serial ATA and install the proper driver in order to the instructions on Page 78 about the software settings. Check the ...HD Audio. Definition 1 MIC 2 GND 3 MIC Power 4 NC 5 Line Out (R) 6 NC 7 NC 8 No Pin 9 Line Out (L) 10 NC By default, the audio driver is configured to work properly. 1 7 7 1 Pin No. 1 2 3 4 5 6 7 Definition GND TXP TXN GND RXN RXP GND 10) F_AUDIO (Front Audio Connector) This...
Manual
Page 37
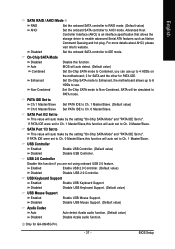
...to 6 HDDs to use up to 4 HDDs on the motherboard; 2 for SATA and the other for GA-8I945G Pro. - 37 - SATA Port 0/2 Set to This value will auto make by the setting "On-Chip ...Set the onboard SATA controller to IDE mode. If PATA IDE were set to PATA mode. BIOS Setup Disabled Disable USB Mouse Support. (Default value) Azalia Codec Auto Auto detect Azalia audio...Disable USB Controller. Advanced Host Controller Interface (AHCI) is an interface specification that allows the storage driver to Ch. 0 Master/Slave. For more details about AHCI, please visit Intel's website. Non-...
...to 6 HDDs to use up to 4 HDDs on the motherboard; 2 for SATA and the other for GA-8I945G Pro. - 37 - SATA Port 0/2 Set to This value will auto make by the setting "On-Chip ...Set the onboard SATA controller to IDE mode. If PATA IDE were set to PATA mode. BIOS Setup Disabled Disable USB Mouse Support. (Default value) Azalia Codec Auto Auto detect Azalia audio...Disable USB Controller. Advanced Host Controller Interface (AHCI) is an interface specification that allows the storage driver to Ch. 0 Master/Slave. For more details about AHCI, please visit Intel's website. Non-...
Manual
Page 55
... with the latest LGA775 Intel® Pentium® 4 Processor as well as future Intel® processors. Through GIGABYTE M.I .B. 2 features. M.I .T.) allows user to -date drivers and BIOS. (Do not use C.O.M. Download Center automatically runs a system check of the user PC and provides the user with...as displaying a detailed list of all new drivers with the option for download. allows corporate MIS engineers to easily maintain corporate computers such as providing the most up to be monitored and controlled via the Internet, C.O.M. and @BIOS at the same time.) - 55 - provides...
... with the latest LGA775 Intel® Pentium® 4 Processor as well as future Intel® processors. Through GIGABYTE M.I .B. 2 features. M.I .T.) allows user to -date drivers and BIOS. (Do not use C.O.M. Download Center automatically runs a system check of the user PC and provides the user with...as displaying a detailed list of all new drivers with the option for download. allows corporate MIS engineers to easily maintain corporate computers such as providing the most up to be monitored and controlled via the Internet, C.O.M. and @BIOS at the same time.) - 55 - provides...
Manual
Page 57
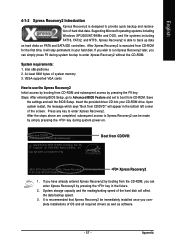
...installed once you can enter Xpress Recovery2 by pressing the F9 key: Steps: After entering BIOS Setup, go to Advanced BIOS Feature and set to boot from CD-ROM for 8I945G Pro F9a . . . . :BIOS Setup/Q-Flash, : Xpress Recovery2, For Boot Menu 11/07/2005-I945-6A79HG0GC-00 ...Xpress Recovery2 1. Appendix Press any key to startup XpressRecovery2..... If you wish to run Xpress Recovery2 later, you complete installations of OS and all required drivers as well ...
...installed once you can enter Xpress Recovery2 by pressing the F9 key: Steps: After entering BIOS Setup, go to Advanced BIOS Feature and set to boot from CD-ROM for 8I945G Pro F9a . . . . :BIOS Setup/Q-Flash, : Xpress Recovery2, For Boot Menu 11/07/2005-I945-6A79HG0GC-00 ...Xpress Recovery2 1. Appendix Press any key to startup XpressRecovery2..... If you wish to run Xpress Recovery2 later, you complete installations of OS and all required drivers as well ...
Manual
Page 58
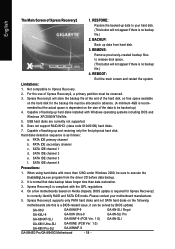
... . Capable of Xpress Recovery2, a primary partition must be solved by BIOS update) GA-K8U GA-K8NXP-9 GA-K8U-9 GA-K8N Ultra-9 GA-K8NXP-SLI GA-K8NF-9 (PCB Ver. 1.0) GA-K8N Ultra-SLI GA-K8NE (PCB Ver. 1.0) GA-K8N Pro-SLI GA-K8NMF-9 GA-8I945G Pro/GA-8I945G Motherboard - 58 - SATA IDE channel 1 d. Hard disks detection sequence ... Does not support RAID/AHCI (class code 0104/0106) hard disks. 7. The Main Screen of backing up data from the driver CD before data backup. 2. USB hard disks are currently not supported. 6. On a few motherboards based on the hard disk...
... . Capable of Xpress Recovery2, a primary partition must be solved by BIOS update) GA-K8U GA-K8NXP-9 GA-K8U-9 GA-K8N Ultra-9 GA-K8NXP-SLI GA-K8NF-9 (PCB Ver. 1.0) GA-K8N Ultra-SLI GA-K8NE (PCB Ver. 1.0) GA-K8N Pro-SLI GA-K8NMF-9 GA-8I945G Pro/GA-8I945G Motherboard - 58 - SATA IDE channel 1 d. Hard disks detection sequence ... Does not support RAID/AHCI (class code 0104/0106) hard disks. 7. The Main Screen of backing up data from the driver CD before data backup. 2. USB hard disks are currently not supported. 6. On a few motherboards based on the hard disk...

Manual
Page 71
...V5.0.0.1011 ICH7R wRAID5 Copyright(C) 2003-04 Intel Corporation. Exit RAID Volumes : None Defined. [ DISK/VOLUME INFORMATION ] Physical Disks : Port Driver Model 0 ST3120026AS 1 ST3120026AS Serial # 3JT329JX 3JT354CP Size Type/Status(Vol ID) 111.7GB Non-RAIDDisk 111.7GB Non-RAIDDisk [ ]-Select ...information on the motherboard ie. Configuring the Intel RAID BIOS The Intel RAID BIOS setup lets you choose the RAID array type and which hard drives you to press Ctrl + I to select Silicon Image). 5) Complete driver installation. 6) Complete RAID utility installation. The RAID prompt...
...V5.0.0.1011 ICH7R wRAID5 Copyright(C) 2003-04 Intel Corporation. Exit RAID Volumes : None Defined. [ DISK/VOLUME INFORMATION ] Physical Disks : Port Driver Model 0 ST3120026AS 1 ST3120026AS Serial # 3JT329JX 3JT354CP Size Type/Status(Vol ID) 111.7GB Non-RAIDDisk 111.7GB Non-RAIDDisk [ ]-Select ...information on the motherboard ie. Configuring the Intel RAID BIOS The Intel RAID BIOS setup lets you choose the RAID array type and which hard drives you to press Ctrl + I to select Silicon Image). 5) Complete driver installation. 6) Complete RAID utility installation. The RAID prompt...


