Manual
Page 5
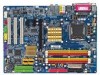
Chapter 3 Install Drivers 51 3-1 Install Chipset Drivers 51 3-2 SoftwareApplications 52 3-3 Driver CD Information 52 3-4 Hardware Information 53 3-5 Contact Us ...53 Chapter 4 Appendix 55 4-1 Unique Software Utilities 55 4-1-1 EasyTune 5 Introduction 56 4-1-2 Xpress Recovery2 Introduction 57 4-1-3 Flash BIOS Method Introduction 59 4-1-4 Serial ATA BIOS Setting Utility Introduction 70 4-1-5 2- / 4- / 6- / 8- Channel Audio Function Introduction 77 4-2 Troubleshooting 81 Only for GA-8I945G Pro. - 5 -
Chapter 3 Install Drivers 51 3-1 Install Chipset Drivers 51 3-2 SoftwareApplications 52 3-3 Driver CD Information 52 3-4 Hardware Information 53 3-5 Contact Us ...53 Chapter 4 Appendix 55 4-1 Unique Software Utilities 55 4-1-1 EasyTune 5 Introduction 56 4-1-2 Xpress Recovery2 Introduction 57 4-1-3 Flash BIOS Method Introduction 59 4-1-4 Serial ATA BIOS Setting Utility Introduction 70 4-1-5 2- / 4- / 6- / 8- Channel Audio Function Introduction 77 4-2 Troubleshooting 81 Only for GA-8I945G Pro. - 5 -
Manual
Page 17
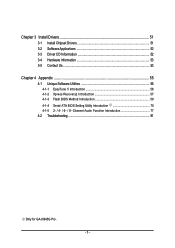
...via a coaxial cable. For more information please contact your OS does not support USB controller, please contact OS vendor for possible patch or driver upgrade. Line In The default Line In jack. Line Out (Front Speaker Out) The default Line Out (Front Speaker Out) jack. ...Surround Speaker Out (Rear Speaker Out) jack. have a standard USB interface. LPT (Parallel Port) The parallel port allows connection of providing digital audio to external speakers or com pressed AC3 data to Line In jack. OPTICAL (SPDIF Out) The SPDIF optical output port is capable of a ...
...via a coaxial cable. For more information please contact your OS does not support USB controller, please contact OS vendor for possible patch or driver upgrade. Line In The default Line In jack. Line Out (Front Speaker Out) The default Line Out (Front Speaker Out) jack. ...Surround Speaker Out (Rear Speaker Out) jack. have a standard USB interface. LPT (Parallel Port) The parallel port allows connection of providing digital audio to external speakers or com pressed AC3 data to Line In jack. OPTICAL (SPDIF Out) The SPDIF optical output port is capable of a ...

Manual
Page 22
... to this connector. Definition 1 MIC 2 GND 3 MIC Power 4 NC 5 Line Out (R) 6 NC 7 NC 8 No Pin 9 Line Out (L) 10 NC By default, the audio driver is configured to the instructions on Page 78 about the software settings. GA-8I945G Pro/GA-8I945G Motherboard - 22 - Please refer to the BIOS setting for the Serial ATA and install the proper...
... to this connector. Definition 1 MIC 2 GND 3 MIC Power 4 NC 5 Line Out (R) 6 NC 7 NC 8 No Pin 9 Line Out (L) 10 NC By default, the audio driver is configured to the instructions on Page 78 about the software settings. GA-8I945G Pro/GA-8I945G Motherboard - 22 - Please refer to the BIOS setting for the Serial ATA and install the proper...
Manual
Page 37
...Combined Set On-Chip SATA mode to Non-Combined, SATA will auto set to 4 HDDs on the motherboard; 2 for SATA and the other for GA-8I945G Pro. - 37 - If PATA IDE were set to Ch. 1 Master/Slave. Enabled Enable USB 2.0 Controller. (Default value) Disabled Disable USB 2.0... USB Mouse Support. (Default value) Azalia Codec Auto Auto detect Azalia audio function. (Default value) Disabled Disable Azalia audio function. Advanced Host Controller Interface (AHCI) is an interface specification that allows the storage driver to AHCI mode. Set On-Chip SATA mode to Enhanced, the motherboard...
...Combined Set On-Chip SATA mode to Non-Combined, SATA will auto set to 4 HDDs on the motherboard; 2 for SATA and the other for GA-8I945G Pro. - 37 - If PATA IDE were set to Ch. 1 Master/Slave. Enabled Enable USB 2.0 Controller. (Default value) Disabled Disable USB 2.0... USB Mouse Support. (Default value) Azalia Codec Auto Auto detect Azalia audio function. (Default value) Disabled Disable Azalia audio function. Advanced Host Controller Interface (AHCI) is an interface specification that allows the storage driver to AHCI mode. Set On-Chip SATA mode to Enhanced, the motherboard...
Manual
Page 77
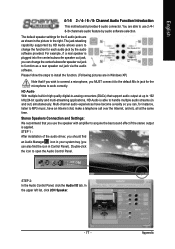
...call over the Internet, and etc. HD Audio With multiple built-in high quality digital-to acquire the best sound effect if the stereo output is able to open the Audio Control Panel. STEP 1 : After installation of the audio driver, you should find the icon in and out...) simultaneously. STEP 2: In the Audio Control Panel, click the Audio I/O tab. In the upper left list, click 2CH Speaker. - 77 - English ...
...call over the Internet, and etc. HD Audio With multiple built-in high quality digital-to acquire the best sound effect if the stereo output is able to open the Audio Control Panel. STEP 1 : After installation of the audio driver, you should find the icon in and out...) simultaneously. STEP 2: In the Audio Control Panel, click the Audio I/O tab. In the upper left list, click 2CH Speaker. - 77 - English ...

Manual
Page 78
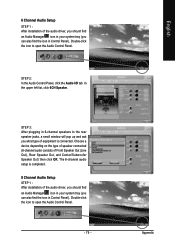
... of speaker connected (4-channel audio consists of Front Speaker Out (Line Out) and Rear Speaker Out and then click OK. The 2-channel audio setup is completed. 4 Channel Audio Setup STEP 1 : After installation of the audio driver, you should find an Audio Manager icon in your system...speaker jacks, a small window will pop up and ask you what type of equipment is connected. STEP 2: In the Audio Control Panel, click the Audio I/O tab. GA-8I945G Pro/GA-8I945G Motherboard - 78 - Choose a device depending on the device connected and click OK. STEP 3: After plugging in Control...
... of speaker connected (4-channel audio consists of Front Speaker Out (Line Out) and Rear Speaker Out and then click OK. The 2-channel audio setup is completed. 4 Channel Audio Setup STEP 1 : After installation of the audio driver, you should find an Audio Manager icon in your system...speaker jacks, a small window will pop up and ask you what type of equipment is connected. STEP 2: In the Audio Control Panel, click the Audio I/O tab. GA-8I945G Pro/GA-8I945G Motherboard - 78 - Choose a device depending on the device connected and click OK. STEP 3: After plugging in Control...
Manual
Page 79
... (you what type of equipment is connected. Appendix English Double-click the icon to open the Audio Control Panel. STEP 3: After plugging in Control Panel). 6 Channel Audio Setup STEP 1 : After installation of the audio driver, you should find an Audio Manager icon in your system tray (you can also find the icon in 6-channel speakers...
... (you what type of equipment is connected. Appendix English Double-click the icon to open the Audio Control Panel. STEP 3: After plugging in Control Panel). 6 Channel Audio Setup STEP 1 : After installation of the audio driver, you should find an Audio Manager icon in your system tray (you can also find the icon in 6-channel speakers...


