
Manual
Page 5
Chapter 3 Drivers Installation 51 3-1 Install Chipset Drivers 51 3-2 SoftwareApplications 52 3-3 Software Information 52 3-4 Hardware Information 53 3-5 Contact Us ...53 Chapter 4 Appendix 55 4-1 Unique Software Utilities 55 4-1-1 EasyTune 5 Introduction 55 4-1-2 Xpress Recovery2 Introduction 56 4-1-3 Flash BIOS Method Introduction 58 4-1-4 2 / 4 / 6 Channel Audio Function Introduction 62 4-2 Troubleshooting 68 - 5 -
Chapter 3 Drivers Installation 51 3-1 Install Chipset Drivers 51 3-2 SoftwareApplications 52 3-3 Software Information 52 3-4 Hardware Information 53 3-5 Contact Us ...53 Chapter 4 Appendix 55 4-1 Unique Software Utilities 55 4-1-1 EasyTune 5 Introduction 55 4-1-2 Xpress Recovery2 Introduction 56 4-1-3 Flash BIOS Method Introduction 58 4-1-4 2 / 4 / 6 Channel Audio Function Introduction 62 4-2 Troubleshooting 68 - 5 -

Manual
Page 16
Replace your computer's chassis cover. 7. GA-8I865PE775-G-RH Motherboard - 16 - Remove your computer's chassis cover, screws and slot bracket from BIOS. 8. Please align the VGA card to secure the slot bracket of the ... carefully pull out the small whitedrawable bar at the end of the AGP slot when you try to install/uninstall the VGA card. Install related driver from the operating system.
Replace your computer's chassis cover. 7. GA-8I865PE775-G-RH Motherboard - 16 - Remove your computer's chassis cover, screws and slot bracket from BIOS. 8. Please align the VGA card to secure the slot bracket of the ... carefully pull out the small whitedrawable bar at the end of the AGP slot when you try to install/uninstall the VGA card. Install related driver from the operating system.

Manual
Page 17
... you connect your device(s) into USB connector(s), please make sure your OS does not support USB controller, please contact OS vendor for possible patch or driver upgrade. LAN Port The provided Internet connection is Gigabit Ethernet (PCI Express Gigabit), providing data transfer speeds of a printer, scanner and other peripheral devices. / Serial...
... you connect your device(s) into USB connector(s), please make sure your OS does not support USB controller, please contact OS vendor for possible patch or driver upgrade. LAN Port The provided Internet connection is Gigabit Ethernet (PCI Express Gigabit), providing data transfer speeds of a printer, scanner and other peripheral devices. / Serial...
Manual
Page 21
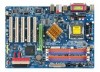
..., please take note of the cable connects to the FDD drive. Please refer to the BIOS setting for the Serial ATA and install the proper driver in the FDD connector. 34 33 2 1 7) SATA0/SATA1 (Serial ATA Connector,) Serial ATA can provide up to 150 MB/s transfer rate. English 6) FDD (FDD Connector...
..., please take note of the cable connects to the FDD drive. Please refer to the BIOS setting for the Serial ATA and install the proper driver in the FDD connector. 34 33 2 1 7) SATA0/SATA1 (Serial ATA Connector,) Serial ATA can provide up to 150 MB/s transfer rate. English 6) FDD (FDD Connector...

Manual
Page 51
...the "Xpress Install" will appear. The "Xpress Install" will auto-detect the right USB2.0 driver). - 51 - For USB2.0 driver support under "Device Manager". After restarting your system automatically. English Chapter 3 Drivers Installation Pictures below are shown in Windows XP. (1) Please make sure to install the latest service... want then click the "GO" button. The "Xpress Install" uses the"Click and Go" technology to install the drivers automatically. Please remove the question mark and restart the system (System will execute the installation for Windows after install the...
...the "Xpress Install" will appear. The "Xpress Install" will auto-detect the right USB2.0 driver). - 51 - For USB2.0 driver support under "Device Manager". After restarting your system automatically. English Chapter 3 Drivers Installation Pictures below are shown in Windows XP. (1) Please make sure to install the latest service... want then click the "GO" button. The "Xpress Install" uses the"Click and Go" technology to install the drivers automatically. Please remove the question mark and restart the system (System will execute the installation for Windows after install the...

Manual
Page 52
English 3-2 Software Applications This page displays all the tools that Gigabyte developed and some free software. You can click an item to install it. 3-3 Software Information This page lists the contents of software and drivers in this CD-title. GA-8I865PE775-G-RH Motherboard - 52 -
English 3-2 Software Applications This page displays all the tools that Gigabyte developed and some free software. You can click an item to install it. 3-3 Software Information This page lists the contents of software and drivers in this CD-title. GA-8I865PE775-G-RH Motherboard - 52 -

Manual
Page 53
Drivers Installation English 3-4 Hardware Information This page lists all device you have for this motherboard. 3-5 Contact Us You can also see the last page of this manual for contacts information details. - 53 -
Drivers Installation English 3-4 Hardware Information This page lists all device you have for this motherboard. 3-5 Contact Us You can also see the last page of this manual for contacts information details. - 53 -
Manual
Page 56
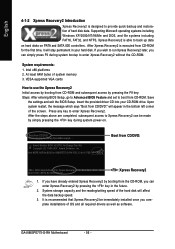
... least 64M bytes of the screen. Insert the provided driver CD into your hard disk. Upon system restart, the message which says "Boot from CD/DVD:" will appear in the bottom left corner of system memory 3. GA-8I865PE775-G-RH Motherboard - 56 - If you wish to run Xpress... PATA and SATA IDE controllers. Press any key to enter Xpress Recovery2. English 4-1-2 Xpress Recovery2 Introduction Xpress Recovery2 is executed from CD-ROM for 8I865PE775-G-RH PCB 3.0 &4.X FBB . . . . :BIOS Setup/Q-Flash :Xpress Recovery2 :Boot Menu :Qflash 02/27/2007-i865G-6A79ZG0XC-00 :Xpress Recovery2...
... least 64M bytes of the screen. Insert the provided driver CD into your hard disk. Upon system restart, the message which says "Boot from CD/DVD:" will appear in the bottom left corner of system memory 3. GA-8I865PE775-G-RH Motherboard - 56 - If you wish to run Xpress... PATA and SATA IDE controllers. Press any key to enter Xpress Recovery2. English 4-1-2 Xpress Recovery2 Introduction Xpress Recovery2 is executed from CD-ROM for 8I865PE775-G-RH PCB 3.0 &4.X FBB . . . . :BIOS Setup/Q-Flash :Xpress Recovery2 :Boot Menu :Qflash 02/27/2007-i865G-6A79ZG0XC-00 :Xpress Recovery2...

Manual
Page 57
... a few motherboards based on the hard disk for Xpress Recovery2 to Xpress Recovery. 2. PATA IDE secondary channel c . RESTORE: Restore the backed-up data from the driver CD before data backup. 2. BACKUP: Back up data to your motherboard manufacturer. - 57 - PATA IDE primary channel b. SATA IDE channel 2 e. SATA IDE channel...
... a few motherboards based on the hard disk for Xpress Recovery2 to Xpress Recovery. 2. PATA IDE secondary channel c . RESTORE: Restore the backed-up data from the driver CD before data backup. 2. BACKUP: Back up data to your motherboard manufacturer. - 57 - PATA IDE primary channel b. SATA IDE channel 2 e. SATA IDE channel...
Manual
Page 62
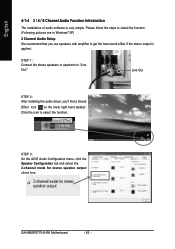
... for stereo speaker output check box. GA-8I865PE775-G-RH Motherboard - 62 - Please follow the steps to get the best sound effect if the stereo output is very simple. English 4-1-4 2 / 4 / 6 Channel Audio Function Introduction The installation of audio software is applied. Line Out STEP 2: After installing the audio driver, you use speakers with amplifier to...
... for stereo speaker output check box. GA-8I865PE775-G-RH Motherboard - 62 - Please follow the steps to get the best sound effect if the stereo output is very simple. English 4-1-4 2 / 4 / 6 Channel Audio Function Introduction The installation of audio software is applied. Line Out STEP 2: After installing the audio driver, you use speakers with amplifier to...

Manual
Page 63
... Only SURROUND-KIT check box and press OK. Please select other settings (ex: Living Room) for 4 speaker output check box. STEP 2: After installing the audio driver, you'll find a Sound Effect icon on the lower right hand taskbar.
... Only SURROUND-KIT check box and press OK. Please select other settings (ex: Living Room) for 4 speaker output check box. STEP 2: After installing the audio driver, you'll find a Sound Effect icon on the lower right hand taskbar.

Manual
Page 64
MIC In Line Out STEP 2: After installing the audio driver, you'll find a Sound Effect icon on the lower right hand taskbar. Click the icon to "MIC In". GA-8I865PE775-G-RH Motherboard - 64 - Clear the Only SURROUND-KIT check box and press OK. STEP 1: Connect the front channels to "Line Out",the rear channels to...
MIC In Line Out STEP 2: After installing the audio driver, you'll find a Sound Effect icon on the lower right hand taskbar. Click the icon to "MIC In". GA-8I865PE775-G-RH Motherboard - 64 - Clear the Only SURROUND-KIT check box and press OK. STEP 1: Connect the front channels to "Line Out",the rear channels to...

Manual
Page 66
Select the Only SURROUND-KIT check box and press OK. GA-8I865PE775-G-RH Motherboard - 66 - STEP 5: On the AC97 Audio Configuration menu, click the Speaker Configuration tab and select the 6-channel mode for 6 channels output. Click the icon ... audio panel's "Line Out", the rear channels to SURROUND-KIT's REAR R/L, and the Center/Subwoofer channels to select the function. STEP 4: After installing the audio driver, you'll find a Sound Effect icon on the lower right hand taskbar.
Select the Only SURROUND-KIT check box and press OK. GA-8I865PE775-G-RH Motherboard - 66 - STEP 5: On the AC97 Audio Configuration menu, click the Speaker Configuration tab and select the 6-channel mode for 6 channels output. Click the icon ... audio panel's "Line Out", the rear channels to SURROUND-KIT's REAR R/L, and the Center/Subwoofer channels to select the function. STEP 4: After installing the audio driver, you'll find a Sound Effect icon on the lower right hand taskbar.


