Manual
Page 5
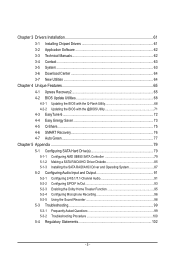
... Recovery 76 4-7 Auto Green...77 Chapter 5 Appendix...79 5-1 Configuring SATA Hard Drive(s 79 5-1-1 Configuring AMD SB850 SATA Controller 79 5-1-2 Making a SATA RAID/AHCI Driver Diskette 85 5-1-3 Installing the SATA RAID/AHCI Driver and Operating System 87 5-2 Configuring Audio Input and Output 91 5-2-1 Configuring 2/4/5.1/7.1-Channel Audio 91 5-2-2 Configuring S/PDIF In/Out 93 5-2-3 Enabling...
... Recovery 76 4-7 Auto Green...77 Chapter 5 Appendix...79 5-1 Configuring SATA Hard Drive(s 79 5-1-1 Configuring AMD SB850 SATA Controller 79 5-1-2 Making a SATA RAID/AHCI Driver Diskette 85 5-1-3 Installing the SATA RAID/AHCI Driver and Operating System 87 5-2 Configuring Audio Input and Output 91 5-2-1 Configuring 2/4/5.1/7.1-Channel Audio 91 5-2-2 Configuring S/PDIF In/Out 93 5-2-3 Enabling...
Manual
Page 10
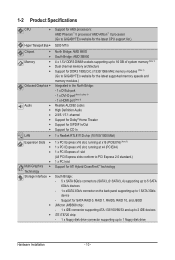
...device - 1-2 Product Specifications CPU Support for AM3 processors: AMD Phenom™ II processor/ AMD Athlon™ II processor (Go to GIGABYTE's website for the latest CPU support list.) Hyper Transport Bus 5200 MT/s Chipset Memory ...Express x1 slot (All PCI Express slots conform to PCI Express 2.0 standard 1 x PCI slot Multi-Graphics Support for SATA RAID 0, RAID 1, RAID5, RAID 10, and JBOD JMicron JMB368 chip: - 1 x IDE connector supporting ATA-133/100/66/33 and up to 2 IDE...
...device - 1-2 Product Specifications CPU Support for AM3 processors: AMD Phenom™ II processor/ AMD Athlon™ II processor (Go to GIGABYTE's website for the latest CPU support list.) Hyper Transport Bus 5200 MT/s Chipset Memory ...Express x1 slot (All PCI Express slots conform to PCI Express 2.0 standard 1 x PCI slot Multi-Graphics Support for SATA RAID 0, RAID 1, RAID5, RAID 10, and JBOD JMicron JMB368 chip: - 1 x IDE connector supporting ATA-133/100/66/33 and up to 2 IDE...

Manual
Page 26
.... If you wish to connect two IDE devices, remember to set the jumpers and the cabling according to your SATA hard drive. • A RAID 0 or RAID 1 configuration requires at least two hard drives. Pin No. Definition SATA3_4 1 GND 7 SATA3_3 7 SATA3_1 7 1 SATA3_2 1 SATA3_0 1 2 TXP ... master/slave settings for instructions on the connector. Each SATA connector supports a single SATA device. The AMD SB850 controller supports RAID 0, RAID 1, RAID 5, RAID 10, and JBOD Refer to Chapter 5, "Configuring SATA Hard Drive(s)," for the IDE devices, read the instructions from the device...
.... If you wish to connect two IDE devices, remember to set the jumpers and the cabling according to your SATA hard drive. • A RAID 0 or RAID 1 configuration requires at least two hard drives. Pin No. Definition SATA3_4 1 GND 7 SATA3_3 7 SATA3_1 7 1 SATA3_2 1 SATA3_0 1 2 TXP ... master/slave settings for instructions on the connector. Each SATA connector supports a single SATA device. The AMD SB850 controller supports RAID 0, RAID 1, RAID 5, RAID 10, and JBOD Refer to Chapter 5, "Configuring SATA Hard Drive(s)," for the IDE devices, read the instructions from the device...
Manual
Page 49
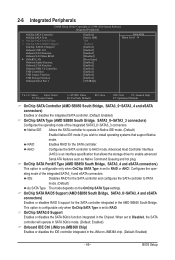
... the operating mode of the integrated SATA3_4 and eSATA connectors. Advanced Host Controller Interface (AHCI) is set to RAID or AHCI. RAID Enables RAID for the SATA controller integrated in the Chipset. BIOS Setup Configures the operating mode of the integrated SATA3_0~SATA3_3 connectors.... OnChip SATA RAID5 Support (AMD SB850 South Bridge, SATA3_0~SATA3_4 and eSATA connectors) Enables or disables RAID 5 support for the SATA controller. OnChip SATA3.0 Support Enables or disables the SATA 6Gb/s function integrated in the AMD SB850...
... the operating mode of the integrated SATA3_4 and eSATA connectors. Advanced Host Controller Interface (AHCI) is set to RAID or AHCI. RAID Enables RAID for the SATA controller integrated in the Chipset. BIOS Setup Configures the operating mode of the integrated SATA3_0~SATA3_3 connectors.... OnChip SATA RAID5 Support (AMD SB850 South Bridge, SATA3_0~SATA3_4 and eSATA connectors) Enables or disables RAID 5 support for the SATA controller. OnChip SATA3.0 Support Enables or disables the SATA 6Gb/s function integrated in the AMD SB850...
Manual
Page 65
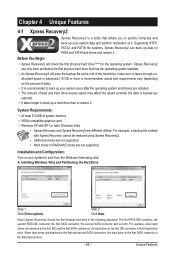
... graphics card • Windows XP with Xpress Recovery cannot be restored using Xpress Recovery2. • USB hard drives are not supported. • Hard drives in RAID/AHCI mode are different utilities. actual size requirements vary, depending on PATA and SATA hard drives and restore it . Chapter 4 Unique Features 4-1 Xpress Recovery2 Xpress...
... graphics card • Windows XP with Xpress Recovery cannot be restored using Xpress Recovery2. • USB hard drives are not supported. • Hard drives in RAID/AHCI mode are different utilities. actual size requirements vary, depending on PATA and SATA hard drives and restore it . Chapter 4 Unique Features 4-1 Xpress Recovery2 Xpress...
Manual
Page 68
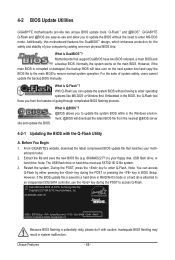
... take over on the main BIOS. What is potentially risky, please do it with the Q-Flash Utility A. GA-880GMA-UD2H E1 . . . . : BIOS Setup : XpressRecovery2 : Boot Menu : Qflash 03/25/2010-RS880P-SB850..., Award Software, Inc. However, if the main BIOS is saved to a hard drive in RAID/AHCI mode or a hard drive attached to your moth- Before You Begin 1. However, if ... an independent IDE/SATA controller, use FAT32/16/12 file system. 3. 4-2 BIOS Update Utilities GIGABYTE motherboards provide two unique BIOS update tools, Q-Flash™ and @BIOS™. Additionally, this motherboard...
... take over on the main BIOS. What is potentially risky, please do it with the Q-Flash Utility A. GA-880GMA-UD2H E1 . . . . : BIOS Setup : XpressRecovery2 : Boot Menu : Qflash 03/25/2010-RS880P-SB850..., Award Software, Inc. However, if the main BIOS is saved to a hard drive in RAID/AHCI mode or a hard drive attached to your moth- Before You Begin 1. However, if ... an independent IDE/SATA controller, use FAT32/16/12 file system. 3. 4-2 BIOS Update Utilities GIGABYTE motherboards provide two unique BIOS update tools, Q-Flash™ and @BIOS™. Additionally, this motherboard...
Manual
Page 69
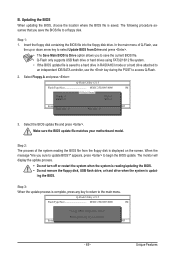
...:Move ESC:Reset F10:Power Off Total size : 0 Free size : 0 3. CoaodpyCMBIOOSS DcoemfapuletteEdn-aPbaless !! Update BIOS from the floppy disk is saved to a hard drive in RAID/AHCI mode or a hard drive attached to an independent IDE/SATA controller, use the up or down arrow key to select Update BIOS from Drive...
...:Move ESC:Reset F10:Power Off Total size : 0 Free size : 0 3. CoaodpyCMBIOOSS DcoemfapuletteEdn-aPbaless !! Update BIOS from the floppy disk is saved to a hard drive in RAID/AHCI mode or a hard drive attached to an independent IDE/SATA controller, use the up or down arrow key to select Update BIOS from Drive...
Manual
Page 79
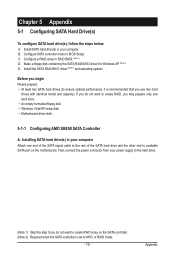
...: • At least two SATA hard drives (to available SATA port on the SATA controller. (Note 2) Required when the SATA controller is set to create RAID, you may prepare only one end of the SATA signal cable to the rear of the SATA hard drive and the other end to ensure... optimal performance, it is recommended that you do not want to AHCI or RAID mode. - 79 - Make a floppy disk containing the SATA RAID/AHCI driver for Windows XP. (Note 2) E. Installing SATA hard drive(s) in your power supply to the hard drive. (Note 1) Skip this...
...: • At least two SATA hard drives (to available SATA port on the SATA controller. (Note 2) Required when the SATA controller is set to create RAID, you may prepare only one end of the SATA signal cable to the rear of the SATA hard drive and the other end to ensure... optimal performance, it is recommended that you do not want to AHCI or RAID mode. - 79 - Make a floppy disk containing the SATA RAID/AHCI driver for Windows XP. (Note 2) E. Installing SATA hard drive(s) in your power supply to the hard drive. (Note 1) Skip this...
Manual
Page 80
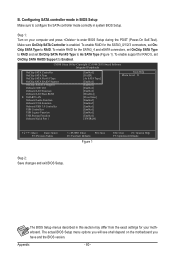
...correctly in this section may differ from the exact settings for the SATA3_4 and eSATA connectors, set OnChip SATA Type to RAID and set OnChip SATA RAID5 Support to Enabled. CMOS Setup Utility-Copyright (C) 1984-2010 Award Software Integrated Peripherals OnChip ... Boot ROM } SMART LAN Onboard Audio Function Onboard 1394 Function Onboard USB 3.0 Controller USB Controllers USB Legacy Function USB Storage Function Onboard Serial Port 1 [Enabled] [RAID] [As SATA Type] [Enabled] [Enabled] [Enabled] [Enabled] [Disabled] [Press Enter] [Enabled] [Enabled] [Enabled] [Enabled] [Enabled] [Enabled] [...
...correctly in this section may differ from the exact settings for the SATA3_4 and eSATA connectors, set OnChip SATA Type to RAID and set OnChip SATA RAID5 Support to Enabled. CMOS Setup Utility-Copyright (C) 1984-2010 Award Software Integrated Peripherals OnChip ... Boot ROM } SMART LAN Onboard Audio Function Onboard 1394 Function Onboard USB 3.0 Controller USB Controllers USB Legacy Function USB Storage Function Onboard Serial Port 1 [Enabled] [RAID] [As SATA Type] [Enabled] [Enabled] [Enabled] [Enabled] [Disabled] [Press Enter] [Enabled] [Enabled] [Enabled] [Enabled] [Enabled] [Enabled] [...
Manual
Page 81
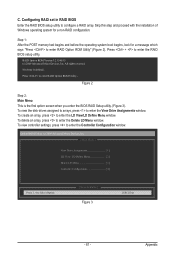
... ROM Version 3.2.1540.15 (c) 2009 Advanced Micro Devices, Inc. No Array is the first option screen when you enter the BIOS RAID Setup utility. (Figure 3). Press to configure a RAID array. To delete an array, press to Select Option [ Keys Available ] Figure 3 [ESC] Exit - 81 - Option ROM Utility (c) 2009 Advanced...+ to enter the View Drive Assignments window. All rights reserved. To view the disk drives assigned to arrays, press to enter the RAID BIOS setup utility. Step 1: After the POST memory test begins and before the operating system boot begins, look for a non...
... ROM Version 3.2.1540.15 (c) 2009 Advanced Micro Devices, Inc. No Array is the first option screen when you enter the BIOS RAID Setup utility. (Figure 3). Press to configure a RAID array. To delete an array, press to Select Option [ Keys Available ] Figure 3 [ESC] Exit - 81 - Option ROM Utility (c) 2009 Advanced...+ to enter the View Drive Assignments window. All rights reserved. To view the disk drives assigned to arrays, press to enter the RAID BIOS setup utility. Step 1: After the POST memory test begins and before the operating system boot begins, look for a non...
Manual
Page 82
... the LD Define Menu. Option ROM Utility (c) 2009 Advanced Micro Devices, Inc. LD No LD Name LD 1 Logical Drive 1 [ LD Define Menu ] RAID Mode Drv RAID 0 0 Stripe Block: 64 KB Gigabyte Boundary: ON Fast Init: ON Cache Mode: WriteThru Port:ID 01:00 02:00 [ Drives Assignments ] Drive Model WDC WD800JD-22LSA0 WDC...
... the LD Define Menu. Option ROM Utility (c) 2009 Advanced Micro Devices, Inc. LD No LD Name LD 1 Logical Drive 1 [ LD Define Menu ] RAID Mode Drv RAID 0 0 Stripe Block: 64 KB Gigabyte Boundary: ON Fast Init: ON Cache Mode: WriteThru Port:ID 01:00 02:00 [ Drives Assignments ] Drive Model WDC WD800JD-22LSA0 WDC...

Manual
Page 83
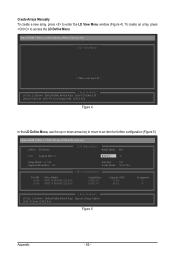
Under the Drives Assignments section, press the up or down arrow key to select RAID 0. 2. If you do not input the array name, the default array name will show the number of the RAID array or press other keys to set the capacity of disks assigned. 5. In the following procedure, we'...ll create RAID 0 as an example. 1. Under the RAID Mode section, press the key to highlight a drive. 4. The Drv section will be used . Press + keys to ignore this option. When the next message ...
Under the Drives Assignments section, press the up or down arrow key to select RAID 0. 2. If you do not input the array name, the default array name will show the number of the RAID array or press other keys to set the capacity of disks assigned. 5. In the following procedure, we'...ll create RAID 0 as an example. 1. Under the RAID Mode section, press the key to highlight a drive. 4. The Drv section will be used . Press + keys to ignore this option. When the next message ...

Manual
Page 84
... type, the disk members, and stripe block size in loss of disk array assignments. LD No LD Name [ View LD Defination Menu ] RAID Mode Drv Capacity(GB) LD 1 GBT RAID 0 2 80 Stripe Block: 64 KB Cache Mode: WriteThru Port:ID 01:00 02:00 [ Drives Assignments ] Drive Model WDC WD800JD-22LSA0 WDC...
... type, the disk members, and stripe block size in loss of disk array assignments. LD No LD Name [ View LD Defination Menu ] RAID Mode Drv Capacity(GB) LD 1 GBT RAID 0 2 80 Stripe Block: 64 KB Cache Mode: WriteThru Port:ID 01:00 02:00 [ Drives Assignments ] Drive Model WDC WD800JD-22LSA0 WDC...
Manual
Page 85
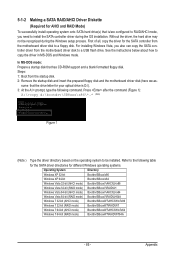
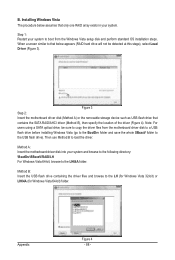
...to a floppy disk. In MS-DOS mode: Prepare a startup disk that the drive letter for your optical drive is /are configured to RAID/AHCI mode, you also can copy the SATA controller driver from the motherboard driver disk to the following command. Press after the command (Figure...the Windows setup process. For installing Windows Vista, you need to be recognized during the OS installation. 5-1-2 Making a SATA RAID/AHCI Driver Diskette (Required for AHCI and RAID Mode) To successfully install operating system onto SATA hard drive(s) that is D:\). 3: At the A:\> prompt, type the ...
...to a floppy disk. In MS-DOS mode: Prepare a startup disk that the drive letter for your optical drive is /are configured to RAID/AHCI mode, you also can copy the SATA controller driver from the motherboard driver disk to the following command. Press after the command (Figure...the Windows setup process. For installing Windows Vista, you need to be recognized during the OS installation. 5-1-2 Making a SATA RAID/AHCI Driver Diskette (Required for AHCI and RAID Mode) To successfully install operating system onto SATA hard drive(s) that is D:\). 3: At the A:\> prompt, type the ...
Manual
Page 86
... an alternative system and insert the motherboard driver disk. 2: From your optical drive folder, double click the Menu.exe file in Figure 3, select 3) ATi AHCI/RAID Driver for XP for Windows XP operating system. Figure 2 Figure 3 Appendix - 86 - For example, from the menu and press . Press any key to the floppy...
... an alternative system and insert the motherboard driver disk. 2: From your optical drive folder, double click the Menu.exe file in Figure 3, select 3) ATi AHCI/RAID Driver for XP for Windows XP operating system. Figure 2 Figure 3 Appendix - 86 - For example, from the menu and press . Press any key to the floppy...

Manual
Page 87
... driver installation. Installing Windows XP Step 1: Restart your hard drive(s). Windows Setup Press F6 if you to install a 3rd party SCSI or RAID driver" (Figure 1). A. Windows Setup You have chosen to the previous screen. The followings are ready to install Windows Vista/ XP onto ...F3=Exit Figure 2 Step 3: On the next screen, press to install a third party SCSI or RAID driver. 5-1-3 Installing the SATA RAID/AHCI Driver and Operating System With the SATA RAID/AHCI driver diskette and correct BIOS settings, you can proceed with Windows, using a device support disk ...
... driver installation. Installing Windows XP Step 1: Restart your hard drive(s). Windows Setup Press F6 if you to install a 3rd party SCSI or RAID driver" (Figure 1). A. Windows Setup You have chosen to the previous screen. The followings are ready to install Windows Vista/ XP onto ...F3=Exit Figure 2 Step 3: On the next screen, press to install a third party SCSI or RAID driver. 5-1-3 Installing the SATA RAID/AHCI Driver and Operating System With the SATA RAID/AHCI driver diskette and correct BIOS settings, you can proceed with Windows, using a device support disk ...
Manual
Page 88
... Method B: Insert the USB flash drive containing the driver files and browse to load the driver. Installing Windows Vista The procedure below appears (RAID hard drive will not be sure to copy the driver files from the Windows Vista setup disk and perform standard OS installation steps. Step ...1: Restart your system. When a screen similar to that below assumes that contains the SATA RAID/AHCI driver (Method B), then specify the location of the driver (Figure 4). Then use Method B to the LH (for Windows Vista 32-bit) ...
... Method B: Insert the USB flash drive containing the driver files and browse to load the driver. Installing Windows Vista The procedure below appears (RAID hard drive will not be sure to copy the driver files from the Windows Vista setup disk and perform standard OS installation steps. Step ...1: Restart your system. When a screen similar to that below assumes that contains the SATA RAID/AHCI driver (Method B), then specify the location of the driver (Figure 4). Then use Method B to the LH (for Windows Vista 32-bit) ...

Manual
Page 89
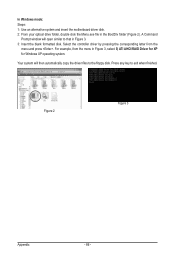
Figure 5 Step 4: After the driver is loaded, the RAID drive will appear. Appendix Step 3: When a screen as shown in Figure 5 appears, select AMD AHCI Compatible RAID Controller and click Next. Figure 6 - 89 - Select the RAID drive and then click Next to continue the OS installation (Figure 6).
Figure 5 Step 4: After the driver is loaded, the RAID drive will appear. Appendix Step 3: When a screen as shown in Figure 5 appears, select AMD AHCI Compatible RAID Controller and click Next. Figure 6 - 89 - Select the RAID drive and then click Next to continue the OS installation (Figure 6).

Manual
Page 90
... rebuilding progress is added to replace a failed drive to launch AMD RAIDXpert. Step 2: Select the RAID array to be rebuilt under Logical Drive View and click the Rebuild tab in to rebuild a RAID 1 array. Appendix Step 5: When done, the array's status on the screen and you can ... to start the rebuilding process. Then launch the AMD RAIDXpert from other drives in the Logical Drive Information pane will display as RAID 1, RAID 5, or RAID 10. The procedures below assume a new drive is displayed on the Information page in the array. Rebuilding an Array: Rebuilding is...
... rebuilding progress is added to replace a failed drive to launch AMD RAIDXpert. Step 2: Select the RAID array to be rebuilt under Logical Drive View and click the Rebuild tab in to rebuild a RAID 1 array. Appendix Step 5: When done, the array's status on the screen and you can ... to start the rebuilding process. Then launch the AMD RAIDXpert from other drives in the Logical Drive Information pane will display as RAID 1, RAID 5, or RAID 10. The procedures below assume a new drive is displayed on the Information page in the array. Rebuilding an Array: Rebuilding is...


