Manual
Page 5
... 59 3-1 Installing Chipset Drivers 59 3-2 Application Software 60 3-3 Technical Manuals 60 3-4 Contact...61 3-5 System...61 3-6 Download Center 62 Chapter 4 Unique Features 63 4-1 Xpress Recovery2 ...Configuring the Onboard SATA Controller 75 5-1-2 Configuring JMicron JMB362 SATA Controller 81 5-1-3 Configuring Marvell 9128 SATA Controller 87 5-1-4 Making a SATA RAID/AHCI Driver Diskette 92 5-1-5 Installing the SATA RAID/AHCI Driver and Operating System 94 5-2 Configuring Audio Input and Output 105 5-2-1 Configuring 2/4/5.1/7.1-Channel Audio 105 5-2-2 Configuring S/PDIF In/Out 107 ...
... 59 3-1 Installing Chipset Drivers 59 3-2 Application Software 60 3-3 Technical Manuals 60 3-4 Contact...61 3-5 System...61 3-6 Download Center 62 Chapter 4 Unique Features 63 4-1 Xpress Recovery2 ...Configuring the Onboard SATA Controller 75 5-1-2 Configuring JMicron JMB362 SATA Controller 81 5-1-3 Configuring Marvell 9128 SATA Controller 87 5-1-4 Making a SATA RAID/AHCI Driver Diskette 92 5-1-5 Installing the SATA RAID/AHCI Driver and Operating System 94 5-2 Configuring Audio Input and Output 105 5-2-1 Configuring 2/4/5.1/7.1-Channel Audio 105 5-2-2 Configuring S/PDIF In/Out 107 ...

Manual
Page 49
...~SATA2_5 connectors) This option is configurable only when OnChip SATA Type is an interface specification that allows the storage driver to RAID or AHCI. IDE Disables RAID for the SATA controller and configures the SATA controller to AHCI mode. BIOS Setup AHCI Configures the SATA controller ...(AHCI) is an interface specification that allows the storage driver to PATA mode. (Default) As SATA Type The mode depends on the Back Panel) Enables or disables RAID for the SATA controller. IDE Disables RAID for the SATA controller and configures the SATA controller to ...
...~SATA2_5 connectors) This option is configurable only when OnChip SATA Type is an interface specification that allows the storage driver to RAID or AHCI. IDE Disables RAID for the SATA controller and configures the SATA controller to AHCI mode. BIOS Setup AHCI Configures the SATA controller ...(AHCI) is an interface specification that allows the storage driver to PATA mode. (Default) As SATA Type The mode depends on the Back Panel) Enables or disables RAID for the SATA controller. IDE Disables RAID for the SATA controller and configures the SATA controller to ...
Manual
Page 63
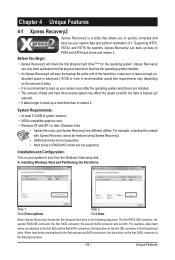
actual size requirements vary, depending on the amount of data). • It is recommended to back up your system soon after the operating system and drivers are installed. • The amount of data and hard drive access speed may affect the speed at the end of the hard drive, make ...Windows Vista and Partitioning the Hard Drive Step 1: Click Drive options. Step 2: Click New. (Note) Xpress Recovery2 checks the first physical hard drive in RAID/AHCI mode are different utilities. For example, when hard drives are attached to the first and second SATA connectors, the hard drive on the first...
actual size requirements vary, depending on the amount of data). • It is recommended to back up your system soon after the operating system and drivers are installed. • The amount of data and hard drive access speed may affect the speed at the end of the hard drive, make ...Windows Vista and Partitioning the Hard Drive Step 1: Click Drive options. Step 2: Click New. (Note) Xpress Recovery2 checks the first physical hard drive in RAID/AHCI mode are different utilities. For example, when hard drives are attached to the first and second SATA connectors, the hard drive on the first...
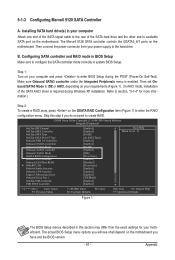
Manual
Page 75
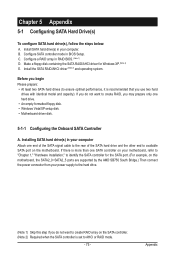
... to ensure optimal performance, it is recommended that you use two hard drives with identical model and capacity). B. Make a floppy disk containing the SATA RAID/AHCI driver for the SATA port. (For example, on the motherboard. Appendix If there is set to available SATA port on this motherboard, the SATA2_0~SATA2_5 ports...
... to ensure optimal performance, it is recommended that you use two hard drives with identical model and capacity). B. Make a floppy disk containing the SATA RAID/AHCI driver for the SATA port. (For example, on the motherboard. Appendix If there is set to available SATA port on this motherboard, the SATA2_0~SATA2_5 ports...
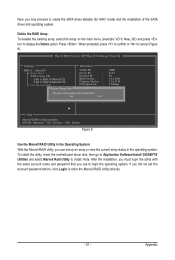
Manual
Page 86
... Main Menu ] [ Hard Disk Drive List ] Create RAID Disk Drive Delete RAID Disk Drive Revert HDD to create the SATA RAID/AHCI driver diskette and the installation of the SATA RAID/ AHCI driver and operating system. Y Model Name RAID Level Capacity Status RDD0: GRAID 0-Stripe 240 GB Normal... to confirm or to confirm your settings before exiting the RAID BIOS utility, then press (Figure 10). GIGABYTE Technology Corp. Press . When prompted to cancel. GIGABYTE Technology Corp. The selection bar will appear to the RAID Disk Drive List block. a small triangle will move to...
... Main Menu ] [ Hard Disk Drive List ] Create RAID Disk Drive Delete RAID Disk Drive Revert HDD to create the SATA RAID/AHCI driver diskette and the installation of the SATA RAID/ AHCI driver and operating system. Y Model Name RAID Level Capacity Status RDD0: GRAID 0-Stripe 240 GB Normal... to confirm or to confirm your settings before exiting the RAID BIOS utility, then press (Figure 10). GIGABYTE Technology Corp. Press . When prompted to cancel. GIGABYTE Technology Corp. The selection bar will appear to the RAID Disk Drive List block. a small triangle will move to...
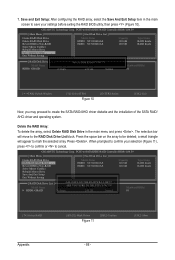
Manual
Page 87
...see shall depend on the GSATA RAID Configuration item (Figure 1) to ... Appendix Configuring SATA controller and RAID mode in this step if you...computer and press to enter the RAID configuration menu. CMOS Setup Utility...controller Onboard SATA3 Mode GSATA RAID Configuration Onboard LAN Function Onboard ... USB Controller USB EHCI Controller [Enabled] [Enabled] [RAID] [As SATA Type] [Enabled] [Enabled] [RAID] [Enabled] [IDE] [Press Enter] [Enabled]....) Step 2: To create a RAID array, press on the motherboard ... other end to create RAID. B. Installing SATA hard...
...see shall depend on the GSATA RAID Configuration item (Figure 1) to ... Appendix Configuring SATA controller and RAID mode in this step if you...computer and press to enter the RAID configuration menu. CMOS Setup Utility...controller Onboard SATA3 Mode GSATA RAID Configuration Onboard LAN Function Onboard ... USB Controller USB EHCI Controller [Enabled] [Enabled] [RAID] [As SATA Type] [Enabled] [Enabled] [RAID] [Enabled] [IDE] [Press Enter] [Enabled]....) Step 2: To create a RAID array, press on the motherboard ... other end to create RAID. B. Installing SATA hard...
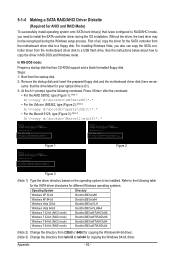
Manual
Page 91
...in the operating system. Marvell BIOS Setup (c) 2009 Marvell Technology Group Ltd. To install the utility, insert the motherboard driver disk, then go to Application Software\Install GIGABYTE Utilities and select Marvell Raid Utility to display the Delete option. Topology HBA 0 : Marvell 0 Virtual Disks VD 0: New_VD PD 0: WDC WD800JD...login the utility with the same account name and password that you may proceed to create the SATA driver diskette (for AHCI mode) and the installation of the SATA driver and operating system. If you did not set up an array or view the current array status ...
...in the operating system. Marvell BIOS Setup (c) 2009 Marvell Technology Group Ltd. To install the utility, insert the motherboard driver disk, then go to Application Software\Install GIGABYTE Utilities and select Marvell Raid Utility to display the Delete option. Topology HBA 0 : Marvell 0 Virtual Disks VD 0: New_VD PD 0: WDC WD800JD...login the utility with the same account name and password that you may proceed to create the SATA driver diskette (for AHCI mode) and the installation of the SATA driver and operating system. If you did not set up an array or view the current array status ...
Manual
Page 92
... Windows 7 64-bit (AHCI mode) Bootdrv\SB7xxW7\AHCI\x64 Windows 7 64-bit (RAID mode) Bootdrv\SB7xxW7\RAID\x64 (Note 2) Change the directory from \32bit to \64bit for copying the Windows 64-bit driver. (Note 3) Change the directory from the motherboard driver disk to a USB flash drive. Refer to the following command. See the instructions...
... Windows 7 64-bit (AHCI mode) Bootdrv\SB7xxW7\AHCI\x64 Windows 7 64-bit (RAID mode) Bootdrv\SB7xxW7\RAID\x64 (Note 2) Change the directory from \32bit to \64bit for copying the Windows 64-bit driver. (Note 3) Change the directory from the motherboard driver disk to a USB flash drive. Refer to the following command. See the instructions...

Manual
Page 93
... system will open similar to exit when finished. Figure 4 Figure 5 - 93 - erating system. • For the Marvell 9128, select 7) Marvell AHCI driver for 32bit system for Windows 32-bit op- tem (Windows XP only). Appendix In Windows mode: Steps: 1: Use an alternative system and insert the motherboard... in the BootDrv folder (Figure 4). Press any key to that in Figure 5, • For the AMD SB750, select 3) SB7xx AHCI/RAID Driver for XP for Windows XP operating system. • For the JMicron JMB362, select 1) GIGABYTE GSATA driver for 32bit system for Windows 32-bit operating sys-
... system will open similar to exit when finished. Figure 4 Figure 5 - 93 - erating system. • For the Marvell 9128, select 7) Marvell AHCI driver for 32bit system for Windows 32-bit op- tem (Windows XP only). Appendix In Windows mode: Steps: 1: Use an alternative system and insert the motherboard... in the BootDrv folder (Figure 4). Press any key to that in Figure 5, • For the AMD SB750, select 3) SB7xx AHCI/RAID Driver for XP for Windows XP operating system. • For the JMicron JMB362, select 1) GIGABYTE GSATA driver for 32bit system for Windows 32-bit operating sys-
Manual
Page 94
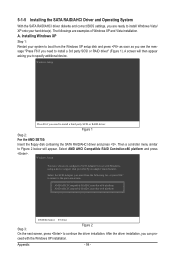
..., press to install a 3rd party SCSI or RAID driver" (Figure 1). ceed with Windows, using a device support disk provided by an adapter manufacturer. 5-1-5 Installing the SATA RAID/AHCI Driver and Operating System With the SATA RAID/AHCI driver diskette and correct BIOS settings, you are examples ... Press F6 if you to install a third party SCSI or RAID driver. Appendix - 94 - Then a controller menu similar to Figure 2 below will then appear asking you need to continue the driver installation. Installing Windows XP Step 1: Restart your hard drive(s). Select...
..., press to install a 3rd party SCSI or RAID driver" (Figure 1). ceed with Windows, using a device support disk provided by an adapter manufacturer. 5-1-5 Installing the SATA RAID/AHCI Driver and Operating System With the SATA RAID/AHCI driver diskette and correct BIOS settings, you are examples ... Press F6 if you to install a third party SCSI or RAID driver. Appendix - 94 - Then a controller menu similar to Figure 2 below will then appear asking you need to continue the driver installation. Installing Windows XP Step 1: Restart your hard drive(s). Select...
Manual
Page 95
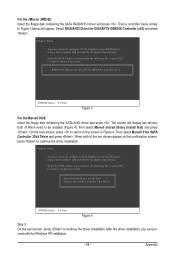
... the SCSI Adapter you want from the following list, or press ESC to return to be installed (Figure 4). RAID/AHCI Driver for use with Windows, using a device support disk provided by an adapter manufacturer. First select Marvell shared library ...GIGABYTE GBB36X Controller (x32) ENTER=Select F3=Exit Figure 3 For the Marvell 9128: Insert the floppy disk containing the SATA AHCI driver and press . The screen will appear. Then select Marvell 91xx SATA Controller 32bit Driver and press . For the JMicron JMB362: Insert the floppy disk containing the SATA RAID/AHCI driver...
... the SCSI Adapter you want from the following list, or press ESC to return to be installed (Figure 4). RAID/AHCI Driver for use with Windows, using a device support disk provided by an adapter manufacturer. First select Marvell shared library ...GIGABYTE GBB36X Controller (x32) ENTER=Select F3=Exit Figure 3 For the Marvell 9128: Insert the floppy disk containing the SATA AHCI driver and press . The screen will appear. Then select Marvell 91xx SATA Controller 32bit Driver and press . For the JMicron JMB362: Insert the floppy disk containing the SATA RAID/AHCI driver...
Manual
Page 96
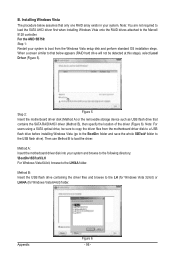
...directory: \BootDrv\SB7xxV\LH For Windows Vista 64-bit, browse to that below assumes that contains the SATA RAID/AHCI driver (Method B), then specify the location of the driver (Figure 6). Note: For users using a SATA optical drive, be detected at this stage), select Load... Driver (Figure 5). Appendix Figure 6 - 96 - Installing Windows Vista The procedure below appears (RAID hard drive will not be sure to copy the driver files from the Windows Vista setup disk and perform standard OS installation steps. ...
...directory: \BootDrv\SB7xxV\LH For Windows Vista 64-bit, browse to that below assumes that contains the SATA RAID/AHCI driver (Method B), then specify the location of the driver (Figure 6). Note: For users using a SATA optical drive, be detected at this stage), select Load... Driver (Figure 5). Appendix Figure 6 - 96 - Installing Windows Vista The procedure below appears (RAID hard drive will not be sure to copy the driver files from the Windows Vista setup disk and perform standard OS installation steps. ...

Manual
Page 97
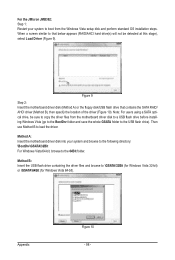
Figure 7 Step 4: After the driver is loaded, the RAID drive will appear. Figure 8 - 97 - Step 3: When a screen as shown in Figure 7 appears, select AMD AHCI Compatible RAID Controller and press Next. Appendix Select the RAID drive and then press Next to continue the OS installation (Figure 8).
Figure 7 Step 4: After the driver is loaded, the RAID drive will appear. Figure 8 - 97 - Step 3: When a screen as shown in Figure 7 appears, select AMD AHCI Compatible RAID Controller and press Next. Appendix Select the RAID drive and then press Next to continue the OS installation (Figure 8).
Manual
Page 98
... drive before installing Windows Vista (go to the BootDrv folder and save the whole GSATA folder to that contains the SATA RAID/ AHCI driver (Method B), then specify the location of the driver (Figure 10). Appendix Figure 10 - 98 - When a screen similar to the USB flash drive). Note: For users ...and browse to load the driver. Then use Method B to \GSATA\32Bit (for Windows Vista 32-bit) or \GSATA\64Bit (for Windows Vista 64-bit). Figure 9 Step 2: Insert the motherboard driver disk (Method A) or the floppy disk/USB flash drive that below appears (RAID/AHCI hard drive(s) will not...
... drive before installing Windows Vista (go to the BootDrv folder and save the whole GSATA folder to that contains the SATA RAID/ AHCI driver (Method B), then specify the location of the driver (Figure 10). Appendix Figure 10 - 98 - When a screen similar to the USB flash drive). Note: For users ...and browse to load the driver. Then use Method B to \GSATA\32Bit (for Windows Vista 32-bit) or \GSATA\64Bit (for Windows Vista 64-bit). Figure 9 Step 2: Insert the motherboard driver disk (Method A) or the floppy disk/USB flash drive that below appears (RAID/AHCI hard drive(s) will not...

Manual
Page 99
Figure 12 - 99 - Appendix Figure 11 Step 4: After the driver is loaded, select the RAID/AHCI drive(s) where you want to install the operating system and then click Next to continue the OS installation (Figure 12). Step 3: When a screen as shown in Figure 11 appears, select GIGABYTE GBB36X Controller and click Next.
Figure 12 - 99 - Appendix Figure 11 Step 4: After the driver is loaded, select the RAID/AHCI drive(s) where you want to install the operating system and then click Next to continue the OS installation (Figure 12). Step 3: When a screen as shown in Figure 11 appears, select GIGABYTE GBB36X Controller and click Next.
Manual
Page 100
... Drive Information pane. Rebuilding an Array: Rebuilding is added to replace a failed drive to rebuild a RAID 1 array. To replace the old drive, make sure the chipset drivers and ATi RAID Utility have been installed from the motherboard driver disk. The procedures below assume a new drive is the process of equal or greater capacity. For...
... Drive Information pane. Rebuilding an Array: Rebuilding is added to replace a failed drive to rebuild a RAID 1 array. To replace the old drive, make sure the chipset drivers and ATi RAID Utility have been installed from the motherboard driver disk. The procedures below assume a new drive is the process of equal or greater capacity. For...

Manual
Page 102
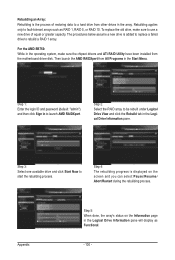
... in the operating system Make sure the JMicron JMB362 SATA controller driver has been installed from All Programs in the Start menu. Launch the GIGABYTE RAID CONFIGURER from the motherboard driver disk. Step 3: Select a drive to start the RAID rebuilding process. Step 1: In the GIGABYTE RAID CONFIGURER screen, right-click on the array to be rebuilt in...
... in the operating system Make sure the JMicron JMB362 SATA controller driver has been installed from All Programs in the Start menu. Launch the GIGABYTE RAID CONFIGURER from the motherboard driver disk. Step 3: Select a drive to start the RAID rebuilding process. Step 1: In the GIGABYTE RAID CONFIGURER screen, right-click on the array to be rebuilt in...


