

Manual
Page 3
....tw Identifying Your Motherboard Revision The revision number on your motherboard revision before updating motherboard BIOS, drivers, or when looking for technical information. Changes to use GIGABYTE's unique features, read or download the information on/from the Support\Motherboard\Technology Guide page on how to the specifications and features in any means...
....tw Identifying Your Motherboard Revision The revision number on your motherboard revision before updating motherboard BIOS, drivers, or when looking for technical information. Changes to use GIGABYTE's unique features, read or download the information on/from the Support\Motherboard\Technology Guide page on how to the specifications and features in any means...

Manual
Page 5
... 53 3-1 Installing Chipset Drivers 53 3-2 Software Applications 54 3-3 Driver CD Information 54 3-4 Hardware Information 55 3-5 Contact Us ...55 Chapter 4 Unique Features 57 4-1 Xpress Recovery2 57 4-2 BIOS Update Utilities 62...Chapter 5 Appendix ...69 5-1 Configuring SATA Hard Drive(s 69 5-1-1 Configuring the Onboard SATA Controller 69 5-1-2 Making a SATA RAID/AHCI Driver Diskette 74 5-1-3 Installing the SATA RAID/AHCI Driver and Operating System 75 5-2 Configuring Audio Input and Output 80 5-2-1 Configuring 2/4/5.1-Channel Audio 80 5-2-2 Installing the S/PDIFOut Cable (Optional ...
... 53 3-1 Installing Chipset Drivers 53 3-2 Software Applications 54 3-3 Driver CD Information 54 3-4 Hardware Information 55 3-5 Contact Us ...55 Chapter 4 Unique Features 57 4-1 Xpress Recovery2 57 4-2 BIOS Update Utilities 62...Chapter 5 Appendix ...69 5-1 Configuring SATA Hard Drive(s 69 5-1-1 Configuring the Onboard SATA Controller 69 5-1-2 Making a SATA RAID/AHCI Driver Diskette 74 5-1-3 Installing the SATA RAID/AHCI Driver and Operating System 75 5-2 Configuring Audio Input and Output 80 5-2-1 Configuring 2/4/5.1-Channel Audio 80 5-2-2 Installing the S/PDIFOut Cable (Optional ...
Manual
Page 6
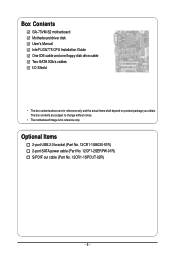
The box contents are for reference only. Optional Items 2-port USB 2.0 bracket (Part No. 12CR1-1UB030-51R) 2-port SATA power cable (Part No. 12CF1-2SERPW-01R) S/PDIF out cable (Part No. 12CR1-1SPOUT-02R) - 6 - Box Contents GA-73VM-S2 motherboard Motherboard driver disk User's Manual Intel® LGA775 CPU Installation Guide One IDE cable and one floppy disk drive cable Two SATA 3Gb/s cables I/O Shield • The box contents above are subject to change without notice. • The motherboard image is for reference only and the actual items shall depend on product package you obtain.
The box contents are for reference only. Optional Items 2-port USB 2.0 bracket (Part No. 12CR1-1UB030-51R) 2-port SATA power cable (Part No. 12CF1-2SERPW-01R) S/PDIF out cable (Part No. 12CR1-1SPOUT-02R) - 6 - Box Contents GA-73VM-S2 motherboard Motherboard driver disk User's Manual Intel® LGA775 CPU Installation Guide One IDE cable and one floppy disk drive cable Two SATA 3Gb/s cables I/O Shield • The box contents above are subject to change without notice. • The motherboard image is for reference only and the actual items shall depend on product package you obtain.
Manual
Page 17
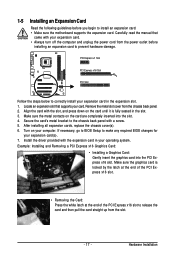
... from the power outlet before you begin to release the card and then pull the card straight up from the chassis back panel. 2. Install the driver provided with your computer.
... from the power outlet before you begin to release the card and then pull the card straight up from the chassis back panel. 2. Install the driver provided with your computer.
Manual
Page 30
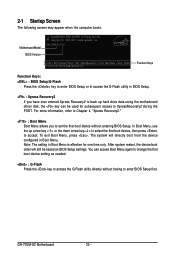
Note: The setting in BIOS Setup. : Xpress Recovery2 If you to XpressRecovery2 during the POST. GA-73VM-S2 Motherboard - 30 - The system will still be used for one time only. After system restart, the device boot order will directly boot from ...motherboard driver disk, the key can access Boot Menu again to change the first boot device setting as needed. : Q-Flash Press the key to access the Q-Flash utility directly without entering BIOS Setup. To exit Boot Menu, press . 2-1 Startup Screen The following screen may appear when the computer boots. GA-73VM-S2 F1a...
Note: The setting in BIOS Setup. : Xpress Recovery2 If you to XpressRecovery2 during the POST. GA-73VM-S2 Motherboard - 30 - The system will still be used for one time only. After system restart, the device boot order will directly boot from ...motherboard driver disk, the key can access Boot Menu again to change the first boot device setting as needed. : Q-Flash Press the key to access the Q-Flash utility directly without entering BIOS Setup. To exit Boot Menu, press . 2-1 Startup Screen The following screen may appear when the computer boots. GA-73VM-S2 F1a...
Manual
Page 39
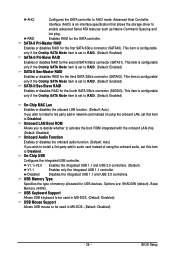
... the third SATA 3Gb/s connector (SATAII2). This item is configurable only if the Onchip SATA Mode item is an interface specification that allows the storage driver to RAID. (Default: Enabled) SATA-II Pri-Slave RAID Enables or disables RAID for the first SATA 3Gb/s connector (SATAII0). V1.1+V2.0 Enables the integrated...
... the third SATA 3Gb/s connector (SATAII2). This item is configurable only if the Onchip SATA Mode item is an interface specification that allows the storage driver to RAID. (Default: Enabled) SATA-II Pri-Slave RAID Enables or disables RAID for the first SATA 3Gb/s connector (SATAII0). V1.1+V2.0 Enables the integrated...

Manual
Page 53
...press the Install button following instructions use Windows XP as the example operating system.) • After installing the operating system, insert the motherboard driver disk into your mouse and select Uninstall) and restart the system. (The system will restart your system. After installing the SP1 (or ...later), if a question mark still exists in Universal Serial Bus Controller in the dialog box. • For USB 2.0 driver support under the Windows XP operating system, please install the Windows XP Service Pack 1 or later. Please select the item that are installed, ...
...press the Install button following instructions use Windows XP as the example operating system.) • After installing the operating system, insert the motherboard driver disk into your mouse and select Uninstall) and restart the system. (The system will restart your system. After installing the SP1 (or ...later), if a question mark still exists in Universal Serial Bus Controller in the dialog box. • For USB 2.0 driver support under the Windows XP operating system, please install the Windows XP Service Pack 1 or later. Please select the item that are installed, ...
Manual
Page 54
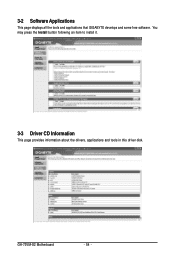
You may press the Install button following an item to install it. 3-3 Driver CD Information This page provides information about the drivers, applications and tools in this driver disk. 3-2 Software Applications This page displays all the tools and applications that GIGABYTE develops and some free software. GA-73VM-S2 Motherboard - 54 -
You may press the Install button following an item to install it. 3-3 Driver CD Information This page provides information about the drivers, applications and tools in this driver disk. 3-2 Software Applications This page displays all the tools and applications that GIGABYTE develops and some free software. GA-73VM-S2 Motherboard - 54 -

Manual
Page 55
3-4 Hardware Information This page provides information about the hardware devices on this motherboard. 3-5 Contact Us Check the contacts information of the GIGABYTE headquarter in Taiwan and the overseas branch offices on the last page of this manual. - 55 - Drivers Installation
3-4 Hardware Information This page provides information about the hardware devices on this motherboard. 3-5 Contact Us Check the contacts information of the GIGABYTE headquarter in Taiwan and the overseas branch offices on the last page of this manual. - 55 - Drivers Installation
Manual
Page 57
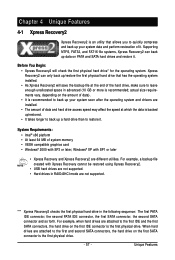
... drive access speed may affect the speed at the end of it . Xpress Recovery2 can back up your system soon after the operating system and drivers are attached to leave enough unallocated space in advanced (10 GB or more is recommended; Supporting NTFS, FAT32, and FAT16 file systems, Xpress Recovery2 can...
... drive access speed may affect the speed at the end of it . Xpress Recovery2 can back up your system soon after the operating system and drivers are attached to leave enough unallocated space in advanced (10 GB or more is recommended; Supporting NTFS, FAT32, and FAT16 file systems, Xpress Recovery2 can...

Manual
Page 60
...Xpress Recovery2 1. B. Accessing Xpress Recovery2 1. After you use the backup function in Xpress Recovery2 for the first time. Figure 12 GA-73VM-S2 Motherboard Xpress Recovery2 will begin to enter Xpress Recovery2 later, simply press during the POST (Figure 9). Select BACKUP to enter Xpress ...00PG, An Energy Star Ally Copyright (C) 1984-2007, Award Software, Inc. Figure 10 Figure 11 3. Boot from the motherboard driver disk to startup XpressRecovery2..... If you see the following message: Press any key to startup Xpress Recovery2 (Figure 8), press any...
...Xpress Recovery2 1. B. Accessing Xpress Recovery2 1. After you use the backup function in Xpress Recovery2 for the first time. Figure 12 GA-73VM-S2 Motherboard Xpress Recovery2 will begin to enter Xpress Recovery2 later, simply press during the POST (Figure 9). Select BACKUP to enter Xpress ...00PG, An Energy Star Ally Copyright (C) 1984-2007, Award Software, Inc. Figure 10 Figure 11 3. Boot from the motherboard driver disk to startup XpressRecovery2..... If you see the following message: Press any key to startup Xpress Recovery2 (Figure 8), press any...
Manual
Page 65
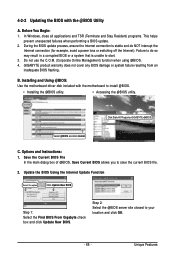
... Stay Resident) programs. This helps prevent unexpected failures when performing a BIOS update. 2. Installing and Using @BIOS: Use the motherboard driver disk included with the @BIOS Utility A. Update the BIOS Using the Internet Update Function Select this option Click Update New BIOS Step ...1: Select the Find BIOS From Gigabyte check box and click Update New BIOS. B. Options and Instructions: 1. Unique Features Failure to do NOT interrupt the Internet connection (for...
... Stay Resident) programs. This helps prevent unexpected failures when performing a BIOS update. 2. Installing and Using @BIOS: Use the motherboard driver disk included with the @BIOS Utility A. Update the BIOS Using the Internet Update Function Select this option Click Update New BIOS Step ...1: Select the Find BIOS From Gigabyte check box and click Update New BIOS. B. Options and Instructions: 1. Unique Features Failure to do NOT interrupt the Internet connection (for...
Manual
Page 69
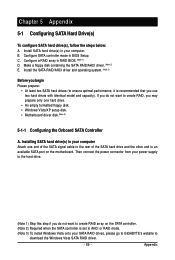
... containing the SATA RAID/AHCI driver. (Note 2) E. If you do not want to an available SATA port on the SATA controller. (Note 2) Required when the SATA controller is set to AHCI or RAID mode. (Note 3) To install Windows Vista onto your SATA RAID drives, please go to GIGABYTE's website to ensure optimal...
... containing the SATA RAID/AHCI driver. (Note 2) E. If you do not want to an available SATA port on the SATA controller. (Note 2) Required when the SATA controller is set to AHCI or RAID mode. (Note 3) To install Windows Vista onto your SATA RAID drives, please go to GIGABYTE's website to ensure optimal...

Manual
Page 73
... array that the boot device is defined in the Array List screen. message appears, press to confirm or to the installation of the SATA controller driver and operating system. - 73 - message appears, press to clear or to cancel. RAID Mode: Striped Stripe Width : 2 Array 1: NVIDIA STRIPE 233.57G - To exit the...
... array that the boot device is defined in the Array List screen. message appears, press to confirm or to the installation of the SATA controller driver and operating system. - 73 - message appears, press to clear or to cancel. RAID Mode: Striped Stripe Width : 2 Array 1: NVIDIA STRIPE 233.57G - To exit the...
Manual
Page 74
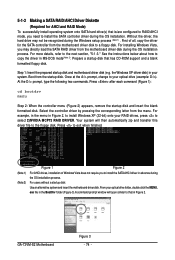
...1 Figure 2 For AHCI drives, installation of all, copy the driver for AHCI and RAID Mode) To successfully install operating system onto SATA hard drive(s) that has CD-ROM support and a blank formatted floppy disk. GA-73VM-S2 Motherboard Figure 3 - 74 - See the instructions below about how... to the next section, "5-1-3." Select the controller driver by pressing the corresponding letter from the motherboard driver disk to install the SATA AHCI driver in MS-DOS mode(Note 2)....
...1 Figure 2 For AHCI drives, installation of all, copy the driver for AHCI and RAID Mode) To successfully install operating system onto SATA hard drive(s) that has CD-ROM support and a blank formatted floppy disk. GA-73VM-S2 Motherboard Figure 3 - 74 - See the instructions below about how... to the next section, "5-1-3." Select the controller driver by pressing the corresponding letter from the motherboard driver disk to install the SATA AHCI driver in MS-DOS mode(Note 2)....
Manual
Page 75
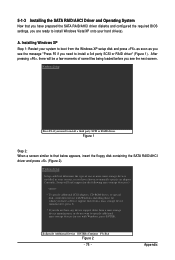
... a mass storage device manufacturer, press S. * If you need to install a third party SCSI or RAID driver. S=Specify Additional Device ENTER=Continue F3=Exit Figure 2 - 75 - 5-1-3 Installing the SATA RAID/AHCI Driver and Operating System Now that below appears, insert the floppy disk containing the SATA RAID/AHCI...will be a few moments of one or more mass storage devices installed in your system, or you have prepared the SATA RAID/AHCI driver diskette and configured the required BIOS settings, you are ready to install Windows Vista/XP onto your system to manually specify an adapter. ...
... a mass storage device manufacturer, press S. * If you need to install a third party SCSI or RAID driver. S=Specify Additional Device ENTER=Continue F3=Exit Figure 2 - 75 - 5-1-3 Installing the SATA RAID/AHCI Driver and Operating System Now that below appears, insert the floppy disk containing the SATA RAID/AHCI...will be a few moments of one or more mass storage devices installed in your system, or you have prepared the SATA RAID/AHCI driver diskette and configured the required BIOS settings, you are ready to install Windows Vista/XP onto your system to manually specify an adapter. ...

Manual
Page 76
... device manufacturer, press S. * If you want from the motherboard driver disk. (Note) The selectable item(s) displayed in Figure 3 may differ according to the RAID or AHCI driver you must press to select an additional driver. GA-73VM-S2 Motherboard - 76 - Later, when a screen similar to that... in Figure 3 below will appear. Select NVIDIA nForce Storage Controller and press . NVIDIA RAID Driver (required) NVIDIA nForce Storage Controller ...
... device manufacturer, press S. * If you want from the motherboard driver disk. (Note) The selectable item(s) displayed in Figure 3 may differ according to the RAID or AHCI driver you must press to select an additional driver. GA-73VM-S2 Motherboard - 76 - Later, when a screen similar to that... in Figure 3 below will appear. Select NVIDIA nForce Storage Controller and press . NVIDIA RAID Driver (required) NVIDIA nForce Storage Controller ...
Manual
Page 77
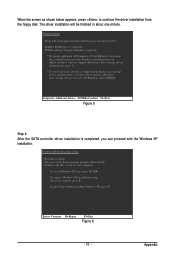
...prepares Microsoft(R) Windows (R) XP to Setup. S=Specify Additional Device ENTER=Continue F3=Exit Figure 5 Step 4: After the SATA controller driver installation is completed, you do not want to specify additional mass storage devices for which you have any device support disks from the ...- 77 - Appendix Windows Setup Setup will be finished in about one minute. When the screen as shown below appears, press to continue the driver installation from a mass storage device manufacturer, or do not have a device support disk from a mass storage device manufacturer, press S. * If...
...prepares Microsoft(R) Windows (R) XP to Setup. S=Specify Additional Device ENTER=Continue F3=Exit Figure 5 Step 4: After the SATA controller driver installation is completed, you do not want to specify additional mass storage devices for which you have any device support disks from the ...- 77 - Appendix Windows Setup Setup will be finished in about one minute. When the screen as shown below appears, press to continue the driver installation from a mass storage device manufacturer, or do not have a device support disk from a mass storage device manufacturer, press S. * If...

Manual
Page 78
... saved, such as your floppy disk and then be detected at this stage), select Load Driver. (Figure 7). GA-73VM-S2 Motherboard - 78 - Save the downloaded file to your floppy disk (Figure 8). (You should go to GIGABYTE's website to that below assumes that only one RAID array exists in advance during the OS installation process. When...
... saved, such as your floppy disk and then be detected at this stage), select Load Driver. (Figure 7). GA-73VM-S2 Motherboard - 78 - Save the downloaded file to your floppy disk (Figure 8). (You should go to GIGABYTE's website to that below assumes that only one RAID array exists in advance during the OS installation process. When...
Manual
Page 79
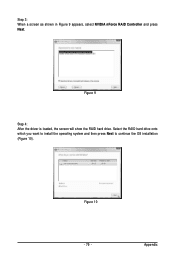
Figure 9 Step 4: After the driver is loaded, the screen will show the RAID hard drive. Select the RAID hard drive onto which you want to install the operating system and then press Next to continue the OS installation (Figure 10). Appendix Step 3: When a screen as shown in Figure 9 appears, select NVIDIA nForce RAID Controller and press Next. Figure 10 - 79 -
Figure 9 Step 4: After the driver is loaded, the screen will show the RAID hard drive. Select the RAID hard drive onto which you want to install the operating system and then press Next to continue the OS installation (Figure 10). Appendix Step 3: When a screen as shown in Figure 9 appears, select NVIDIA nForce RAID Controller and press Next. Figure 10 - 79 -


