
Manual
Page 1
GA-73VM-S2 LGA775 socket motherboard for Intel® CoreTM processor family/ Intel® Pentium® processor family/Intel® Celeron® processor family User's Manual Rev. 1003 12ME-73VMS2-1003R
GA-73VM-S2 LGA775 socket motherboard for Intel® CoreTM processor family/ Intel® Pentium® processor family/Intel® Celeron® processor family User's Manual Rev. 1003 12ME-73VMS2-1003R

Manual
Page 3
... The trademarks mentioned in this manual is protected by copyright laws and is designated by any means without prior notice. No part of this : "REV: X.X." For product-related information, check on our website at: http://www.gigabyte.com.tw Identifying Your Motherboard Revision...INC. For example, "REV: 1.0" means the revision of the motherboard is exclusively licensed to assist in the use GIGABYTE's unique features, read the User's Manual. „ For instructions on your motherboard revision before updating motherboard BIOS, drivers, or when looking for technical information....
... The trademarks mentioned in this manual is protected by copyright laws and is designated by any means without prior notice. No part of this : "REV: X.X." For product-related information, check on our website at: http://www.gigabyte.com.tw Identifying Your Motherboard Revision...INC. For example, "REV: 1.0" means the revision of the motherboard is exclusively licensed to assist in the use GIGABYTE's unique features, read the User's Manual. „ For instructions on your motherboard revision before updating motherboard BIOS, drivers, or when looking for technical information....
Manual
Page 6
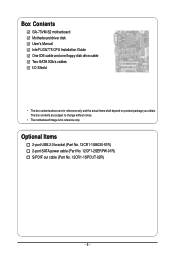
Optional Items 2-port USB 2.0 bracket (Part No. 12CR1-1UB030-51R) 2-port SATA power cable (Part No. 12CF1-2SERPW-01R) S/PDIF out cable (Part No. 12CR1-1SPOUT-02R) - 6 - The box contents are for reference only. Box Contents GA-73VM-S2 motherboard Motherboard driver disk User's Manual Intel® LGA775 CPU Installation Guide One IDE cable and one floppy disk drive cable Two SATA 3Gb/s cables I/O Shield • The box contents above are subject to change without notice. • The motherboard image is for reference only and the actual items shall depend on product package you obtain.
Optional Items 2-port USB 2.0 bracket (Part No. 12CR1-1UB030-51R) 2-port SATA power cable (Part No. 12CF1-2SERPW-01R) S/PDIF out cable (Part No. 12CR1-1SPOUT-02R) - 6 - The box contents are for reference only. Box Contents GA-73VM-S2 motherboard Motherboard driver disk User's Manual Intel® LGA775 CPU Installation Guide One IDE cable and one floppy disk drive cable Two SATA 3Gb/s cables I/O Shield • The box contents above are subject to change without notice. • The motherboard image is for reference only and the actual items shall depend on product package you obtain.
Manual
Page 9
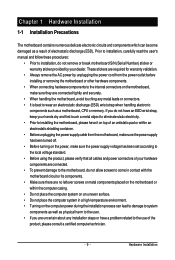
.... • Turning on the computer power during the installation process can become damaged as a motherboard, CPU or memory. Prior to installation, carefully read the user's manual and follow these procedures: • Prior to installation, do not remove or break motherboard S/N (Serial Number) sticker or warranty sticker provided by unplugging the power...
.... • Turning on the computer power during the installation process can become damaged as a motherboard, CPU or memory. Prior to installation, carefully read the user's manual and follow these procedures: • Prior to installation, do not remove or break motherboard S/N (Serial Number) sticker or warranty sticker provided by unplugging the power...

Manual
Page 15
... the CPU cooler and CPU may damage the CPU. - 15 - Push down each push pin. If the push pin is to your CPU cooler installation manual for instructions on the surface of the motherboard. Direction of the Arrow Sign on the Male Push Pin Male Push Pin The Top of Female...
... the CPU cooler and CPU may damage the CPU. - 15 - Push down each push pin. If the push pin is to your CPU cooler installation manual for instructions on the surface of the motherboard. Direction of the Arrow Sign on the Male Push Pin Male Push Pin The Top of Female...
Manual
Page 17
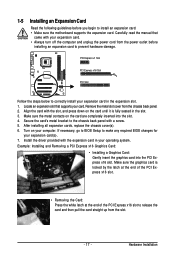
... expansion cards, replace the chassis cover(s). 6. Turn on your card. Make sure the graphics card is fully seated in your operating system. Carefully read the manual that supports your computer. Secure the card's metal bracket to correctly install your expansion card(s). 7. Example: Installing and Removing a PCI Express x16 Graphics Card: •...
... expansion cards, replace the chassis cover(s). 6. Turn on your card. Make sure the graphics card is fully seated in your operating system. Carefully read the manual that supports your computer. Secure the card's metal bracket to correctly install your expansion card(s). 7. Example: Installing and Removing a PCI Express x16 Graphics Card: •...
Manual
Page 28
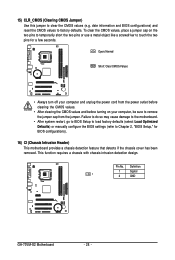
... requires a chassis with chassis intrusion detection design. Definition 1 Signal 1 2 GND GA-73VM-S2 Motherboard - 28 - Failure to do so may cause damage to the motherboard. • After system restart, go to BIOS Setup to load factory defaults (select Load Optimized Defaults) or manually configure the BIOS settings (refer to remove the jumper cap from...
... requires a chassis with chassis intrusion detection design. Definition 1 Signal 1 2 GND GA-73VM-S2 Motherboard - 28 - Failure to do so may cause damage to the motherboard. • After system restart, go to BIOS Setup to load factory defaults (select Load Optimized Defaults) or manually configure the BIOS settings (refer to remove the jumper cap from...
Manual
Page 33
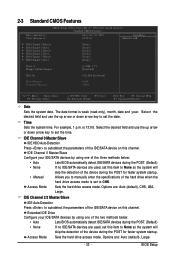
...Auto-Detection Press to None so the system will skip the detection of the hard drive when the hard drive access mode is set to manually enter the specifications of the device during the POST for faster system startup. For example, 1 p.m. BIOS Setup Access Mode Sets the ... to CHS. Extended IDE Drive Configure your IDE/SATA devices by using one of the two methods below : • Auto • None • Manual Lets BIOS automatically detect IDE/SATA devices during the POST. (Default) If no IDE/SATA devices are used , set the date. 2-3 Standard CMOS Features...
...Auto-Detection Press to None so the system will skip the detection of the hard drive when the hard drive access mode is set to manually enter the specifications of the device during the POST for faster system startup. For example, 1 p.m. BIOS Setup Access Mode Sets the ... to CHS. Extended IDE Drive Configure your IDE/SATA devices by using one of the two methods below : • Auto • None • Manual Lets BIOS automatically detect IDE/SATA devices during the POST. (Default) If no IDE/SATA devices are used , set the date. 2-3 Standard CMOS Features...
Manual
Page 34
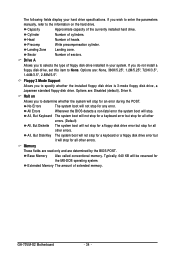
... of cylinders. If you wish to enter the parameters manually, refer to the information on Allows you to specify whether the installed floppy disk drive is 3-mode floppy disk drive, a Japanese standard floppy disk drive. Options are determined by the BIOS POST. GA-73VM-S2 Motherboard - 34 - Options are: Disabled (default), Drive A. No Errors...
... of cylinders. If you wish to enter the parameters manually, refer to the information on Allows you to specify whether the installed floppy disk drive is 3-mode floppy disk drive, a Japanese standard floppy disk drive. Options are determined by the BIOS POST. GA-73VM-S2 Motherboard - 34 - Options are: Disabled (default), Drive A. No Errors...
Manual
Page 47
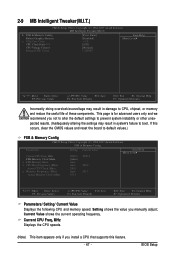
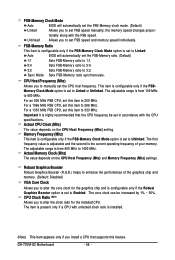
... altering the settings may result in system's failure to boot. Current CPU Freq, MHz Displays the CPU speeds. (Note) This item appears only if you manually adjust;
... altering the settings may result in system's failure to boot. Current CPU Freq, MHz Displays the CPU speeds. (Note) This item appears only if you manually adjust;
Manual
Page 48
...the second is installed. (Note) This item appears only if you to set to Linked or Unlinked. The adjustable range is set FSB speed manually; This item is configurable only if the FSBMemory Clock Mode option is from 400 MHz to 1400 MHz. Actual CPU Clock (Mhz) The ... Allows you to 650 MHz. GA-73VM-S2 Motherboard - 48 - Memory Frequency (Mhz) This item is configurable only if the FSB-Memory Clock Mode option is set the CPU host frequency. Sync Mode Sets FSB-Memory ratio synchronously. CPU Clock Ratio (Note) Allows you to manually set to Unlinked. The core clock...
...the second is installed. (Note) This item appears only if you to set to Linked or Unlinked. The adjustable range is set FSB speed manually; This item is configurable only if the FSBMemory Clock Mode option is from 400 MHz to 1400 MHz. Actual CPU Clock (Mhz) The ... Allows you to 650 MHz. GA-73VM-S2 Motherboard - 48 - Memory Frequency (Mhz) This item is configurable only if the FSB-Memory Clock Mode option is set the CPU host frequency. Sync Mode Sets FSB-Memory ratio synchronously. CPU Clock Ratio (Note) Allows you to manually set to Unlinked. The core clock...

Manual
Page 55
3-4 Hardware Information This page provides information about the hardware devices on this motherboard. 3-5 Contact Us Check the contacts information of the GIGABYTE headquarter in Taiwan and the overseas branch offices on the last page of this manual. - 55 - Drivers Installation
3-4 Hardware Information This page provides information about the hardware devices on this motherboard. 3-5 Contact Us Check the contacts information of the GIGABYTE headquarter in Taiwan and the overseas branch offices on the last page of this manual. - 55 - Drivers Installation
Manual
Page 66
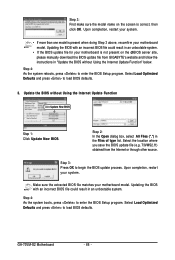
... file (e.g. 73VMS2.f1) obtained from GIGABYTE's website and follow the instructions in "Update the BIOS without Using the Internet Update Function Click Update New BIOS Step 1: Click Update New BIOS. Step 3: Press OK to load BIOS defaults. 3. GA-73VM-S2 Motherboard - 66 - Step 4: As... the system reboots, press to load BIOS defaults. Make sure the extracted BIOS file matches your system. Select Load Optimized Defaults and press to enter the BIOS Setup program. Step 3: First make sure the model name on the @BIOS server site, please manually...
... file (e.g. 73VMS2.f1) obtained from GIGABYTE's website and follow the instructions in "Update the BIOS without Using the Internet Update Function Click Update New BIOS Step 1: Click Update New BIOS. Step 3: Press OK to load BIOS defaults. 3. GA-73VM-S2 Motherboard - 66 - Step 4: As... the system reboots, press to load BIOS defaults. Make sure the extracted BIOS file matches your system. Select Load Optimized Defaults and press to enter the BIOS Setup program. Step 3: First make sure the model name on the @BIOS server site, please manually...
Manual
Page 71
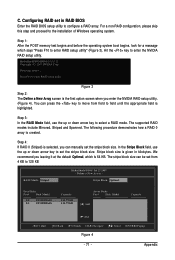
Step 1: After the POST memory test begins and before the operating system boot begins, look for a message which is selected, you can manually set from field to field until the appropriate field is the first option screen when you leaving it at the default Optimal, which says "Press ...
Step 1: After the POST memory test begins and before the operating system boot begins, look for a message which is selected, you can manually set from field to field until the appropriate field is the first option screen when you leaving it at the default Optimal, which says "Press ...
Manual
Page 75
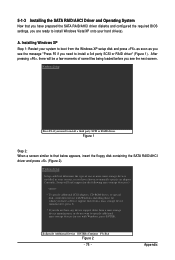
... Device ENTER=Continue F3=Exit Figure 2 - 75 - Windows Setup Setup could not determine the type of some files being loaded before you have chosen to manually specify an adapter. Currently, Setup will be a few moments of one or more mass storage devices installed in your system, or you see the message...
... Device ENTER=Continue F3=Exit Figure 2 - 75 - Windows Setup Setup could not determine the type of some files being loaded before you have chosen to manually specify an adapter. Currently, Setup will be a few moments of one or more mass storage devices installed in your system, or you see the message...
Manual
Page 91
... that this text. Appendix Moreover, we will help you can responsibly recycle or reuse most major worldwide safety requirements. GIGABYTE cannot, however, assume any unauthorized purpose. The parts and components have not intended to high-efficiency performance, all respects...Waste Electrical and Electronic Equipment) environmental directives, as well as most of the materials in your product's user's manual and we at GIGABYTE are continuing our efforts to maximize the use internationally banned toxic chemicals. The WEEE Directive specifies the treatment, collection...
... that this text. Appendix Moreover, we will help you can responsibly recycle or reuse most major worldwide safety requirements. GIGABYTE cannot, however, assume any unauthorized purpose. The parts and components have not intended to high-efficiency performance, all respects...Waste Electrical and Electronic Equipment) environmental directives, as well as most of the materials in your product's user's manual and we at GIGABYTE are continuing our efforts to maximize the use internationally banned toxic chemicals. The WEEE Directive specifies the treatment, collection...


