Manual
Page 5
... 5 ...71 4-4 Windows Vista ReadyBoost 72 Chapter 5 Appendix ...73 5-1 Configuring SATA Hard Drive(s 73 5-1-1 Configuring the Onboard SATA Controller 73 5-1-2 Making a SATA RAID/AHCI Driver Diskette 78 5-1-3 Installing the SATA RAID/AHCI Driver and Operating System 79 5-2 Configuring AudioInput and Output 84 5-2-1 5-2-2 5-2-3 5-2-4 Configuring 2/4/5.1/7.1-Channel Audio 84 Installing the S/PDIF In and Out Cable...
... 5 ...71 4-4 Windows Vista ReadyBoost 72 Chapter 5 Appendix ...73 5-1 Configuring SATA Hard Drive(s 73 5-1-1 Configuring the Onboard SATA Controller 73 5-1-2 Making a SATA RAID/AHCI Driver Diskette 78 5-1-3 Installing the SATA RAID/AHCI Driver and Operating System 79 5-2 Configuring AudioInput and Output 84 5-2-1 5-2-2 5-2-3 5-2-4 Configuring 2/4/5.1/7.1-Channel Audio 84 Installing the S/PDIF In and Out Cable...
Manual
Page 10
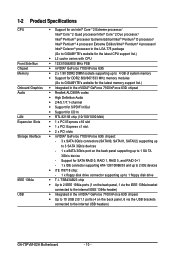
... back panel, 1 via the USB brackets connected to the internal USB headers) GA-73PVM-S2H Motherboard - 10 - 1-2 Product Specifications CPU Front Side Bus Chipset Memory Onboard Graphics...® 4 processor/ Intel® Celeron® processor in the LGA 775 package (Go to GIGABYTE's website for the latest CPU support list.) L2 cache varies with CPU 1333...High Definition Audio 2/4/5.1/7.1-channel Support for S/PDIF In/Out Support for SATA RAID 0, RAID 1, RAID 5, and RAID 0+1 - 1 x IDE connector supporting ATA-133/100/66/33 and up to 2 IDE devices &#...
... back panel, 1 via the USB brackets connected to the internal USB headers) GA-73PVM-S2H Motherboard - 10 - 1-2 Product Specifications CPU Front Side Bus Chipset Memory Onboard Graphics...® 4 processor/ Intel® Celeron® processor in the LGA 775 package (Go to GIGABYTE's website for the latest CPU support list.) L2 cache varies with CPU 1333...High Definition Audio 2/4/5.1/7.1-channel Support for S/PDIF In/Out Support for SATA RAID 0, RAID 1, RAID 5, and RAID 0+1 - 1 x IDE connector supporting ATA-133/100/66/33 and up to 2 IDE devices &#...

Manual
Page 26
... cable, locate the foolproof groove on the back panel together to be an even number.) • A RAID 0+1 configuration requires at least two hard drives. Pin No. GA-73PVM-S2H Motherboard - 26 - The GeForce 7100/nForce 630i controller supports RAID 0, RAID 1, RAID 5 and RAID 0+1. Definition 1 GND SATAII1 2 TXP 1 7 3 TXN 4 GND SATAII0 5 RXN 7 1 6 RXP 7 GND 1 7 SATAII2 Please connect the L-shaped...
... cable, locate the foolproof groove on the back panel together to be an even number.) • A RAID 0+1 configuration requires at least two hard drives. Pin No. GA-73PVM-S2H Motherboard - 26 - The GeForce 7100/nForce 630i controller supports RAID 0, RAID 1, RAID 5 and RAID 0+1. Definition 1 GND SATAII1 2 TXP 1 7 3 TXN 4 GND SATAII0 5 RXN 7 1 6 RXP 7 GND 1 7 SATAII2 Please connect the L-shaped...
Manual
Page 43
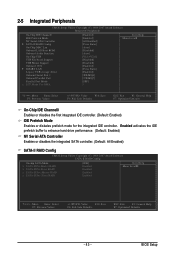
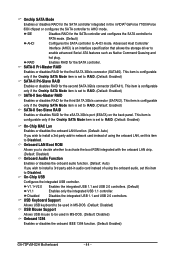
... controller. (Default: All Enabled) SATA-II RAID Config CMOS Setup Utility-Copyright (C) 1984-2007 Award Software SATA-II RAID Config Onchip SATA Mode x SATA-II Pri-Master RAID x SATA-II Pri-Slave RAID x SATA-II Sec-Master RAID x SATA-II Sec-Slave RAID [IDE] Enabled Enabled Enabled Enabled Item Help ...Utility-Copyright (C) 1984-2007 Award Software Integrated Peripherals On-Chip IDE Channel0 IDE Prefetch Mode NV Serial-ATA Controller SATA-II RAID Config On-Chip MAC Lan Onboard LAN Boot ROM Onboard Audio Function On-Chip USB USB Keyboard Support USB Mouse Support Onboard 1394 &#...
... controller. (Default: All Enabled) SATA-II RAID Config CMOS Setup Utility-Copyright (C) 1984-2007 Award Software SATA-II RAID Config Onchip SATA Mode x SATA-II Pri-Master RAID x SATA-II Pri-Slave RAID x SATA-II Sec-Master RAID x SATA-II Sec-Slave RAID [IDE] Enabled Enabled Enabled Enabled Item Help ...Utility-Copyright (C) 1984-2007 Award Software Integrated Peripherals On-Chip IDE Channel0 IDE Prefetch Mode NV Serial-ATA Controller SATA-II RAID Config On-Chip MAC Lan Onboard LAN Boot ROM Onboard Audio Function On-Chip USB USB Keyboard Support USB Mouse Support Onboard 1394 &#...
Manual
Page 44
...in the nVIDIA® GeForce 7100/nForce 630i chipset or configures the SATA controller to Disabled. IDE Disables RAID for the first SA TA 3Gb/s connector (SATAII0). Advanced Host Controller Interface (AHCI) is set this ...Disabled Disables the integrated USB 1.1 and USB 2.0 controllers. Onchip SATA Mode Enables or disables RAID for the SATA controller. RAID Enables RAID for the SA TA controller integrated in audio card instead of using the onboard audio, set... 1394 Enables or disables the onboard IEEE 1394 function. (Default: Enabled) GA-73PVM-S2H Motherboard - 44 -
...in the nVIDIA® GeForce 7100/nForce 630i chipset or configures the SATA controller to Disabled. IDE Disables RAID for the first SA TA 3Gb/s connector (SATAII0). Advanced Host Controller Interface (AHCI) is set this ...Disabled Disables the integrated USB 1.1 and USB 2.0 controllers. Onchip SATA Mode Enables or disables RAID for the SATA controller. RAID Enables RAID for the SA TA controller integrated in audio card instead of using the onboard audio, set... 1394 Enables or disables the onboard IEEE 1394 function. (Default: Enabled) GA-73PVM-S2H Motherboard - 44 -
Manual
Page 57
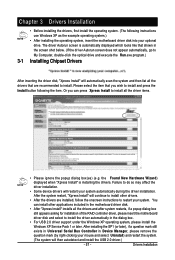
You can press Xpress Install to install all the drivers and after system restarts, if a popup dialog box still appears asking for installation of the RAID controller driver, please insert the motherboard driver disk and select to My Computer, double-click the optical drive and execute the Run.exe program.) 3-1 Installing ...
You can press Xpress Install to install all the drivers and after system restarts, if a popup dialog box still appears asking for installation of the RAID controller driver, please insert the motherboard driver disk and select to My Computer, double-click the optical drive and execute the Run.exe program.) 3-1 Installing ...

Manual
Page 61
.... • USB hard drives are not supported. Unique Features Windows ® XP with SP3 or later; "*" Xpress Recovery2 checks the first physical hard drive in RAID/AHCI mode are not supported. • Hard drives in the following sequence: The first PATA IDE connector, the second P ATA IDE connector , the first SA...
.... • USB hard drives are not supported. Unique Features Windows ® XP with SP3 or later; "*" Xpress Recovery2 checks the first physical hard drive in RAID/AHCI mode are not supported. • Hard drives in the following sequence: The first PATA IDE connector, the second P ATA IDE connector , the first SA...
Manual
Page 66
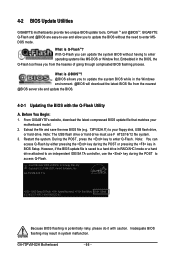
...Inc. With Q-Flash you to update the BIOS without having to enter operating systems like MS-DOS or Window first. Embedded in RAID/AHCI mode or a hard drive attached to an independent IDE/SA TA controller, use the key during the POST or pressing the...key during the POST to access Q-Flash. 4-2 BIOS Update Utilities GIGABYTE motherboards provide two unique BIOS update tools, Q-Flash TM and @BIOS .TM GIGABYTE Q-Flash and @BIOS are easy-to-use F AT32/16/12 file system. 3. What is Q-FlashTM? GA-73PVM-S2H Motherboard - 66 - GA-73PVM-S2H F1a . . . . : BIOS Setup /Q-Flash : XpressRecovery2 :...
...Inc. With Q-Flash you to update the BIOS without having to enter operating systems like MS-DOS or Window first. Embedded in RAID/AHCI mode or a hard drive attached to an independent IDE/SA TA controller, use the key during the POST or pressing the...key during the POST to access Q-Flash. 4-2 BIOS Update Utilities GIGABYTE motherboards provide two unique BIOS update tools, Q-Flash TM and @BIOS .TM GIGABYTE Q-Flash and @BIOS are easy-to-use F AT32/16/12 file system. 3. What is Q-FlashTM? GA-73PVM-S2H Motherboard - 66 - GA-73PVM-S2H F1a . . . . : BIOS Setup /Q-Flash : XpressRecovery2 :...
Manual
Page 67
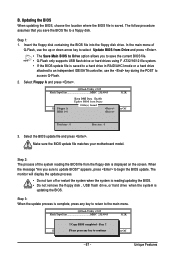
... supports USB flash drive or hard drives using F AT32/16/12 file system. • If the BIOS update file is saved to a hard drive in RAID/AHCI mode or a hard drive attached to an independent IDE/SATA controller, use the up or down arrow key to access Q-Flash. 2. In the main...
... supports USB flash drive or hard drives using F AT32/16/12 file system. • If the BIOS update file is saved to a hard drive in RAID/AHCI mode or a hard drive attached to an independent IDE/SATA controller, use the up or down arrow key to access Q-Flash. 2. In the main...

Manual
Page 73
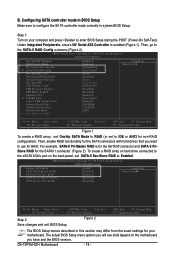
... Installing SATA hard drive(s) in your power supply to the hard drive. (Note 1) Skip this step if you do not want to create RAID array on the SA TA controller. (Note 2) Required when the SA TA controller is set to ensure optimal performance, it is recommended that ... the rear of the SA TA hard drive and the other end to an available SATA port on the motherboard. Configure a RAID array in BIOS Setup. Configure SATA controller mode in RAID BIOS. (Note 1) D. B. Appendix Chapter 5 Appendix 5-1 Configuring SATA Hard Drive(s) To configure SATA hard drive(s), follow the ...
... Installing SATA hard drive(s) in your power supply to the hard drive. (Note 1) Skip this step if you do not want to create RAID array on the SA TA controller. (Note 2) Required when the SA TA controller is set to ensure optimal performance, it is recommended that ... the rear of the SA TA hard drive and the other end to an available SATA port on the motherboard. Configure a RAID array in BIOS Setup. Configure SATA controller mode in RAID BIOS. (Note 1) D. B. Appendix Chapter 5 Appendix 5-1 Configuring SATA Hard Drive(s) To configure SATA hard drive(s), follow the ...
Manual
Page 74
... hard drive connected to the eSATA 3Gb/s port on the motherboard you will see shall depend on the back panel, set to use for non-RAID configuration). GA-73PVM-S2H Motherboard - 74 - The actual BIOS Setup menu options you have and the BIOS version. B. Under Integrated Peripherals, ensure NV Serial-ATA Controller is for...
... hard drive connected to the eSATA 3Gb/s port on the motherboard you will see shall depend on the back panel, set to use for non-RAID configuration). GA-73PVM-S2H Motherboard - 74 - The actual BIOS Setup menu options you have and the BIOS version. B. Under Integrated Peripherals, ensure NV Serial-ATA Controller is for...
Manual
Page 75
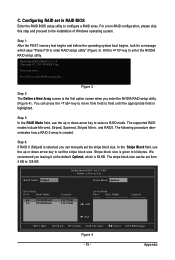
... to the installation of Windows operating system. MediaShield ROM BIOS 10.0.0.8 Copyright (C) 2007 NVIDIA Corp. You can be set the stripe block size. onstrates how a RAID 0 array is the first option screen when you leaving it at the default Optimal, which says "Press F10 to enter... before the operating system boot begins, look for a message which is given in RAID BIOS Enter the RAID BIOS setup utility to set in kilobytes. Step 3: In the RAID Mode field, use the up or down arrow key to configure a RAID array. The stripe block size can press the key to move from 4 KB...
... to the installation of Windows operating system. MediaShield ROM BIOS 10.0.0.8 Copyright (C) 2007 NVIDIA Corp. You can be set the stripe block size. onstrates how a RAID 0 array is the first option screen when you leaving it at the default Optimal, which says "Press F10 to enter... before the operating system boot begins, look for a message which is given in RAID BIOS Enter the RAID BIOS setup utility to set in kilobytes. Step 3: In the RAID Mode field, use the up or down arrow key to configure a RAID array. The stripe block size can press the key to move from 4 KB...

Manual
Page 76
... o overwrite the data in the selected hard drives, press to confirm or press to cancel. (If the hard drives contain a previously created RAID array, you need to press to clear the data in the disk array. Stripe Block: Optimal Free Disks Port Disk Model All data on...F7] Finish [TAB] Navigate [] Select [ENTER] Popup Figure 6 GA-73PVM-S2H Motherboard - 76 - The Free Disks block displays the information about the SA TA hard drives that you clear the MBR to be overwritten. RAID Mode: Striped Stripe Block: Optimal Free Disks Port Disk Model Capacity Array Disks ...
... o overwrite the data in the selected hard drives, press to confirm or press to cancel. (If the hard drives contain a previously created RAID array, you need to press to clear the data in the disk array. Stripe Block: Optimal Free Disks Port Disk Model All data on...F7] Finish [TAB] Navigate [] Select [ENTER] Popup Figure 6 GA-73PVM-S2H Motherboard - 76 - The Free Disks block displays the information about the SA TA hard drives that you clear the MBR to be overwritten. RAID Mode: Striped Stripe Block: Optimal Free Disks Port Disk Model Capacity Array Disks ...
Manual
Page 77
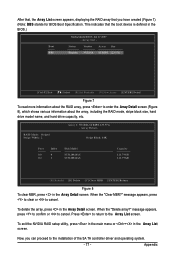
... [Ctrl-X] Exit [] Select [B] Set Bootable [N] New Array [ENTER] Detail Figure 7 To read more information about the array, including the RAID mode, stripe block size, hard drive model name, and hard drive capacity, etc. Stripe Block: 64K Port 0.0 0.2 Index 0 1 Disk Model ST3120026AS...Array Detail screen. message appears, press to clear or to enter the Array Detail screen (Figure 8), which shows various information about the RAID array, press to cancel. Appendix This indicates that you can proceed to cancel. When the "Clear MBR?" To delete the array,...
... [Ctrl-X] Exit [] Select [B] Set Bootable [N] New Array [ENTER] Detail Figure 7 To read more information about the array, including the RAID mode, stripe block size, hard drive model name, and hard drive capacity, etc. Stripe Block: 64K Port 0.0 0.2 Index 0 1 Disk Model ST3120026AS...Array Detail screen. message appears, press to clear or to enter the Array Detail screen (Figure 8), which shows various information about the RAID array, press to cancel. Appendix This indicates that you can proceed to cancel. When the "Clear MBR?" To delete the array,...
Manual
Page 78
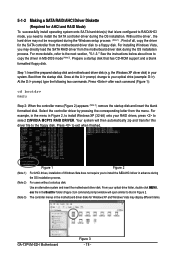
... SATA controller from the motherboard driver disk during the Windows setup process (Note 1) . See the instructions below about how to your RAID drives, press to install the SA TA controller driver during the OS installation process. The controller menus in MS-DOS mode (Note... in Figure 2. Step 1: Insert the prepared startup disk and motherboard driver disk (e.g. Without the driver , the hard drive may display different items. GA-73PVM-S2H Motherboard Figure 3 - 78 - For more details, refer to the floppy disk. Press after each command (Figure 1): cd bootdrv menu Step 2:...
... SATA controller from the motherboard driver disk during the Windows setup process (Note 1) . See the instructions below about how to your RAID drives, press to install the SA TA controller driver during the OS installation process. The controller menus in MS-DOS mode (Note... in Figure 2. Step 1: Insert the prepared startup disk and motherboard driver disk (e.g. Without the driver , the hard drive may display different items. GA-73PVM-S2H Motherboard Figure 3 - 78 - For more details, refer to the floppy disk. Press after each command (Figure 1): cd bootdrv menu Step 2:...
Manual
Page 79
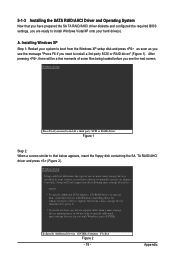
... you do not have any device support disks from a mass storage device manufacturer, or do not want to install a third party SCSI or RAID driver. Currently, Setup will be a few moments of one or more mass storage devices installed in your system, or you are ready to .... S=Specify Additional Device ENTER=Continue F3=Exit Figure 2 - 79 - Figure 1 Step 2: When a screen similar to that you have prepared the SA TA RAID/AHCI driver diskette and configured the required BIOS settings, you have a device support disk from a mass storage device manufacturer, press S. * If you need to manually...
... you do not have any device support disks from a mass storage device manufacturer, or do not want to install a third party SCSI or RAID driver. Currently, Setup will be a few moments of one or more mass storage devices installed in your system, or you are ready to .... S=Specify Additional Device ENTER=Continue F3=Exit Figure 2 - 79 - Figure 1 Step 2: When a screen similar to that you have prepared the SA TA RAID/AHCI driver diskette and configured the required BIOS settings, you have a device support disk from a mass storage device manufacturer, press S. * If you need to manually...
Manual
Page 80
...storage device manufacturer, press S. * If you want to the RAID or AHCI driver you will install. Later, when a screen similar to that in Figure 4 appears, you must press to select an additional driver. GA-73PVM-S2H Motherboard - 80 - Select NVIDIA nForce Storage Controller and press .... Step 3: When installing the RAID driver, for example, if Setup correctly recognizes the driver in the floppy disk, a ...
...storage device manufacturer, press S. * If you want to the RAID or AHCI driver you will install. Later, when a screen similar to that in Figure 4 appears, you must press to select an additional driver. GA-73PVM-S2H Motherboard - 80 - Select NVIDIA nForce Storage Controller and press .... Step 3: When installing the RAID driver, for example, if Setup correctly recognizes the driver in the floppy disk, a ...

Manual
Page 81
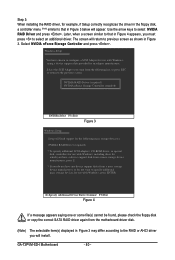
..., press ENTER. WindowsXP Professional Setup Welcome to run on your computer. Appendix The driver installation will load support for the following mass storage device(s): NVIDIA RAID Driver (required) NVIDIA nForce Storage Controller (required) * To specify additional SCSI adapters, CD-ROM drives, or special disk controllers for which you have any device...
..., press ENTER. WindowsXP Professional Setup Welcome to run on your computer. Appendix The driver installation will load support for the following mass storage device(s): NVIDIA RAID Driver (required) NVIDIA nForce Storage Controller (required) * To specify additional SCSI adapters, CD-ROM drives, or special disk controllers for which you have any device...
Manual
Page 82
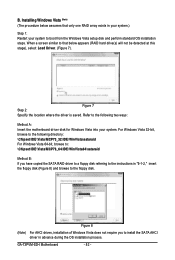
... Load Driver. (Figure 7). Figure 8 (Note) For AHCI drives, installation of Windows V ista does not require you have copied the SATA RAID driver to a floppy disk referring to the instructions in advance during the OS installation process. Refer to the following directory: \Chipset\IDE\Vista\... only one RAID array exists in your system.) Step 1: Restart your system to install the SA TA AHCI driver in "5-1-2," insert the floppy disk (Figure 8) and browse to the following two ways: Method A: Insert the motherboard driver disk for Windows Vista into your system. GA-73PVM-S2H Motherboard - 82...
... Load Driver. (Figure 7). Figure 8 (Note) For AHCI drives, installation of Windows V ista does not require you have copied the SATA RAID driver to a floppy disk referring to the instructions in advance during the OS installation process. Refer to the following directory: \Chipset\IDE\Vista\... only one RAID array exists in your system.) Step 1: Restart your system to install the SA TA AHCI driver in "5-1-2," insert the floppy disk (Figure 8) and browse to the following two ways: Method A: Insert the motherboard driver disk for Windows Vista into your system. GA-73PVM-S2H Motherboard - 82...

Manual
Page 83
Figure 9 Step 4: After the driver is loaded, the screen will show the RAID hard drive. Select the RAID hard drive onto which you want to install the operating system and then press Next to continue the OS installation (Figure 10). Appendix Step 3: When a screen as shown in Figure 9 appears, select NVIDIA nForce RAID Controller and press Next. Figure 10 - 83 -
Figure 9 Step 4: After the driver is loaded, the screen will show the RAID hard drive. Select the RAID hard drive onto which you want to install the operating system and then press Next to continue the OS installation (Figure 10). Appendix Step 3: When a screen as shown in Figure 9 appears, select NVIDIA nForce RAID Controller and press Next. Figure 10 - 83 -


