Gigabyte G1.Sniper M3 Support and Manuals
Get Help and Manuals for this Gigabyte item
View All Support Options Below
Free Gigabyte G1.Sniper M3 manuals!
Problems with Gigabyte G1.Sniper M3?
Ask a Question
Free Gigabyte G1.Sniper M3 manuals!
Problems with Gigabyte G1.Sniper M3?
Ask a Question
Gigabyte G1.Sniper M3 Videos

3570K + Gigabyte G1 Sniper M3 problem [SOLVED]
Duration: :16
Total Views: 1,532
Duration: :16
Total Views: 1,532
Newegg TV: GIGABYTE G1.Sniper M3 Motherboard Overview
Duration: 13:46
Total Views: 23,131
Duration: 13:46
Total Views: 23,131
Gigabyte Z77 G1.Sniper M3 Motherboard Unboxing + Written Review
Duration: 6:50
Total Views: 4,592
Duration: 6:50
Total Views: 4,592
Gigabyte Z77 G1 Sniper M3 Preview
Duration: 7:00
Total Views: 22,701
Duration: 7:00
Total Views: 22,701
Popular Gigabyte G1.Sniper M3 Manual Pages
User Manual - Page 4
... G1.Sniper M3 Motherboard Block Diagram 8
Chapter 1 Hardware Installation 9 1-1 Installation Precautions 9 1-2 Product Specifications 10 1-3 Installing the CPU and CPU Cooler 13
1-3-1 Installing the CPU 13 1-3-2 Installing the CPU Cooler 15 1-4 Installing the Memory 16 1-4-1 Dual Channel Memory Configuration 16 1-4-2 Installing a Memory 17 1-5 Installing an Expansion Card 18 1-6 Setting...
User Manual - Page 6
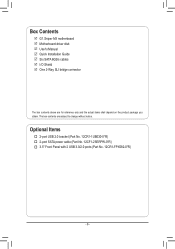
.... 12CR1-1UB030-5*R) †† 2-port SATA power cable (Part No. 12CF1-2SERPW-0*R) †† 3.5" Front Panel with 2 USB 3.0/2.0 ports (Part No. 12CR1-FPX582-0*R)
- 6 -
Box Contents
55 G1.Sniper M3 motherboard 55 Motherboard driver disk 55 User's Manual 55 Quick Installation Guide 55 Six SATA 6Gb/s cables 55 I/O Shield 55 One 2-Way SLI bridge connector
The box contents above are subject...
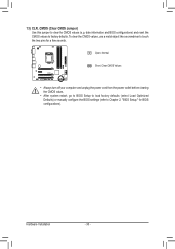
User Manual - Page 8
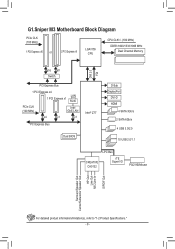
G1.Sniper M3 Motherboard Block Diagram
PCIe CLK (100 MHz)
1 PCI Express x16 or
2 PCI Express x8
LGA1155 CPU
CPU CLK+/- (100 MHz) DDR3 1600/1333/1066 MHz Dual Channel Memory
x16 x8 Switch
PCI Express Bus
1 PCI Express x4 LAN
1 PCI Express x1 RJ45
PCIe CLK (100 MHz)
Intel GbE LAN
x4
x1
x1
PCI Express...
User Manual - Page 12
... CPU/system fan speed control function is supported will depend on the CPU/system cooler you install.
2 x 64 Mbit flash Use of licensed AMI EFI BIOS Support for DualBIOS™ PnP 1.0a, DMI 2.0, SM BIOS 2.6, ACPI 2.0a
Support for @BIOS Support for Q-Flash Support for Xpress Install Support for Xpress Recovery2 Support for Microsoft® Windows 7
Form Factor ŠŠ Micro ATX Form Factor...
User Manual - Page 18
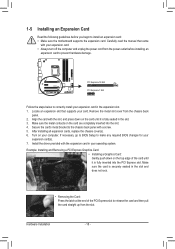
...to BIOS Setup to make any required BIOS ...and unplug the power cord from the power outlet before you begin to install an expansion card: •• Make sure the motherboard supports the expansion ... back
panel. 2. Carefully read the manual that supports your computer. Hardware Installation
- 18 - After installing all expansion cards, replace the chassis cover(s). 6. Locate an expansion...
User Manual - Page 21
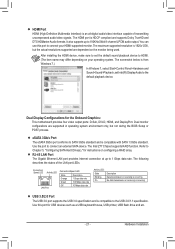
... interface capable of the LAN port LEDs.
Refer to Chapter 5, "Configuring SATA Hard Drive(s)," for instructions on your HDMI-supported monitor.
After installing the HDMI device, make sure to set Intel(R) Display Audio to 192KHz/24bit 8-channel LPCM audio output.
RJ-45 LAN Port The Gigabit Ethernet LAN port provides Internet connection at up to the default...
User Manual - Page 29
... SUSCLK
Voltage measurement points(G1.Sniper 3)
BIOS Switcher (SW4)
- 29 -
DB_PORT15 SSTX2-
6 SSTX1+
16 GND
1
20
7 GND
8 D1-
17 SSRX2+ 18 SSRX2-
9 D1+
19 VBUS
10 NC
Voltage meas2u0rementNmoodPuilne(X58A-OC)
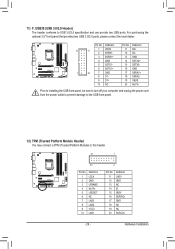
TPM
Prior to installing the USwB/hofurosingt panel, be sure to turn off your computer and unplug the power cord
from the power outlet to prevent...
User Manual - Page 30
Hardware Installation
- 30 - 13) CLR_CMOS (Clear CMOS Jumper) Use this jumper to factory defaults.
Open: Normal
Short: Clear CMOS Values
•• Always turn off your computer and unplug the power cord from the power outlet before clearing the CMOS values.
•• After system restart, go to BIOS Setup to load factory defaults (select Load Optimized Defaults) or manually ...
User Manual - Page 31
To flash the BIOS, do not encounter problems using the current version of BIOS, it with caution. When the power is turned on the motherboard. For instructions on the motherboard supplies the necessary power to the CMOS to boot. If this occurs, try to clear the CMOS values and reset the board to default values. (Refer to the "Load Optimized Defaults" section in this...
User Manual - Page 37
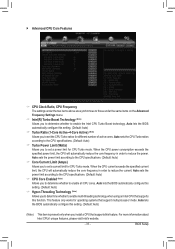
...)
&& Hyper-Threading Technology (Note) Allows you to determine whether to enable multi-threading technology when using an Intel CPU that support multi-processor mode. BIOS Setup Auto sets the CPU Turbo ratios according to the CPU specifications. (Default: Auto)
&& Turbo Power Limit (Watts) Allows you to determine whether to enable all CPU cores. For more information about...
User Manual - Page 55
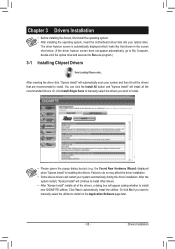
You can click the Install All button and "Xpress Install" will install all of the drivers, a dialog box will appear asking whether to install new GIGABYTE utilities. After the system restart, "Xpress Install" will continue to do so may affect the driver installation.
•• Some device drivers will automatically scan your system and then list all the drivers that shown in the...
User Manual - Page 62
... of system safety, users cannot update the backup BIOS manually.
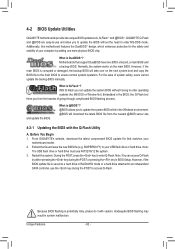
Motherboards that matches your computer by either pressing the key during the POST to update the system BIOS while in BIOS Setup. What is Q-Flash™? Before You Begin 1. 4-2 BIOS Update Utilities
GIGABYTE motherboards provide two unique BIOS update tools, Q-Flash™ and @BIOS™. However, if the main...
User Manual - Page 68

... drive in the Intel Chipset. (Note 2) It is added. Without the driver, the hard drive may not be able to Chapter 5, "Installing the SATA RAID/AHCI Driver and Operating System." )
Step 3: Install the motherboard drivers and the X.H.D utiltiy After installing the operating system, insert the motherboard driver disk. To manually set up all motherboard drivers, including the X.H.D utility...
User Manual - Page 74
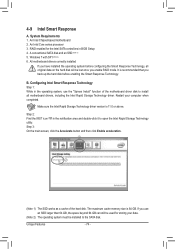
... driver. Step 2: Find the IRST icon in BIOS Setup 4. System Requirements 1. A conventional SATA disk and an SSD (Note 1) 5.
Unique Features
- 74 - Step 3: On the main screen, click the Accelerate button and then click Enable acceleration. An Intel Chipset-based motherboard 2. Windows 7 with SP1 (Note 2) 6. Restart your data.
(Note 2) The operating system must be installed...
User Manual - Page 85
... d[isDkISfoKr/rVebOuLilUdiMngE(IENSFCOtRoMexAitT):ION ]
RAID Volumes : None definedID. Option ROM - 11.0.0.1339 Copyright(C) 2003-11 Intel Corporation. Selecting4. All Rights Reserved.
[ MAIN MENU ]
1.
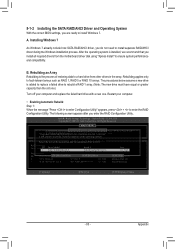
5-1-2 Installing the SATA RAID/AHCI Driver and Operating System
With the correct BIOS settings, you install all required drivers from other drives in the operating system.
Gigabyte G1.Sniper M3 Reviews
We have not received any reviews for Gigabyte yet.