Manual
Page 1
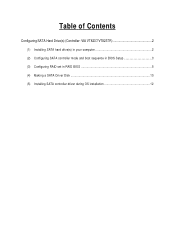
Table of Contents Configuring SATA Hard Drive(s) (Controller: VIA VT8237/VT8237R 2 (1) Installing SATA hard drive(s) in your computer 2 (2) Configuring SATA controller mode and boot sequence in BIOS Setup 3 (3) Configuring RAID set in RAID BIOS 5 (4) Making a SATA Driver Disk 10 (5) Installing SATA controller driver during OS installation 12
Table of Contents Configuring SATA Hard Drive(s) (Controller: VIA VT8237/VT8237R 2 (1) Installing SATA hard drive(s) in your computer 2 (2) Configuring SATA controller mode and boot sequence in BIOS Setup 3 (3) Configuring RAID set in RAID BIOS 5 (4) Making a SATA Driver Disk 10 (5) Installing SATA controller driver during OS installation 12
Manual
Page 2
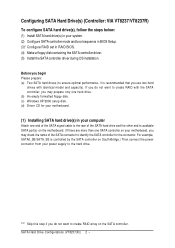
...;¤ (1) Install SATA hard drive(s) in your system. ¤å (2) Configure SATA controller mode and boot sequence in BIOS Setup. (3)* Configure RAID set in your computer Attach one end of the SATA signal cable to the rear of the SATA hard drive and the other end to available SATA port(s) on the motherboard. (If there are more than one SATA controller on your motherboard, you may prepare only one hard drive. (b) An empty formatted floppy disk. (c) Windows XP/2000 setup disk. (d) Driver CD...
...;¤ (1) Install SATA hard drive(s) in your system. ¤å (2) Configure SATA controller mode and boot sequence in BIOS Setup. (3)* Configure RAID set in your computer Attach one end of the SATA signal cable to the rear of the SATA hard drive and the other end to available SATA port(s) on the motherboard. (If there are more than one SATA controller on your motherboard, you may prepare only one hard drive. (b) An empty formatted floppy disk. (c) Windows XP/2000 setup disk. (d) Driver CD...
Manual
Page 3
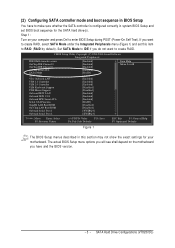
... BIOS Setup menu options you will see shall depend on your motherboard. SATA Hard Drive Configurations (VT8237(R)) Set SATA Mode to IDE if you want to create RAID. CMOS Setup Utility-Copyright (C) 1984-2004 Award Software Integrated Peripherals IDE DMA transfer access OnChip IDE Channel 0 OnChip IDE Channel 1 OnChip Serial ATA SATA Mode AC97 Audio VIA Onboard LAN USB 1.1 Controller USB 2.0 Controller USB Keyboard Support USB Mouse Support Onboard H/W LAN Onboard H/W 1394 Onboard H/W Serial ATA Serial ATA Function GigaBit LAN Boot ROM On-Chip LAN Boot ROM Onboard Serial Port 1 Onboard...
... BIOS Setup menu options you will see shall depend on your motherboard. SATA Hard Drive Configurations (VT8237(R)) Set SATA Mode to IDE if you want to create RAID. CMOS Setup Utility-Copyright (C) 1984-2004 Award Software Integrated Peripherals IDE DMA transfer access OnChip IDE Channel 0 OnChip IDE Channel 1 OnChip Serial ATA SATA Mode AC97 Audio VIA Onboard LAN USB 1.1 Controller USB 2.0 Controller USB Keyboard Support USB Mouse Support Onboard H/W LAN Onboard H/W 1394 Onboard H/W Serial ATA Serial ATA Function GigaBit LAN Boot ROM On-Chip LAN Boot ROM Onboard Serial Port 1 Onboard...

Manual
Page 4
... Menu Level} Second Boot Device [Hard Disk] Third Boot Device [CDROM] Boot Up Floopy Seek Password Check Flexible AGP 8X [Disabled] [Setup] [Auto] Init Display First [AGP] higf: Move Enter: Select F5: Previous Values Step 4: Save and exit BIOS Setup. +/-/PU/PD: Value F10: Save F6: Fail-Safe Defaults Figure 3 ESC: Exit F1: General Help F7: Optimized Defaults SATA Hard Drive Configurations (VT8237(R)) 4 - CMOS Setup Utility-Copyright (C) 1984-2004 Award Software Hard Disk Boot Priority 1. Bootable Add-in Cards Item Help Menu Level }} Use...
... Menu Level} Second Boot Device [Hard Disk] Third Boot Device [CDROM] Boot Up Floopy Seek Password Check Flexible AGP 8X [Disabled] [Setup] [Auto] Init Display First [AGP] higf: Move Enter: Select F5: Previous Values Step 4: Save and exit BIOS Setup. +/-/PU/PD: Value F10: Save F6: Fail-Safe Defaults Figure 3 ESC: Exit F1: General Help F7: Optimized Defaults SATA Hard Drive Configurations (VT8237(R)) 4 - CMOS Setup Utility-Copyright (C) 1984-2004 Award Software Hard Disk Boot Priority 1. Bootable Add-in Cards Item Help Menu Level }} Use...
Manual
Page 10
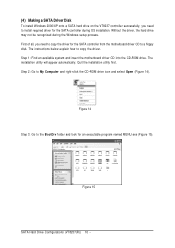
... a SATA Driver Disk Åé To install Windows 2000/XP onto a SATA hard drive on the VT8237 controller successfully, you need to install required driver for the SATA controller from the motherboard driver CD to a floppy disk. The instructions below explain how to the BootDrv folder and look for an executable program named MENU.exe (Figure 15). Figure 15 SATA Hard Drive Configurations (VT8237(R)) 10 - Step 1: Find an available system and insert the motherboard driver...
... a SATA Driver Disk Åé To install Windows 2000/XP onto a SATA hard drive on the VT8237 controller successfully, you need to install required driver for the SATA controller from the motherboard driver CD to a floppy disk. The instructions below explain how to the BootDrv folder and look for an executable program named MENU.exe (Figure 15). Figure 15 SATA Hard Drive Configurations (VT8237(R)) 10 - Step 1: Find an available system and insert the motherboard driver...

Manual
Page 12
... Windows, press ENTER. Windows Setup Setup could not determine the type of ¤¤ Windows XP installation. ¤å Step 1: Restart your system to boot from a mass storage device manufacturer, or do not have a device support disk from a mass storage device manufacturer, press S. * If you need to specify additional mass storage devices for use with Windows, including those for use with the SATA driver. The following mass storage devices(s) * To specify additional SCSI adapters, CD-ROM drives...
... Windows, press ENTER. Windows Setup Setup could not determine the type of ¤¤ Windows XP installation. ¤å Step 1: Restart your system to boot from a mass storage device manufacturer, or do not have a device support disk from a mass storage device manufacturer, press S. * If you need to specify additional mass storage devices for use with Windows, including those for use with the SATA driver. The following mass storage devices(s) * To specify additional SCSI adapters, CD-ROM drives...

Manual
Page 14
... Setup. To set up Windows XP now, press ENTER. To repair a Windows XP installation using Recovery Console, press R. After that, the driver will have to be installed under Windows once for that you have to be installed.) SATA Hard Drive Configurations (VT8237(R)) 14 - WindowsXP Professional Setup Welcome to run on your computer. Enter= Continue R=Repair F3=Exit Figure 19 (Note: Each time you should see a screen as below. Ác After the SATA controller driver installation...
... Setup. To set up Windows XP now, press ENTER. To repair a Windows XP installation using Recovery Console, press R. After that, the driver will have to be installed under Windows once for that you have to be installed.) SATA Hard Drive Configurations (VT8237(R)) 14 - WindowsXP Professional Setup Welcome to run on your computer. Enter= Continue R=Repair F3=Exit Figure 19 (Note: Each time you should see a screen as below. Ác After the SATA controller driver installation...
User Manual
Page 4
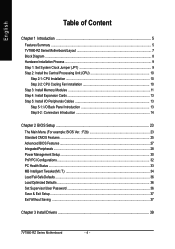
... Summary ...5 7VT880-RZ Series Motherboard Layout 7 Block Diagram ...8 Hardware Installation Process ...9 Step 1: Set System Clock Jumper (JP1 9 Step 2: Install the Central Processing Unit (CPU 10 Step 2-1: CPU Installation 10 Step 2-2: CPU Cooling Fan Installation 10 Step 3: Install Memory Modules 11 Step 4: Install Expansion Cards 13 Step 5: Install I/O Peripherals Cables 13 Step 5-1: I/O Back Panel Introduction 13 Step 5-2 : Connectors Introduction 14 Chapter 2 BIOS Setup 23 The Main Menu (For example: BIOS Ver. : F2b 23 Standard CMOS Features ...25 Advanced BIOS Features ...27...
... Summary ...5 7VT880-RZ Series Motherboard Layout 7 Block Diagram ...8 Hardware Installation Process ...9 Step 1: Set System Clock Jumper (JP1 9 Step 2: Install the Central Processing Unit (CPU 10 Step 2-1: CPU Installation 10 Step 2-2: CPU Cooling Fan Installation 10 Step 3: Install Memory Modules 11 Step 4: Install Expansion Cards 13 Step 5: Install I/O Peripherals Cables 13 Step 5-1: I/O Back Panel Introduction 13 Step 5-2 : Connectors Introduction 14 Chapter 2 BIOS Setup 23 The Main Menu (For example: BIOS Ver. : F2b 23 Standard CMOS Features ...25 Advanced BIOS Features ...27...

User Manual
Page 5
... FDD connection, allows connection of licensed AWARD BIOS Supports Q-Flash (Note 1) It is recommended to be continued...... to use SATA (1.5Gb/s) hard disks. Line Out ; Introduction MIC In Supports 2 / 4 / 6 channel audio Supports SPDIF In/Out connection CD In/AUX In/Game connector Use of 2 FDD devices 1 parallel port supporting Normal/EPP/ECP mode 2 serial ports (COMA, COMB) 8 USB 2.0/1.1 ports (rear x 4, front x 4 via cable) 1 front audio connector 1 IR connector 1 PS/2 keyboard port 1 PS/2 mouse port RTL8100C* 1 RJ45 port* ALC655 CODEC Supports Line In ; "*" For 7VT880-RZ only...
... FDD connection, allows connection of licensed AWARD BIOS Supports Q-Flash (Note 1) It is recommended to be continued...... to use SATA (1.5Gb/s) hard disks. Line Out ; Introduction MIC In Supports 2 / 4 / 6 channel audio Supports SPDIF In/Out connection CD In/AUX In/Game connector Use of 2 FDD devices 1 parallel port supporting Normal/EPP/ECP mode 2 serial ports (COMA, COMB) 8 USB 2.0/1.1 ports (rear x 4, front x 4 via cable) 1 front audio connector 1 IR connector 1 PS/2 keyboard port 1 PS/2 mouse port RTL8100C* 1 RJ45 port* ALC655 CODEC Supports Line In ; "*" For 7VT880-RZ only...

User Manual
Page 6
... bus frequencies properly will depend on your system can run under these specific bus frequencies are not the standard specifications for CPU, chipset and most of up to set the CPU host frequency in accordance with your processor's specifications. supports JBOD function - Whether your hardware configurations, including CPU, Chipsets, Memory, Cards....etc. 7VT880-RZ Series Motherboard - 6 - English I/O Control Hardware Monitor Onboard SATA RAID Additional Features Form Factor IT8705F CPU / System fan speed detection System voltage detection CPU temperature detection CPU / System fan...
... bus frequencies properly will depend on your system can run under these specific bus frequencies are not the standard specifications for CPU, chipset and most of up to set the CPU host frequency in accordance with your processor's specifications. supports JBOD function - Whether your hardware configurations, including CPU, Chipsets, Memory, Cards....etc. 7VT880-RZ Series Motherboard - 6 - English I/O Control Hardware Monitor Onboard SATA RAID Additional Features Form Factor IT8705F CPU / System fan speed detection System voltage detection CPU temperature detection CPU / System fan...
User Manual
Page 17
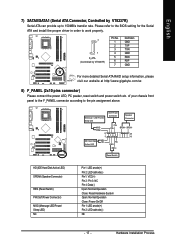
... LED) SPEAK (Speaker Connector) RES (Reset Switch) PW (Soft Power Connector) MSG (Message LED/Power/ Sleep LED) NC Pin 1: LED anode(+) Pin 2: LED cathode(-) Pin 1: VCC(+) Pin 2- Message LED/Power/ Sleep LED MSGMSG+ 2 1 IDE Hard Disk HHDD+- Pin 3: NC Pin 4: Data(-) Open: Normal Operation Close: Reset Hardware System Open: Normal Operation Close: Power On/Off Pin 1: LED anode(+) Pin 2: LED cathode(-) NC - 17 - Hardware Installation Process of your chassis front panel to the F_PANEL connector according to 150MB/s transfer rate. Please refer to the BIOS setting for the Serial...
... LED) SPEAK (Speaker Connector) RES (Reset Switch) PW (Soft Power Connector) MSG (Message LED/Power/ Sleep LED) NC Pin 1: LED anode(+) Pin 2: LED cathode(-) Pin 1: VCC(+) Pin 2- Message LED/Power/ Sleep LED MSGMSG+ 2 1 IDE Hard Disk HHDD+- Pin 3: NC Pin 4: Data(-) Open: Normal Operation Close: Reset Hardware System Open: Normal Operation Close: Power On/Off Pin 1: LED anode(+) Pin 2: LED cathode(-) NC - 17 - Hardware Installation Process of your chassis front panel to the F_PANEL connector according to 150MB/s transfer rate. Please refer to the BIOS setting for the Serial...

User Manual
Page 19
... to the stand by voltage. Remove memory modules only when AC power cord is on. Please note, you can have front audio connector. Definition 1 MIC 2 GND 3 MIC_BIAS 4 POWER 5 FrontAudio(R) 6 Rear Audio (R)/ Return R 7 NC 8 No Pin 9 FrontAudio (L) 10 Rear Audio (L)/ Return L Please contact your chassis must remove jumpers on the MB header. In order to utilize the front audio header, your nearest dealer for optional SUR_CEN cable. 1 2 5 6 Pin No. 1 2 3 4 5 6 Definition SUR...
... to the stand by voltage. Remove memory modules only when AC power cord is on. Please note, you can have front audio connector. Definition 1 MIC 2 GND 3 MIC_BIAS 4 POWER 5 FrontAudio(R) 6 Rear Audio (R)/ Return R 7 NC 8 No Pin 9 FrontAudio (L) 10 Rear Audio (L)/ Return L Please contact your chassis must remove jumpers on the MB header. In order to utilize the front audio header, your nearest dealer for optional SUR_CEN cable. 1 2 5 6 Pin No. 1 2 3 4 5 6 Definition SUR...

User Manual
Page 24
... auto-detected temperature, voltage, and fan speed. • MB Intelligent Tweaker (M.I.T.) This setup page allows to control CPU clock and frequency ratio. • Load Fail-Safe Defaults Fail-Safe Defaults indicates the value of the system parameters with which the system would be in best performance configuration. • Set Supervisor Password Change, set , or disable password. It allows you to limit access to the system. • Save & Exit Setup Save CMOS value settings to BIOS Setup. • Set User Password Change, set , or disable password...
... auto-detected temperature, voltage, and fan speed. • MB Intelligent Tweaker (M.I.T.) This setup page allows to control CPU clock and frequency ratio. • Load Fail-Safe Defaults Fail-Safe Defaults indicates the value of the system parameters with which the system would be in best performance configuration. • Set Supervisor Password Change, set , or disable password. It allows you to limit access to the system. • Save & Exit Setup Save CMOS value settings to BIOS Setup. • Set User Password Change, set , or disable password...
User Manual
Page 25
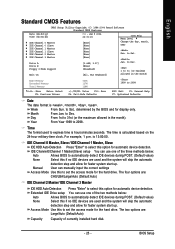
... display only. BIOS Setup For example, 1 p.m. Extended IDE Drive setup You can manually input the correct settings Access Mode Use this to 31st (or the maximum allowed in the month) Base Memory Extended Memory Total Memory KLJI: Move Enter: Select F5: Previous Values 640K 127M 128M +/-/PU/PD: Value F10: Save F6: Fail-Safe Defaults 1999 to select this if no IDE devices are : Large/Auto (Default:Auto) Capacity Capacity of currently installed hard disk...
... display only. BIOS Setup For example, 1 p.m. Extended IDE Drive setup You can manually input the correct settings Access Mode Use this to 31st (or the maximum allowed in the month) Base Memory Extended Memory Total Memory KLJI: Move Enter: Select F5: Previous Values 640K 127M 128M +/-/PU/PD: Value F10: Save F6: Fail-Safe Defaults 1999 to select this if no IDE devices are : Large/Auto (Default:Auto) Capacity Capacity of currently installed hard disk...

User Manual
Page 28
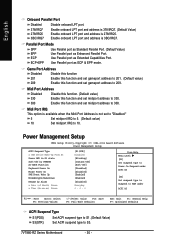
... USB Keyboard Support USB Mouse Support Onboard H/W LAN * OnBoard LAN Boot ROM * Onboard Serial Port 1 Onboard Serial Port 2 UART Mode Select x UR2 Duplex Mode Onboard Parallel Port Parallel Port Mode Game Port Address Midi Port Address x Midi Port IRQ [Enabled] [Enabled] [Enabled] [RAID] [Auto] [Enabled] [Enabled] [Disabled] [Disabled] [Enabled] [Disabled] [3F8/IRQ4] [2F8/IRQ3] [Normal] Half [378/IRQ7] [SPP] [201] [Disabled] 5 Item Help Menu Level X If a hard disk controller card is used, set at Disabled [Enabled] Enable onboard IDE PORT [Disabled] Disable onboard IDE PORT KLJI: Move Enter...
... USB Keyboard Support USB Mouse Support Onboard H/W LAN * OnBoard LAN Boot ROM * Onboard Serial Port 1 Onboard Serial Port 2 UART Mode Select x UR2 Duplex Mode Onboard Parallel Port Parallel Port Mode Game Port Address Midi Port Address x Midi Port IRQ [Enabled] [Enabled] [Enabled] [RAID] [Auto] [Enabled] [Enabled] [Disabled] [Disabled] [Enabled] [Disabled] [3F8/IRQ4] [2F8/IRQ3] [Normal] Half [378/IRQ7] [SPP] [201] [Disabled] 5 Item Help Menu Level X If a hard disk controller card is used, set at Disabled [Enabled] Enable onboard IDE PORT [Disabled] Disable onboard IDE PORT KLJI: Move Enter...
User Manual
Page 30
... Use Parallel port as Enhanced Parallel Port. Power Management Setup CMOS Setup Utility-Copyright (C) 1984-2004 Award Software Power Management Setup ACPI Suspend Type x USB Device Wake-Up From S3 Power LED in S1 state Soft-Off by PWRBTN AC BACK Function Keyboard Power On Mouse Power On PME Event Wake Up ModemRingOn/WakeOnLan Resume by Alarm x Date (of Month) Alarm x Time (hh:mm:ss) Alarm [S1(POS)] Disabled [Blinking] [Instant-Off] [Soft-Off] [Disabled] [Disabled] [Enabled] [Enabled] [Disabled...
... Use Parallel port as Enhanced Parallel Port. Power Management Setup CMOS Setup Utility-Copyright (C) 1984-2004 Award Software Power Management Setup ACPI Suspend Type x USB Device Wake-Up From S3 Power LED in S1 state Soft-Off by PWRBTN AC BACK Function Keyboard Power On Mouse Power On PME Event Wake Up ModemRingOn/WakeOnLan Resume by Alarm x Date (of Month) Alarm x Time (hh:mm:ss) Alarm [S1(POS)] Disabled [Blinking] [Instant-Off] [Soft-Off] [Disabled] [Disabled] [Enabled] [Enabled] [Disabled...

User Manual
Page 35
... voltage. DRAM Clock By SPD 133 166 200 BIOS will reset and run at CPU default Host clock at next boot. But it may get stable for times out reboot . Auto Supply AGP voltage as memory module required(2.5V). (Default value) +0.1V Increase DDR voltage +0.1V. +0.2V Increase DDR voltage +0.2V. - 35 - CPU Voltage Control Increase CPU voltage may get stable for over -clock. CPU Host Frequency (MHz) To change these settings, you must first select Enable...
... voltage. DRAM Clock By SPD 133 166 200 BIOS will reset and run at CPU default Host clock at next boot. But it may get stable for times out reboot . Auto Supply AGP voltage as memory module required(2.5V). (Default value) +0.1V Increase DDR voltage +0.1V. +0.2V Increase DDR voltage +0.2V. - 35 - CPU Voltage Control Increase CPU voltage may get stable for over -clock. CPU Host Frequency (MHz) To change these settings, you must first select Enable...
User Manual
Page 37
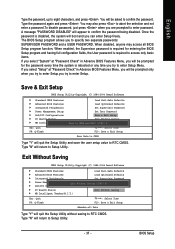
... Advance BIOS Features Menu, you can enter Setup freely. Save & Exit Setup CMOS Setup Utility-Copyright (C) 1984-2004 Award Software ` Standard CMOS Features Load Fail-Safe Defaults ` Advanced BIOS Features Load Optimized Defaults ` Integrated Peripherals Set Supervisor Password ` Power Management Setup Set User Password ` PnP/PCI Configurations Save & Exit Setup ` PC Health Status Exit Without Saving ` MB Intelligent Tweaker (M.IS.aTv.e)to RTC CMOS. Y Esc: Quit KLJI: Select Item F8: Q-Flash F10: Save & Exit Setup Save Data to CMOS Type "Y" will boot and...
... Advance BIOS Features Menu, you can enter Setup freely. Save & Exit Setup CMOS Setup Utility-Copyright (C) 1984-2004 Award Software ` Standard CMOS Features Load Fail-Safe Defaults ` Advanced BIOS Features Load Optimized Defaults ` Integrated Peripherals Set Supervisor Password ` Power Management Setup Set User Password ` PnP/PCI Configurations Save & Exit Setup ` PC Health Status Exit Without Saving ` MB Intelligent Tweaker (M.IS.aTv.e)to RTC CMOS. Y Esc: Quit KLJI: Select Item F8: Q-Flash F10: Save & Exit Setup Save Data to CMOS Type "Y" will boot and...

User Manual
Page 39
...", and execute the setup.exe. Massage: Some device drivers will auto-detect the right USB2.0 driver). - 39 - Please remove the question mark and restart the system (System will restart your CD-ROM drive, the driver CD-title will continue to install the drivers automatically. If not, please double click the CD-ROM device icon in "Universal Serial Bus controller" under Windows XP operating system, please use Windows Service Pack. Click...
...", and execute the setup.exe. Massage: Some device drivers will auto-detect the right USB2.0 driver). - 39 - Please remove the question mark and restart the system (System will restart your CD-ROM drive, the driver CD-title will continue to install the drivers automatically. If not, please double click the CD-ROM device icon in "Universal Serial Bus controller" under Windows XP operating system, please use Windows Service Pack. Click...

User Manual
Page 40
Item Description „ VIA 4IN1 Driver For INF, AGP, IDE and DMA Driver „ USB Patch for WinXP This patch driver can help you to resolve the USB device wake up S3 hang up issue in XP „ Realtek LAN Driver * LAN driver for RTL8100C chips „ RealTek AC97 Audio Driver Audio driver for Realtek AC97 codec chipset „ VIA 8237 Serial ATA Driver Driver for VIA 8237 SATA controller. „ VIA USB 2.0 Controller USB 2.0 Driver information for XP "*" For 7VT880-RZ only. 7VT880-RZ Series Motherboard - 40 - English You have completed drivers installation.
Item Description „ VIA 4IN1 Driver For INF, AGP, IDE and DMA Driver „ USB Patch for WinXP This patch driver can help you to resolve the USB device wake up S3 hang up issue in XP „ Realtek LAN Driver * LAN driver for RTL8100C chips „ RealTek AC97 Audio Driver Audio driver for Realtek AC97 codec chipset „ VIA 8237 Serial ATA Driver Driver for VIA 8237 SATA controller. „ VIA USB 2.0 Controller USB 2.0 Driver information for XP "*" For 7VT880-RZ only. 7VT880-RZ Series Motherboard - 40 - English You have completed drivers installation.


