
User Manual
Page 4
... Cabels 11 Step 5-1: I/O Back Panel Introduction 11 Step 5-2: Connectors Introduction 12 Chapter 2 BIOS Setup 19 The Main Menu (For example: BIOS Ver. : F5 19 Standard CMOS Features ...21 Advanced BIOS Features ...23 Integrated Peripherals ...24 Power Management Setup 26 PnP/PCI Configurations ...27 PC Health Status ...28 Frequency/Voltage Control 29 Load Fail-Safe Defaults ...30 Load Optimized Defaults ...30 Set Supervisor/User Password 31 Save & Exit Setup ...32 Exit Without Saving ...32 Chapter 3 Driver Installation 33 7VM400M-RZ Motherboard - 4 -
... Cabels 11 Step 5-1: I/O Back Panel Introduction 11 Step 5-2: Connectors Introduction 12 Chapter 2 BIOS Setup 19 The Main Menu (For example: BIOS Ver. : F5 19 Standard CMOS Features ...21 Advanced BIOS Features ...23 Integrated Peripherals ...24 Power Management Setup 26 PnP/PCI Configurations ...27 PC Health Status ...28 Frequency/Voltage Control 29 Load Fail-Safe Defaults ...30 Load Optimized Defaults ...30 Set Supervisor/User Password 31 Save & Exit Setup ...32 Exit Without Saving ...32 Chapter 3 Driver Installation 33 7VM400M-RZ Motherboard - 4 -

User Manual
Page 5
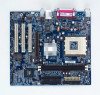
... Features Summary CPU Chipset Memory Slots On-Board IDE On-Board Floppy On-Board Peripherals On-Board VGA On-Board LAN On-Board Sound BIOS I/O Control Hardware Monitor Additional Features Overclocking Form Factor y Socket A for AMD Sempron™ / Athlon™ XP / Athlon™ / Duron™ processor y 200/266/333MHz FSB y Supports 1.4GHz and faster y Northbridge : VIA KM400 y Southbridge : VIA VT8235 / VT8237R y 2 184-pin DDR DIMM sockets, supports up to 2GB DRAM (Max) y Supports DDR333/DDR266/DDR200 DIMM y Supports only 2.5V...
... Features Summary CPU Chipset Memory Slots On-Board IDE On-Board Floppy On-Board Peripherals On-Board VGA On-Board LAN On-Board Sound BIOS I/O Control Hardware Monitor Additional Features Overclocking Form Factor y Socket A for AMD Sempron™ / Athlon™ XP / Athlon™ / Duron™ processor y 200/266/333MHz FSB y Supports 1.4GHz and faster y Northbridge : VIA KM400 y Southbridge : VIA VT8235 / VT8237R y 2 184-pin DDR DIMM sockets, supports up to 2GB DRAM (Max) y Supports DDR333/DDR266/DDR200 DIMM y Supports only 2.5V...

User Manual
Page 9
... hardware configurations, including CPU, Memory, Cards...etc. Please set the system bus frequency over the CPU's specification because these specific bus frequencies properly will result. 6. English Step 2: Install the Central Processing Unit (CPU) Before installing the processor, adhere to the 90-degree directly. Please make sure the CPU type is plugged to the locked position while holding pressure on the CPU upper corner. Figure 2. Fasten the cooling fan supporting-base onto the CPU socket...
... hardware configurations, including CPU, Memory, Cards...etc. Please set the system bus frequency over the CPU's specification because these specific bus frequencies properly will result. 6. English Step 2: Install the Central Processing Unit (CPU) Before installing the processor, adhere to the 90-degree directly. Please make sure the CPU type is plugged to the locked position while holding pressure on the CPU upper corner. Figure 2. Fasten the cooling fan supporting-base onto the CPU socket...

User Manual
Page 10
.... The BIOS will cause improper installation. Insert the DIMM memory module vertically into the DIMM socket. Then push it vertically into the DIMM socket. Wrong orientation will automatically detects memory type and size. Please change the insert orientation. The DIMM module can only fit in one direction. 2. The DIMM socket has a notch, so the DIMM memory module can vary between sockets. 7VM400M-RZ Motherboard Notch...
.... The BIOS will cause improper installation. Insert the DIMM memory module vertically into the DIMM socket. Then push it vertically into the DIMM socket. Wrong orientation will automatically detects memory type and size. Please change the insert orientation. The DIMM module can only fit in one direction. 2. The DIMM socket has a notch, so the DIMM memory module can vary between sockets. 7VM400M-RZ Motherboard Notch...

User Manual
Page 11
... small white-drawable bar. English Step 4: Install AGP Card 1. AGP 4X/8X notch 3. Please align the AGP card to Parallel port. Make sure your OS does not support USB controller, please contact OS vendor for possible patch or driver upgrade. Z Serial port (COMA) Mouse and modem etc. can be connected to Serial port. [ VGA port Monitor can be connected to the onboard AGP slot and press firmly down on the...
... small white-drawable bar. English Step 4: Install AGP Card 1. AGP 4X/8X notch 3. Please align the AGP card to Parallel port. Make sure your OS does not support USB controller, please contact OS vendor for possible patch or driver upgrade. Z Serial port (COMA) Mouse and modem etc. can be connected to Serial port. [ VGA port Monitor can be connected to the onboard AGP slot and press firmly down on the...

User Manual
Page 15
... (L) - 15 - MSG- 1 1 2 1 HD+ 1 HDRES- RES+ 1 NC HD (IDE Hard Disk Active LED) SPK (Speaker Connector) RES (Reset Switch) PW (Power Switch) MSG (Message LED/ Power/ Sleep LED) NC IDE Hard Disk Reset Switch Active LED Pin 1: LED anode(+) Pin 2: LED cathode(-) Pin 1: VCC(+) Pin 2- Pin No. of using rear audio connector to the pin assignment below. English 7) F_PANEL (2 x 10 pins Connector) Please connect the power LED, PC speaker, reset switch and power switch etc. Message LED/Power/ Sleep LED Power Switch Speaker Connector SPEAK19 20 1 SPEAK+ PW+ MSG+ PW- Hardware...
... (L) - 15 - MSG- 1 1 2 1 HD+ 1 HDRES- RES+ 1 NC HD (IDE Hard Disk Active LED) SPK (Speaker Connector) RES (Reset Switch) PW (Power Switch) MSG (Message LED/ Power/ Sleep LED) NC IDE Hard Disk Reset Switch Active LED Pin 1: LED anode(+) Pin 2: LED cathode(-) Pin 1: VCC(+) Pin 2- Pin No. of using rear audio connector to the pin assignment below. English 7) F_PANEL (2 x 10 pins Connector) Please connect the power LED, PC speaker, reset switch and power switch etc. Message LED/Power/ Sleep LED Power Switch Speaker Connector SPEAK19 20 1 SPEAK+ PW+ MSG+ PW- Hardware...

User Manual
Page 16
... 4 CD-R 7VM400M-RZ Motherboard - 16 - Pin No. For optional SPDIF cable, please contact your nearest dealer for optional SUR_CEN cable. Be careful with the polarity of providing digital audio to external speakers or compressed AC3 data to an external Dolby Digital Decoder. Check the pin assignment carefully while you connect the SPDIF cable, incorrect connection between the cable and connector will make the device unable to the connector. 1 Pin No. Definition...
... 4 CD-R 7VM400M-RZ Motherboard - 16 - Pin No. For optional SPDIF cable, please contact your nearest dealer for optional SUR_CEN cable. Be careful with the polarity of providing digital audio to external speakers or compressed AC3 data to an external Dolby Digital Decoder. Check the pin assignment carefully while you connect the SPDIF cable, incorrect connection between the cable and connector will make the device unable to the connector. 1 Pin No. Definition...

User Manual
Page 19
... keys to modify the basic system configuration. CMOS Setup Utility-Copyright (C) 1984-2004 Award Software ` Standard CMOS Features ` Advanced BIOS Features ` Integrated Peripherals ` Power Management Setup ` PnP/PCI Configurations ` PC Health Status ` Frequency/Voltage Control ESC: Quit F8: Q-Flash Load Fail-Safe Defaults Load Optimized Defaults Set Supervisor Password Set User Password Save & Exit Setup Exit Without Saving KLJI: Select Item F10: Save & Exit Setup Time, Date, Hard Disk Type... - 19 - This type of information is displayed at the bottom of the screen. ENTERING SETUP...
... keys to modify the basic system configuration. CMOS Setup Utility-Copyright (C) 1984-2004 Award Software ` Standard CMOS Features ` Advanced BIOS Features ` Integrated Peripherals ` Power Management Setup ` PnP/PCI Configurations ` PC Health Status ` Frequency/Voltage Control ESC: Quit F8: Q-Flash Load Fail-Safe Defaults Load Optimized Defaults Set Supervisor Password Set User Password Save & Exit Setup Exit Without Saving KLJI: Select Item F10: Save & Exit Setup Time, Date, Hard Disk Type... - 19 - This type of information is displayed at the bottom of the screen. ENTERING SETUP...

User Manual
Page 20
... auto detect Temperature, voltage, fan, speed. • Frequency/Voltage Control This setup page is control CPU clock and frequency ratio. • Load Fail-Safe Defaults Fail-Safe Defaults indicates the value of the system parameters which the system would be in safe configuration. • Load Optimized Defaults Optimized Defaults indicates the value of the system parameters which the system would be in standard compatible BIOS. • Advanced BIOS Features This setup page includes all the items of Award...
... auto detect Temperature, voltage, fan, speed. • Frequency/Voltage Control This setup page is control CPU clock and frequency ratio. • Load Fail-Safe Defaults Fail-Safe Defaults indicates the value of the system parameters which the system would be in safe configuration. • Load Optimized Defaults Optimized Defaults indicates the value of the system parameters which the system would be in standard compatible BIOS. • Advanced BIOS Features This setup page includes all the items of Award...

User Manual
Page 21
... user-definable; Manual type is calculated base on the 24-hour military-time clock. is , , , . Auto type which will not work properly if you select User Type, related information will be provided in . Drive A Drive B Floppy 3 Mode Suport Halt On Base Memory Extended Memory Total Memory KLJI: Move Enter: Select F5: Previous Values [1.44M, 3.5"] [None] [Disabled] [All, But Keyboard] 640K 127M 128M +/-/PU/PD: Value F10: Save F6: Fail-Safe Defaults...
... user-definable; Manual type is calculated base on the 24-hour military-time clock. is , , , . Auto type which will not work properly if you select User Type, related information will be provided in . Drive A Drive B Floppy 3 Mode Suport Halt On Base Memory Extended Memory Total Memory KLJI: Move Enter: Select F5: Previous Values [1.44M, 3.5"] [None] [Disabled] [All, But Keyboard] 640K 127M 128M +/-/PU/PD: Value F10: Save F6: Fail-Safe Defaults...

User Manual
Page 22
... AT-type high-density drive; 1.2M byte capacity (3.5 inch when 3 Mode is 3 mode Floppy Drive. All, But Keyboard The system boot will not stop for all other errors. English Drive A / Drive B The category identifies the types of floppy disk drive A or drive B that used. 7VM400M-RZ Motherboard - 22 - The value of the base memory is detected during the POST. Total Memory This item displays the memory size that has been installed in the system. No Errors The system boot will...
... AT-type high-density drive; 1.2M byte capacity (3.5 inch when 3 Mode is 3 mode Floppy Drive. All, But Keyboard The system boot will not stop for all other errors. English Drive A / Drive B The category identifies the types of floppy disk drive A or drive B that used. 7VM400M-RZ Motherboard - 22 - The value of the base memory is detected during the POST. Total Memory This item displays the memory size that has been installed in the system. No Errors The system boot will...

User Manual
Page 23
... USB-ZIP. SCSI Select your boot device priority by LAN. LAN Select your boot device priority by SCSI. Setup The system will boot, but access to Setup page will be denied if the correct password is not entered at the prompt. English Advanced BIOS Features CMOS Setup Utility-Copyright (C) 1984-2004 Award Software Advanced BIOS Features First Boot Device Second Boot Device Third Boot Device Password Check [Floppy] [HDD-0] [CDROM] [Setup] Item Help Menu Level` Select Boot Device priority [Floppy] Boot from floppy [LS120] Boot from LS120 [HDD-0] Boot...
... USB-ZIP. SCSI Select your boot device priority by LAN. LAN Select your boot device priority by SCSI. Setup The system will boot, but access to Setup page will be denied if the correct password is not entered at the prompt. English Advanced BIOS Features CMOS Setup Utility-Copyright (C) 1984-2004 Award Software Advanced BIOS Features First Boot Device Second Boot Device Third Boot Device Password Check [Floppy] [HDD-0] [CDROM] [Setup] Item Help Menu Level` Select Boot Device priority [Floppy] Boot from floppy [LS120] Boot from LS120 [HDD-0] Boot...

User Manual
Page 24
If a hard disk controller card is used, please set at "Disabled". If a hard disk controller card is used, please set at "Disabled". English Integrated Peripherals CMOS Setup Utility-Copyright (C) 1984-2004 Award Software Integrated Peripherals OnChip IDE Channel0 OnChip IDE Channel1 AC97 Audio VIA Onboard LAN USB 1.1 Controller USB 2.0 Controller USB Keyboard Support USB Mouse Support On-Chip LAN Boot ROM Onboard Serial Port 1 Onboard Serial Port 2 Onboard Parallel Port Parallel Port Mode Game Port Address Midi Port Address x Midi Port IRQ [Enabled] [Enabled] [Auto] [Enabled] ...
If a hard disk controller card is used, please set at "Disabled". If a hard disk controller card is used, please set at "Disabled". English Integrated Peripherals CMOS Setup Utility-Copyright (C) 1984-2004 Award Software Integrated Peripherals OnChip IDE Channel0 OnChip IDE Channel1 AC97 Audio VIA Onboard LAN USB 1.1 Controller USB 2.0 Controller USB Keyboard Support USB Mouse Support On-Chip LAN Boot ROM Onboard Serial Port 1 Onboard Serial Port 2 Onboard Parallel Port Parallel Port Mode Game Port Address Midi Port Address x Midi Port IRQ [Enabled] [Enabled] [Auto] [Enabled] ...

User Manual
Page 26
... power button then Power off by mouse event. 7VM400M-RZ Motherboard - 26 - Soft-off instantly. (Default value) Delay 4 Sec. Memory System power on depends on password. English Power Management Setup CMOS Setup Utility-Copyright (C) 1984-2004 Award Software Power Management Setup ACPI Suspend Type x USB Device Wake-Up from S3. Enter suspend if button is pressed less than 4 sec. If you use dual color LED, power LED will blink. (Default value) Dual/Off In standby mode(S1): a. b. Enabled USB device can press the key to Power off . USB Device...
... power button then Power off by mouse event. 7VM400M-RZ Motherboard - 26 - Soft-off instantly. (Default value) Delay 4 Sec. Memory System power on depends on password. English Power Management Setup CMOS Setup Utility-Copyright (C) 1984-2004 Award Software Power Management Setup ACPI Suspend Type x USB Device Wake-Up from S3. Enter suspend if button is pressed less than 4 sec. If you use dual color LED, power LED will blink. (Default value) Dual/Off In standby mode(S1): a. b. Enabled USB device can press the key to Power off . USB Device...

User Manual
Page 27
... Power ON Password Enter Input password (from 1 to 5 characters) and press Enter to set "Resume by Alarm" item to enabled and key in Data/time to POWER ON system. PnP/PCI Configurations CMOS Setup Utility-Copyright (C) 1984-2004 Award Software PnP/PCI Configurations PCI 1 IRQ Assignment PCI 2 IRQ Assignment PCI 3 IRQ Assignment [Auto] [Auto] [Auto] Item Help Menu Level` Device(s) using this function. (Default Value) Enabled Enable alarm function to power on function. This feature requires an ATX power supply that provides at Enabled, any PCI...
... Power ON Password Enter Input password (from 1 to 5 characters) and press Enter to set "Resume by Alarm" item to enabled and key in Data/time to POWER ON system. PnP/PCI Configurations CMOS Setup Utility-Copyright (C) 1984-2004 Award Software PnP/PCI Configurations PCI 1 IRQ Assignment PCI 2 IRQ Assignment PCI 3 IRQ Assignment [Auto] [Auto] [Auto] Item Help Menu Level` Device(s) using this function. (Default Value) Enabled Enable alarm function to power on function. This feature requires an ATX power supply that provides at Enabled, any PCI...

User Manual
Page 29
..., system will reset and run at CPU default Host clock at "166-DDR333". Auto Supply voltage as AGP required. (Default value) +0.1V Increase AGP voltage +0.1V. +0.2V Increase AGP voltage +0.2V. +0.3V Increase AGP voltage +0.3V. - 29 - BIOS Setup English Frequency/Voltage Control CMOS Setup Utility-Copyright (C) 1984-2004 Award Software Frequency/Voltage Control Auto Detect PCI/DIMM Clk Spread Specturm CPU Host Clock Control x CPU Clock DRAM Clock(MHz) AGP OverVoltage Control DIMM OverVoltage Control [Enabled] [Enabled] [Disabled] 133MHz [By SPD] [Auto] [Auto] Item Help Menu Level...
..., system will reset and run at CPU default Host clock at "166-DDR333". Auto Supply voltage as AGP required. (Default value) +0.1V Increase AGP voltage +0.1V. +0.2V Increase AGP voltage +0.2V. +0.3V Increase AGP voltage +0.3V. - 29 - BIOS Setup English Frequency/Voltage Control CMOS Setup Utility-Copyright (C) 1984-2004 Award Software Frequency/Voltage Control Auto Detect PCI/DIMM Clk Spread Specturm CPU Host Clock Control x CPU Clock DRAM Clock(MHz) AGP OverVoltage Control DIMM OverVoltage Control [Enabled] [Enabled] [Disabled] 133MHz [By SPD] [Auto] [Auto] Item Help Menu Level...

User Manual
Page 30
.... 7VM400M-RZ Motherboard - 30 - Load Optimized Defaults CMOS Setup Utility-Copyright (C) 1984-2004 Award Software ` Standard CMOS Features Load Fail-Safe Defaults ` Advanced BIOS Features Load Optimized Defaults ` Integrated Peripherals Set Supervisor Password ` Power Management Setup Set User Password ` PnP/PCI Configurations Load Optimized DefaultSsav(eY/&N)E?xiNt Setup ` PC Health Status Exit Without Saving ` Frequency/Voltage Control ESC: Quit KLJI: Select Item F8: Q-Flash F10: Save & Exit Setup Load Optimized Defaults Selecting this feature. Auto Supply voltage as...
.... 7VM400M-RZ Motherboard - 30 - Load Optimized Defaults CMOS Setup Utility-Copyright (C) 1984-2004 Award Software ` Standard CMOS Features Load Fail-Safe Defaults ` Advanced BIOS Features Load Optimized Defaults ` Integrated Peripherals Set Supervisor Password ` Power Management Setup Set User Password ` PnP/PCI Configurations Load Optimized DefaultSsav(eY/&N)E?xiNt Setup ` PC Health Status Exit Without Saving ` Frequency/Voltage Control ESC: Quit KLJI: Select Item F8: Q-Flash F10: Save & Exit Setup Load Optimized Defaults Selecting this feature. Auto Supply voltage as...

User Manual
Page 31
.... Type the password, up to enter Setup Menu. The BIOS Setup program allows you are prompted to enter password. BIOS Setup To disable password, just press when you to specify two separate passwords: SUPERVISOR PASSWORD and a USER PASSWORD. English Set Supervisor/User Password CMOS Setup Utility-Copyright (C) 1984-2004 Award Software ` Standard CMOS Features ` Advanced BIOS Features ` Integrated Peripherals ` Power Management Setup ` PnP/PCI ConfiguratEinotnesr Password: ` PC Health Status ` Frequency/Voltage Control ESC: Quit F8: Q-Flash Load Fail-Safe Defaults Load...
.... Type the password, up to enter Setup Menu. The BIOS Setup program allows you are prompted to enter password. BIOS Setup To disable password, just press when you to specify two separate passwords: SUPERVISOR PASSWORD and a USER PASSWORD. English Set Supervisor/User Password CMOS Setup Utility-Copyright (C) 1984-2004 Award Software ` Standard CMOS Features ` Advanced BIOS Features ` Integrated Peripherals ` Power Management Setup ` PnP/PCI ConfiguratEinotnesr Password: ` PC Health Status ` Frequency/Voltage Control ESC: Quit F8: Q-Flash Load Fail-Safe Defaults Load...

User Manual
Page 32
...-2004 Award Software ` Standard CMOS Features Load Fail-Safe Defaults ` Advanced BIOS Features Load Optimized Defaults ` Integrated Peripherals Set Supervisor Password ` Power Management Setup Set User Password ` PnP/PCI Configurations Save to CMOS and EXITSa(vYe/N&)?ExYit Setup ` PC Health Status Exit Without Saving ` Frequency/Voltage Control ESC: Quit KLJI: Select Item F8: Q-Flash F10: Save & Exit Setup Save & Exit Setup Type "Y" will quit the Setup Utility without saving to RTC CMOS. Type "N" will return to Setup Utility. 7VM400M-RZ Motherboard - 32 - Type...
...-2004 Award Software ` Standard CMOS Features Load Fail-Safe Defaults ` Advanced BIOS Features Load Optimized Defaults ` Integrated Peripherals Set Supervisor Password ` Power Management Setup Set User Password ` PnP/PCI Configurations Save to CMOS and EXITSa(vYe/N&)?ExYit Setup ` PC Health Status Exit Without Saving ` Frequency/Voltage Control ESC: Quit KLJI: Select Item F8: Q-Flash F10: Save & Exit Setup Save & Exit Setup Type "Y" will quit the Setup Utility without saving to RTC CMOS. Type "N" will return to Setup Utility. 7VM400M-RZ Motherboard - 32 - Type...

User Manual
Page 34
... Lan Driver For VIA Phy family Lan driver. „ VIA AC97 Audio Driver Audio driver for VIA codec chipset. „ VIA USB 2.0 Controller For VIA VT8233 (VT6203) / VIA VT8235 / VIA VT8237 / VIA VT8237R south bridge. After install Windows Service Pack, it will auto-detect the right USB2.0 driver). 7VM400M-RZ Motherboard - 34 - Item Description „ VIA 4IN1 Driver For INF, AGP, IDE and DMA driver. „ VIA KM400 VGA Driver For KM400 drvier. „ USB...
... Lan Driver For VIA Phy family Lan driver. „ VIA AC97 Audio Driver Audio driver for VIA codec chipset. „ VIA USB 2.0 Controller For VIA VT8233 (VT6203) / VIA VT8235 / VIA VT8237 / VIA VT8237R south bridge. After install Windows Service Pack, it will auto-detect the right USB2.0 driver). 7VM400M-RZ Motherboard - 34 - Item Description „ VIA 4IN1 Driver For INF, AGP, IDE and DMA driver. „ VIA KM400 VGA Driver For KM400 drvier. „ USB...


