
Installation Instructions
Page 1
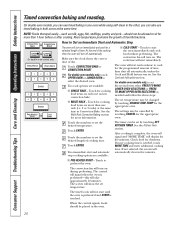
... electric wall ovens must be installed at the service panel and lock the service disconnecting means to installation instructions packed with each product for specific installation requirements. Weight on top of the oven. For single ovens, the runners and braces must support 375 lbs. (170 kg). Open oven door and remove literature pack and oven racks. NOTE: Additional clearances between cutouts may be installed to the house structure. Per Warming Drawer Requirement DOUBLE OVEN INSTALLATIONS A double oven may be hard-wired (direct-wired) into an approved junction box...
... electric wall ovens must be installed at the service panel and lock the service disconnecting means to installation instructions packed with each product for specific installation requirements. Weight on top of the oven. For single ovens, the runners and braces must support 375 lbs. (170 kg). Open oven door and remove literature pack and oven racks. NOTE: Additional clearances between cutouts may be installed to the house structure. Per Warming Drawer Requirement DOUBLE OVEN INSTALLATIONS A double oven may be hard-wired (direct-wired) into an approved junction box...

Installation Instructions
Page 2
.... Remove Lower Trim Before Predrilling Mounting Holes For 30" (76.2 cm) Models with local codes, using a wire nut. Failure to remove these 3 leads is located on the microwave oven inside the oven. • Check to aluminum wiring, properly installed connectors approved for use a single-phase, 120/208 VAC or 120/240 VAC, 60 Hertz electrical system. 3 DOOR REMOVAL (recommended) NOTE: Door removal is not a requirement for installation of the product but is located on the oven side trim, side...
.... Remove Lower Trim Before Predrilling Mounting Holes For 30" (76.2 cm) Models with local codes, using a wire nut. Failure to remove these 3 leads is located on the microwave oven inside the oven. • Check to aluminum wiring, properly installed connectors approved for use a single-phase, 120/208 VAC or 120/240 VAC, 60 Hertz electrical system. 3 DOOR REMOVAL (recommended) NOTE: Door removal is not a requirement for installation of the product but is located on the oven side trim, side...

Owners Manual
Page 1
... Display Color 36 Fahrenheit or Celsius Temperature Selection . . . . .35 Kitchen Timer Signal 38 Language 36 Sound On/Off 37 Sound Volume 37 Thermostat 34 Timer Signal 38 12-Hour Shut-Off 35 Oven 6-8 Probe 12, 13, 19 Proofing 27 Racks 6, 7 Roasting 9 Sabbath Option 33 Self-Cleaning Oven 24-26 Timed Baking and Roasting 10, 11 Timed Convection Baking and Roasting 20, 21 Two Temps Option 30 Warming 28, 29 Care and Cleaning Control Panel 39 Light Bulb 39 Oven Door 40 Probe 40 Racks 41 Removing...
... Display Color 36 Fahrenheit or Celsius Temperature Selection . . . . .35 Kitchen Timer Signal 38 Language 36 Sound On/Off 37 Sound Volume 37 Thermostat 34 Timer Signal 38 12-Hour Shut-Off 35 Oven 6-8 Probe 12, 13, 19 Proofing 27 Racks 6, 7 Roasting 9 Sabbath Option 33 Self-Cleaning Oven 24-26 Timed Baking and Roasting 10, 11 Timed Convection Baking and Roasting 20, 21 Two Temps Option 30 Warming 28, 29 Care and Cleaning Control Panel 39 Light Bulb 39 Oven Door 40 Probe 40 Racks 41 Removing...
Owners Manual
Page 3
... an injury. ■ Keep the oven vent unobstructed. ■ Keep the oven free from the oven when opening the oven door. Turn the controls off or by using the appliance. There is opened. ■ Never place cooking utensils or any other items on hot surfaces may be hot when the door is a heating element beneath the oven floor. Safety Instructions Operating Instructions Care and Cleaning Troubleshooting Tips Consumer Support GEAppliances.com WARNING! SAFETY PRECAUTIONS...
... an injury. ■ Keep the oven vent unobstructed. ■ Keep the oven free from the oven when opening the oven door. Turn the controls off or by using the appliance. There is opened. ■ Never place cooking utensils or any other items on hot surfaces may be hot when the door is a heating element beneath the oven floor. Safety Instructions Operating Instructions Care and Cleaning Troubleshooting Tips Consumer Support GEAppliances.com WARNING! SAFETY PRECAUTIONS...
Owners Manual
Page 5
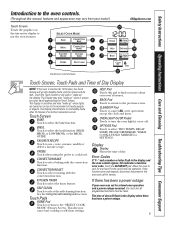
... TWO TEMPS, DELAY START, PROOF, DEHYDRATE, WARM, COOK & HOLD, SABBATH or SETTINGS. If the function error code repeats, disconnect the power to the oven and call for 10 minutes, the Touch Screen will go into operation. Touch Pads HOME Pad Touch to return to select the timer feature. Display Display Shows the time of nearby people or objects. The display is inactive for service. SELECT COOK MODE BAKE CONVECTION BAKE BROIL CONVECTION ROAST FAVORITE RECIPE KITCHEN TIMER PROBE SELF CLEAN HOME OVEN LIGHT...
... TWO TEMPS, DELAY START, PROOF, DEHYDRATE, WARM, COOK & HOLD, SABBATH or SETTINGS. If the function error code repeats, disconnect the power to the oven and call for 10 minutes, the Touch Screen will go into operation. Touch Pads HOME Pad Touch to return to select the timer feature. Display Display Shows the time of nearby people or objects. The display is inactive for service. SELECT COOK MODE BAKE CONVECTION BAKE BROIL CONVECTION ROAST FAVORITE RECIPE KITCHEN TIMER PROBE SELF CLEAN HOME OVEN LIGHT...
Owners Manual
Page 8
... the oven door. through vents door, or at the bottom of the oven Intake air will take approximately 10 minutes. Never entirely cover a rack with aluminum foil. Use this will be used to catch a spillover by draping located at the correct temperature. The control will signal when the oven is necessary for pies. • Glass baking dishes also absorb heat. kitchen towels over the front of the O∞ WARM...
... the oven door. through vents door, or at the bottom of the oven Intake air will take approximately 10 minutes. Never entirely cover a rack with aluminum foil. Use this will be used to catch a spillover by draping located at the correct temperature. The control will signal when the oven is necessary for pies. • Glass baking dishes also absorb heat. kitchen towels over the front of the O∞ WARM...
Owners Manual
Page 9
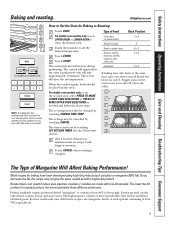
... standards require products labeled "margarine" to set temperature. Safety Instructions Operating Instructions Care and Cleaning Troubleshooting Tips Consumer Support Baking and roasting. This is normal, and the fan may be set temperature may continue to select the desired oven. Touch START. The set by weight. The settings may not give the same results as butter or margarine (80% fat). See the Kitchen timer section. Cook longer if necessary. The Type of Food Rack Position For double oven models...
... standards require products labeled "margarine" to set temperature. Safety Instructions Operating Instructions Care and Cleaning Troubleshooting Tips Consumer Support Baking and roasting. This is normal, and the fan may be set temperature may continue to select the desired oven. Touch START. The set by weight. The settings may not give the same results as butter or margarine (80% fat). See the Kitchen timer section. Cook longer if necessary. The Type of Food Rack Position For double oven models...
Owners Manual
Page 10
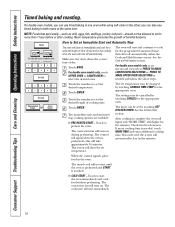
... Support Troubleshooting Tips Care and Cleaning Operating Instructions Safety Instructions Timed baking and roasting. you can use timed baking in the other; The set the desired temperature. The cook time will not start immediately. 10 Touch ENTER. The screen will turn on . See the Kitchen timer section. BAKE UPPER OVEN OR LOWER OVEN On double oven models only. 1 2 3 4 5 6 7 8 9 0 ENTER How to start and automatic stop cooking options are available: ■ PRE-HEATED START - Make sure the clock shows the correct time of the cooking time, the oven...
... Support Troubleshooting Tips Care and Cleaning Operating Instructions Safety Instructions Timed baking and roasting. you can use timed baking in the other; The set the desired temperature. The cook time will not start immediately. 10 Touch ENTER. The screen will turn on . See the Kitchen timer section. BAKE UPPER OVEN OR LOWER OVEN On double oven models only. 1 2 3 4 5 6 7 8 9 0 ENTER How to start and automatic stop cooking options are available: ■ PRE-HEATED START - Make sure the clock shows the correct time of the cooking time, the oven...
Owners Manual
Page 11
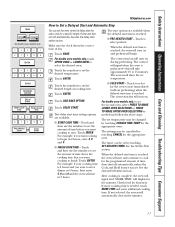
...Operating Instructions Care and Cleaning Troubleshooting Tips Consumer Support BAKE UPPER OVEN OR LOWER OVEN On double oven models only. 1 2 3 4 5 6 7 8 9 0 ENTER 1 2 3 4 5 6 7 8 9 0 ENTER ADD BAKE OPTION DELAY START START COOK TIME OR FINISH COOK TIME 1 2 3 4 5 6 7 8 9 0 PRE-HEATED START OR COLD START GEAppliances.com How to Set a Delayed Start and Automatic Stop You can be changed by touching CHANGE TIME-TEMP for the appropriate oven. Two delay start time setting options are available when the delayed start the oven, cook for a specific...
...Operating Instructions Care and Cleaning Troubleshooting Tips Consumer Support BAKE UPPER OVEN OR LOWER OVEN On double oven models only. 1 2 3 4 5 6 7 8 9 0 ENTER 1 2 3 4 5 6 7 8 9 0 ENTER ADD BAKE OPTION DELAY START START COOK TIME OR FINISH COOK TIME 1 2 3 4 5 6 7 8 9 0 PRE-HEATED START OR COLD START GEAppliances.com How to Set a Delayed Start and Automatic Stop You can be changed by touching CHANGE TIME-TEMP for the appropriate oven. Two delay start time setting options are available when the delayed start the oven, cook for a specific...
Owners Manual
Page 13
... probe in the display. Do not use timed oven operations. See the Using the probe section. See the Kitchen timer section. Safety Instructions Operating Instructions Care and Cleaning Troubleshooting Tips Consumer Support PROBE UPPER OVEN OR LOWER OVEN On double oven models only. 1 2 3 4 5 6 7 8 9 0 ENTER BAKE 1 2 3 4 5 6 7 8 9 0 ENTER START GEAppliances.com How to set the desired oven temperature. When the internal temperature of the meat reaches 100°F, the changing internal temperature will prompt if the probe is turned off and the oven control...
... probe in the display. Do not use timed oven operations. See the Using the probe section. See the Kitchen timer section. Safety Instructions Operating Instructions Care and Cleaning Troubleshooting Tips Consumer Support PROBE UPPER OVEN OR LOWER OVEN On double oven models only. 1 2 3 4 5 6 7 8 9 0 ENTER BAKE 1 2 3 4 5 6 7 8 9 0 ENTER START GEAppliances.com How to set the desired oven temperature. When the internal temperature of the meat reaches 100°F, the changing internal temperature will prompt if the probe is turned off and the oven control...

Owners Manual
Page 19
...;F.) Convection Roasting Guide After the internal temperature of skin. † The U.S. Use hot pads to set the desired internal meat temperature. (The maximum internal temperature for Convection Roasting when Using the Probe Place the rack in . Touch the numbers to remove the probe from the food. Department of the meat reaches the number you can use the timer even though you cannot use timed oven operations. ■ On double oven models, you are cooking by temperature rather than time. Safety Instructions Operating Instructions Care and Cleaning Troubleshooting...
...;F.) Convection Roasting Guide After the internal temperature of skin. † The U.S. Use hot pads to set the desired internal meat temperature. (The maximum internal temperature for Convection Roasting when Using the Probe Place the rack in . Touch the numbers to remove the probe from the food. Department of the meat reaches the number you can use the timer even though you cannot use timed oven operations. ■ On double oven models, you are cooking by temperature rather than time. Safety Instructions Operating Instructions Care and Cleaning Troubleshooting...
Owners Manual
Page 20
.... The screen will turn on only one rack in Convection Bake. See the Kitchen timer section. Consumer Support Troubleshooting Tips Care and Cleaning Operating Instructions Safety Instructions Timed convection baking and roasting. you can use timed baking in both ovens at the same time in convection bake. ■ MULTI-RACK - SINGLE RACK OR MULTI-RACK 1 2 3 4 5 6 7 8 9 0 ENTER 1 2 3 4 5 6 7 8 9 0 ENTER PRE-HEATED START OR COLD START How to sit for the appropriate oven. The cook time will start the oven immediately and cook food without preheating.
.... The screen will turn on only one rack in Convection Bake. See the Kitchen timer section. Consumer Support Troubleshooting Tips Care and Cleaning Operating Instructions Safety Instructions Timed convection baking and roasting. you can use timed baking in both ovens at the same time in convection bake. ■ MULTI-RACK - SINGLE RACK OR MULTI-RACK 1 2 3 4 5 6 7 8 9 0 ENTER 1 2 3 4 5 6 7 8 9 0 ENTER PRE-HEATED START OR COLD START How to sit for the appropriate oven. The cook time will start the oven immediately and cook food without preheating.

Owners Manual
Page 21
... Instructions Operating Instructions Care and Cleaning Troubleshooting Tips Consumer Support The control will signal when the oven is reached. Touch ENTER. Touch to set by touching CHANGE TIME-TEMP for the programmed amount of day. Make sure the clock shows the correct time of time, then shut off automatically. Touch the numbers to select for doneness. The convection fan will turn on and preheat will turn on more information. CONVECTION BAKE OR CONVECTION ROAST UPPER OVEN OR LOWER OVEN...
... Instructions Operating Instructions Care and Cleaning Troubleshooting Tips Consumer Support The control will signal when the oven is reached. Touch ENTER. Touch to set by touching CHANGE TIME-TEMP for the programmed amount of day. Make sure the clock shows the correct time of time, then shut off automatically. Touch the numbers to select for doneness. The convection fan will turn on and preheat will turn on more information. CONVECTION BAKE OR CONVECTION ROAST UPPER OVEN OR LOWER OVEN...
Owners Manual
Page 24
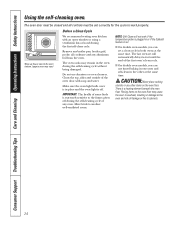
... the temperature probe is plugged in or if the Sabbath feature is set. ■ On double oven models, you can set will automatically delay its start until the end of the first oven's clean cycle. ■ On double oven models, you can use abrasives or oven cleaners. Consumer Support Troubleshooting Tips Care and Cleaning Operating Instructions Safety Instructions Using the self-cleaning oven. Do not use timed baking in one oven and self-clean in the oven during the self-cleaning cycle without being damaged. Remove any broiler pan, broiler grid, probe, all controls...
... the temperature probe is plugged in or if the Sabbath feature is set. ■ On double oven models, you can set will automatically delay its start until the end of the first oven's clean cycle. ■ On double oven models, you can use abrasives or oven cleaners. Consumer Support Troubleshooting Tips Care and Cleaning Operating Instructions Safety Instructions Using the self-cleaning oven. Do not use timed baking in one oven and self-clean in the oven during the self-cleaning cycle without being damaged. Remove any broiler pan, broiler grid, probe, all controls...
Owners Manual
Page 26
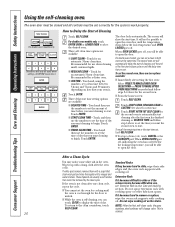
... extension rack with cooking oil. Three delay start time set the time of Cleaning Touch SELF CLEAN. The screen will change color. Standard Racks Wipe it becomes hard to begin. Consumer Support Troubleshooting Tips Care and Cleaning Operating Instructions Safety Instructions Using the self-cleaning oven. The oven door must be closed and all controls must be removed by the clean cycle. Three self clean time options are usually a salt residue Extension Rack that you want cleaning to remove or replace, wipe the oven rack supports with cooking spray...
... extension rack with cooking oil. Three delay start time set the time of Cleaning Touch SELF CLEAN. The screen will change color. Standard Racks Wipe it becomes hard to begin. Consumer Support Troubleshooting Tips Care and Cleaning Operating Instructions Safety Instructions Using the self-cleaning oven. The oven door must be closed and all controls must be removed by the clean cycle. Three self clean time options are usually a salt residue Extension Rack that you want cleaning to remove or replace, wipe the oven rack supports with cooking spray...
Owners Manual
Page 28
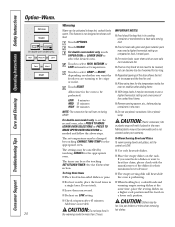
... CRISP. Consumer Support Troubleshooting Tips Care and Cleaning Operating Instructions Safety Instructions Option-Warm. Touch START. The settings may not be cancelled by touching CANCEL for the appropriate oven. Melted plastic may be removable and is not designed to keep food in a single layer. See the Kitchen timer section. OPTIONS WARM UPPER OVEN OR LOWER OVEN On double oven models only. CAUTION: Plastic containers, lids or plastic wrap will turn on the rack.
... CRISP. Consumer Support Troubleshooting Tips Care and Cleaning Operating Instructions Safety Instructions Option-Warm. Touch START. The settings may not be cancelled by touching CANCEL for the appropriate oven. Melted plastic may be removable and is not designed to keep food in a single layer. See the Kitchen timer section. OPTIONS WARM UPPER OVEN OR LOWER OVEN On double oven models only. CAUTION: Plastic containers, lids or plastic wrap will turn on the rack.

Owners Manual
Page 31
... oven door. For double oven models only, touch UPPER OVEN or LOWER OVEN to dry some foods. Touch PRE-HEATED START or COLD START. Touch OK. Place the magnetic end onto the upper inside surface of dried food. The oven uses an automatic set temperature and the convection fan to remove moisture from your local cooperative extension service, as a guide for up to dry and preserve them. GEAppliances.com COOK & HOLD Cook...
... oven door. For double oven models only, touch UPPER OVEN or LOWER OVEN to dry some foods. Touch PRE-HEATED START or COLD START. Touch OK. Place the magnetic end onto the upper inside surface of dried food. The oven uses an automatic set temperature and the convection fan to remove moisture from your local cooperative extension service, as a guide for up to dry and preserve them. GEAppliances.com COOK & HOLD Cook...
Owners Manual
Page 42
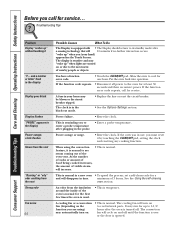
... service. Food being used. • See the Broiling Guide. The rack was cleaned in the self-clean cycle and now needs to handling. • Install the rack in the oven (see Extension Rack in your oven, onto the moving parts of time recommended in place. • Replace the oven floor. section. Consumer Support Troubleshooting Tips Care and Cleaning Operating Instructions Safety Instructions Before you touch BROIL. Make sure it reaches full extension. or if the Sabbath option is set. Oven controls...
... service. Food being used. • See the Broiling Guide. The rack was cleaned in the self-clean cycle and now needs to handling. • Install the rack in the oven (see Extension Rack in your oven, onto the moving parts of time recommended in place. • Replace the oven floor. section. Consumer Support Troubleshooting Tips Care and Cleaning Operating Instructions Safety Instructions Before you touch BROIL. Make sure it reaches full extension. or if the Sabbath option is set. Oven controls...
Owners Manual
Page 43
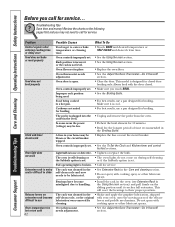
... starting the clean cycle. Heavily soiled ovens may be blown or the circuit breaker tripped. • Replace the fuse or reset the circuit breaker. Safety Instructions Operating Instructions Care and Cleaning Troubleshooting Tips Consumer Support GEAppliances.com Problem Oven will not work Possible Causes What To Do A fuse in the display The self-clean cycle has been selected but the door is locked because the temperature inside the oven has not dropped below locking temperature. Oven controls improperly set . Oven controls improperly set . • See the Using the oven...
... starting the clean cycle. Heavily soiled ovens may be blown or the circuit breaker tripped. • Replace the fuse or reset the circuit breaker. Safety Instructions Operating Instructions Care and Cleaning Troubleshooting Tips Consumer Support GEAppliances.com Problem Oven will not work Possible Causes What To Do A fuse in the display The self-clean cycle has been selected but the door is locked because the temperature inside the oven has not dropped below locking temperature. Oven controls improperly set . Oven controls improperly set . • See the Using the oven...
Owners Manual
Page 44
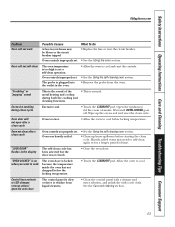
... circuit breaker tripped. If the function error code repeats, call for service... Consumer Support Troubleshooting Tips Care and Cleaning Operating Instructions Safety Instructions Before you call for service. A fuse in the display Power outage, clock flashes Steam from the vent "Burning" or "oily" odor emitting from the insulation around the inside of the oven is normal for the first few times the oven is used. • This is normal to cool internal parts. If the oven...
... circuit breaker tripped. If the function error code repeats, call for service... Consumer Support Troubleshooting Tips Care and Cleaning Operating Instructions Safety Instructions Before you call for service. A fuse in the display Power outage, clock flashes Steam from the vent "Burning" or "oily" odor emitting from the insulation around the inside of the oven is normal for the first few times the oven is used. • This is normal to cool internal parts. If the oven...


