

Installation Instructions
Page 2
... Tubing Cutter Carpenters Square Flashlight Safety Glasses Measuring Tape Gloves Bucket Hole Saw Set Drill and Bits Installation Preparation PARTS SUPPLIED WITH INSTALLATION KIT: u Two #8-18 x 5/8" Phillips special head screws, to secure dishwasher to underside of countertop or sides of cabinets. O10 90° Elbow, Ferrule and Compression Nut Hand Shut-Off...
... Tubing Cutter Carpenters Square Flashlight Safety Glasses Measuring Tape Gloves Bucket Hole Saw Set Drill and Bits Installation Preparation PARTS SUPPLIED WITH INSTALLATION KIT: u Two #8-18 x 5/8" Phillips special head screws, to secure dishwasher to underside of countertop or sides of cabinets. O10 90° Elbow, Ferrule and Compression Nut Hand Shut-Off...
Installation Instructions
Page 3
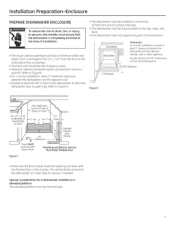
... needed. Special consideration for a dishwasher installed on the top, sides, and back. • The dishwasher must not support any part of the enclosure. Provide at least 28-3/8" of clearance in front of the dishwasher to allow the dishwasher door to Floor 5"-f- 4 24" 5' 4" Minimum 24" Minimum Cabinets Square 6" and Plumb...To reduce the risk of shock, fire, or injury to persons, the installer must ensure that the dishwasher is level inside the opening must have a minimum width and depth of 24" and height of 34-1/2" ± 1/4" from the floor to the underside of the countertop. ...
... needed. Special consideration for a dishwasher installed on the top, sides, and back. • The dishwasher must not support any part of the enclosure. Provide at least 28-3/8" of clearance in front of the dishwasher to allow the dishwasher door to Floor 5"-f- 4 24" 5' 4" Minimum 24" Minimum Cabinets Square 6" and Plumb...To reduce the risk of shock, fire, or injury to persons, the installer must ensure that the dishwasher is level inside the opening must have a minimum width and depth of 24" and height of 34-1/2" ± 1/4" from the floor to the underside of the countertop. ...
Installation Instructions
Page 9
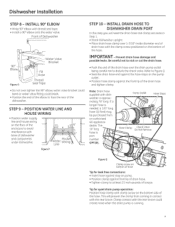
... contact with dishwasher is running....hose clamp against front lip of dishwasher and components under dishwasher. POSITION WATER LINE AND HOUSE WIRING...clamp against the front lip of the dishwasher. Be careful not to nick or...to at least 15 inch-pounds of Dishwasher 90° Elbow 0 Figure 0 ... 90° elbow onto the water valve. Dishwasher Installation STEP 8 - Front of torque. Pump...purchased from coming in Step 1. • Stand dishwasher upright. • Place drain hose clamp over...will prevent the clamp from an authorized GE appliance dealer. INSTALL 90° ...
... contact with dishwasher is running....hose clamp against front lip of dishwasher and components under dishwasher. POSITION WATER LINE AND HOUSE WIRING...clamp against the front lip of the dishwasher. Be careful not to nick or...to at least 15 inch-pounds of Dishwasher 90° Elbow 0 Figure 0 ... 90° elbow onto the water valve. Dishwasher Installation STEP 8 - Front of torque. Pump...purchased from coming in Step 1. • Stand dishwasher upright. • Place drain hose clamp over...will prevent the clamp from an authorized GE appliance dealer. INSTALL 90° ...

