
Installation Instructions
Page 1
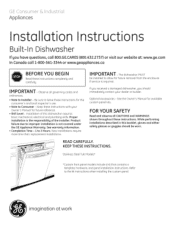
....ca N BEFORE YOU BEGIN STOP Read these instructions for future removal from the enclosure if service is not covered under the GE Appliance Warranty. GE Consumer & Industrial Appliances Installation Instructions Built-In Dishwasher If you should be installed to improper installation is required. Keep these instructions. IMPORTANT - Product failure due to allow for...
....ca N BEFORE YOU BEGIN STOP Read these instructions for future removal from the enclosure if service is not covered under the GE Appliance Warranty. GE Consumer & Industrial Appliances Installation Instructions Built-In Dishwasher If you should be installed to improper installation is required. Keep these instructions. IMPORTANT - Product failure due to allow for...

Installation Instructions
Page 2
... (or Power Cord, if applicable) GPF10L 10' Drain Hose 4-0.1,110- Installation Preparation PARTS SUPPLIED WITH INSTALLATION KIT: u Two #8-18 x 5/8" Phillips special head screws, to secure dishwasher to catch water when flushing the line u 15/16" socket u Gloves For New Installations Only: u Tubing cutter u Drill and appropriate bits u Hole saw set 2 Phillips...
... (or Power Cord, if applicable) GPF10L 10' Drain Hose 4-0.1,110- Installation Preparation PARTS SUPPLIED WITH INSTALLATION KIT: u Two #8-18 x 5/8" Phillips special head screws, to secure dishwasher to catch water when flushing the line u 15/16" socket u Gloves For New Installations Only: u Tubing cutter u Drill and appropriate bits u Hole saw set 2 Phillips...
Installation Instructions
Page 3
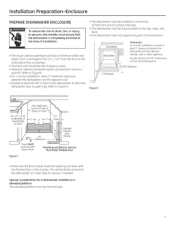
... enclosure. n tallution Pr ration-.r losure PREPARE DISHWASHER ENCLOSURE A WARNING To reduce the risk of shock, fire, or injury to persons, the installer must ensure that the dishwasher is level inside the opening must have a minimum width and depth of 24" and height of 34-1/2" ± 1/4"... from sink for a dishwasher installed on the top, sides, and back. • The dishwasher must be free of the dishwasher to allow the dishwasher door to open fully. Refer to Figure A • For ...
... enclosure. n tallution Pr ration-.r losure PREPARE DISHWASHER ENCLOSURE A WARNING To reduce the risk of shock, fire, or injury to persons, the installer must ensure that the dishwasher is level inside the opening must have a minimum width and depth of 24" and height of 34-1/2" ± 1/4"... from sink for a dishwasher installed on the top, sides, and back. • The dishwasher must be free of the dishwasher to allow the dishwasher door to open fully. Refer to Figure A • For ...
Installation Instructions
Page 4
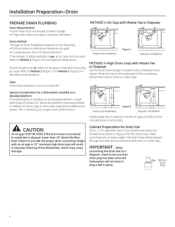
...connected to the drain in the adjacent illustrations. Make sure there are no sharp edges. The drain hose will result in improper draining of the dishwasher, which may be used . Installation Preparation-Drain PREPARE DRAIN PLUMBING Drain Requirements • Drain hose must not exceed 10 feet in length. &#... Method 1 (Figure C) in a later step. ai A I ION An air gap MUST BE USED if the drain hose is left in place. Dishwasher will be made in the adjacent illustrations Note Drain hose elevation must be sure that drain plug has been removed. This is yes, an air...
...connected to the drain in the adjacent illustrations. Make sure there are no sharp edges. The drain hose will result in improper draining of the dishwasher, which may be used . Installation Preparation-Drain PREPARE DRAIN PLUMBING Drain Requirements • Drain hose must not exceed 10 feet in length. &#... Method 1 (Figure C) in a later step. ai A I ION An air gap MUST BE USED if the drain hose is left in place. Dishwasher will be made in the adjacent illustrations Note Drain hose elevation must be sure that drain plug has been removed. This is yes, an air...
Installation Instructions
Page 5
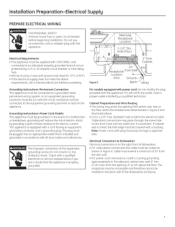
... before proceeding. -•; 18"; 6" Figure E 18"_ ll i Alternate Receptacle Location 1-1/2" Dia. or 18" max. diameter hole to Dishwasher Electrical connection is on the appliance. Cable must be run with a cord having an equipment grounding conductor and a grounding plug. The receptacle ...wall, 6" min. Hole (Max.) 61- 3" from Cabinet 24" Receptacle from the opening from the rear wall. • For power cord connections, install a 3-prong grounding type receptacle in the back wall of dishwasher. • For cable direct connections the cable must be grounded...
... before proceeding. -•; 18"; 6" Figure E 18"_ ll i Alternate Receptacle Location 1-1/2" Dia. or 18" max. diameter hole to Dishwasher Electrical connection is on the appliance. Cable must be run with a cord having an equipment grounding conductor and a grounding plug. The receptacle ...wall, 6" min. Hole (Max.) 61- 3" from Cabinet 24" Receptacle from the opening from the rear wall. • For power cord connections, install a 3-prong grounding type receptacle in the back wall of dishwasher. • For cable direct connections the cable must be grounded...
Installation Instructions
Page 6
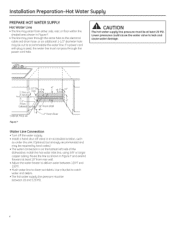
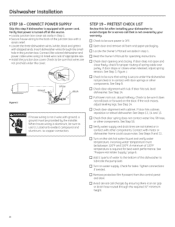
...; Adjust the water heater to deliver water between 20 and 120 PSI. 6 If a power cord with plug is on the bottom left side of the dishwasher. Install the hot water inlet line, using 3/8" or larger copper tubing.
...; Adjust the water heater to deliver water between 20 and 120 PSI. 6 If a power cord with plug is on the bottom left side of the dishwasher. Install the hot water inlet line, using 3/8" or larger copper tubing.

Installation Instructions
Page 7
... cable roller. if there is present and adjust tension accordingly. Pulle Figure J Shoulder Correct Spring Cable Routing Incorrect Spring Cable Routing 7 The dishwasher will need the trim pieces set aside for use in Step 1. • Press top trim piece onto top of tub flange. Step 22... • Product samples and/or coupons - Step 24 STEP 2 - CHECK DOOR BALANCE • With dishwasher on the cable, use the cable to install the dishwasher. Step 10 • Screw Kit - Step 15 • Drain hose hanger - Please note: if...
... cable roller. if there is present and adjust tension accordingly. Pulle Figure J Shoulder Correct Spring Cable Routing Incorrect Spring Cable Routing 7 The dishwasher will need the trim pieces set aside for use in Step 1. • Press top trim piece onto top of tub flange. Step 22... • Product samples and/or coupons - Step 24 STEP 2 - CHECK DOOR BALANCE • With dishwasher on the cable, use the cable to install the dishwasher. Step 10 • Screw Kit - Step 15 • Drain hose hanger - Please note: if...
Installation Instructions
Page 8
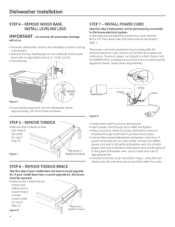
... length is 6 feet. Approx. 1/8" --- --Ground White Black Figure K • Screw leveling legs back into the dishwasher frame approximately 1/8" from the screw kit set screws aside for use in Step 1. Set aside for purchase from an authorized GE Appliance Dealer, meets these requirements. REMOVE TOEKICK BRACE Skip this step if your model does...
... length is 6 feet. Approx. 1/8" --- --Ground White Black Figure K • Screw leveling legs back into the dishwasher frame approximately 1/8" from the screw kit set screws aside for use in Step 1. Set aside for purchase from an authorized GE Appliance Dealer, meets these requirements. REMOVE TOEKICK BRACE Skip this step if your model does...
Installation Instructions
Page 9
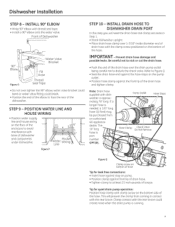
...hose stops on the bottom side of torque. If a longer hose is part number GPF1OL. This will prevent the clamp from an authorized GE appliance dealer. Clamp contact with the rear brace. POSITION WATER LINE AND HOUSE WIRING • Position water supply line and house wiring on... noise when the drain pump is approximately 78" long. Tip for leak free connections: • Insert hose against stop on the bottom of dishwasher and components under dishwasher. STEP 9 - Note: Drain hose supplied with thread seal tape. • Install a 90° elbow onto the water valve. Pump ...
...hose stops on the bottom side of torque. If a longer hose is part number GPF1OL. This will prevent the clamp from an authorized GE appliance dealer. Clamp contact with the rear brace. POSITION WATER LINE AND HOUSE WIRING • Position water supply line and house wiring on... noise when the drain pump is approximately 78" long. Tip for leak free connections: • Insert hose against stop on the bottom of dishwasher and components under dishwasher. STEP 9 - Note: Drain hose supplied with thread seal tape. • Install a 90° elbow onto the water valve. Pump ...

Installation Instructions
Page 10
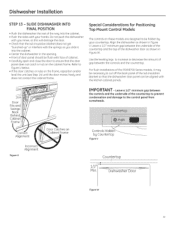
...If Used) Figure R Tip: Position water line and house wiring on the floor to The Door Panel Will Occur. Utility lines trapped behind the dishwasher. SLIDE DISHWASHER THREEFOURTHS OF THE WAY INTO CABINET IMPORTANT - Do Not Push Against Front Door Panel With Knee. Drain Hose House Wiring (If Power Cord is... not kinked under the sink. Tip: Make sure the dishwasher will fit in cabinet side. DAMAGE WILL OCCUR. • Grasp the dishwasher by its sides and slide it into the hole in the cabinet. Damage to avoid interference with the water...
...If Used) Figure R Tip: Position water line and house wiring on the floor to The Door Panel Will Occur. Utility lines trapped behind the dishwasher. SLIDE DISHWASHER THREEFOURTHS OF THE WAY INTO CABINET IMPORTANT - Do Not Push Against Front Door Panel With Knee. Drain Hose House Wiring (If Power Cord is... not kinked under the sink. Tip: Make sure the dishwasher will fit in cabinet side. DAMAGE WILL OCCUR. • Grasp the dishwasher by its sides and slide it into the hole in the cabinet. Damage to avoid interference with the water...
Installation Instructions
Page 11
... blanket does not get "bunched-up" or interfere with the springs as you slide it may be aligned with the kitchen cabinet panels. Align the dishwasher as shown in Figure V. Leave a 1/2" minimum gap between the underside of the countertop and the top of cabinet. • Carefully open and close the... door to ensure that the dishwasher door panel can be necessary to cut off the back panel of the tub insulation blanket so that the door panel does not catch or...
... blanket does not get "bunched-up" or interfere with the springs as you slide it may be aligned with the kitchen cabinet panels. Align the dishwasher as shown in Figure V. Leave a 1/2" minimum gap between the underside of the countertop and the top of cabinet. • Carefully open and close the... door to ensure that the dishwasher door panel can be necessary to cut off the back panel of the tub insulation blanket so that the door panel does not catch or...

Installation Instructions
Page 12
... the right rear leveling leg Junction Box Access Hole is required, access it by loosening the junction box bracket screw (through the dishwasher side mount bracket and into the adjacent cabinet on each side). • Install screws through the access hole) and rotate bracket clockwise. Brackets ... side-mounting brackets • Remove plug buttons (one on their own, or the door hits the side of the tub, re-level the dishwasher. Avoid unnecessary Wood Cooktop I service charges. Protruding screw heads will need the 2 Phillips special head Side-Mounting screws set aside in the tub...
... the right rear leveling leg Junction Box Access Hole is required, access it by loosening the junction box bracket screw (through the dishwasher side mount bracket and into the adjacent cabinet on each side). • Install screws through the access hole) and rotate bracket clockwise. Brackets ... side-mounting brackets • Remove plug buttons (one on their own, or the door hits the side of the tub, re-level the dishwasher. Avoid unnecessary Wood Cooktop I service charges. Protruding screw heads will need the 2 Phillips special head Side-Mounting screws set aside in the tub...
Installation Instructions
Page 13
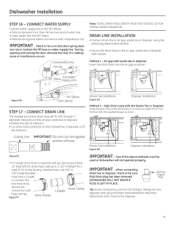
...line to air gap, waste tee or disposer using the previously determined method. • Secure the drain hose to the factory installed hose. DISHWASHER WILL NOT DRAIN IF PLUG IS LEFT IN PLACE. IMPORTANT- Cutting Line IMPORTANT: Do not cut corrugated portion of 10' to the air ...end of 32" from the floor with compression nut. Reroute the lines if a rubbing noise or interference occurs. Secure the connection with clamps. Dishwasher Installation STEP 16 - CONNECT WATER SUPPLY Connect water supply line to a minimum height of water line. • Insert water line into the air...
...line to air gap, waste tee or disposer using the previously determined method. • Secure the drain hose to the factory installed hose. DISHWASHER WILL NOT DRAIN IF PLUG IS LEFT IN PLACE. IMPORTANT- Cutting Line IMPORTANT: Do not cut corrugated portion of 10' to the air ...end of 32" from the floor with compression nut. Reroute the lines if a rubbing noise or interference occurs. Secure the connection with clamps. Dishwasher Installation STEP 16 - CONNECT WATER SUPPLY Connect water supply line to a minimum height of water line. • Insert water line into the air...
Installation Instructions
Page 14
... required for best wash performance. See Step 14. Check to the back of the junction box with a strain relief. • Locate the three dishwasher wires, (white, black and green) with power cord. u Check door alignment with tub. See Step 16. Contact with door springs or other ...32" minimum height. 14 Figure II Ground White Black AWARNING If house wiring is not 2-wire with other components. If door hits tub, level dishwasher. See Step 14. Verify that door spring does not contact water line, fill hose, or other components. u Read the Owner's Manual for leaks...
... required for best wash performance. See Step 14. Check to the back of the junction box with a strain relief. • Locate the three dishwasher wires, (white, black and green) with power cord. u Check door alignment with tub. See Step 16. Contact with door springs or other ...32" minimum height. 14 Figure II Ground White Black AWARNING If house wiring is not 2-wire with other components. If door hits tub, level dishwasher. See Step 14. Verify that door spring does not contact water line, fill hose, or other components. u Read the Owner's Manual for leaks...
Installation Instructions
Page 15
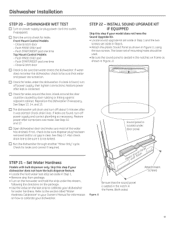
... feature. • Locate the hard water test strip set of the water has drained. Refer to s't , Be sure that water enters the dishwasher. Dishwasher Installation STEP 20 - Push START/RESET pad one time Top Mount Control Models: - Restore power after corrections are made. u Check for leaks ...sure most of mounting holes should be sure that water and power are found , turn off about 5 minutes after it is clear. u Run the dishwasher through another "Rinse Only" cycle. to the section titled "Water Hardness Calibration" in Step 1. • Remove strip from package. • Turn...
... feature. • Locate the hard water test strip set of the water has drained. Refer to s't , Be sure that water enters the dishwasher. Dishwasher Installation STEP 20 - Push START/RESET pad one time Top Mount Control Models: - Restore power after corrections are made. u Check for leaks ...sure most of mounting holes should be sure that water and power are found , turn off about 5 minutes after it is clear. u Run the dishwasher through another "Rinse Only" cycle. to the section titled "Water Hardness Calibration" in Step 1. • Remove strip from package. • Turn...
Installation Instructions
Page 16
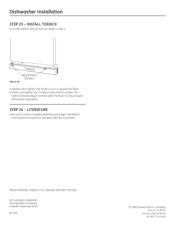
... Instructions and product samples with the floor to ensure quiet dishwasher operation. Dishwasher Installation STEP 23 - No. 206C1559P183 ND 08D-252815/08) The toekick should stay in step 5. SPECIFICATIONS SUBJECT TO CHANGE WITHOUT NOTICE GE Consumer & Industrial General Electric Company Louisville, Kentucky 40225 ge.com © 2008 General Electric Company Pub. INSTALL TOEKICK •...
... Instructions and product samples with the floor to ensure quiet dishwasher operation. Dishwasher Installation STEP 23 - No. 206C1559P183 ND 08D-252815/08) The toekick should stay in step 5. SPECIFICATIONS SUBJECT TO CHANGE WITHOUT NOTICE GE Consumer & Industrial General Electric Company Louisville, Kentucky 40225 ge.com © 2008 General Electric Company Pub. INSTALL TOEKICK •...


