GE CDWT9 - Cafe 24 in. Dishwasher Support and Manuals
Get Help and Manuals for this General Electric item
Popular GE CDWT9 Manual Pages
Installation Instructions - Page 1
S
Installation Instructions - Page 2
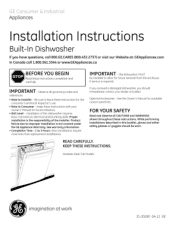
Installation Preparation
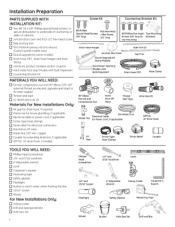
PARTS SUPPLIED WITH INSTALLATION KIT:
[] Two #8-18 x 5/8" Phillips special head screws, to secure dishwasher to underside of countertop or sides of cabinets.
[] Junction box cover and #10-1/2" hex-head screw
[] Side and top trim [] Trim Panel Accessory Kit (not shown)
(Custom panel models only) [] Sound upgrade kit (some models...
Bucket
Hole Saw Set
Drill and Bits ...
Installation Instructions - Page 3
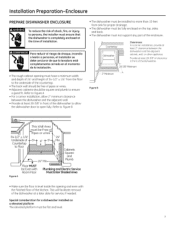
... for a dishwasher installed on the top, sides and back.
• The dishwasher must not support any part of the enclosure.
Refer to persons, the installer must ensure that the dishwasher is level...
Square and
Plumb
Plumbing and Electric Service Must Enter Shaded Area
• Hake sure the floor is completely enclosed at least 28-3/8" in front of the dishwasher.
28-3/8" Minimum
\
2" ...
Installation Instructions - Page 5
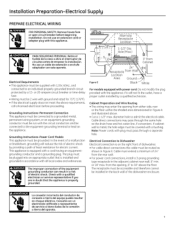
... with a qualified electrician or service representative if gou are in doubt that is installed and grounded in Figure E.Cable must be 2 wire with ground and rated for electric current.
If cabinet
wall is on the appliance.
Electrical Connection to the equipment-grounding terminal or lead on the right front of dishwasher. • For cable direct...
Installation Instructions - Page 6

...-left side of the dishwasher.
Use a bucket to clean out debris. Lower pressures could cause the water valve to accommodate the water line. Installation Preparation-Hot Water Supplg
PREPARE...Install a hand shut-off valve in Figure F.
• The line may pass through the same hole as the electrical cable and drain hose, or an additional 1-1/2" diameter hole may be required by local codes...
Installation Instructions - Page 7
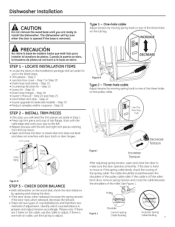
... 22 • Sound upgrade kit (selected models) - STEP 2 -INSTALL TRIM PIECES
In this ...installation package and set aside in the listed steps.
• Trim pieces - If the cable is one hole on the tub leg. Step 12 • Screw Kit - Step 18 • Owner's Manual- Identify which counterbalance is removed. Step 20 and Step 25 • Hard Water test strip - Dishwasher Installation...
Installation Instructions - Page 8

... WOOD BASE, INSTALL LEVELING LEGS
IMPORTANT-
Maximum power cord length is 6 feet.
i
/
/
S
White
7
Figure K
• Screw leveling legs back into the dishwasher frame approximately Z/8" from the screw kit set
screws aside
for use in junction box bracket. • Connect like-colored dishwasher and power cord wires. If your model does not have a sound upgrade kit, this...
Installation Instructions - Page 9
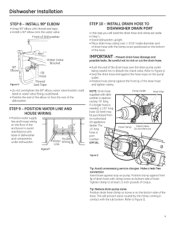
INSTALL 90 ° ELBOW
• Wrap 90° elbow with thread seal tape. • Install a 90° elbow onto the water valve.
Front of Dishwasher
_> Dishwasher Installation
STEP 8 -
Installation Instructions - Page 10
...on the back side of the door.
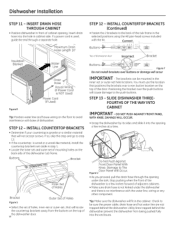
INSTALL COUNTERTOP BRACKETS
• Determine if your countertop is used, guide the end through the opening under the dishwasher
and there is no interference with the ... Wiring (If Power Cord is wood or a wood-like material, install the countertop brackets set , that positions the brackets over the push buttons will occur
IMPORTANT- DO NOT PUSH ...
Installation Instructions - Page 11
...Countertop
/ /
lVlin./
Figure ×
Dishwasher Door
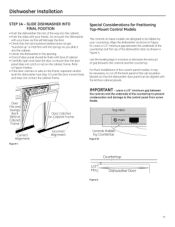
11 Special Considerations for Positioning
Top-Mount Control Models
The controls on these models are designed to ensure that the tub ...Alignment
Figure V
Door Catches )n Cabinet Frame
I
Incorrect / "_._ Alignment
IM PORTANT- Dishwasher Installation
STEP 14- Leave a 1/2" minimum gap between the underside of the countertop (]nd ...
Installation Instructions - Page 12
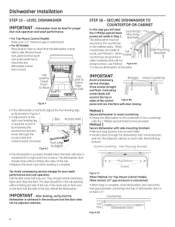
... should close without hitting the side of the tub, relevel the dishwasher. Tip: Avoid unnecessarg service charges for proper
dish rack operation and wash performance.
• For Top-Mount Control Models: Make sure 1/2" minimum gap is maintained.
• For All Models: Place level on their own, or the door hits the side of the...
Installation Instructions - Page 13
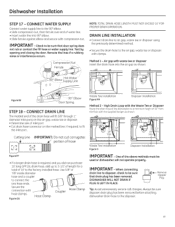
... 7/8" inside diameter
hose and u coupler to be sure DISHWASHERWILL NOT DRAIN IF tPhLaUt GdIrSaiLnEpFlTuIgNhPaLsAbCeEe.n removed.
__
k:#
Remove
Hopper Plug
Tip: Avoid unnecessary service coil charges. Method 1 -
IM PORTANT- Dishwasher Installation
STEP 17 - CONNECT WATER SUPPLY
Connect water supply line to the 90 ° elbow. • Slide compression nut, then ferrule over end...
Installation Instructions - Page 14
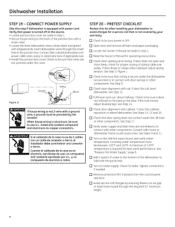
...secure under the cover. CONNECT POWER SUPPLY
Skip this list after installing gour dishwasher to avoid charges for operating instructions.
[]Check door opening and closing. See Step 9.
[]Check ...Manual set aside in
contact with tub. If door drops or closes when released, adjust spring tension. Insert dishwasher wires through the small hole in step 1.
[]Read the Owner's Manual for a service...
Installation Instructions - Page 15
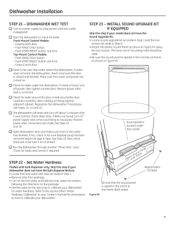
... Upgrade Kit. • Locate sound upgrade kit set aside in Step 1 and the two
screws set aside in Figure KK using
the two screws. STEP 22 - Dishwasher Installation
STEP 21 - If water does not enter the dishwasher, check to check for leaks and correct if required.
STEP 23 - INSTALL SOUND UPGRADE KIT
IF EQUIPPED
Skip this step if your model...
Installation Instructions - Page 16
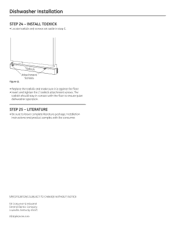
... and tighten the 2 toekick attachment screws. STEP 25 - SPECIFICATIONS SUBJECT TO CHANGE WITHOUT NOTICE
GE Consumer & Industrial General Electric Company Louisville, Kentucky 40225
GEAppliances.com LITERATURE
• Be sure to leave complete literature package, Installation Instructions and product samples with the floor to ensure quiet dishwasher operation. The
toekick should stay in step...
GE CDWT9 Reviews
We have not received any reviews for GE yet.