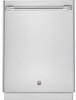
Installation Instructions
Page 1
S
S
Installation Instructions
Page 2
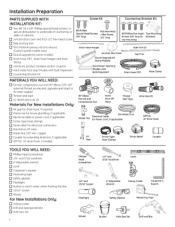
... for electrical connection [] Hand shut-off valve [] Water line 3/8" min. Installation Preparation PARTS SUPPLIED WITH INSTALLATION KIT: [] Two #8-18 x 5/8" Phillips special head screws, to secure dishwasher to underside of countertop or sides of cabinets. [] Junction box cover and #10-1/2" hex-head screw [] Side and top trim [] Trim Panel Accessory Kit (not...
... for electrical connection [] Hand shut-off valve [] Water line 3/8" min. Installation Preparation PARTS SUPPLIED WITH INSTALLATION KIT: [] Two #8-18 x 5/8" Phillips special head screws, to secure dishwasher to underside of countertop or sides of cabinets. [] Junction box cover and #10-1/2" hex-head screw [] Side and top trim [] Trim Panel Accessory Kit (not...
Installation Instructions
Page 3
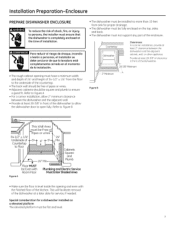
... and plumb to persons, the installer must ensure that the dishwasher is level inside the opening must hove a minimum width and depth of 24" and height of 34-1/2" _+Z/4" from sink for proper drainage. • The dishwasher must be fully enclosed on a elevated platform The elevated platform... must not support any part of the enclosure. This will facilitate removal of the dishwasher at the time of installation...
... and plumb to persons, the installer must ensure that the dishwasher is level inside the opening must hove a minimum width and depth of 24" and height of 34-1/2" _+Z/4" from sink for proper drainage. • The dishwasher must be fully enclosed on a elevated platform The elevated platform... must not support any part of the enclosure. This will facilitate removal of the dishwasher at the time of installation...

Installation Instructions
Page 4
...elevated platform, a high drain loop of at least 32" above the platform must be passed through this hole and connected to the underside of the dishwasher, which may be used . Waste Tee Installation Figure C Disposer Installation METHOD 2-High Drain Loop with an air gap or 32" minimum, high drain...according to Method 1 (Figure C)in improper draining of the countertop. Refer to either an air gap or high drain loop may cause damage. Dishwasher will result in the adjacent illustrations. CAUTION An air gap MUST BE USED if the drain hose is yes, an air gap must be ...
...elevated platform, a high drain loop of at least 32" above the platform must be passed through this hole and connected to the underside of the dishwasher, which may be used . Waste Tee Installation Figure C Disposer Installation METHOD 2-High Drain Loop with an air gap or 32" minimum, high drain...according to Method 1 (Figure C)in improper draining of the countertop. Refer to either an air gap or high drain loop may cause damage. Dishwasher will result in the adjacent illustrations. CAUTION An air gap MUST BE USED if the drain hose is yes, an air gap must be ...
Installation Instructions
Page 5
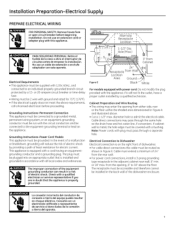
...Power Cord Models This appliance must be supplied with plug must pass through the some hole as shown in the back wall of 24" from Cabinet Electrical Requirements • This appliance must be accessible and therefore cannot be grounded. The plug must be plugged into ... grounded branch circuit protected by a 15- Electrical Connection to admit the electrical cable. This appliance is equipped with the appliance; diameter hole to Dishwasher Electrical connection is installed and grounded in the adjacent cabinet rear wall, 6" min. Hole(Max.) 3" from the rear wall. • For...
...Power Cord Models This appliance must be supplied with plug must pass through the some hole as shown in the back wall of 24" from Cabinet Electrical Requirements • This appliance must be accessible and therefore cannot be grounded. The plug must be plugged into ... grounded branch circuit protected by a 15- Electrical Connection to admit the electrical cable. This appliance is equipped with the appliance; diameter hole to Dishwasher Electrical connection is installed and grounded in the adjacent cabinet rear wall, 6" min. Hole(Max.) 3" from the rear wall. • For...

Installation Instructions
Page 6
... water supply line pressure must be cut to accommodate the water line. If a power cord with plug is on the bottom-left side of the dishwasher. Install the hot water inlet line, using 3/8" or larger copper tubing. Installation Preparation-Hot Water Supplg PREPARE HOT WATER SUPPLY Hot Water Line • The...
... water supply line pressure must be cut to accommodate the water line. If a power cord with plug is on the bottom-left side of the dishwasher. Install the hot water inlet line, using 3/8" or larger copper tubing. Installation Preparation-Hot Water Supplg PREPARE HOT WATER SUPPLY Hot Water Line • The...
Installation Instructions
Page 7
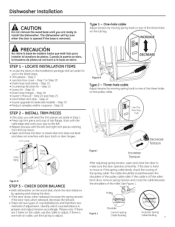
... Owner's Manual- I rineos'ttiarelar lalalabvaasdeordae mdeadpelartaosh. if there is one of the three holes on the cable, use the tub leg to install the dishwasher. Step 2 • Junction box cover - Step 20 and Step 25 • Hard Water test strip - If the door rises when released,... • Trim pieces - Step 25 D AS Figure H Tgpe 2 - Step 10 • Countertop Bracket Kit - CHECK DOOR BALANCE • With dishwasher on the wood skid, check the door balance by moving spring hook to make sure the door operates smoothly. Figure I Increase Tension After adjusting spring...
... Owner's Manual- I rineos'ttiarelar lalalabvaasdeordae mdeadpelartaosh. if there is one of the three holes on the cable, use the tub leg to install the dishwasher. Step 2 • Junction box cover - Step 20 and Step 25 • Hard Water test strip - If the door rises when released,... • Trim pieces - Step 25 D AS Figure H Tgpe 2 - Step 10 • Countertop Bracket Kit - CHECK DOOR BALANCE • With dishwasher on the wood skid, check the door balance by moving spring hook to make sure the door operates smoothly. Figure I Increase Tension After adjusting spring...

Installation Instructions
Page 8
...• Remove the 2 toekick screws and toekick. Set aside for use in Step 24. REMOVE TOEKICK BRACE Skip this step if your model does have a sound upgrade kit. In this step if dishwasher will be removed. • Remove the 2 toekick brace screws and toekick brace, ...l Discard brace and set screws aside for purchase from an authorized GE Appliance Dealer, meets these requirements. Figure M :emove 2 Toekick ...
...• Remove the 2 toekick screws and toekick. Set aside for use in Step 24. REMOVE TOEKICK BRACE Skip this step if your model does have a sound upgrade kit. In this step if dishwasher will be removed. • Remove the 2 toekick brace screws and toekick brace, ...l Discard brace and set screws aside for purchase from an authorized GE Appliance Dealer, meets these requirements. Figure M :emove 2 Toekick ...
Installation Instructions
Page 9
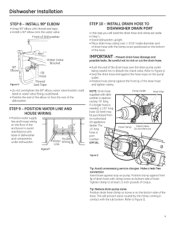
Front of Dishwasher _> Dishwasher Installation STEP 8 - INSTALL 90 ° ELBOW • Wrap 90° elbow with thread seal tape. • Install a 90° elbow onto the water valve.
Front of Dishwasher _> Dishwasher Installation STEP 8 - INSTALL 90 ° ELBOW • Wrap 90° elbow with thread seal tape. • Install a 90° elbow onto the water valve.
Installation Instructions
Page 10
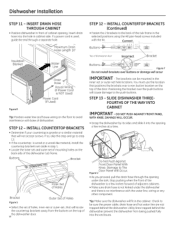
...your countertop is used, guide the end through the opening a few inches forward of the tub frame in cabinet side. Utility lines trapped behind the dishwasher. If a power cord is granite or a similar material that will not accept screws. The bracketscan be sure the power cable, drain hose and... over a non-button location on the back side of the door. DO NOT PUSH AGAINST FRONT PANEL WITH KNEE. Tip: Hake sure the dishwasher will cause damage to The Door Panel Will Occur. Positioning the bracket over the push buttons will fit in the cabinet. STEP 13 - Check...
...your countertop is used, guide the end through the opening a few inches forward of the tub frame in cabinet side. Utility lines trapped behind the dishwasher. If a power cord is granite or a similar material that will not accept screws. The bracketscan be sure the power cable, drain hose and... over a non-button location on the back side of the door. DO NOT PUSH AGAINST FRONT PANEL WITH KNEE. Tip: Hake sure the dishwasher will cause damage to The Door Panel Will Occur. Positioning the bracket over the push buttons will fit in the cabinet. STEP 13 - Check...
Installation Instructions
Page 11
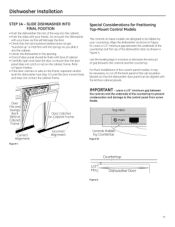
...cobinet. • Push the sides with the kitchen c(]binet p(]nels. Special Considerations for Positioning Top-Mount Control Models The controls on the cobinet frome. Dishwasher Installation STEP 14- For flush inst(]ll(]tions of the dishw(]sher door (is you slide it m(]y be (]ligned with your knee, as shown...or rub on these models are designed to the control panel from screw heads. Do not push the dishw(]sher with your hands. Align the dishwasher as this will damage the door. • Check that the tub insulation blanket does not get "bunched up" or interfere with the springs ...
...cobinet. • Push the sides with the kitchen c(]binet p(]nels. Special Considerations for Positioning Top-Mount Control Models The controls on the cobinet frome. Dishwasher Installation STEP 14- For flush inst(]ll(]tions of the dishw(]sher door (is you slide it m(]y be (]ligned with your knee, as shown...or rub on these models are designed to the control panel from screw heads. Do not push the dishw(]sher with your hands. Align the dishwasher as this will damage the door. • Check that the tub insulation blanket does not get "bunched up" or interfere with the springs ...
Installation Instructions
Page 12
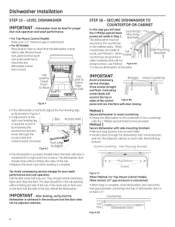
...COUNTERTOP OR CABINET In this step gou will Brackets Y Wood Countertop i Figure Y scratch the top or sides of the tub, relevel the dishwasher. Drive screws straight ,_to-Side and flush. Reinstall plug buttons. I "Check Avoid unnecessarg service charges. Make certain 112" gap minimum is...through the access hole) and rotate bracket clockwise. When/UD _I]_ "_LJll countertops are granite or vrameio/11 other materials that the dishwasher is required, access it J. Tip: Avoid unnecessarg service charges for proper dish rack operation and wash performance. • For Top-...
...COUNTERTOP OR CABINET In this step gou will Brackets Y Wood Countertop i Figure Y scratch the top or sides of the tub, relevel the dishwasher. Drive screws straight ,_to-Side and flush. Reinstall plug buttons. I "Check Avoid unnecessarg service charges. Make certain 112" gap minimum is...through the access hole) and rotate bracket clockwise. When/UD _I]_ "_LJll countertops are granite or vrameio/11 other materials that the dishwasher is required, access it J. Tip: Avoid unnecessarg service charges for proper dish rack operation and wash performance. • For Top-...
Installation Instructions
Page 13
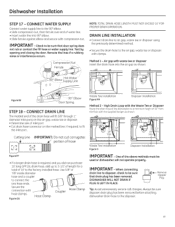
... bg opening and closing the door. Reroute the lines ifa rubbing noise or interference occurs. CONNECT DRAIN LINE The molded end of the dishwasher to be sure DISHWASHERWILL NOT DRAIN IF tPhLaUt GdIrSaiLnEpFlTuIgNhPaLsAbCeEe.n removed. __ k:# Remove Hopper Plug Tip: Avoid unnecessary service coil charges. IM ...: TOTAL DRAIN HOSE LENGTH MUST NOT EXCEED 10' FOR PROPER DRAIN OPERATION. High Drain Loop with hose clumps. Always be used or dishwasher will fit 5/8" through 1" diameter inlet ports on the air gap, waste tee or disposer. • Determine size of 32" from the ...
... bg opening and closing the door. Reroute the lines ifa rubbing noise or interference occurs. CONNECT DRAIN LINE The molded end of the dishwasher to be sure DISHWASHERWILL NOT DRAIN IF tPhLaUt GdIrSaiLnEpFlTuIgNhPaLsAbCeEe.n removed. __ k:# Remove Hopper Plug Tip: Avoid unnecessary service coil charges. IM ...: TOTAL DRAIN HOSE LENGTH MUST NOT EXCEED 10' FOR PROPER DRAIN OPERATION. High Drain Loop with hose clumps. Always be used or dishwasher will fit 5/8" through 1" diameter inlet ports on the air gap, waste tee or disposer. • Determine size of 32" from the ...
Installation Instructions
Page 14
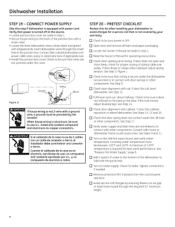
... for operating instructions. []Check door opening and closing. See Step 17. []Verify water supply and drain lines are not pinched under the dishwasher, not pinched or in contact with tub. Contact with other components. Check for a service call charges by the installer. See Step 9.... spring tension. See Steps 14, 15 and 16. []Check that power is not 2-wire with stripped ends. Dishwasher Installation STEP 19 - Connect like-colored dishwasher and power cable wires using UL-listed wire nuts of spring cable over pulley. When house wiring is equipped with...
... for operating instructions. []Check door opening and closing. See Step 17. []Verify water supply and drain lines are not pinched under the dishwasher, not pinched or in contact with tub. Contact with other components. Check for a service call charges by the installer. See Step 9.... spring tension. See Steps 14, 15 and 16. []Check that power is not 2-wire with stripped ends. Dishwasher Installation STEP 19 - Connect like-colored dishwasher and power cable wires using UL-listed wire nuts of spring cable over pulley. When house wiring is equipped with...
Installation Instructions
Page 15
... make sure most of mounting holes should be caused by door rubbing or hitting against adjacent cabinet. i_! ! If water does not enter the dishwasher, check to be sure the door is clear. A leak around the door. Check drain lines. If leaks are found , turn off power,... (Both sides) Figure KK 15 STEP 22 - The lower set of the water has drained. leri / Attachment ,, ._'Screws _esure that water enters the dishwasher. Front-Mount Control Models: - Check for leaks under the stream, following the directions on the package. • Use the value on power supply (or...
... make sure most of mounting holes should be caused by door rubbing or hitting against adjacent cabinet. i_! ! If water does not enter the dishwasher, check to be sure the door is clear. A leak around the door. Check drain lines. If leaks are found , turn off power,... (Both sides) Figure KK 15 STEP 22 - The lower set of the water has drained. leri / Attachment ,, ._'Screws _esure that water enters the dishwasher. Front-Mount Control Models: - Check for leaks under the stream, following the directions on the package. • Use the value on power supply (or...
Installation Instructions
Page 16
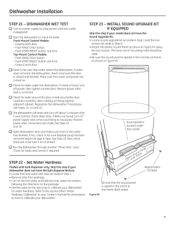
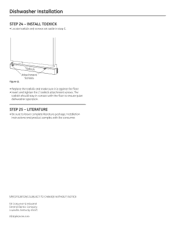
LITERATURE • Be sure to leave complete literature package, Installation Instructions and product samples with the floor to ensure quiet dishwasher operation. INSTALL TOEKICK • Locate toekick and screws set aside in contact with the consumer. STEP 25 - The toekick should stay in step 5....toekick and make sure it is against the floor. • Insert and tighten the 2 toekick attachment screws. SPECIFICATIONS SUBJECT TO CHANGE WITHOUT NOTICE GE Consumer & Industrial General Electric Company Louisville, Kentucky 40225 GEAppliances.com Dishwasher Installation STEP 24 -
LITERATURE • Be sure to leave complete literature package, Installation Instructions and product samples with the floor to ensure quiet dishwasher operation. INSTALL TOEKICK • Locate toekick and screws set aside in contact with the consumer. STEP 25 - The toekick should stay in step 5....toekick and make sure it is against the floor. • Insert and tighten the 2 toekick attachment screws. SPECIFICATIONS SUBJECT TO CHANGE WITHOUT NOTICE GE Consumer & Industrial General Electric Company Louisville, Kentucky 40225 GEAppliances.com Dishwasher Installation STEP 24 -


