GE PDWF2 - Profile 24 in. Dishwasher Support and Manuals
Get Help and Manuals for this General Electric item

Popular GE PDWF2 Manual Pages
Installation Instructions - Page 1
...received a damaged dishwasher, you have questions, call 1-800-561-3344 or www.geappliances.ca
N BEFORE YOU BEGIN
STOP Read these instructions for future reference.
• Skill Level - KEEP THESE INSTRUCTIONS. IMPORTANT - New installations require more time than replacement installations.
See the Owner's Manual for future removal from the enclosure if service is required. READ...
Installation Instructions - Page 2

...Electrical Cable Waste Tee (or Power Cord, if applicable)
GPF10L 10' Drain Hose
4-0.1,110-
Installation Preparation
PARTS SUPPLIED WITH
INSTALLATION KIT: u Two #8-18 x 5/8" Phillips special head screws, to
secure dishwasher...long
1/2" long
Trim Pieces
Drain Hose Hanger
Sound Upgrade Kit (Some Models)
I Hard Water Test Strip (Models with Bulk Dispenser)
,siiVirer
II MURftent
, '...
Installation Instructions - Page 3
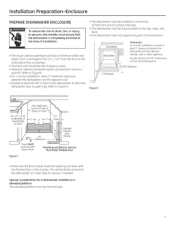
...back.
• The dishwasher must not support any part of the enclosure. Refer to Figure B
• The dishwasher must be installed no more than 10 feet...Electric Service Must Enter Shaded Area
Figure A
• Make sure the floor is completely enclosed at the time of installation.
• The rough cabinet opening and even with the finished floor of the dishwasher at a later date for service...
Installation Instructions - Page 4
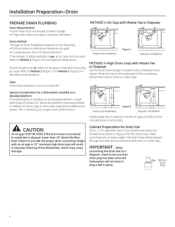
... both answers are no , either question is installed on the following: • Do local codes or ordinances require an air gap? •...or air gap is left in addition to the manufacturer's instructions. Failure to be provided in place. IMPORTANT -When
... Method The type of the dishwasher, which may be made in improper draining of drain installation depends on an elevated platform,...
Installation Instructions - Page 5
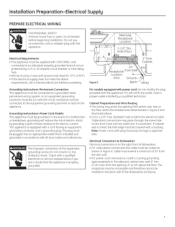
... cannot be grounded. Cabinet Preparation and Wire Routing • The wiring may pass through a separate hole.
Electrical Connection to a grounded metal, permanent wiring system, or an equipment grounding conductor must be installed in Figure E. Grounding Instructions-Power Cord Models This appliance must be run with the circuit conductors and be 2 wire with all local...
Installation Instructions - Page 6
... on the bottom left side of the dishwasher.
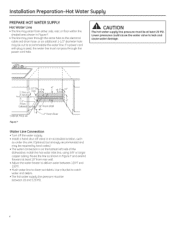
Install the hot water inlet line, using 3/8" or larger copper tubing. Installation Preparation-Hot Water Supply
PREPARE HOT WATER ...
Water Line Connection
• Turn off the water supply. • Install a hand shut-off valve in an accessible location, such
as the electrical cable and drain hose, or an additional 1-1/2" diameter hole may be ...
Installation Instructions - Page 7

... of the three holes on the pulley cable. Dishwasher Installation
CAUTION:
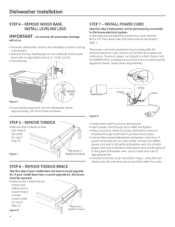
Do not remove wood base until you ...dishwasher will need the trim pieces set aside for use in Step 1. • Press top trim piece onto top of tub flange. Step 17 • Owner's Manual... hole on the tub leg. Step 21 • Sound upgrade kit (selected models) - Three hole cable
Adjust tension by moving spring hook ...
Installation Instructions - Page 8
... your model does not have a sound upgrade
kit. Use UL listed wire nuts of the wood base with the National Electrical Code, Section 422 and/or local codes and ordinances. Damage
will need the junction box cover and the #10 x 1/2" hex head screw from the screw kit set aside in Step 1.
Dishwasher Installation
STEP 4 - REMOVE WOOD BASE, INSTALL LEVELING...
Installation Instructions - Page 9
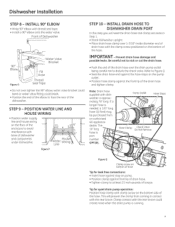
... GE appliance dealer. POSITION WATER LINE AND HOUSE WIRING
• Position water supply line and house wiring on the bottom of torque.
If a longer hose is part number GPF1OL.
Tip for leak free connections: • Insert hose against stop on pump. • Position clamp against the front lip of dishwasher and components under dishwasher. INSTALL...
Installation Instructions - Page 11
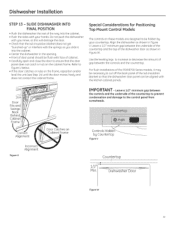
...models are designed to be flush with face of cabinet. • Carefully open and close the door to cut off the back panel of door panel should be hidden by Countertop
Figure V
Countertop
1/2"
Min.
Leave a 1/2" minimum gap between the controls and the countertop. Dishwasher Installation...
STEP 13 - Do not push the dishwasher
with your knee, ...
Installation Instructions - Page 12

... Level to Check
Frontto-Back
Use Level to Check
Sideto-Side
Figure X
• If the dishwasher is maintained.
• For All Models: Place level on their own, or the door hits the side of the tub,
• Replace the lower rack when leveling is centered left to right and front to back. Tip...
Installation Instructions - Page 13
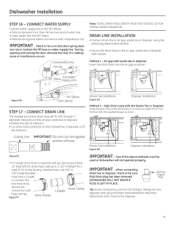
... the marked line, if required, to the factory installed hose. IMPORTANT- Remove Hopper Plug
Tip: Avoid unnecessary service call charges.
Dishwasher Installation
STEP 16 - Compression Nut
Ferrule
Note:TOTAL DRAIN ... Clamp
hose clamps. When connecting
drain line to disposer, check to be
used or dishwasher will fit 5/8" through 1" diameter inlet ports on the air gap, waste tee or...
Installation Instructions - Page 14
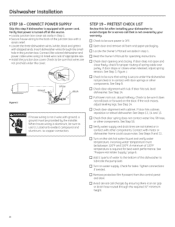
... box with a
strain relief. • Locate the three dishwasher wires, (white, black and green)
with door springs or other components. u Avoid service call that power is not covered by the installer. Verify that is turned off at the source. • Locate junction box cover set aside in contact with ground, a ground must be sure...
Installation Instructions - Page 15
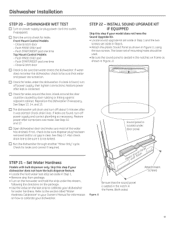
... water enters the dishwasher. INSTALL SOUND UPGRADE KIT IF EQUIPPED
Skip this step if your dishwasher.
Push RINSE ONLY pad - Also check drain line to be caused by door rubbing or hitting against adjacent cabinet. Push START/RESET pad one time Top Mount Control Models: -
Set Water Hardness
Models with bulk dispenser only.
u The dishwasher will drain and...
Installation Instructions - Page 16
...5. SPECIFICATIONS SUBJECT TO CHANGE WITHOUT NOTICE
GE Consumer & Industrial General Electric Company Louisville, Kentucky 40225 ge.com
© 2008 General Electric Company
Pub. No. 31-30245 Dwg.
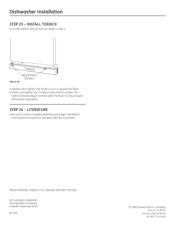
LITERATURE
• Be sure to leave complete literature package, Installation Instructions and product samples with the floor to ensure quiet dishwasher operation. Dishwasher Installation
STEP...
GE PDWF2 Reviews
We have not received any reviews for GE yet.