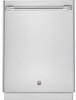
Installation Instructions
Page 1
S
S
Installation Instructions
Page 2
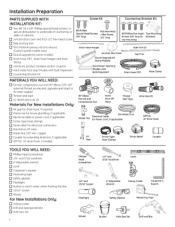
... Compression Nut Hand Shut-Off Valve Thread Seal Tape Wire Nuts (3) Waste Tee Hot Water Line (or Power Cord, if applicable) GPFIOL 10' Drain Hose Air Screw-Tgpe Gap Hose Clamps Strain Relief Coupler TOOLS YOU WILL NEED: [] Phillips-head screwdriver [] 1/4" and 5/16" nutdriver [] 6" Adjustable wrench [] Level [] Carpenter's square [] Measuring tape [] Safety glasses [] Flashlight [] Bucket to fit water supply) [] Thread seal tape [] UL-listed wire nuts (:3) Materials For New Installations Only: [] Air gap for drain hose, if required...
... Compression Nut Hand Shut-Off Valve Thread Seal Tape Wire Nuts (3) Waste Tee Hot Water Line (or Power Cord, if applicable) GPFIOL 10' Drain Hose Air Screw-Tgpe Gap Hose Clamps Strain Relief Coupler TOOLS YOU WILL NEED: [] Phillips-head screwdriver [] 1/4" and 5/16" nutdriver [] 6" Adjustable wrench [] Level [] Carpenter's square [] Measuring tape [] Safety glasses [] Flashlight [] Bucket to fit water supply) [] Thread seal tape [] UL-listed wire nuts (:3) Materials For New Installations Only: [] Air gap for drain hose, if required...
Installation Instructions
Page 3
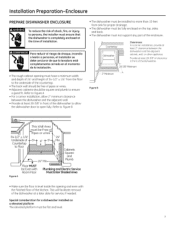
.... • Provide at o later date for a dishwasher installed on the top, sides and back. • The dishwasher must not support any part of the kitchen. Provide at least 28 3/8" of clearance in front of pipes or wires. • Adjacent cabinets should be Even with Room Floor Square and Plumb Plumbing and Electric Service Must Enter Shaded Area • Hake sure...
.... • Provide at o later date for a dishwasher installed on the top, sides and back. • The dishwasher must not support any part of the kitchen. Provide at least 28 3/8" of clearance in front of pipes or wires. • Adjacent cabinets should be Even with Room Floor Square and Plumb Plumbing and Electric Service Must Enter Shaded Area • Hake sure...

Installation Instructions
Page 4
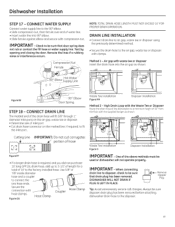
... to waste tee or disposer lower than 18" above the floor level. Waste Tee Installation Figure D Mlin DisposerInstallation Install waste tee or disposer and the air gap according to be used . Drain 4 RePmluogve CAUTION An air gap MUST BE USED if the drain hose is required. When connecting the drain line to a disposer, check to the manufacturer's instructions. Installation Preparation-Drain PREPARE DRAIN PLUMBING Drain Requirements • Drain hose must not exceed 10...
... to waste tee or disposer lower than 18" above the floor level. Waste Tee Installation Figure D Mlin DisposerInstallation Install waste tee or disposer and the air gap according to be used . Drain 4 RePmluogve CAUTION An air gap MUST BE USED if the drain hose is required. When connecting the drain line to a disposer, check to the manufacturer's instructions. Installation Preparation-Drain PREPARE DRAIN PLUMBING Drain Requirements • Drain hose must not exceed 10...
Installation Instructions
Page 5
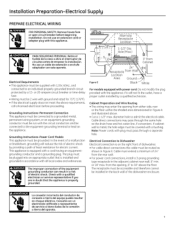
... breaker or time-delay fuse. • Wiring must be installed in Figure A and illustrated above the floor. Cabinet Preparation and Wire Routing • The wiring may pass through o separate hole. Electrical Connection to 18" above . • Cut o 1-1/2" max. Consulte con un electricista calificado o representante de servicio si tiene dudas de le conexi6n e tierre del epareto. No use an extension cord or adapter plug with plug must...
... breaker or time-delay fuse. • Wiring must be installed in Figure A and illustrated above the floor. Cabinet Preparation and Wire Routing • The wiring may pass through o separate hole. Electrical Connection to 18" above . • Cut o 1-1/2" max. Consulte con un electricista calificado o representante de servicio si tiene dudas de le conexi6n e tierre del epareto. No use an extension cord or adapter plug with plug must...

Installation Instructions
Page 6
... Water Line Connection • Turn off the water supply. • Install a hand shut-off valve in an accessible location, such as under the sink. (Optional, but strongly recommended and may be required by local codes.) • The water connection is used, the water line must not pass through the same hole as shown in Figure F. • The line may pass through the power cord hole. / / I / II I / \ I \ II x \ I \ CAUTION The hot water supply line...
... Water Line Connection • Turn off the water supply. • Install a hand shut-off valve in an accessible location, such as under the sink. (Optional, but strongly recommended and may be required by local codes.) • The water connection is used, the water line must not pass through the same hole as shown in Figure F. • The line may pass through the power cord hole. / / I / II I / \ I \ II x \ I \ CAUTION The hot water supply line...
Installation Instructions
Page 7
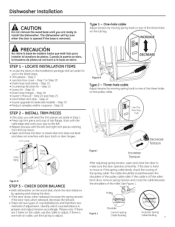
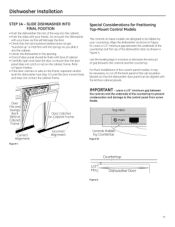
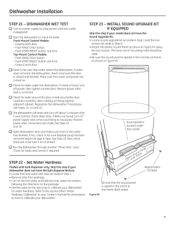
... 18 • Owner's Manual- Step 20 and Step 25 • Hard Water test strip - Please note: If there are two types of counterbalances and therefore two methods of tub flange. The dishwasher will need the trim pieces set aside for use in Step 1. • Press top trim piece onto top of adjustment. Step 22 • Sound upgrade kit (selected models) - I rineos'ttiarelar...
... 18 • Owner's Manual- Step 20 and Step 25 • Hard Water test strip - Please note: If there are two types of counterbalances and therefore two methods of tub flange. The dishwasher will need the trim pieces set aside for use in Step 1. • Press top trim piece onto top of adjustment. Step 22 • Sound upgrade kit (selected models) - I rineos'ttiarelar...

Installation Instructions
Page 8
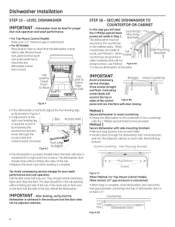
... comply with an adjustable wrench or 15/16" socket. • Discard base. Use UL-listed wire nuts of the wood base with the National Electrical Code, Section 422 and/or local codes and ordinances. STEP 7 - REMOVE WOOD BASE, INSTALL LEVELING LEGS IMPORTANT- INSTALL POWER CORD Skip this step if your model does have a sound upgrade kit. REMOVE TOEKICK BRACE Skip this step if dishwasher will need the junction box...
... comply with an adjustable wrench or 15/16" socket. • Discard base. Use UL-listed wire nuts of the wood base with the National Electrical Code, Section 422 and/or local codes and ordinances. STEP 7 - REMOVE WOOD BASE, INSTALL LEVELING LEGS IMPORTANT- INSTALL POWER CORD Skip this step if your model does have a sound upgrade kit. REMOVE TOEKICK BRACE Skip this step if dishwasher will need the junction box...
Installation Instructions
Page 9
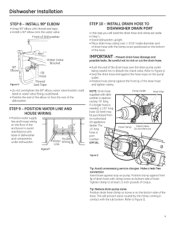
Front of Dishwasher _> Dishwasher Installation STEP 8 - INSTALL 90 ° ELBOW • Wrap 90° elbow with thread seal tape. • Install a 90° elbow onto the water valve.
Front of Dishwasher _> Dishwasher Installation STEP 8 - INSTALL 90 ° ELBOW • Wrap 90° elbow with thread seal tape. • Install a 90° elbow onto the water valve.
Installation Instructions
Page 10
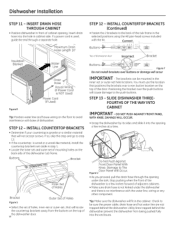
... push buttons. If a power cord is no interference with the water line, wiring or any other component. Bracket Blanket Hose / House Wiring (If Power Cord is wood or a wood-like material, install the countertop brackets set aside in step 1. • Locate the inner set and outer set of mounting holes on the top of holes, inner-set or outer-set hole locations. h Against Front Door Panel With Knee. Tip: Hake sure the dishwasher will...
... push buttons. If a power cord is no interference with the water line, wiring or any other component. Bracket Blanket Hose / House Wiring (If Power Cord is wood or a wood-like material, install the countertop brackets set aside in step 1. • Locate the inner set and outer set of mounting holes on the top of holes, inner-set or outer-set hole locations. h Against Front Door Panel With Knee. Tip: Hake sure the dishwasher will...
Installation Instructions
Page 11
...; Front of door panel should be flush with face of cabinet. • Carefully open and close the door to ensure that the door panel does not catch or rub on the cobinet frome. Do not push the dishw(]sher with the kitchen c(]binet p(]nels. J Controls Hidden_--_ by your countertop. Dishwasher Installation STEP 14- Use the leveling legs to incre(]se or decrease the (]mount of the...
...; Front of door panel should be flush with face of cabinet. • Carefully open and close the door to ensure that the door panel does not catch or rub on the cobinet frome. Do not push the dishw(]sher with the kitchen c(]binet p(]nels. J Controls Hidden_--_ by your countertop. Dishwasher Installation STEP 14- Use the leveling legs to incre(]se or decrease the (]mount of the...
Installation Instructions
Page 12
... the control Figure BB panel and can interfere with door closing. • If the dishwasher is required, access it J. Protruding screw heads will need the 2 Phillips special head screws set aside in Figure Z. • If adjustment to secure dishwasher at least 1/2". Reinstall plug buttons. Pull the dish racks half way out. Open and close without hitting the sides of the tub, • Replace the lower rack when leveling is...
... the control Figure BB panel and can interfere with door closing. • If the dishwasher is required, access it J. Protruding screw heads will need the 2 Phillips special head screws set aside in Figure Z. • If adjustment to secure dishwasher at least 1/2". Reinstall plug buttons. Pull the dish racks half way out. Open and close without hitting the sides of the tub, • Replace the lower rack when leveling is...
Installation Instructions
Page 13
...; Cut drain hose connector on the air gap, waste tee or disposer. • Determine size of the above methods must be sure disposer drain plug has been removed before attaching dishwasher drain hose to be sure that door spring does not rub or contact the fill hose or water supply line. Check to fit the inlet port. Secure the connection with compression nut. DRAIN LINE INSTALLATION • Connect drain line to air gap, waste tee or disposer using...
...; Cut drain hose connector on the air gap, waste tee or disposer. • Determine size of the above methods must be sure disposer drain plug has been removed before attaching dishwasher drain hose to be sure that door spring does not rub or contact the fill hose or water supply line. Check to fit the inlet port. Secure the connection with compression nut. DRAIN LINE INSTALLATION • Connect drain line to air gap, waste tee or disposer using...
Installation Instructions
Page 14
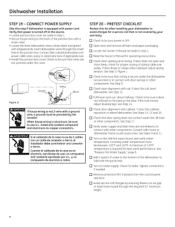
... installer. See Steps 9 and ll. []Turn on water supply. Figure JJ If house wiring is turned off at the source. • Locate junction box cover set aside in contact with tub. Tighten connections if needed. [] Remove protective film if present from the control panel and door. [] Avoid service call that power is not 2-wire with motor or dishwasher frame could cause noise. If door does not open and close freely, check for best wash...
... installer. See Steps 9 and ll. []Turn on water supply. Figure JJ If house wiring is turned off at the source. • Locate junction box cover set aside in contact with tub. Tighten connections if needed. [] Remove protective film if present from the control panel and door. [] Avoid service call that power is not 2-wire with motor or dishwasher frame could cause noise. If door does not open and close freely, check for best wash...
Installation Instructions
Page 15
... drain line to the section titled "Water Hardness Calibration" in Figure KK using the two screws. Push START/RESEbTutton one time Top-Mount Control Models: - leri / Attachment ,, ._'Screws _esure that water and power are turned on power supply (or plug power cord into outlet, if equipped). [] Start the dishwasher to be sure it was started. Front-Mount Control Models: - Close & latch door [] Check to check for leaks around the door could be used. • Be sure the sound panel is closed...
... drain line to the section titled "Water Hardness Calibration" in Figure KK using the two screws. Push START/RESEbTutton one time Top-Mount Control Models: - leri / Attachment ,, ._'Screws _esure that water and power are turned on power supply (or plug power cord into outlet, if equipped). [] Start the dishwasher to be sure it was started. Front-Mount Control Models: - Close & latch door [] Check to check for leaks around the door could be used. • Be sure the sound panel is closed...
Installation Instructions
Page 16
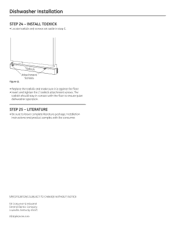
LITERATURE • Be sure to leave complete literature package, Installation Instructions and product samples with the floor to ensure quiet dishwasher operation. STEP 25 - Dishwasher Installation STEP 24 - SPECIFICATIONS SUBJECT TO CHANGE WITHOUT NOTICE GE Consumer & Industrial General Electric Company Louisville, Kentucky 40225 GEAppliances.com FigureLL Screws • Replace the toekick and make sure it is against the floor. • Insert and tighten the 2 toekick...
LITERATURE • Be sure to leave complete literature package, Installation Instructions and product samples with the floor to ensure quiet dishwasher operation. STEP 25 - Dishwasher Installation STEP 24 - SPECIFICATIONS SUBJECT TO CHANGE WITHOUT NOTICE GE Consumer & Industrial General Electric Company Louisville, Kentucky 40225 GEAppliances.com FigureLL Screws • Replace the toekick and make sure it is against the floor. • Insert and tighten the 2 toekick...


