Owners Manual
Page 4
...wall. • Metal or foil touching the side of the oven. • Foil not molded to build up on the microwave or the fan filters. • In the event of the microwave often. Take care to prevent the starting and spreading of accidental cooking fires while the vent fan is... covering the pan completely with a lid, cookie sheet or flat tray. • Use care when cleaning the vent fan filters. Boilovers cause smoking and greasy spillovers that may damage the filters. • When preparing flaming foods under certain conditions (see arcing, press the OFF pad and correct the problem. To...
...wall. • Metal or foil touching the side of the oven. • Foil not molded to build up on the microwave or the fan filters. • In the event of the microwave often. Take care to prevent the starting and spreading of accidental cooking fires while the vent fan is... covering the pan completely with a lid, cookie sheet or flat tray. • Use care when cleaning the vent fan filters. Boilovers cause smoking and greasy spillovers that may damage the filters. • When preparing flaming foods under certain conditions (see arcing, press the OFF pad and correct the problem. To...
Owners Manual
Page 7
...kits fill in the additional width to have a qualified electrician or service technician install an outlet near the appliance. This appliance is your GE supplier. Do not use an adapter plug with a properly grounded 3-prong wall outlet. not for the electric current. If the outlet is... filler panels. The plug must be plugged into its own electrical outlet to whether the appliance is properly grounded. Filter Kits JX81H-Recirculating Charcoal Filter Kit Filter kits are not completely understood, or if doubt exists as to prevent flickering of lights, blowing of fuse or ...
...kits fill in the additional width to have a qualified electrician or service technician install an outlet near the appliance. This appliance is your GE supplier. Do not use an adapter plug with a properly grounded 3-prong wall outlet. not for the electric current. If the outlet is... filler panels. The plug must be plugged into its own electrical outlet to whether the appliance is properly grounded. Filter Kits JX81H-Recirculating Charcoal Filter Kit Filter kits are not completely understood, or if doubt exists as to prevent flickering of lights, blowing of fuse or ...
Owners Manual
Page 8
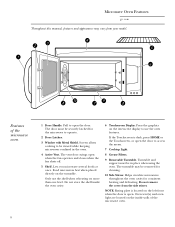
... the Touchscreen is open the door to use the shelf when reheating on the interactive display to access the menu. 7 Cooktop Light. 8 Grease Filters. 9 Removable Turntable. Do not store the shelf inside walls of the microwave oven 1 Door Handle. Do not remove the cover from your model...throughout the oven cavity for consistent heating and defrosting. Features of the microwave oven. 8 Only use the oven features. Microwave Oven Features ge.com Throughout this manual, features and appearance may be removed for cleaning. 10 Side Stirrer. Pull to open when the fan operates and ...
... the Touchscreen is open the door to use the shelf when reheating on the interactive display to access the menu. 7 Cooktop Light. 8 Grease Filters. 9 Removable Turntable. Do not store the shelf inside walls of the microwave oven 1 Door Handle. Do not remove the cover from your model...throughout the oven cavity for consistent heating and defrosting. Features of the microwave oven. 8 Only use the oven features. Microwave Oven Features ge.com Throughout this manual, features and appearance may be removed for cleaning. 10 Side Stirrer. Pull to open when the fan operates and ...
Owners Manual
Page 10
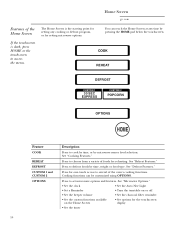
... by time, or by pressing the HOME pad below the touchscreen. Press to defrost foods by time, weight or food type. Home Screen ge.com Features of the Home Screen If the touchscreen is the starting point for setting any time by microwave sensor food selection. You can be...; Set the Auto Nite Light • Set a Reminder • Turn the turntable on or off • Set the beeper volume • Set the charcoal filter reminder • Set the custom functions available on the Home Screen • Set options for reheating. Press to choose from a variety of the oven's cooking...
... by time, or by pressing the HOME pad below the touchscreen. Press to defrost foods by time, weight or food type. Home Screen ge.com Features of the Home Screen If the touchscreen is the starting point for setting any time by microwave sensor food selection. You can be...; Set the Auto Nite Light • Set a Reminder • Turn the turntable on or off • Set the beeper volume • Set the charcoal filter reminder • Set the custom functions available on the Home Screen • Set options for reheating. Press to choose from a variety of the oven's cooking...
Owners Manual
Page 28
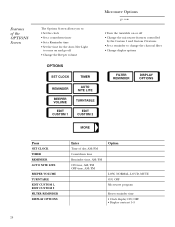
... and go off • Change the Beeper volume OPTIONS SET CLOCK TIMER REMINDER BEEPER VOLUME EDIT CUSTOM 1 AUTO NITE LITE TURNTABLE EDIT CUSTOM 2 Microwave Options ge.com • Turn the turntable on or off • Change the microwave features controlled by the Custom 1 and Custom 2 features • Set a reminder to change... DISPLAY OPTIONS MORE Press SET CLOCK TIMER REMINDER AUTO NITE LITE BEEPER VOLUME TURNTABLE EDIT CUSTOM 1, EDIT CUSTOM 2 FILTER REMINDER DISPLAY OPTIONS Enter Time of day, AM/PM Countdown time Reminder time, AM/PM ON time, AM/PM OFF time, AM/PM Option LOW, ...
... and go off • Change the Beeper volume OPTIONS SET CLOCK TIMER REMINDER BEEPER VOLUME EDIT CUSTOM 1 AUTO NITE LITE TURNTABLE EDIT CUSTOM 2 Microwave Options ge.com • Turn the turntable on or off • Change the microwave features controlled by the Custom 1 and Custom 2 features • Set a reminder to change... DISPLAY OPTIONS MORE Press SET CLOCK TIMER REMINDER AUTO NITE LITE BEEPER VOLUME TURNTABLE EDIT CUSTOM 1, EDIT CUSTOM 2 FILTER REMINDER DISPLAY OPTIONS Enter Time of day, AM/PM Countdown time Reminder time, AM/PM ON time, AM/PM OFF time, AM/PM Option LOW, ...
Owners Manual
Page 31
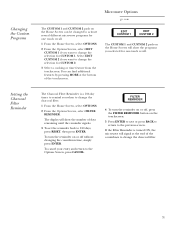
...the selection for CUSTOM 1. Changing the Custom Programs Microwave Options ge.com The CUSTOM 1 and CUSTOM 2 pads on the Home Screen can find additional features by pressing MORE at the end of the countdown to change the charcoal filter. 1 From the Home Screen, select OPTIONS. 2 From the...can be changed to change the selection for CUSTOM 2. 3 Select a cooking or time feature from the touchscreen. Setting the Charcoal Filter Reminder The Charcoal Filter Reminder is turned ON, the microwave will signal at the bottom of days remaining until the reminder signals. 3 To set the reminder...
...the selection for CUSTOM 1. Changing the Custom Programs Microwave Options ge.com The CUSTOM 1 and CUSTOM 2 pads on the Home Screen can find additional features by pressing MORE at the end of the countdown to change the charcoal filter. 1 From the Home Screen, select OPTIONS. 2 From the...can be changed to change the selection for CUSTOM 2. 3 Select a cooking or time feature from the touchscreen. Setting the Charcoal Filter Reminder The Charcoal Filter Reminder is turned ON, the microwave will signal at the bottom of days remaining until the reminder signals. 3 To set the reminder...
Owners Manual
Page 38
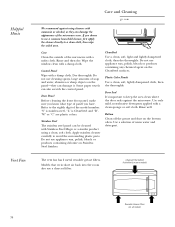
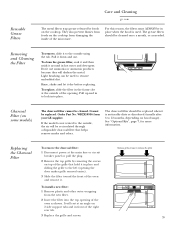
... with a clean sponge or soft cloth. Apply stainless cleaner carefully to the eighth digit of panel you choose to use a charcoal filter. Do not use appliance wax, polish, bleach or products containing any chemical agent on Stainless Steel finishes. Models that recirculate air back...Use a clean, soft, light and lightly dampened cloth, then dry thoroughly. The vent fan has 2 metal reusable grease filters. Rinse well. Helpful Hints Vent Fan Care and Cleaning ge.com We recommend against the microwave. Door Seal It's important to a clean cloth, then wipe the soiled area.
... with a clean sponge or soft cloth. Apply stainless cleaner carefully to the eighth digit of panel you choose to use a charcoal filter. Do not use appliance wax, polish, bleach or products containing any chemical agent on Stainless Steel finishes. Models that recirculate air back...Use a clean, soft, light and lightly dampened cloth, then dry thoroughly. The vent fan has 2 metal reusable grease filters. Rinse well. Helpful Hints Vent Fan Care and Cleaning ge.com We recommend against the microwave. Door Seal It's important to a clean cloth, then wipe the soiled area.
Owners Manual
Page 39
... it dry before replacing. Light brushing can be cleaned once a month, or as shown. Order Part No. The charcoal filter should be used . Reusable Grease Filters Care and Cleaning ge.com The metal filters trap grease released by removing the screws on the cooktop from damaging the inside of the microwave. Pull up and...
... it dry before replacing. Light brushing can be cleaned once a month, or as shown. Order Part No. The charcoal filter should be used . Reusable Grease Filters Care and Cleaning ge.com The metal filters trap grease released by removing the screws on the cooktop from damaging the inside of the microwave. Pull up and...
Installation Instructions
Page 2
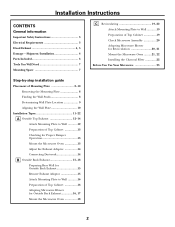
... Preparation of Top Cabinet 19 Check Microwave Assembly 20 Adapting Microwave Blower for Recirculation 20, 21 Mount the Microwave Oven ..........21, 22 Installing the Charcoal Filter 22 Before You Use Your Microwave 23 Step-by-step installation guide Placement of Mounting Plate 8-10 Removing the Mounting Plate 8 Finding the Wall Studs...
... Preparation of Top Cabinet 19 Check Microwave Assembly 20 Adapting Microwave Blower for Recirculation 20, 21 Mount the Microwave Oven ..........21, 22 Installing the Charcoal Filter 22 Before You Use Your Microwave 23 Step-by-step installation guide Placement of Mounting Plate 8-10 Removing the Mounting Plate 8 Finding the Wall Studs...
Installation Instructions
Page 6
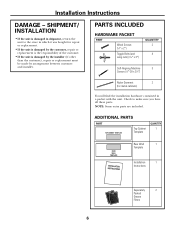
... a packet with the unit. NOTE: Some extra parts are included. ADDITIONAL PARTS PART Top Cabinet Template QUANTITY 1 Rear Wall 1 Template Installation 1 Instructions Separately 2 Packed Grease Filters 6 Installation Instructions DAMAGE - PARTS INCLUDED HARDWARE PACKET PART Wood Screws (1⁄4″ x 2″) Toggle Bolts (and wing nuts) (3⁄16″ x 3″) QUANTITY 2 4 Self-Aligning...
... a packet with the unit. NOTE: Some extra parts are included. ADDITIONAL PARTS PART Top Cabinet Template QUANTITY 1 Rear Wall 1 Template Installation 1 Instructions Separately 2 Packed Grease Filters 6 Installation Instructions DAMAGE - PARTS INCLUDED HARDWARE PACKET PART Wood Screws (1⁄4″ x 2″) Toggle Bolts (and wing nuts) (3⁄16″ x 3″) QUANTITY 2 4 Self-Aligning...
Installation Instructions
Page 8
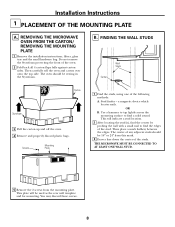
... the mounting plate. Stud finder - a magnetic device which locates nails. REMOVING THE MICROWAVE OVEN FROM THE CARTON/ REMOVING THE MOUNTING PLATE 1 Remove the installation instructions, filters, glass tray and the small hardware bag. The center of any adjacent studs should be used as the rear wall template and for mounting. Screws...
... the mounting plate. Stud finder - a magnetic device which locates nails. REMOVING THE MICROWAVE OVEN FROM THE CARTON/ REMOVING THE MOUNTING PLATE 1 Remove the installation instructions, filters, glass tray and the small hardware bag. The center of any adjacent studs should be used as the rear wall template and for mounting. Screws...
Installation Instructions
Page 11
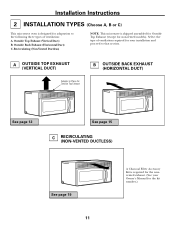
... Place for Outside Top Exhaust B OUTSIDE BACK EXHAUST (HORIZONTAL DUCT) See page 12 See page 15 C RECIRCULATING (NON-VENTED DUCTLESS) See page 19 11 A Charcoal Filter Accessory Kit is shipped assembled for Outside Top Exhaust (except for non-vented models). Outside Back Exhaust (Horizontal Duct) C.
... Place for Outside Top Exhaust B OUTSIDE BACK EXHAUST (HORIZONTAL DUCT) See page 12 See page 15 C RECIRCULATING (NON-VENTED DUCTLESS) See page 19 11 A Charcoal Filter Accessory Kit is shipped assembled for Outside Top Exhaust (except for non-vented models). Outside Back Exhaust (Horizontal Duct) C.
Installation Instructions
Page 14
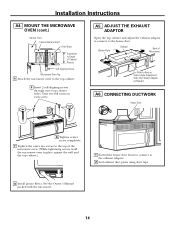
... Cabinet Recess Self-Aligning Screw Microwave Oven Top 4 Attach the microwave oven to the exhaust adaptor. 2 Seal exhaust duct joints using duct tape. 8 Install grease filters. Blower Plate Damper Back of Microwave For Front-to-Back or Side-to the house duct. Installation Instructions A4.
... Cabinet Recess Self-Aligning Screw Microwave Oven Top 4 Attach the microwave oven to the exhaust adaptor. 2 Seal exhaust duct joints using duct tape. 8 Install grease filters. Blower Plate Damper Back of Microwave For Front-to-Back or Side-to the house duct. Installation Instructions A4.
Installation Instructions
Page 18
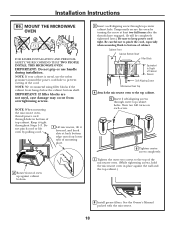
... Recess Self-Aligning Screw Microwave Oven Top 4 Attach the microwave oven to bottom of oven up against the wall and the top cabinet.) 8 Install grease filters. NOTE: If your cabinet is metal, use handle during installation. Do not pinch cord or lift oven by turning the screw at back bottom edge...
... Recess Self-Aligning Screw Microwave Oven Top 4 Attach the microwave oven to bottom of oven up against the wall and the top cabinet.) 8 Install grease filters. NOTE: If your cabinet is metal, use handle during installation. Do not pinch cord or lift oven by turning the screw at back bottom edge...
Installation Instructions
Page 19
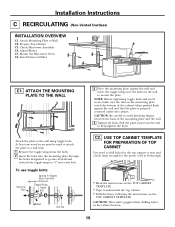
... against the wall and insert the toggle wings into drywall and reattach the toggle wings to mount the plate. Prepare Top Cabinet C3. Install Charcoal Filter C1. USE TOP CABINET TEMPLATE FOR PREPARATION OF TOP CABINET You need to drill holes for the top support screws and a hole large enough for...
... against the wall and insert the toggle wings into drywall and reattach the toggle wings to mount the plate. Prepare Top Cabinet C3. Install Charcoal Filter C1. USE TOP CABINET TEMPLATE FOR PREPARATION OF TOP CABINET You need to drill holes for the top support screws and a hole large enough for...
Installation Instructions
Page 22
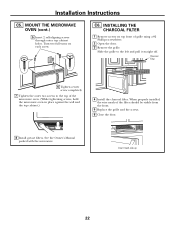
... center screw completely. 7 Tighten the outer two screws to the left and pull it straight off. INSTALLING THE CHARCOAL FILTER 1 Remove screws on each screw. See the Owner's Manual packed with the microwave. Slide the grille to the top of the microwave oven. (While tightening ...screws, hold the microwave oven in place against the wall and the top cabinet.) 4 Install the charcoal filter. MOUNT THE MICROWAVE OVEN (cont.) 5 Insert 2 self-aligning screws through outer top cabinet holes. Turn two full turns on top front of the...
... center screw completely. 7 Tighten the outer two screws to the left and pull it straight off. INSTALLING THE CHARCOAL FILTER 1 Remove screws on each screw. See the Owner's Manual packed with the microwave. Slide the grille to the top of the microwave oven. (While tightening ...screws, hold the microwave oven in place against the wall and the top cabinet.) 4 Install the charcoal filter. MOUNT THE MICROWAVE OVEN (cont.) 5 Insert 2 self-aligning screws through outer top cabinet holes. Turn two full turns on top front of the...
Dimensions
Page 2
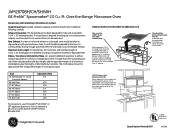
..." rectangular duct. Over-the-Range Microwave Oven Dimensions and Installation Information (in appearance. For answers to your Monogram,® GE Profile™ or GE® appliance questions, visit our website at additional cost) Filler Panel Kits JX40CT-Bisque JX41-Black JX40WH-White When replacing ... additional resistance to provide a custom built-in inches) Hood Exhaust Duct: Outside ventilation requires a HOOD EXHAUST DUCT. Recirculating Charcoal Filter Kit To be used , care should not exceed 120 equivalent feet. Maximum Duct Length: For satisfactory air movement, the total ...
..." rectangular duct. Over-the-Range Microwave Oven Dimensions and Installation Information (in appearance. For answers to your Monogram,® GE Profile™ or GE® appliance questions, visit our website at additional cost) Filler Panel Kits JX40CT-Bisque JX41-Black JX40WH-White When replacing ... additional resistance to provide a custom built-in inches) Hood Exhaust Duct: Outside ventilation requires a HOOD EXHAUST DUCT. Recirculating Charcoal Filter Kit To be used , care should not exceed 120 equivalent feet. Maximum Duct Length: For satisfactory air movement, the total ...


