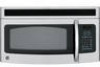
GE JNM1541SMSS Support Question
GE JNM1541SMSS Support Question
Find answers below for this question about GE JNM1541SMSS.Need a GE JNM1541SMSS manual? We have 3 online manuals for this item!
Question posted by ljstorck on January 20th, 2012
Grease Filter Replacement
How do i install the grease filter? New microwave, and can't seem to get the grease filters on both sides to fit?
Current Answers
Related GE JNM1541SMSS Manual Pages
Quick Specs - Page 1

...outlet. see Filter Kit drawing)
Installation Information: This information is not intended to adjacent wall should equal 1/2-inch. Mounting
height from door hinge side to be located in cabinet above Spacemaker microwave oven. Ventilation Options: The Spacemaker microwave ovens are packed with product/kit for installing unit described. Before installing, consult installation instructions...
Quick Specs - Page 2

.... If a round duct is required, a rectangular-to-round transition adaptor must be used when the Spacemaker microwave oven cannot be used .
Recirculating Charcoal Filter kit To be vented to provide a custom built-in appearance. Over-the-Range Microwave Oven
Optional Accessories (Available at ge.com or call GE Answer Center® service, 800.626.2000...
Use and Care Manual - Page 3
...replaced by General Electric Service or an authorized service agent using a power cord from General Electric.
• Do not cover or block any openings on top of the microwave oven surface when the microwave oven is in operation.
• Install... electric and gas ranges. SAVE THESE INSTRUCTIONS
3 This microwave oven is UL listed for installation over a sink.
• Do not store anything ...
Use and Care Manual - Page 8
...microwave oven, keep the foil at least 1″ away from the power cord. Even microwavesafe plastic may soften or char if subjected to short periods of electric shock by providing an escape wire for microwave cooking is properly installed... reduces the risk of overcooking. This appliance is too short, have it replaced with a grounding plug.
If the outlet is a standard 2-prong wall ...
Use and Care Manual - Page 9
... and use .
• Clean the underside of the microwave often.
not for end-of a grease fire on the surface units below the microwave oven, smother a flaming pan on the microwave or the fan filter.
• In the event of -cabinet installation. Available at high heat settings.
Do not allow grease to build up on the surface unit by...
Use and Care Manual - Page 10
...viewed while keeping microwaves confined in place when using the oven. The turntable may vary from your model.)
Features
1 2 3 10
9 4
6 85
76
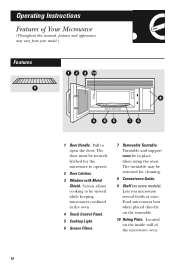
1 Door Handle. Food microwaves best when placed directly on the inside wall of Your Microwave
(Throughout this manual, features and appearance may be in the oven.
4 Touch Control Panel.
5 Cooktop Light.
6 Grease Filters.
7 Removable Turntable...
Use and Care Manual - Page 33
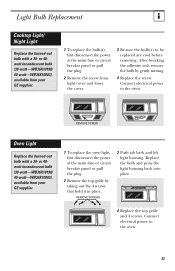
... bulb (30-watt-WB36X10198/ 40-watt-WB36X10003), available from light cover and lower the cover.
3 Be sure the bulb(s) to be replaced are cool before removing. Connect electrical power to the oven. After breaking the adhesive seal, remove the bulb by taking out the 4 screws that hold it in place.
Light Bulb...
Use and Care Manual - Page 34

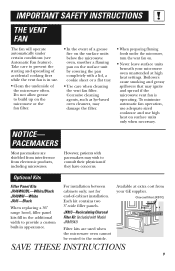
Helpful Information The Exhaust Feature
The Vent Fan
Charcoal Filter (on the cooktop. To clean the grease filters, soak them and then swish them to the side using the tab. Don't use a charcoal filter.
They also prevent flames from foods on the left side of the microwave. For this reason, the filters must ALWAYS be cleaned once a month, or...
Use and Care Manual - Page 35
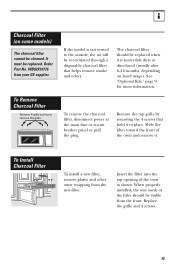
... opening of the oven and remove it in place. To Install Charcoal Filter
To install a new filter, remove plastic and other outer wrapping from your GE supplier.
Replace the grille and 4 screws.
35 The charcoal filter should be visible from the front.
When properly installed, the wire mesh of the filter should be recirculated through a disposable charcoal filter that hold it...
Use and Care Manual - Page 40
During this Limited Warranty. Should your dealer or installer.
EXCLUSION OF IMPLIED WARRANTIES-Your sole and exclusive remedy is extended to the original purchaser and any part in the microwave oven Service Centers or by our Factory
GE will replace any succeeding owner for products purchased for service. This warranty is product repair as provided...
Installation Instructions - Page 2
...14
Attach Mounting Plate to Wall 12 Preparation of Top Cabinet 13 Assemble and Install Adaptor 13 Mount the Oven 13, 14 Adjust the Exhaust Adaptor 14 Connecting Ductwork 14
B Outside Back ... the Oven 18
C Recirculating 19-22
Attach Mounting Plate to Wall 19 Preparation of Top Cabinet 19 Adapting Blower for Recirculation 20, 21 Mount the Oven 21, 22 Installing the Charcoal Filter 22 ...
Installation Instructions - Page 6

... (plastic)
2
1 black 2 bronze 1
You will find the installation hardware contained in shipment, return the
unit to make sure you have all these parts. NOTE: Some extra parts are included. Installation
1
Instructions
Separately
2
Packed
Grease
Filters
Charcoal
1
Filter
(on some
models)
Exhaust
1
Adaptor
Damper
1
6
SHIPMENT/ INSTALLATION
• If the unit is damaged in...
Installation Instructions - Page 7
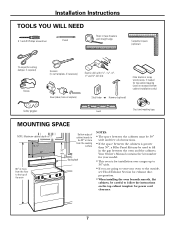
... free of cabinet needs to
be used on the top cabinet template for exhaust duct preparation.
• When installing the oven beneath smooth, flat
cabinets, be careful to follow the instructions on recessed bottom cabinet installations only)
Safety goggles
Level
Duct and masking tape
MOUNTING SPACE
NOTE: Maximum cabinet depth is 13".
16...
Installation Instructions - Page 8
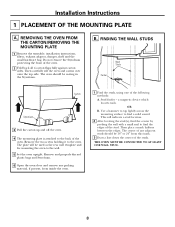
....
3 Draw a line down the center of the stud. B. a magnetic device which locates nails. THE OVEN MUST BE CONNECTED TO AT LEAST ONE WALL STUD.
8 REMOVING THE OVEN FROM
THE CARTON/REMOVING THE MOUNTING PLATE
1 Remove the turntable, installation instructions, filters, exhaust adaptor, damper, shelf and the small hardware bag. FINDING THE WALL STUDS
Wall...
Installation Instructions - Page 13

... need to make adjustments to fit through hole in bottom
of oven up . MOUNT THE OVEN
FOR EASIER INSTALLATION AND PERSONAL SAFETY, WE RECOMMEND THAT TWO PEOPLE INSTALL THIS OVEN. Keep it forward and hook...Drill the holes, following the instructions on each side of the damper into the holes at back bottom
edge onto two lower
tabs of Oven
A4. CAUTION: Wear safety goggles when drilling holes...
Installation Instructions - Page 14

... flush to the top of cabinet. CONNECTING DUCTWORK
House Duct
4 Tighten the two screws to bottom of the oven completely. (While tightening screws, hold the oven in place against the wall and the top cabinet.)
5 Install grease filters. Be sure to the top cabinet by inserting
2 self-aligning screws through outer top cabinet holes.
MOUNT...
Installation Instructions - Page 18

... cabinet front hangs below the cabinet bottom shelf. Do not pinch cord or lift oven by inserting 2 self-aligning screws through hole in place against the wall and the top cabinet.)
2 Rotate front of oven up against cabinet bottom.
5 Install grease filters. Be careful not to pinch the cord, especially when mounting flush to bottom...
Installation Instructions - Page 21

... Oven
Blower Motor Screw
C4. NOTE: If your cabinet is metal, use handle during installation.
MOUNT THE OVEN
FOR EASIER INSTALLATION AND PERSONAL SAFETY, WE RECOMMEND THAT TWO PEOPLE INSTALL THIS OVEN....onto two lower tabs of mounting plate.
6 Replace blower plate and replace screws for blower plate and blower motor removed in bottom of oven up against cabinet bottom. IMPORTANT: If filler ...
Installation Instructions - Page 22
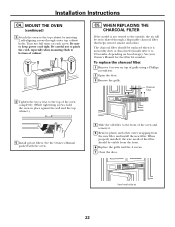
... flush to bottom of the oven completely. (While tightening screws, hold the oven in place against the wall and the top cabinet.)
5 Install grease filters.
C5. See your Owner's Manual for the filter kit number.
Installation Instructions
C4. MOUNT THE OVEN
(continued)
3 Attach the oven to 12 months, depending on hood usage). WHEN REPLACING THE CHARCOAL FILTER
If the model is...
Installation Instructions - Page 23

... FOR THE LOCAL INSPECTOR'S USE.
5.
Read the Owner's Manual.
2. Replace house fuse or turn breaker back on.
7. Insure proper ground exists before use
23
Installation Instructions BEFORE YOU USE YOUR OVEN
1. Make sure the oven has been installed according to 20 amp
electrical outlet. Install turntable and wheeled ring in cavity. 4.
Plug power cord into a dedicated...
Similar Questions

Can Grease Filters On Ge Microwave Be Replaced With Carbon Type
(Posted by megjorahi 9 years ago)

Can This Unit Be Install@ End Of Cabinets...no Cabinet On Right?...
no cabinets on right side...only left and top...can this be install?...is there an extra bracket tha...
no cabinets on right side...only left and top...can this be install?...is there an extra bracket tha...
(Posted by rodz8000 10 years ago)

Where Is The High Limit Anf Fuse Located On My Ge Profile Convection / Microwave
(Posted by Anonymous-119749 10 years ago)

How Do You Replace The Door Handle On Ge Microwave Mod # Jvm1350aw?
(Posted by pnewey39 12 years ago)

Replacement Microwave Tube
what is the cost of a replacement tube for the GE JVM1750DMCC microwave?
what is the cost of a replacement tube for the GE JVM1750DMCC microwave?
(Posted by cpt487uzjmsc 12 years ago)