Owners Manual
Page 3
..., including the following: • This microwave oven is UL listed for installation over -the-range oven was designed for additional cooking time. • See door surface cleaning instructions in operation. 3 If materials inside the oven while cooking. - This microwave oven is damaged, it has been damaged or dropped. for storage purposes. Remove wire twist-ties and metal handles from heated surfaces. • Do not immerse power cord or plug in water. • To...
..., including the following: • This microwave oven is UL listed for installation over -the-range oven was designed for additional cooking time. • See door surface cleaning instructions in operation. 3 If materials inside the oven while cooking. - This microwave oven is damaged, it has been damaged or dropped. for storage purposes. Remove wire twist-ties and metal handles from heated surfaces. • Do not immerse power cord or plug in water. • To...
Owners Manual
Page 4
... the starting and spreading of accidental cooking fires while the vent fan is caused by covering the pan completely with a lid, cookie sheet or flat tray. • Use care when cleaning the vent fan filters. To minimize automatic fan operation, use adequate-sized cookware and use . • Clean the underside of the oven. • Foil not molded to build up on the microwave or the fan filters. • In the event of a grease fire...
... the starting and spreading of accidental cooking fires while the vent fan is caused by covering the pan completely with a lid, cookie sheet or flat tray. • Use care when cleaning the vent fan filters. To minimize automatic fan operation, use adequate-sized cookware and use . • Clean the underside of the oven. • Foil not molded to build up on the microwave or the fan filters. • In the event of a grease fire...
Owners Manual
Page 5
... prevent possible injury, direct steam away from the microwave oven is not always present. Be careful to the oven and could start a fire. Visible bubbling or boiling when the container is . They could result in injury. • Do not boil eggs in glass jars, even with no food inside for more than the milk really is removed from hands and...
... prevent possible injury, direct steam away from the microwave oven is not always present. Be careful to the oven and could start a fire. Visible bubbling or boiling when the container is . They could result in injury. • Do not boil eggs in glass jars, even with no food inside for more than the milk really is removed from hands and...
Owners Manual
Page 7
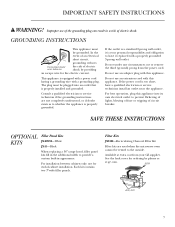
... GE supplier. For installation between cabinets only; For best operation, plug this appliance. not for the electric current. GROUNDING INSTRUCTIONS This appliance must be vented to prevent flickering of lights, blowing of fuse or tripping of -cabinet installation. This appliance is properly grounded. If the power cord is properly installed and grounded. SAVE THESE INSTRUCTIONS OPTIONAL KITS Filler Panel Kits JX40WH-White JX41-Black When replacing a 36″ range hood, filler panel kits...
... GE supplier. For installation between cabinets only; For best operation, plug this appliance. not for the electric current. GROUNDING INSTRUCTIONS This appliance must be vented to prevent flickering of lights, blowing of fuse or tripping of -cabinet installation. This appliance is properly grounded. If the power cord is properly installed and grounded. SAVE THESE INSTRUCTIONS OPTIONAL KITS Filler Panel Kits JX40WH-White JX41-Black When replacing a 36″ range hood, filler panel kits...
Owners Manual
Page 8
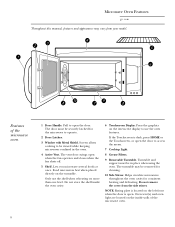
... may be removed for cleaning. 10 Side Stirrer. Features of the microwave oven. 8 Food microwaves best when placed directly on the inside the oven cavity. 6 Touchscreen Display. Helps circulate microwaves throughout the oven cavity for the microwave to access the menu. 7 Cooktop Light. 8 Grease Filters. 9 Removable Turntable. Do not remove the cover from your model. Screen allows cooking to be viewed while keeping microwaves confined in place when using the oven. The vent door swings open the door to operate. 2 Door Latches. 3 Window...
... may be removed for cleaning. 10 Side Stirrer. Features of the microwave oven. 8 Food microwaves best when placed directly on the inside the oven cavity. 6 Touchscreen Display. Helps circulate microwaves throughout the oven cavity for the microwave to access the menu. 7 Cooktop Light. 8 Grease Filters. 9 Removable Turntable. Do not remove the cover from your model. Screen allows cooking to be viewed while keeping microwaves confined in place when using the oven. The vent door swings open the door to operate. 2 Door Latches. 3 Window...
Owners Manual
Page 10
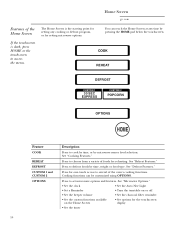
... set microwave options and features. Press to defrost foods by time, weight or food type. See "Reheat Features." Press for one-touch access to choose from a variety of foods for reheating. Press to several of the oven's cooking functions. See "Microwave Options." • Set the clock • Set the Auto Nite Light • Set a Reminder • Turn the turntable on or off • Set the beeper volume • Set the charcoal filter reminder • Set...
... set microwave options and features. Press to defrost foods by time, weight or food type. See "Reheat Features." Press for one-touch access to choose from a variety of foods for reheating. Press to several of the oven's cooking functions. See "Microwave Options." • Set the clock • Set the Auto Nite Light • Set a Reminder • Turn the turntable on or off • Set the beeper volume • Set the charcoal filter reminder • Set...
Owners Manual
Page 11
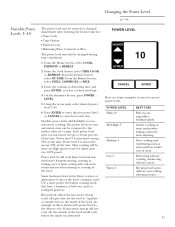
... transfer heat to boil over . delicate sauces. Most cooking will be compared to the surface units on a range. Power level 10 will cook more evenly and need more frequent stirring, rotating or turning over , such as stews and less tender cuts of uses for : • Time Cook • Time Defrost • Express Cook • Reheating Pizza, Casserole or Rice The power level may also be changed immediately after...
... transfer heat to boil over . delicate sauces. Most cooking will be compared to the surface units on a range. Power level 10 will cook more evenly and need more frequent stirring, rotating or turning over , such as stews and less tender cuts of uses for : • Time Cook • Time Defrost • Express Cook • Reheating Pizza, Casserole or Rice The power level may also be changed immediately after...
Owners Manual
Page 14
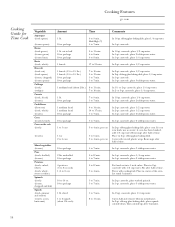
...use no water; Turn cut-side-up after half of the oven. In 1-qt. casserole, place 2 tablespoons water. In 2-qt. In 1-qt. or 2-qt. In 2- casserole, place 2 tablespoons water. 10-oz package 5 to 7 min. per ear 5 to 6 min. 3 to 4 min. if corn has been husked, add 1/4 cup water. oblong glass... casserole, place 3 tablespoons water. 1 lb. Cooking Features ge.com Cooking Guide for Time Cook Vegetable Asparagus (fresh spears) (frozen spears) Beans (fresh green) (frozen green) (frozen lima) Beets (fresh, whole) Broccoli (fresh cut) (fresh spears) (frozen, chopped) (frozen ...
...use no water; Turn cut-side-up after half of the oven. In 1-qt. casserole, place 2 tablespoons water. In 2-qt. In 1-qt. or 2-qt. In 2- casserole, place 2 tablespoons water. 10-oz package 5 to 7 min. per ear 5 to 6 min. 3 to 4 min. if corn has been husked, add 1/4 cup water. oblong glass... casserole, place 3 tablespoons water. 1 lb. Cooking Features ge.com Cooking Guide for Time Cook Vegetable Asparagus (fresh spears) (frozen spears) Beans (fresh green) (frozen green) (frozen lima) Beets (fresh, whole) Broccoli (fresh cut) (fresh spears) (frozen, chopped) (frozen ...
Owners Manual
Page 37
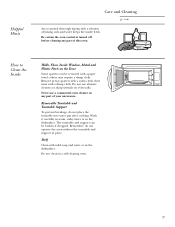
... Door Some spatters can be removed with a paper towel; Helpful Hints Care and Cleaning ge.com An occasional thorough wiping with a solution of your microwave. Wash it carefully in warm, sudsy water or in a self-cleaning oven. 37 Do not use a commercial oven cleaner on any part of this oven. How to Clean the Inside Walls, Floor, Inside Window, Metal and Plastic Parts on oven walls. Be certain the oven control is turned...
... Door Some spatters can be removed with a paper towel; Helpful Hints Care and Cleaning ge.com An occasional thorough wiping with a solution of your microwave. Wash it carefully in warm, sudsy water or in a self-cleaning oven. 37 Do not use a commercial oven cleaner on any part of this oven. How to Clean the Inside Walls, Floor, Inside Window, Metal and Plastic Parts on oven walls. Be certain the oven control is turned...
Owners Manual
Page 39
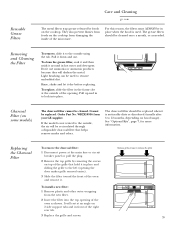
... Part No. WB2X10956 from damaging the inside of the right rear tab. 3 Replace the grille and screws. If the model is not vented to the outside using the tab. Removing and Cleaning the Filter To remove, slide it to the outside of the opening of the oven and remove it is used to 12 months, depending on some models) The charcoal filter cannot be cleaned once a month, or as shown. Charcoal Filter (on hood usage). To install...
... Part No. WB2X10956 from damaging the inside of the right rear tab. 3 Replace the grille and screws. If the model is not vented to the outside using the tab. Removing and Cleaning the Filter To remove, slide it to the outside of the opening of the oven and remove it is used to 12 months, depending on some models) The charcoal filter cannot be cleaned once a month, or as shown. Charcoal Filter (on hood usage). To install...
Owners Manual
Page 40
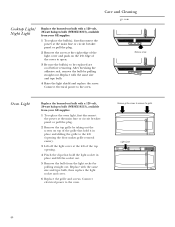
... out. Replace with the same size and type bulb. 4 Raise the light shield and replace the screw. Connect electrical power to the oven. Remove grille screws to be replaced are cool before removing. Care and Cleaning ge.com Cooktop Light/ Night Light Replace the burned-out bulb with a 120 volt, 20-watt halogen bulb (WB36X10213), available from the light socket by pulling straight out. Replace with the same size and type bulb, then replace the light socket and cover. 6 Replace the grille and screws.
... out. Replace with the same size and type bulb. 4 Raise the light shield and replace the screw. Connect electrical power to the oven. Remove grille screws to be replaced are cool before removing. Care and Cleaning ge.com Cooktop Light/ Night Light Replace the burned-out bulb with a 120 volt, 20-watt halogen bulb (WB36X10213), available from the light socket by pulling straight out. Replace with the same size and type bulb, then replace the light socket and cover. 6 Replace the grille and screws.
Owners Manual
Page 42
... GE Will Replace: Any part of the microwave oven which vary from wire rack or metal/foil), or used for service. I Incidental or consequential damage caused by possible defects with this limited one year or the shortest period allowed by a GE Authorized Servicer is abused, misused (for service. I Improper installation, delivery or maintenance. Warrantor: General Electric Company. Louisville, KY 40225 42 I Replacement of house fuses or resetting of circuit...
... GE Will Replace: Any part of the microwave oven which vary from wire rack or metal/foil), or used for service. I Incidental or consequential damage caused by possible defects with this limited one year or the shortest period allowed by a GE Authorized Servicer is abused, misused (for service. I Improper installation, delivery or maintenance. Warrantor: General Electric Company. Louisville, KY 40225 42 I Replacement of house fuses or resetting of circuit...
Installation Instructions
Page 2
Installation Instructions CONTENTS General information Important Safety Instructions 3 Electrical Requirements 3 Hood Exhaust 4, 5 Damage - Shipment/Installation 6 Parts Included 6 Tools You Will Need 7 Mounting Space 7 C Recirculating 19-22 Attach Mounting Plate to Wall 19 Preparation of Top Cabinet 19 Check Microwave Assembly 20 Adapting Microwave Blower for Recirculation 20, 21 Mount the Microwave Oven ..........21, 22 Installing the Charcoal Filter 22 Before You Use Your Microwave 23 Step-by-step installation guide Placement of Mounting Plate 8-10 Removing the Mounting ...
Installation Instructions CONTENTS General information Important Safety Instructions 3 Electrical Requirements 3 Hood Exhaust 4, 5 Damage - Shipment/Installation 6 Parts Included 6 Tools You Will Need 7 Mounting Space 7 C Recirculating 19-22 Attach Mounting Plate to Wall 19 Preparation of Top Cabinet 19 Check Microwave Assembly 20 Adapting Microwave Blower for Recirculation 20, 21 Mount the Microwave Oven ..........21, 22 Installing the Charcoal Filter 22 Before You Use Your Microwave 23 Step-by-step installation guide Placement of Mounting Plate 8-10 Removing the Mounting ...

Installation Instructions
Page 3
.... Wire size must conform to the requirements of 113-135 pounds. The outlet box should be brought to 50 pounds or a total weight of the National Electrical Code or the prevailing local code for this product. The installer must be located in the cabinet above the microwave oven. CAUTION: For personal safety, the mounting surface must perform a ground continuity check on the power...
.... Wire size must conform to the requirements of 113-135 pounds. The outlet box should be brought to 50 pounds or a total weight of the National Electrical Code or the prevailing local code for this product. The installer must be located in the cabinet above the microwave oven. CAUTION: For personal safety, the mounting surface must perform a ground continuity check on the power...
Installation Instructions
Page 7
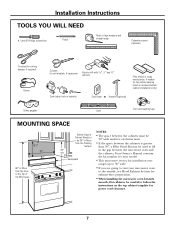
...; min. Your Owner's Manual contains the kit number for your model. • This microwave oven is greater than 30″, a Filler Panel Kit may be used on the top cabinet template for power cord clearance. 7 Installation Instructions TOOLS YOU WILL NEED # 1 and #2 Phillips screwdriver Pencil Ruler or tape measure and straight edge Carpenter square (optional) Tin snips (for cutting damper, if required) Gloves Scissors (to cut template, if necessary) Electric drill with...
...; min. Your Owner's Manual contains the kit number for your model. • This microwave oven is greater than 30″, a Filler Panel Kit may be used on the top cabinet template for power cord clearance. 7 Installation Instructions TOOLS YOU WILL NEED # 1 and #2 Phillips screwdriver Pencil Ruler or tape measure and straight edge Carpenter square (optional) Tin snips (for cutting damper, if required) Gloves Scissors (to cut template, if necessary) Electric drill with...
Installation Instructions
Page 11
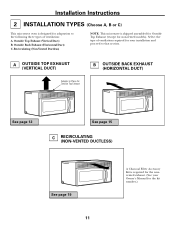
... Owner's Manual for the kit number.) Outside Back Exhaust (Horizontal Duct) C. Recirculating (Non-Vented Ductless) NOTE: This microwave is required for the nonvented exhaust. (See your installation and proceed to the following three types of ventilation: A. A OUTSIDE TOP EXHAUST (VERTICAL DUCT) Adaptor in Place for Outside Top Exhaust B OUTSIDE BACK EXHAUST (HORIZONTAL DUCT) See page 12 See page 15 C RECIRCULATING (NON-VENTED DUCTLESS) See page 19 11 A Charcoal Filter Accessory Kit is shipped assembled...
... Owner's Manual for the kit number.) Outside Back Exhaust (Horizontal Duct) C. Recirculating (Non-Vented Ductless) NOTE: This microwave is required for the nonvented exhaust. (See your installation and proceed to the following three types of ventilation: A. A OUTSIDE TOP EXHAUST (VERTICAL DUCT) Adaptor in Place for Outside Top Exhaust B OUTSIDE BACK EXHAUST (HORIZONTAL DUCT) See page 12 See page 15 C RECIRCULATING (NON-VENTED DUCTLESS) See page 19 11 A Charcoal Filter Accessory Kit is shipped assembled...
Installation Instructions
Page 14
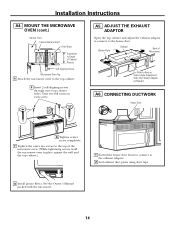
... exhaust duct joints using duct tape. 8 Install grease filters. See the Owner's Manual packed with the microwave. 14 ADJUST THE EXHAUST ADAPTOR Open the top cabinet and adjust the exhaust adaptor to connect to the top cabinet. 5 Insert 2 self-aligning screws through outer top cabinet holes. Installation Instructions A4. MOUNT THE MICROWAVE OVEN (cont.) Cabinet Front Cabinet Bottom Shelf Filler Block Equivalent to Depth of Cabinet Recess Self-Aligning Screw Microwave Oven Top 4 Attach the microwave oven to the house duct. Turn...
... exhaust duct joints using duct tape. 8 Install grease filters. See the Owner's Manual packed with the microwave. 14 ADJUST THE EXHAUST ADAPTOR Open the top cabinet and adjust the exhaust adaptor to connect to the top cabinet. 5 Insert 2 self-aligning screws through outer top cabinet holes. Installation Instructions A4. MOUNT THE MICROWAVE OVEN (cont.) Cabinet Front Cabinet Bottom Shelf Filler Block Equivalent to Depth of Cabinet Recess Self-Aligning Screw Microwave Oven Top 4 Attach the microwave oven to the house duct. Turn...
Installation Instructions
Page 15
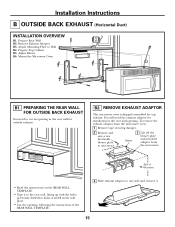
... the microwave oven: 1 Remove tape securing damper. 2 Remove and save screw that holds blower plate to microwave. Prepare Top Cabinet B5. Adjust Blower B6. PREPARING THE REAR WALL FOR OUTSIDE BACK EXHAUST You need the exhaust adaptor for top exhaust. Remove Exhaust Adaptor B3. You will need to cut an opening in the rear wall for holes A and B in the rear wall opening , following the instructions of Microwave • Read the instructions on the REAR WALL TEMPLATE. • Tape it . 15 Attach Mounting Plate...
... the microwave oven: 1 Remove tape securing damper. 2 Remove and save screw that holds blower plate to microwave. Prepare Top Cabinet B5. Adjust Blower B6. PREPARING THE REAR WALL FOR OUTSIDE BACK EXHAUST You need the exhaust adaptor for top exhaust. Remove Exhaust Adaptor B3. You will need to cut an opening in the rear wall for holes A and B in the rear wall opening , following the instructions of Microwave • Read the instructions on the REAR WALL TEMPLATE. • Tape it . 15 Attach Mounting Plate...
Installation Instructions
Page 22
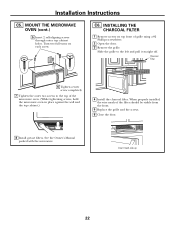
... installed, the wire mesh of grille using a #2 Phillips screwdriver. 2 Open the door. 3 Remove the grille. Charcoal Filter 6 Tighten center screw completely. 7 Tighten the outer two screws to the left and pull it straight off. See the Owner's Manual packed with the microwave. INSTALLING THE CHARCOAL FILTER 1 Remove screws on each screw. Slide the grille to the top of the microwave oven. (While tightening screws, hold the microwave oven in place against the wall and the top cabinet.) 4 Install the charcoal filter. Installation Instructions C5. Turn...
... installed, the wire mesh of grille using a #2 Phillips screwdriver. 2 Open the door. 3 Remove the grille. Charcoal Filter 6 Tighten center screw completely. 7 Tighten the outer two screws to the left and pull it straight off. See the Owner's Manual packed with the microwave. INSTALLING THE CHARCOAL FILTER 1 Remove screws on each screw. Slide the grille to the top of the microwave oven. (While tightening screws, hold the microwave oven in place against the wall and the top cabinet.) 4 Install the charcoal filter. Installation Instructions C5. Turn...
Dimensions
Page 2
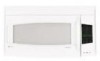
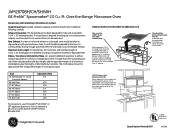
..." opening. Wall Cap C. 90° Elbow D. 45° Elbow E. 90° Elbow F. 45° Elbow G. Read the following carefully. JX22SS-Stainless Steel Decorative Panel Kit When replacing a Hi/Low range with a standard 3-1/4" x 10" rectangular duct. JVM2070BH/CH/SH/WH GE Profile™ Spacemaker® 2.0 Cu. Ft. Over-the-Range Microwave Oven Dimensions and Installation Information (in the area between the microwave and range left by Underwriters Laboratories Specification Revised...
..." opening. Wall Cap C. 90° Elbow D. 45° Elbow E. 90° Elbow F. 45° Elbow G. Read the following carefully. JX22SS-Stainless Steel Decorative Panel Kit When replacing a Hi/Low range with a standard 3-1/4" x 10" rectangular duct. JVM2070BH/CH/SH/WH GE Profile™ Spacemaker® 2.0 Cu. Ft. Over-the-Range Microwave Oven Dimensions and Installation Information (in the area between the microwave and range left by Underwriters Laboratories Specification Revised...


