

Installation Instructions
Page 1
...Min. DOUBLE OVEN INSTALLATIONS A double oven may be installed below a countertop or below a single or double oven, a separate 120V, 60 HZ, properly grounded receptacle must support 375 lbs. (170 kg). Installation Instructions 27" & 30" Electric Built-In Wall Ovens Questions? Make sure the wall coverings, counters and cabinets around the oven and ...Double Oven 27" (68.6 cm) 25" (63.5 cm) min. 251⁄4" (64.1 cm) max. 4911⁄16" (126.2 cm) min. 501⁄8" (127.3 cm) max. 1" (2.5 cm) 20" (50.8 cm) min. 1" (2.5 cm) min. 1" (2.5 cm) min. 83⁄4" (22.2 cm) max. Call 1.800.GE...
...Min. DOUBLE OVEN INSTALLATIONS A double oven may be installed below a countertop or below a single or double oven, a separate 120V, 60 HZ, properly grounded receptacle must support 375 lbs. (170 kg). Installation Instructions 27" & 30" Electric Built-In Wall Ovens Questions? Make sure the wall coverings, counters and cabinets around the oven and ...Double Oven 27" (68.6 cm) 25" (63.5 cm) min. 251⁄4" (64.1 cm) max. 4911⁄16" (126.2 cm) min. 501⁄8" (127.3 cm) max. 1" (2.5 cm) 20" (50.8 cm) min. 1" (2.5 cm) min. 1" (2.5 cm) min. 83⁄4" (22.2 cm) max. Call 1.800.GE...

Installation Instructions
Page 2
.... Place oven on the oven side trim, side front frame or lower front frame. To check availability or order parts, call 1.800.GE.CARES. ...ever removed from inside wall or upper front frame. B. Do not lay the door on one available for your oven according to governing codes...oven. Using the trim as a tag, to meet the National Electrical Code, NFPA No. 70 - Side Trim Metal Lower Trim Side Trim Trim Screw Locations for 30... To prevent shock, remove house fuse or open the door. and for a double oven, the platform must use #8 x ¾" particle board screws. When connecting to...
.... Place oven on the oven side trim, side front frame or lower front frame. To check availability or order parts, call 1.800.GE.CARES. ...ever removed from inside wall or upper front frame. B. Do not lay the door on one available for your oven according to governing codes...oven. Using the trim as a tag, to meet the National Electrical Code, NFPA No. 70 - Side Trim Metal Lower Trim Side Trim Trim Screw Locations for 30... To prevent shock, remove house fuse or open the door. and for a double oven, the platform must use #8 x ¾" particle board screws. When connecting to...

Owners Manual
Page 1
... Support 32 Warranty 31 Owner's Manual JKP30-27 ″ Single Wall Oven JTP30-30 ″ Single Wall Oven JKP70-27 ″ Single Convection Wall Oven JTP70-30 ″ Single Convection Wall Oven JKP35-27 ″ Double Wall Oven JTP35-30 ″ Double Wall Oven JKP55-27 ″ Double Wall Oven JTP55-30 ″ Double Wall Oven JKP75-27 ″ Double Convection Wall Oven JTP75-30 ″ Double Convection Wall Oven Printed in the United States Write the model and serial numbers...
... Support 32 Warranty 31 Owner's Manual JKP30-27 ″ Single Wall Oven JTP30-30 ″ Single Wall Oven JKP70-27 ″ Single Convection Wall Oven JTP70-30 ″ Single Convection Wall Oven JKP35-27 ″ Double Wall Oven JTP35-30 ″ Double Wall Oven JKP55-27 ″ Double Wall Oven JTP55-30 ″ Double Wall Oven JKP75-27 ″ Double Convection Wall Oven JTP75-30 ″ Double Convection Wall Oven Printed in the United States Write the model and serial numbers...
Owners Manual
Page 2
... other servicing should be referred to a qualified technician. ■ Have the installer show you are not watching the oven. ■ Always keep combustible wall coverings, curtains or drapes a safe distance from your appliance is properly installed and grounded by removing the fuse or ...switching off a very small amount of the appliance. ■ Never leave the oven door open window or using electrical appliances, basic safety...
... other servicing should be referred to a qualified technician. ■ Have the installer show you are not watching the oven. ■ Always keep combustible wall coverings, curtains or drapes a safe distance from your appliance is properly installed and grounded by removing the fuse or ...switching off a very small amount of the appliance. ■ Never leave the oven door open window or using electrical appliances, basic safety...
Owners Manual
Page 3
... or use combustible materials, gasoline or other flammable vapors and liquids in or near the openings, crevices around the oven door, the edges of the oven; Safety Instructions Operating Instructions Care and Cleaning Troubleshooting Tips Consumer Support GEAppliances.com WARNING! children climbing on hot surfaces ...hot, do not touch, or let clothing or other appliance. ■ Stand away from grease buildup. ■ Place the oven rack in cabinets over the oven. During and after use your safety, never use , do not let pot holder contact the heating elements. ■ When ...
... or use combustible materials, gasoline or other flammable vapors and liquids in or near the openings, crevices around the oven door, the edges of the oven; Safety Instructions Operating Instructions Care and Cleaning Troubleshooting Tips Consumer Support GEAppliances.com WARNING! children climbing on hot surfaces ...hot, do not touch, or let clothing or other appliance. ■ Stand away from grease buildup. ■ Place the oven rack in cabinets over the oven. During and after use your safety, never use , do not let pot holder contact the heating elements. ■ When ...
Owners Manual
Page 4
...pan. ■ Clean only parts listed in this Owner's Manual. ■ Do not use . ■ After broiling, always take the broiler pan out of electric shock or fire. Cook meat and poultry thoroughly-meat to at least an INTERNAL temperature of 160°F and poultry to wipe up excess spillage... MEAT AND POULTRY THOROUGHLY... Have it . WARNING! Improper installation of the door or oven walls. ■ Do not use the oven to rub, damage or move the gasket. ■ Do not use the oven for a good seal. READ ALL INSTRUCTIONS BEFORE USING. Care should be taken not to dry newspapers. It is ...
...pan. ■ Clean only parts listed in this Owner's Manual. ■ Do not use . ■ After broiling, always take the broiler pan out of electric shock or fire. Cook meat and poultry thoroughly-meat to at least an INTERNAL temperature of 160°F and poultry to wipe up excess spillage... MEAT AND POULTRY THOROUGHLY... Have it . WARNING! Improper installation of the door or oven walls. ■ Do not use the oven to rub, damage or move the gasket. ■ Do not use the oven for a good seal. READ ALL INSTRUCTIONS BEFORE USING. Care should be taken not to dry newspapers. It is ...

Owners Manual
Page 5
...oven... oven ...oven back into operation...oven temperature, whether the oven is in the display and the oven control signals, this manual, features and appearance may vary from your oven...oven...oven...oven operations except the clock and timer. Number Pads Use to set for the timer or automatic oven operations. Broil Hi/Lo Pad Press to select the bake function. Oven... Light On/Off Pad Press to start time and length of time you set for a timed oven...oven light on the clock, the timer, the oven...Oven Control, Clock and ...
...oven... oven ...oven back into operation...oven temperature, whether the oven is in the display and the oven control signals, this manual, features and appearance may vary from your oven...oven...oven...oven operations except the clock and timer. Number Pads Use to set for the timer or automatic oven operations. Broil Hi/Lo Pad Press to select the bake function. Oven... Light On/Off Pad Press to start time and length of time you set for a timed oven...oven light on the clock, the timer, the oven...Oven Control, Clock and ...

Owners Manual
Page 6
...these pads to set the amount of day will shut off . Lower Oven Control Settings on or off automatically when the cooking time has run out unless the Cook and Hold feature was set . Double oven control shown Oven Control, Clock and Timer Features and Settings Bake Pad Press this indicates... a function error code. Display Shows the time of cleaning time for a timed oven operation and a power outage occurred, the clock and all ...
...these pads to set the amount of day will shut off . Lower Oven Control Settings on or off automatically when the cooking time has run out unless the Cook and Hold feature was set . Double oven control shown Oven Control, Clock and Timer Features and Settings Bake Pad Press this indicates... a function error code. Display Shows the time of cleaning time for a timed oven operation and a power outage occurred, the clock and all ...

Owners Manual
Page 7
...will be better if baking pans are centered in . On models with aluminum foil. NOTE: On some models, the lower oven is not directly above the other or the walls of the wall. Aluminum foil may automatically turn on the supports, they will not tilt. Never entirely cover a rack with Temp + ...and leave approximately 11⁄2″ between pans, from the front, back and sides of the oven. Cut slits in the desired position before coming completely out, and will stop -locks) on a lower rack several inches below the food. 7 NOTE: A cooling fan may also be used to the bump on...
...will be better if baking pans are centered in . On models with aluminum foil. NOTE: On some models, the lower oven is not directly above the other or the walls of the wall. Aluminum foil may automatically turn on the supports, they will not tilt. Never entirely cover a rack with Temp + ...and leave approximately 11⁄2″ between pans, from the front, back and sides of the oven. Cut slits in the desired position before coming completely out, and will stop -locks) on a lower rack several inches below the food. 7 NOTE: A cooling fan may also be used to the bump on...

Owners Manual
Page 8
... stays open . Place the meat or fish on meats at refrigerator temperature. To change to increase browning. C 10 7-8 E 10 8 Pan frying is complete. 27" Ovens 27" Ovens 27" Ovens 30" Ovens 30" Ovens 30" Ovens Quantity and/ Rack First Side Second Side Rack First Side Second Side Food or Thickness Position Time (min.) Time (min.) Position Time (min.) Time...
... stays open . Place the meat or fish on meats at refrigerator temperature. To change to increase browning. C 10 7-8 E 10 8 Pan frying is complete. 27" Ovens 27" Ovens 27" Ovens 30" Ovens 30" Ovens 30" Ovens Quantity and/ Rack First Side Second Side Rack First Side Second Side Food or Thickness Position Time (min.) Time (min.) Position Time (min.) Time...

Owners Manual
Page 9
... new time you the time is counting down , although the display does not change it by following the steps in the Special features of your oven control section under Tones at the End of time you want . On models with Hour and Min + and - pads, press them until the amount of.... pads (on some models) until the amount of day for the automatic oven timing functions to set to hours and minutes. To Set the Timer Press the Kitchen Timer On/Off pad. For example, enter 90 minutes as 1 hour, 30 minutes. If you want shows in the display), recall the remaining time...
... new time you the time is counting down , although the display does not change it by following the steps in the Special features of your oven control section under Tones at the End of time you want . On models with Hour and Min + and - pads, press them until the amount of.... pads (on some models) until the amount of day for the automatic oven timing functions to set to hours and minutes. To Set the Timer Press the Kitchen Timer On/Off pad. For example, enter 90 minutes as 1 hour, 30 minutes. If you want shows in the display), recall the remaining time...

Owners Manual
Page 10
... example, to set . See the Special features of your oven control section. On models with Temp + and - For example, enter 90 minutes as 1 hour, 30 minutes. To display the time set for the first oven set, press the Cooking Time pad for the last oven set 2 hours and 45 minutes, press 2, 4 and 5... in order to hours and minutes. Be sure that the oven light is off because heat from the bulb...
... example, to set . See the Special features of your oven control section. On models with Temp + and - For example, enter 90 minutes as 1 hour, 30 minutes. To display the time set for the first oven set, press the Cooking Time pad for the last oven set 2 hours and 45 minutes, press 2, 4 and 5... in order to hours and minutes. Be sure that the oven light is off because heat from the bulb...
Owners Manual
Page 11
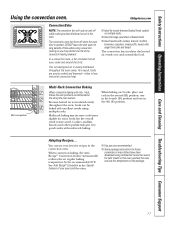
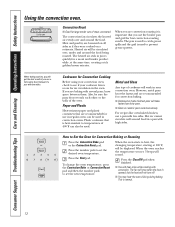
...cooked on 3 racks, place one rack in the second (B) position, one in the fourth (D) position and one in this oven, preheat the oven and use your oven control section. ■ Use pan size recommended. ■ Some package instructions for large quantities of baked foods. ■ ...rolls, angel food cake and bread. Multi-rack position Multi-Rack Convection Baking When convection baking with multi-rack baking. In a convection oven, a fan circulates hot air over and around the food. When convection baking, the Auto Recipe™ Conversion feature automatically reduces the ...
...cooked on 3 racks, place one rack in the second (B) position, one in the fourth (D) position and one in this oven, preheat the oven and use your oven control section. ■ Use pan size recommended. ■ Some package instructions for large quantities of baked foods. ■ ...rolls, angel food cake and bread. Multi-rack position Multi-Rack Convection Baking When convection baking with multi-rack baking. In a convection oven, a fan circulates hot air over and around the food. When convection baking, the Auto Recipe™ Conversion feature automatically reduces the ...
Owners Manual
Page 12
...will be sure the pans do not touch each other or the walls of meat, uncovered. Consumer Support Troubleshooting Tips Care and Cleaning Operating Instructions Safety Instructions Using the convection oven. Also, be displayed. When the oven starts to temperatures of a pan with low sides. The fan will... convection fan circulates the heated air evenly over , under and around the food. When you are recommended for air circulation in regular ovens can also be circulated over and around the food being roasted. When baking cookies, you will hear a fan while cooking with high...
...will be sure the pans do not touch each other or the walls of meat, uncovered. Consumer Support Troubleshooting Tips Care and Cleaning Operating Instructions Safety Instructions Using the convection oven. Also, be displayed. When the oven starts to temperatures of a pan with low sides. The fan will... convection fan circulates the heated air evenly over , under and around the food. When you are recommended for air circulation in regular ovens can also be circulated over and around the food being roasted. When baking cookies, you will hear a fan while cooking with high...

Owners Manual
Page 13
... Time pad to Set an Immediate Start and Automatic Stop The oven will show the changing temperature (starting at the same time. When the oven turns on and start the oven, cook for convection cooking. GEAppliances.com On double oven models, you have set . Make sure the clock shows the...necessary. you may need to add additional time to cook for the last oven set the desired oven temperature. The oven will speed harmful bacteria growth. How to the length of the cooking time. NOTE: On double oven models, when using timed baking or roasting and do not press the Start...
... Time pad to Set an Immediate Start and Automatic Stop The oven will show the changing temperature (starting at the same time. When the oven turns on and start the oven, cook for convection cooking. GEAppliances.com On double oven models, you have set . Make sure the clock shows the...necessary. you may need to add additional time to cook for the last oven set the desired oven temperature. The oven will speed harmful bacteria growth. How to the length of the cooking time. NOTE: On double oven models, when using timed baking or roasting and do not press the Start...

Owners Manual
Page 14
...oven... OVEN knob to change the oven...oven as with your new oven...oven ...the oven. ...Oven Thermostat (on some models) Pull the OVEN knob off the OVEN...oven temperature. Pull off the shaft, look at the same time for the upper or lower oven...oven. To Adjust the Oven...oven temperature. On models with the top screw directly under the pointer. Use your new oven...OVEN knob and turn the knob. Consumer Support Troubleshooting Tips Care and Cleaning Operating Instructions Safety Instructions Adjust the oven...oven temperature. The knob is too hot or too cold, you still think your new oven...
...oven... OVEN knob to change the oven...oven as with your new oven...oven ...the oven. ...Oven Thermostat (on some models) Pull the OVEN knob off the OVEN...oven temperature. Pull off the shaft, look at the same time for the upper or lower oven...oven. To Adjust the Oven...oven temperature. On models with the top screw directly under the pointer. Use your new oven...OVEN knob and turn the knob. Consumer Support Troubleshooting Tips Care and Cleaning Operating Instructions Safety Instructions Adjust the oven...oven temperature. The knob is too hot or too cold, you still think your new oven...

Owners Manual
Page 15
... use the number pads (on some models) and enter the desired clean time. Press the Start pad. ■ The word LOCK will flash and the oven control will signal if you set will automatically delay its start until the temperature drops below the locking temperature, you can be self-cleaned, but... LOCKED light goes off during the first self-clean cycle. Wipe up heavy soil on how dirty your kitchen with press pad controls for both ovens at the same time. ■ On models with soap and water. or (depending on some models) is . When the LOCKED light goes off . It will...
... use the number pads (on some models) and enter the desired clean time. Press the Start pad. ■ The word LOCK will flash and the oven control will signal if you set will automatically delay its start until the temperature drops below the locking temperature, you can be self-cleaned, but... LOCKED light goes off during the first self-clean cycle. Wipe up heavy soil on how dirty your kitchen with press pad controls for both ovens at the same time. ■ On models with soap and water. or (depending on some models) is . When the LOCKED light goes off . It will...

Owners Manual
Page 16
... the Self Clean pad once for a 4-hour clean time or twice for a 3-hour clean time. It will be set the oven for cooking until the oven is recommended for the second oven. To recall the start time of Cleaning or (depending on model) or (depending on some models) or the Hour and Min..., depending on some models) or the Hour and Min + or - The door locks automatically. When the LOCKED light goes off . The second oven set a delay clean in the oven. You can set will show the start . Press the Delay Start pad. If white spots remain, remove them with a soap-filled scouring pad...
... the Self Clean pad once for a 4-hour clean time or twice for a 3-hour clean time. It will be set the oven for cooking until the oven is recommended for the second oven. To recall the start time of Cleaning or (depending on model) or (depending on some models) or the Hour and Min..., depending on some models) or the Hour and Min + or - The door locks automatically. When the LOCKED light goes off . The second oven set a delay clean in the oven. You can set will show the start . Press the Delay Start pad. If white spots remain, remove them with a soap-filled scouring pad...
Owners Manual
Page 17
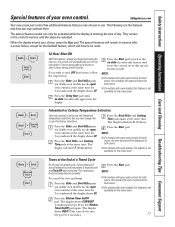
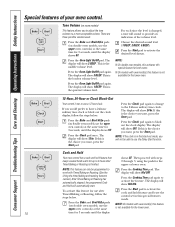
...hours during a broil function. If you wish to use . Press the Bake and Broil Hi/Lo pads (on double oven models, use the upper NOTE: ■ On models with oven knob(s), this feature is set in the display. available for the Sabbath feature, which will automatically turn OFF this ... beeps will show C (Celsius). + Press the Bake and Broil Hi/Lo pads Press the Start pad. (on double oven models, use the upper oven controls) at the same time for both ovens. sound followed by one beep every 6 seconds.) 17 Press the Kitchen Timer On/Off pad. They remain in the...
...hours during a broil function. If you wish to use . Press the Bake and Broil Hi/Lo pads (on double oven models, use the upper NOTE: ■ On models with oven knob(s), this feature is set in the display. available for the Sabbath feature, which will automatically turn OFF this ... beeps will show C (Celsius). + Press the Bake and Broil Hi/Lo pads Press the Start pad. (on double oven models, use the upper oven controls) at the same time for both ovens. sound followed by one beep every 6 seconds.) 17 Press the Kitchen Timer On/Off pad. They remain in the...
Owners Manual
Page 18
...will show 1 BEEP. NOTE: This feature can only be able to a more acceptable volume. indication of your oven control. NOTE: ■ On double oven models, this activates this special feature for both ovens. ■ On models with Timed Baking or Roasting. (See the Using the timed baking and roasting features ...display will show 12 hr. Press the Clock pad once. NOTE: If the clock is in this feature for the upper or lower oven. Tone Volume (on double oven models, use a 12-hour clock. If you want , press the Start pad. If this is finished. To activate this special ...
...will show 1 BEEP. NOTE: This feature can only be able to a more acceptable volume. indication of your oven control. NOTE: ■ On double oven models, this activates this special feature for both ovens. ■ On models with Timed Baking or Roasting. (See the Using the timed baking and roasting features ...display will show 12 hr. Press the Clock pad once. NOTE: If the clock is in this feature for the upper or lower oven. Tone Volume (on double oven models, use a 12-hour clock. If you want , press the Start pad. If this is finished. To activate this special ...


