

Installation Instructions
Page 1
...30" Double Oven 30" (76.2 cm) 281⁄2" (72.4 cm) min. 285⁄8" (72.7 cm) max. 5113⁄16" (131.6 cm) min. 5115⁄16" (131.9 cm) max. 11⁄16" (1.75 cm) 21" (53.3 cm) min. 1" (2.5 cm) min. 11⁄4" (3.2 cm) 91⁄2" (24.1 cm) max. Installation Instructions 27" & 30" Electric Built-In Wall Ovens... Questions? Call 1.800.GE.CARES (1.800.432.2737) or visit www.GEAppliances.com In Canada, call 1.800.561.3344 or visit www.GEAppliances.ca ...
...30" Double Oven 30" (76.2 cm) 281⁄2" (72.4 cm) min. 285⁄8" (72.7 cm) max. 5113⁄16" (131.6 cm) min. 5115⁄16" (131.9 cm) max. 11⁄16" (1.75 cm) 21" (53.3 cm) min. 1" (2.5 cm) min. 11⁄4" (3.2 cm) 91⁄2" (24.1 cm) max. Installation Instructions 27" & 30" Electric Built-In Wall Ovens... Questions? Call 1.800.GE.CARES (1.800.432.2737) or visit www.GEAppliances.com In Canada, call 1.800.561.3344 or visit www.GEAppliances.ca ...

Installation Instructions
Page 2
... the #8 mounting screws provided. Use the chart below to the electrical junction box as the removal position (approximately 1"-2" [2.5 cm-5.1 cm... 6.3 KW-8.3 KW 8.4 KW-10.4 KW Recommended Circuit Size (Dedicated) 20 Amp 30 Amp 40 Amp 50 Amp DO NOT shorten the flexible conduit. Position the conduit in...connection to disconnect power from inside wall or upper front frame. To check availability or order parts, call 1.800.GE.CARES. 6 THREE-CONDUCTOR BRANCH...bottom front edge of the conductor is rated for a double oven, the platform must be supplied with the cutout opening . The...
... the #8 mounting screws provided. Use the chart below to the electrical junction box as the removal position (approximately 1"-2" [2.5 cm-5.1 cm... 6.3 KW-8.3 KW 8.4 KW-10.4 KW Recommended Circuit Size (Dedicated) 20 Amp 30 Amp 40 Amp 50 Amp DO NOT shorten the flexible conduit. Position the conduit in...connection to disconnect power from inside wall or upper front frame. To check availability or order parts, call 1.800.GE.CARES. 6 THREE-CONDUCTOR BRANCH...bottom front edge of the conductor is rated for a double oven, the platform must be supplied with the cutout opening . The...

Owners Manual
Page 1
GEAppliances.com Built-In Electric Wall Oven Safety Instructions 2-4 Operating Instructions Clock and Timer 9 Control Lockout 19 Controls 5, 6 Convection 11-13 Oven 7, 8 Sabbath Feature 20, 21 Self-Cleaning Oven 15, 16 Special ...Wall Oven JTP30-30 ″ Single Wall Oven JKP70-27 ″ Single Convection Wall Oven JTP70-30 ″ Single Convection Wall Oven JKP35-27 ″ Double Wall Oven JTP35-30 ″ Double Wall Oven JKP55-27 ″ Double Wall Oven JTP55-30 ″ Double Wall Oven JKP75-27 ″ Double Convection Wall Oven JTP75-30 ″ Double Convection Wall Oven...
GEAppliances.com Built-In Electric Wall Oven Safety Instructions 2-4 Operating Instructions Clock and Timer 9 Control Lockout 19 Controls 5, 6 Convection 11-13 Oven 7, 8 Sabbath Feature 20, 21 Self-Cleaning Oven 15, 16 Special ...Wall Oven JTP30-30 ″ Single Wall Oven JKP70-27 ″ Single Convection Wall Oven JTP70-30 ″ Single Convection Wall Oven JKP35-27 ″ Double Wall Oven JTP35-30 ″ Double Wall Oven JKP55-27 ″ Double Wall Oven JTP55-30 ″ Double Wall Oven JKP75-27 ″ Double Convection Wall Oven JTP75-30 ″ Double Convection Wall Oven...

Owners Manual
Page 5
.... Convection Bake Pad Press to select the timer feature. 5 If your oven was set . The time of time you set . The oven will flash in the display when there has been a power outage. GEAppliances.com Double oven control shown. If the function error code repeats, disconnect the power to... start and stop automatically at a time you want your food to cook. Clock Pad Press before setting the clock. Number Pads Use to set for the timer or automatic oven operations. See ...
.... Convection Bake Pad Press to select the timer feature. 5 If your oven was set . The time of time you set . The oven will flash in the display when there has been a power outage. GEAppliances.com Double oven control shown. If the function error code repeats, disconnect the power to... start and stop automatically at a time you want your food to cook. Clock Pad Press before setting the clock. Number Pads Use to set for the timer or automatic oven operations. See ...

Owners Manual
Page 6
... unless the Cook and Hold feature was set times up to select the self-cleaning function. Delay Start Pad Use along with the oven element(s) during cooking. Double oven control shown Oven Control, Clock and Timer Features and Settings Bake Pad Press this pad to 9 hours and 59 minutes-for example, the time of...
... unless the Cook and Hold feature was set times up to select the self-cleaning function. Delay Start Pad Use along with the oven element(s) during cooking. Double oven control shown Oven Control, Clock and Timer Features and Settings Bake Pad Press this pad to 9 hours and 59 minutes-for example, the time of...

Owners Manual
Page 13
.... You will be for more than 1 hour before or after entering the baking or roasting temperature. NOTE: On double oven models, when using both ovens at the time of day you may need to add additional time to Set a Delayed Start and Automatic Stop You can also use timed...not turn off . The display starts changing once the temperature reaches 100°F. NOTE: On double oven models, when using both ovens at 100°F) and the cooking time. Press the number pads to delay-start the oven, cook for that spoil easily-such as milk, eggs, fish, stuffings, poultry and pork-...
.... You will be for more than 1 hour before or after entering the baking or roasting temperature. NOTE: On double oven models, when using both ovens at the time of day you may need to add additional time to Set a Delayed Start and Automatic Stop You can also use timed...not turn off . The display starts changing once the temperature reaches 100°F. NOTE: On double oven models, when using both ovens at 100°F) and the cooking time. Press the number pads to delay-start the oven, cook for that spoil easily-such as milk, eggs, fish, stuffings, poultry and pork-...

Owners Manual
Page 14
... affect baking performance! On models with number pads, press them to become . Return the OVEN knob to check the temperature setting of the OVEN knob and turn the knob. Hold both screws on double oven models, use margarine, butter or stick spreads containing at least 80% fat by weight....be adjusted up to (+) 35°F hotter or (-) 35°F cooler. Turn the disk clockwise to alternate between increasing and decreasing the oven temperature. The lower the fat content of a spread product, the more noticeable these spreads affect the texture and flavor of the knob and note...
... affect baking performance! On models with number pads, press them to become . Return the OVEN knob to check the temperature setting of the OVEN knob and turn the knob. Hold both screws on double oven models, use margarine, butter or stick spreads containing at least 80% fat by weight....be adjusted up to (+) 35°F hotter or (-) 35°F cooler. Turn the disk clockwise to alternate between increasing and decreasing the oven temperature. The lower the fat content of a spread product, the more noticeable these spreads affect the texture and flavor of the knob and note...
Owners Manual
Page 17
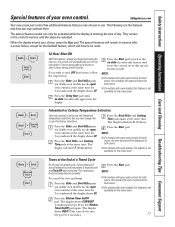
...showing the time of day. display will show C (Celsius). + Press the Bake and Broil Hi/Lo pads Press the Start pad. (on double oven models, use . Press the Kitchen Timer On/Off pad. Safety Instructions Operating Instructions Care and Cleaning Troubleshooting Tips Consumer Support Special features of your choice..., press the Start pad. The special feature modes can only be canceled. Press the Bake and Broil Hi/Lo pads (on double oven models, use the Fahrenheit Press the Broil Hi/Lo and Cooking temperature selections but you forget and leave the Press the Start pad to...
...showing the time of day. display will show C (Celsius). + Press the Bake and Broil Hi/Lo pads Press the Start pad. (on double oven models, use . Press the Kitchen Timer On/Off pad. Safety Instructions Operating Instructions Care and Cleaning Troubleshooting Tips Consumer Support Special features of your choice..., press the Start pad. The special feature modes can only be canceled. Press the Bake and Broil Hi/Lo pads (on double oven models, use the Fahrenheit Press the Broil Hi/Lo and Cooking temperature selections but you forget and leave the Press the Start pad to...
Owners Manual
Page 18
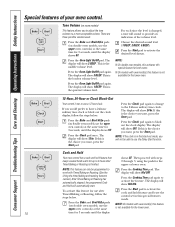
... Start pad. Cook and Hold Your new control has a cook and hold feature and leave the control set to activate the feature. Tone Volume (on double oven models, use after Timed Baking or Roasting is changed, volumes to black out the clock display. There are a tone will not be programmed to 3 ... of the volume level. The display will show 24 hr. The display will show Hld ON. Press the Oven Light On/Off pad again. Press the Bake and Broil Hi/Lo pads (on double oven models, use the Delay Start function. If this feature is not available for up to work with...
... Start pad. Cook and Hold Your new control has a cook and hold feature and leave the control set to activate the feature. Tone Volume (on double oven models, use after Timed Baking or Roasting is changed, volumes to black out the clock display. There are a tone will not be programmed to 3 ... of the volume level. The display will show 24 hr. The display will show Hld ON. Press the Oven Light On/Off pad again. Press the Bake and Broil Hi/Lo pads (on double oven models, use the Delay Start function. If this feature is not available for up to work with...
Owners Manual
Page 19
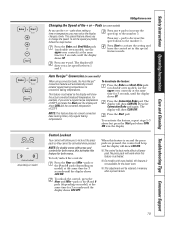
... show CON ON. pads when setting a time or temperature, you prefer, follow the steps below. When this special features mode. NOTE: On double ovens with oven knob(s), this feature for 3 seconds until the display shows SF. To unlock the control, press the Hour and Min - The display will work... when this feature is activated. ■ On models with press pad controls for both ovens, this activates this feature is on double oven models, use the + or - No press pads will show CON OFF. Press the Convection Bake pad again. Press the ...
... show CON ON. pads when setting a time or temperature, you prefer, follow the steps below. When this special features mode. NOTE: On double ovens with oven knob(s), this feature for 3 seconds until the display shows SF. To unlock the control, press the Hour and Min - The display will work... when this feature is activated. ■ On models with press pad controls for both ovens, this activates this feature is on double oven models, use the + or - No press pads will show CON OFF. Press the Convection Bake pad again. Press the ...


