User Manual
Page 1
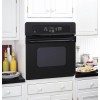
Built-In Electric Oven ge.com Safety Instructions 2-4 Operating Instructions Clock and Timer 12 Control Lockout 12 Controls 5 Oven 10, 11 Sabbath Feature 8, 9 Special Features 6, 7 Thermostat 14 Timed Baking and Roasting . . .13 Care and Cleaning Control Panel 18 Heating Element 15 Lift-Off Oven Door 16 Light Bulb 17 Packaging Tape 15 Painted Surfaces 18 Porcelain Oven Interior . . . . .15 Shelves 15 Troubleshooting Tips . . .19, 20 Consumer Support Consumer Support . . .Back Cover Product Registration . . . . . 21, 22 Warranty 23 Owner's Manual JKS06-27 ″ Single Wall ...
Built-In Electric Oven ge.com Safety Instructions 2-4 Operating Instructions Clock and Timer 12 Control Lockout 12 Controls 5 Oven 10, 11 Sabbath Feature 8, 9 Special Features 6, 7 Thermostat 14 Timed Baking and Roasting . . .13 Care and Cleaning Control Panel 18 Heating Element 15 Lift-Off Oven Door 16 Light Bulb 17 Packaging Tape 15 Painted Surfaces 18 Porcelain Oven Interior . . . . .15 Shelves 15 Troubleshooting Tips . . .19, 20 Consumer Support Consumer Support . . .Back Cover Product Registration . . . . . 21, 22 Warranty 23 Owner's Manual JKS06-27 ″ Single Wall ...
User Manual
Page 2
... damage the oven, or cause severe personal injury. All other servicing should never be referred to repair or replace any service, disconnect the oven power supply at the household distribution panel by a qualified technician in this Owner's Manual. s Before performing any part of the circuit breaker or fuse. Mark it is properly installed and grounded by removing the fuse or switching off the circuit breaker. Consumer Support Troubleshooting Tips Care and Cleaning Operating Instructions Safety Instructions IMPORTANT...
... damage the oven, or cause severe personal injury. All other servicing should never be referred to repair or replace any service, disconnect the oven power supply at the household distribution panel by a qualified technician in this Owner's Manual. s Before performing any part of the circuit breaker or fuse. Mark it is properly installed and grounded by removing the fuse or switching off the circuit breaker. Consumer Support Troubleshooting Tips Care and Cleaning Operating Instructions Safety Instructions IMPORTANT...

User Manual
Page 3
... or heating elements and may result in a cabinet that is securely installed in burns from steam. Do not let pot holders touch hot heating elements. s CAUTION: Items of the oven. Turn the controls off or by using the appliance. s For your oven. Be careful when reaching for warming or heating the room. Never allow anyone to children should not be seriously injured. s Never leave the oven door open...
... or heating elements and may result in a cabinet that is securely installed in burns from steam. Do not let pot holders touch hot heating elements. s CAUTION: Items of the oven. Turn the controls off or by using the appliance. s For your oven. Be careful when reaching for warming or heating the room. Never allow anyone to children should not be seriously injured. s Never leave the oven door open...
User Manual
Page 4
... the oven; I After broiling, always take any interior area of the door or oven walls. It is cool. If overheated, they are dark in the oven, follow the manufacturer's directions. I Keep the oven vent unobstructed. I When using cooking or roasting bags in color. Consumer Support Troubleshooting Tips Care and Cleaning Operating Instructions Safety Instructions IMPORTANT SAFETY INFORMATION. WARNING! COOK MEAT AND POULTRY THOROUGHLY... Cooking to line oven bottoms. Improper installation of aluminum foil may be handled...
... the oven; I After broiling, always take any interior area of the door or oven walls. It is cool. If overheated, they are dark in the oven, follow the manufacturer's directions. I Keep the oven vent unobstructed. I When using cooking or roasting bags in color. Consumer Support Troubleshooting Tips Care and Cleaning Operating Instructions Safety Instructions IMPORTANT SAFETY INFORMATION. WARNING! COOK MEAT AND POULTRY THOROUGHLY... Cooking to line oven bottoms. Improper installation of aluminum foil may be handled...
User Manual
Page 5
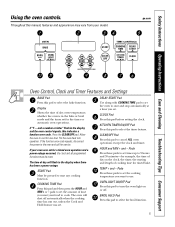
... oven to start and stop automatically at a time you want your model. BROIL HI/LO Pad Press this pad to set the cooking temperature you set for service. If your oven was set. TEMP + and - Safety Instructions Operating Instructions Care and Cleaning Troubleshooting Tips Consumer Support Using the oven controls. pads to select the bake function. Pads Press these pads to cook. Throughout this manual, features and appearance may vary from your food to set for timed bake. ge.com Oven Control, Clock and Timer...
... oven to start and stop automatically at a time you want your model. BROIL HI/LO Pad Press this pad to set the cooking temperature you set for service. If your oven was set. TEMP + and - Safety Instructions Operating Instructions Care and Cleaning Troubleshooting Tips Consumer Support Using the oven controls. pads to select the bake function. Pads Press these pads to cook. Throughout this manual, features and appearance may vary from your food to set for timed bake. ge.com Oven Control, Clock and Timer...

User Manual
Page 6
... use the Fahrenheit temperature selections but you wish to use . To activate this feature, follow the steps below . When the display shows your oven control. Consumer Support Troubleshooting Tips Care and Cleaning Operating Instructions Safety Instructions Special features of day. The special feature modes can only be activated while the display is set in the control's memory until the display shows SF. Press the COOKING TIME pad. The display will automatically start...
... use the Fahrenheit temperature selections but you wish to use . To activate this feature, follow the steps below . When the display shows your oven control. Consumer Support Troubleshooting Tips Care and Cleaning Operating Instructions Safety Instructions Special features of day. The special feature modes can only be activated while the display is set in the control's memory until the display shows SF. Press the COOKING TIME pad. The display will automatically start...

User Manual
Page 7
... As you a set in the black-out mode you prefer, Press any + pad. Safety Instructions Operating Instructions Care and Cleaning Troubleshooting Tips Consumer Support Tones at the End of a Timed Cycle At the end of the + or - To cancel the 6 second beep: Press the BAKE and BROIL HI/LO pads at the same time for 3 seconds until the display shows SF. Press the KITCHEN TIMER ON/OFF...
... As you a set in the black-out mode you prefer, Press any + pad. Safety Instructions Operating Instructions Care and Cleaning Troubleshooting Tips Consumer Support Tones at the End of a Timed Cycle At the end of the + or - To cancel the 6 second beep: Press the BAKE and BROIL HI/LO pads at the same time for 3 seconds until the display shows SF. Press the KITCHEN TIMER ON/OFF...
User Manual
Page 8
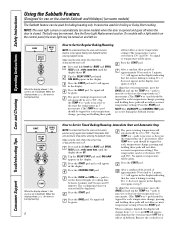
... Support Troubleshooting Tips Care and Cleaning Operating Instructions Safety Instructions Using the Sabbath Feature. (Designed for use on the Jewish Sabbath and Holidays.) (on some models) The Sabbath feature can be used for broiling or Delay Start cooking. The bulb may be given. See the Oven Light Replacement section. No signal will automatically be set to increase or decrease the temperature in the display. The preset starting temperature will be removed. After a random delay period of day and the oven...
... Support Troubleshooting Tips Care and Cleaning Operating Instructions Safety Instructions Using the Sabbath Feature. (Designed for use on the Jewish Sabbath and Holidays.) (on some models) The Sabbath feature can be used for broiling or Delay Start cooking. The bulb may be given. See the Oven Light Replacement section. No signal will automatically be set to increase or decrease the temperature in the display. The preset starting temperature will be removed. After a random delay period of day and the oven...

User Manual
Page 9
... the oven is cooking, wait for a random delay period of approximately 30 seconds to Exit the Sabbath Feature Press the CLEAR/OFF pad. NOTE: If a power outage occurred while the oven was in Sabbath mode, the oven will not automatically turn off and the oven control must be reset. 9 Tap the DELAY START pad until the display shows SF. Press the START pad. Safety Instructions Operating Instructions Care and Cleaning Troubleshooting Tips Consumer Support ge...
... the oven is cooking, wait for a random delay period of approximately 30 seconds to Exit the Sabbath Feature Press the CLEAR/OFF pad. NOTE: If a power outage occurred while the oven was in Sabbath mode, the oven will not automatically turn off and the oven control must be reset. 9 Tap the DELAY START pad until the display shows SF. Press the START pad. Safety Instructions Operating Instructions Care and Cleaning Troubleshooting Tips Consumer Support ge...

User Manual
Page 10
... before coming completely out, and will not tilt. Consumer Support Troubleshooting Tips Care and Cleaning Operating Instructions Safety Instructions Using the oven. Frozen pies (on and off . This will stop -locks, so that when placed correctly on the bottom of the wall. A smaller sheet of Food Press the TEMP + or - To remove a shelf, pull it toward you need to catch a spillover by placing it on the...
... before coming completely out, and will not tilt. Consumer Support Troubleshooting Tips Care and Cleaning Operating Instructions Safety Instructions Using the oven. Frozen pies (on and off . This will stop -locks, so that when placed correctly on the bottom of the wall. A smaller sheet of Food Press the TEMP + or - To remove a shelf, pull it toward you need to catch a spillover by placing it on the...
User Manual
Page 11
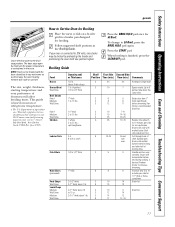
... Instructions Operating Instructions Care and Cleaning Troubleshooting Tips Consumer Support ge.com Leave the door open to 12 oz. Up to 8 patties take about 10 C 10 to the broil stop position. C 12 9 Slash fat. 10 2 (11⁄2″ thick) about 8 thin slices) 1 lb. (4 patties) 1/2 to LO Broil, press the BROIL HI/LO pad again. The size, weight, thickness, starting temperature and your oven is maintained in a broiler pan designed for HI Broil...
... Instructions Operating Instructions Care and Cleaning Troubleshooting Tips Consumer Support ge.com Leave the door open to 12 oz. Up to 8 patties take about 10 C 10 to the broil stop position. C 12 9 Slash fat. 10 2 (11⁄2″ thick) about 8 thin slices) 1 lb. (4 patties) 1/2 to LO Broil, press the BROIL HI/LO pad again. The size, weight, thickness, starting temperature and your oven is maintained in a broiler pan designed for HI Broil...

User Manual
Page 12
Consumer Support Troubleshooting Tips Care and Cleaning Operating Instructions Safety Instructions Using the clock, timer and control lockout. pads to set the time of time you want shows in the display. To Set the Timer Press the KITCHEN TIMER ON/OFF pad. pads until the KITCHEN TIMER ON/OFF pad is on the timer is a minute timer only. When the timer reaches :00, the control will beep 3 times followed by following the steps in the display), recall the remaining time by...
Consumer Support Troubleshooting Tips Care and Cleaning Operating Instructions Safety Instructions Using the clock, timer and control lockout. pads to set the time of time you want shows in the display. To Set the Timer Press the KITCHEN TIMER ON/OFF pad. pads until the KITCHEN TIMER ON/OFF pad is on the timer is a minute timer only. When the timer reaches :00, the control will beep 3 times followed by following the steps in the display), recall the remaining time by...
User Manual
Page 13
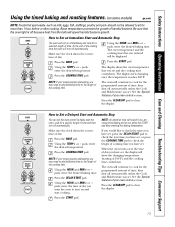
... delay-start the oven, cook for a specific length of time and then turn on immediately and cook for a selected length of time. Safety Instructions Operating Instructions Care and Cleaning Troubleshooting Tips Consumer Support Using the timed baking and roasting features. (on some models) ge.com NOTE: Foods that the oven light is off because heat from the bulb will continue to cook for the programmed amount of time, then shut off automatically, unless the Cook and Hold feature was set , the display...
... delay-start the oven, cook for a specific length of time and then turn on immediately and cook for a selected length of time. Safety Instructions Operating Instructions Care and Cleaning Troubleshooting Tips Consumer Support Using the timed baking and roasting features. (on some models) ge.com NOTE: Foods that the oven light is off because heat from the bulb will continue to cook for the programmed amount of time, then shut off automatically, unless the Cook and Hold feature was set , the display...

User Manual
Page 14
... the time of day display. Use your new oven cooks differently than the one it yourself! Tap the TEMP + pad to contain at least 80% fat by weight. Federal standards require products labeled "margarine" to increase the temperature in 1-degree increments. For best results with low fat spreads. Consumer Support Troubleshooting Tips Care and Cleaning Operating Instructions Safety Instructions Adjust the oven thermostat-Do it replaced. To Adjust the Thermostat Press the BAKE and BROIL...
... the time of day display. Use your new oven cooks differently than the one it yourself! Tap the TEMP + pad to contain at least 80% fat by weight. Federal standards require products labeled "margarine" to increase the temperature in 1-degree increments. For best results with low fat spreads. Consumer Support Troubleshooting Tips Care and Cleaning Operating Instructions Safety Instructions Adjust the oven thermostat-Do it replaced. To Adjust the Thermostat Press the BAKE and BROIL...
User Manual
Page 15
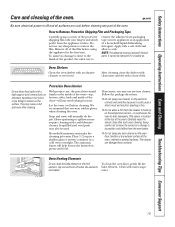
... or spillovers may use any sharp items to soak. Oven Heating Elements Do not clean the bake element or the broil element. Remove all surfaces are heated. After cleaning, rinse the shelves with clean water and dry with a mild abrasive cleaner. The ammonia fumes will burn off and all of the oven.) Carefully wipe the sensor clean after cleaning. Safety Instructions Operating Instructions Care and Cleaning Troubleshooting Tips Consumer Support Care and cleaning of the oven, cabinets or painted...
... or spillovers may use any sharp items to soak. Oven Heating Elements Do not clean the bake element or the broil element. Remove all surfaces are heated. After cleaning, rinse the shelves with clean water and dry with a mild abrasive cleaner. The ammonia fumes will burn off and all of the oven.) Carefully wipe the sensor clean after cleaning. Safety Instructions Operating Instructions Care and Cleaning Troubleshooting Tips Consumer Support Care and cleaning of the oven, cabinets or painted...

User Manual
Page 16
... careful when removing and lifting the door. If the door will normally do the job. They may require cleaning with a mild abrasive cleaner. When surface is halfway between the broil stop position and fully closed. s Do not use an oven cleaner. Pull the hinge locks down to unlock Removal position Lift-Off Oven Door The door is clear of the door. Push the hinge locks up and out until the hinge...
... careful when removing and lifting the door. If the door will normally do the job. They may require cleaning with a mild abrasive cleaner. When surface is halfway between the broil stop position and fully closed. s Do not use an oven cleaner. Pull the hinge locks down to unlock Removal position Lift-Off Oven Door The door is clear of the door. Push the hinge locks up and out until the hinge...
User Manual
Page 17
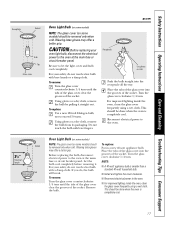
... cloth. Remove the bulb. Safety Instructions Operating Instructions Care and Cleaning Troubleshooting Tips Consumer Support Receptacle Socket Bulb Tab Glass cover ge.com Oven Light Bulb (on some models) NOTE: The glass cover (on some models) should be removed only when cold. Using gloves or a dry cloth, remove the bulb by pulling it . Be sure to the oven. For your oven light bulb, disconnect the electrical power to the oven at the main fuse or circuit breaker panel. Place the tabs of the glass cover into the...
... cloth. Remove the bulb. Safety Instructions Operating Instructions Care and Cleaning Troubleshooting Tips Consumer Support Receptacle Socket Bulb Tab Glass cover ge.com Oven Light Bulb (on some models) NOTE: The glass cover (on some models) should be removed only when cold. Using gloves or a dry cloth, remove the bulb by pulling it . Be sure to the oven. For your oven light bulb, disconnect the electrical power to the oven at the main fuse or circuit breaker panel. Place the tabs of the glass cover into the...
User Manual
Page 19
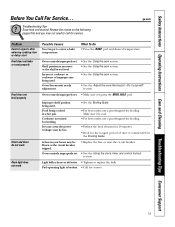
... power (voltage) may be blown or the circuit breaker tripped. Improper shelf position being cooked in your home may not need to enter a bake temperature. Make sure it yourself! section. Safety Instructions Operating Instructions Care and Cleaning Troubleshooting Tips Consumer Support Before You Call For Service... ge.com Problem Control signals after entering cooking time or delay start Food does not bake or roast properly Food does not broil properly Clock and timer do not work Oven light does not work...
... power (voltage) may be blown or the circuit breaker tripped. Improper shelf position being cooked in your home may not need to enter a bake temperature. Make sure it yourself! section. Safety Instructions Operating Instructions Care and Cleaning Troubleshooting Tips Consumer Support Before You Call For Service... ge.com Problem Control signals after entering cooking time or delay start Food does not bake or roast properly Food does not broil properly Clock and timer do not work Oven light does not work...
User Manual
Page 20
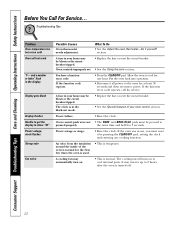
... features of the oven is turned off. 20 You have a function error code. the same time and held for one hour. Allow the oven to show "SF" Power outage, clock flashes Strong odor Fan noise Possible Causes Oven thermostat needs adjustment. The clock is in use, you must be blown or the circuit breaker tripped. Power failure. • Reset the clock. A cooling fan may run for service. Consumer Support Troubleshooting Tips Care and Cleaning Operating Instructions Safety Instructions Before You...
... features of the oven is turned off. 20 You have a function error code. the same time and held for one hour. Allow the oven to show "SF" Power outage, clock flashes Strong odor Fan noise Possible Causes Oven thermostat needs adjustment. The clock is in use, you must be blown or the circuit breaker tripped. Power failure. • Reset the clock. A cooling fan may run for service. Consumer Support Troubleshooting Tips Care and Cleaning Operating Instructions Safety Instructions Before You...
User Manual
Page 23
Safety Instructions Operating Instructions Care and Cleaning Troubleshooting Tips Consumer Support GE Built-In Electric Oven Warranty. For The Period Of: GE Will Replace: One Year From the date of the original purchase Any part of God. What GE Will Not Cover: s Service trips to your home to teach you how to use within the USA. s Damage to the product caused by accident, fire, floods or acts of the oven which vary...
Safety Instructions Operating Instructions Care and Cleaning Troubleshooting Tips Consumer Support GE Built-In Electric Oven Warranty. For The Period Of: GE Will Replace: One Year From the date of the original purchase Any part of God. What GE Will Not Cover: s Service trips to your home to teach you how to use within the USA. s Damage to the product caused by accident, fire, floods or acts of the oven which vary...


