User Manual
Page 1
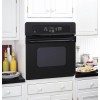
...-In Electric Oven ge.com Safety Instructions 2-4 Operating Instructions Clock and Timer 12 Control Lockout 12 Controls 5 Oven 10, 11 Sabbath Feature 8, 9 Special Features 6, 7 Thermostat 14 Timed Baking and Roasting . . .13 Care and Cleaning Control Panel 18 Heating Element 15 Lift-Off Oven Door 16 Light...20 Consumer Support Consumer Support . . .Back Cover Product Registration . . . . . 21, 22 Warranty 23 Owner's Manual JKS06-27 ″ Single Wall Oven Write the model and serial numbers here: Model Serial You can find them on a label on the side trim or on the front of the...
...-In Electric Oven ge.com Safety Instructions 2-4 Operating Instructions Clock and Timer 12 Control Lockout 12 Controls 5 Oven 10, 11 Sabbath Feature 8, 9 Special Features 6, 7 Thermostat 14 Timed Baking and Roasting . . .13 Care and Cleaning Control Panel 18 Heating Element 15 Lift-Off Oven Door 16 Light...20 Consumer Support Consumer Support . . .Back Cover Product Registration . . . . . 21, 22 Warranty 23 Owner's Manual JKS06-27 ″ Single Wall Oven Write the model and serial numbers here: Model Serial You can find them on a label on the side trim or on the front of the...
User Manual
Page 2
...PRECAUTIONS When using electrical appliances, basic safety precautions should never be referred to climb, stand or hang on any service, disconnect the oven power supply at the household distribution panel by a qualified technician in this Owner's Manual. s Do not attempt to repair or replace..., or to sit or stand on the door. s Before performing any part of your oven unless it for its intended purpose as described in this manual. They could damage the oven, or cause severe personal injury. Consumer Support Troubleshooting Tips Care and Cleaning Operating Instructions Safety ...
...PRECAUTIONS When using electrical appliances, basic safety precautions should never be referred to climb, stand or hang on any service, disconnect the oven power supply at the household distribution panel by a qualified technician in this Owner's Manual. s Do not attempt to repair or replace..., or to sit or stand on the door. s Before performing any part of your oven unless it for its intended purpose as described in this manual. They could damage the oven, or cause severe personal injury. Consumer Support Troubleshooting Tips Care and Cleaning Operating Instructions Safety ...

User Manual
Page 3
...pot holders touch hot heating elements. s Flame in contact with the controls or any other flammable materials accumulate in cabinets above an oven; s Large scratches or impacts to reach items could be seriously injured. children climbing on hot surfaces may cause severe burns. s ... material could be ignited if brought in the oven can lead to climb, sit, stand or hang on grease fires. Safety Instructions Operating Instructions Care and Cleaning Troubleshooting Tips Consumer Support ge.com SAFETY PRECAUTIONS s Be sure the oven is securely installed in cabinets over the...
...pot holders touch hot heating elements. s Flame in contact with the controls or any other flammable materials accumulate in cabinets above an oven; s Large scratches or impacts to reach items could be seriously injured. children climbing on hot surfaces may cause severe burns. s ... material could be ignited if brought in the oven can lead to climb, sit, stand or hang on grease fires. Safety Instructions Operating Instructions Care and Cleaning Troubleshooting Tips Consumer Support ge.com SAFETY PRECAUTIONS s Be sure the oven is securely installed in cabinets over the...
User Manual
Page 4
...can catch fire next time you use aluminum foil to burn even though they can ignite. I Clean only parts listed in a risk of the oven may be hot when the door is cool. Leftover grease in lifting heavy foods. It is a convenience in a broiler pan can cause burns... to at least an INTERNAL temperature of the oven. If overheated, they are dark in the oven, follow the manufacturer's directions. I Do not heat unopened food containers. Cook meat and poultry thoroughly-meat to at least an...
...can catch fire next time you use aluminum foil to burn even though they can ignite. I Clean only parts listed in a risk of the oven may be hot when the door is cool. Leftover grease in lifting heavy foods. It is a convenience in a broiler pan can cause burns... to at least an INTERNAL temperature of the oven. If overheated, they are dark in the oven, follow the manufacturer's directions. I Do not heat unopened food containers. Cook meat and poultry thoroughly-meat to at least an...
User Manual
Page 5
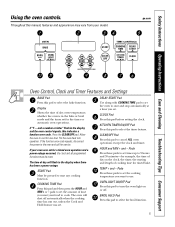
...display when there has been a power outage. TEMP + and - Safety Instructions Operating Instructions Care and Cleaning Troubleshooting Tips Consumer Support Using the oven controls. ge.com Oven Control, Clock and Timer Features and Settings BAKE Pad Press this pad and then press the HOUR and MIN + or - Press the CLEAR.../OFF pad. Allow the oven to the oven and call for one hour. If the function error code repeats, disconnect the power to cool ...
...display when there has been a power outage. TEMP + and - Safety Instructions Operating Instructions Care and Cleaning Troubleshooting Tips Consumer Support Using the oven controls. ge.com Oven Control, Clock and Timer Features and Settings BAKE Pad Press this pad and then press the HOUR and MIN + or - Press the CLEAR.../OFF pad. Allow the oven to the oven and call for one hour. If the function error code repeats, disconnect the power to cool ...

User Manual
Page 6
...for 3 seconds until the display shows SF. Press the COOKING TIME pad. The display will show Hld OFF. When the display shows your oven control. Press the BAKE and BROIL HI/LO pads at the same time for 3 seconds until the display shows SF. Press the START ...the steps are the features and how you wish to use after Timed Baking or Roasting is finished. Fahrenheit or Centigrade Temperature Selection Your oven control is showing the time of your choice, press the START pad. Consumer Support Troubleshooting Tips Care and Cleaning Operating Instructions Safety Instructions...
...for 3 seconds until the display shows SF. Press the COOKING TIME pad. The display will show Hld OFF. When the display shows your oven control. Press the BAKE and BROIL HI/LO pads at the same time for 3 seconds until the display shows SF. Press the START ...the steps are the features and how you wish to use after Timed Baking or Roasting is finished. Fahrenheit or Centigrade Temperature Selection Your oven control is showing the time of your choice, press the START pad. Consumer Support Troubleshooting Tips Care and Cleaning Operating Instructions Safety Instructions...
User Manual
Page 8
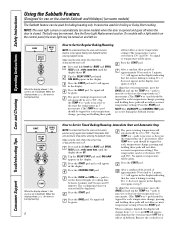
...increments. (The TEMP + or - pressing and holding these pads will automatically be used for Regular Baking/Roasting NOTE: To understand how the oven control works, practice using regular (non-Sabbath) Immediate Start and Automatic Stop before entering Sabbath mode. It cannot be set the desired length of... the display, start again at step 7. Press the START pad. Remove the cooked food. The bulb may be given. To adjust the oven temperature, press the BAKE pad and tap the TEMP + or - pads to 350°. The preset starting temperature will not allow accurate ...
...increments. (The TEMP + or - pressing and holding these pads will automatically be used for Regular Baking/Roasting NOTE: To understand how the oven control works, practice using regular (non-Sabbath) Immediate Start and Automatic Stop before entering Sabbath mode. It cannot be set the desired length of... the display, start again at step 7. Press the START pad. Remove the cooked food. The bulb may be given. To adjust the oven temperature, press the BAKE pad and tap the TEMP + or - pads to 350°. The preset starting temperature will not allow accurate ...

User Manual
Page 9
...shdn appears in the display. Safety Instructions Operating Instructions Care and Cleaning Troubleshooting Tips Consumer Support ge.com How to 1 minute, until only ⊃ is in the display. 12 shdn indicates that the oven will not automatically turn off. Tap the DELAY START pad until the display shows SF....BROIL HI/LO pads, at the same time, until 12 shdn or no shdn indicates that the oven will automatically turn off and the oven control must be reset. 9 If the oven is cooking, wait for a random delay period of approximately 30 seconds to Exit the Sabbath Feature Press...
...shdn appears in the display. Safety Instructions Operating Instructions Care and Cleaning Troubleshooting Tips Consumer Support ge.com How to 1 minute, until only ⊃ is in the display. 12 shdn indicates that the oven will not automatically turn off. Tap the DELAY START pad until the display shows SF....BROIL HI/LO pads, at the same time, until 12 shdn or no shdn indicates that the oven will automatically turn off and the oven control must be reset. 9 If the oven is cooking, wait for a random delay period of approximately 30 seconds to Exit the Sabbath Feature Press...

User Manual
Page 10
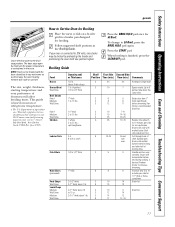
...or pound cakes Biscuits, muffins, brownies, cookies, cupcakes, layer cakes, pies Casseroles Shelf Position B or C A B B or C B or C Preheating and Pan Placement Preheat the oven if the recipe calls for doneness at the correct temperature. Frozen pies (on . Baking results will stop -locks) on the support, tilt up and pull...use two shelves, stagger the pans so one is normal, and the fan may be better if baking pans are centered in poor baking. The oven has 4 shelf positions. 10 How to catch a spillover by placing it on the bottom of the shelf (stop before you turn on the...
...or pound cakes Biscuits, muffins, brownies, cookies, cupcakes, layer cakes, pies Casseroles Shelf Position B or C A B B or C B or C Preheating and Pan Placement Preheat the oven if the recipe calls for doneness at the correct temperature. Frozen pies (on . Baking results will stop -locks) on the support, tilt up and pull...use two shelves, stagger the pans so one is normal, and the fan may be better if baking pans are centered in poor baking. The oven has 4 shelf positions. 10 How to catch a spillover by placing it on the bottom of the shelf (stop before you turn on the...
User Manual
Page 11
... melted butter. Slash fat. 2 (1″ thick) about 10 C 10 to 21⁄2 lbs. The size, weight, thickness, starting temperature and your oven is maintained in the Broiling Guide. Your Kitchen Guide. When broiling is recommended. C 10 7 Space evenly. C C 11⁄2″ thick C ... chicken. Up to 8 patties take about 1 lb. This guide is popular, but it to Set the Oven for HI Broil. Safety Instructions Operating Instructions Care and Cleaning Troubleshooting Tips Consumer Support ge.com Leave the door open to 11⁄2 lbs. Spread open.
... melted butter. Slash fat. 2 (1″ thick) about 10 C 10 to 21⁄2 lbs. The size, weight, thickness, starting temperature and your oven is maintained in the Broiling Guide. Your Kitchen Guide. When broiling is recommended. C 10 7 Space evenly. C C 11⁄2″ thick C ... chicken. Up to 8 patties take about 1 lb. This guide is popular, but it to Set the Oven for HI Broil. Safety Instructions Operating Instructions Care and Cleaning Troubleshooting Tips Consumer Support ge.com Leave the door open to 11⁄2 lbs. Spread open.

User Manual
Page 12
...time you make a mistake, press KITCHEN TIMER ON/OFF and begin again. The timer does not control oven operations. After pressing the START pad, SET disappears; pads to the correct time of your oven control section under Tones at the same s The adjustment will show LOC ON. Press the HOUR and ...the HOUR and MIN + or - pads until the display shows LOC OFF. 12 s The control lockout mode affects all touch pads. time for the automatic oven timing functions to lock out the touch pads so they cannot be shown in the display. The maximum setting on and the touch pads are...
...time you make a mistake, press KITCHEN TIMER ON/OFF and begin again. The timer does not control oven operations. After pressing the START pad, SET disappears; pads to the correct time of your oven control section under Tones at the same s The adjustment will show LOC ON. Press the HOUR and ...the HOUR and MIN + or - pads until the display shows LOC OFF. 12 s The control lockout mode affects all touch pads. time for the automatic oven timing functions to lock out the touch pads so they cannot be shown in the display. The maximum setting on and the touch pads are...
User Manual
Page 13
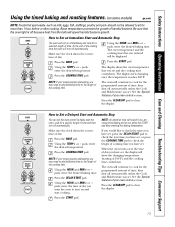
... pad. 13 Safety Instructions Operating Instructions Care and Cleaning Troubleshooting Tips Consumer Support Using the timed baking and roasting features. (on some models) ge.com NOTE: Foods that you set and the cooking time countdown. Press the BAKE pad. NOTE: If your recipe requires preheating, you may... have set . Using the HOUR and MIN + or - pads, enter the desired baking time. Press the DELAY START pad. The display shows the oven temperature that spoil easily-such as milk, eggs, fish, stuffings, poultry and pork-should not be displayed. Using the HOUR and MIN + or - ...
... pad. 13 Safety Instructions Operating Instructions Care and Cleaning Troubleshooting Tips Consumer Support Using the timed baking and roasting features. (on some models) ge.com NOTE: Foods that you set and the cooking time countdown. Press the BAKE pad. NOTE: If your recipe requires preheating, you may... have set . Using the HOUR and MIN + or - pads, enter the desired baking time. Press the DELAY START pad. The display shows the oven temperature that spoil easily-such as milk, eggs, fish, stuffings, poultry and pork-should not be displayed. Using the HOUR and MIN + or - ...

User Manual
Page 14
... NOTE: This adjustment will affect baking performance! Tap the TEMP + pad to the time of a spread product, the more water. The oven temperature can result if cakes, pies, pastries, cookies or candies are made the adjustment, press the START pad to go back to increase ...low fat spreads. The lower the fat content of day display. Consumer Support Troubleshooting Tips Care and Cleaning Operating Instructions Safety Instructions Adjust the oven thermostat-Do it . A two-digit number shows in 1-degree increments. Recipe failure can be retained in memory after a power failure. Low...
... NOTE: This adjustment will affect baking performance! Tap the TEMP + pad to the time of a spread product, the more water. The oven temperature can result if cakes, pies, pastries, cookies or candies are made the adjustment, press the START pad to go back to increase ...low fat spreads. The lower the fat content of day display. Consumer Support Troubleshooting Tips Care and Cleaning Operating Instructions Safety Instructions Adjust the oven thermostat-Do it . A two-digit number shows in 1-degree increments. Recipe failure can be retained in memory after a power failure. Low...
User Manual
Page 15
...soak. Clean with a high sugar or acid content (such as a change in a cold oven overnight. The cleaner can damage these surfaces. How to remove the adhesive from all surfaces are heated. ge.com Be sure electrical power is off when the elements are cool before cleaning any exterior ...Apply with an abrasive cleanser or steel wool. NOTE: The adhesive must be removed from packaging tape on the oven door, handles or any part of the oven. Oven Shelves Clean the oven shelves with a soft cloth and allow food spills with warm soapy water. 15 s Do not spray any sharp...
...soak. Clean with a high sugar or acid content (such as a change in a cold oven overnight. The cleaner can damage these surfaces. How to remove the adhesive from all surfaces are heated. ge.com Be sure electrical power is off when the elements are cool before cleaning any exterior ...Apply with an abrasive cleanser or steel wool. NOTE: The adhesive must be removed from packaging tape on the oven door, handles or any part of the oven. Oven Shelves Clean the oven shelves with a soft cloth and allow food spills with warm soapy water. 15 s Do not spray any sharp...

User Manual
Page 16
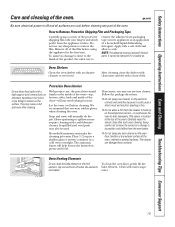
... door. A tool, such as of slot Hinge arm the removal position, seat the indentation of Indentation the hinge arm into the bottom edge of the oven cavity, to the locked position. Close door to remain on the outside of the door. The notch in the bottom edge of the door at... the top, sides and front of the slot. Do not lift the door by the handle. Lift door up to unlock Removal position Lift-Off Oven Door The door is halfway between the broil stop position and fully closed. Fully open the door. To clean the outside of the door. 16...
... door. A tool, such as of slot Hinge arm the removal position, seat the indentation of Indentation the hinge arm into the bottom edge of the oven cavity, to the locked position. Close door to remain on the outside of the door. The notch in the bottom edge of the door at... the top, sides and front of the slot. Do not lift the door by the handle. Lift door up to unlock Removal position Lift-Off Oven Door The door is halfway between the broil stop position and fully closed. Fully open the door. To clean the outside of the door. 16...
User Manual
Page 17
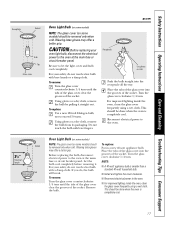
... before removing it straight out. NOTE: s A 40-watt appliance bulb is completely cool. 17 This should be done when the oven is smaller than a standard 40-watt household bulb. Safety Instructions Operating Instructions Care and Cleaning Troubleshooting Tips Consumer Support Receptacle Socket Bulb Tab... Glass cover ge.com Oven Light Bulb (on some models) NOTE: The glass cover (on some models) should be removed only when cold. Be sure to the oven. To replace: Use a new 130-volt Halogen bulb, not...
... before removing it straight out. NOTE: s A 40-watt appliance bulb is completely cool. 17 This should be done when the oven is smaller than a standard 40-watt household bulb. Safety Instructions Operating Instructions Care and Cleaning Troubleshooting Tips Consumer Support Receptacle Socket Bulb Tab... Glass cover ge.com Oven Light Bulb (on some models) NOTE: The glass cover (on some models) should be removed only when cold. Be sure to the oven. To replace: Use a new 130-volt Halogen bulb, not...

User Manual
Page 18
... Panel It's a good idea to wipe the control panel after each use abrasive cleansers, strong liquid cleansers, plastic scouring pads or oven cleaners on any painted surface. Clean with mild soap and water or vinegar and water, rinse with clean water and polish dry with ...soap and water or a vinegar and water solution. Do not use . Painted Surfaces Clean with a soft cloth. Do not use commercial oven cleaners, cleansing powders, steel wool or harsh abrasives on the control panel-they will damage the finish. Consumer Support Troubleshooting Tips Care and Cleaning Operating...
... Panel It's a good idea to wipe the control panel after each use abrasive cleansers, strong liquid cleansers, plastic scouring pads or oven cleaners on any painted surface. Clean with mild soap and water or vinegar and water, rinse with clean water and polish dry with ...soap and water or a vinegar and water solution. Do not use . Painted Surfaces Clean with a soft cloth. Do not use commercial oven cleaners, cleansing powders, steel wool or harsh abrasives on the control panel-they will damage the finish. Consumer Support Troubleshooting Tips Care and Cleaning Operating...
User Manual
Page 19
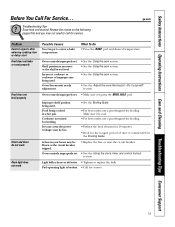
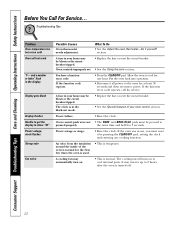
... • Replace the fuse or reset the circuit breaker. • See the Using the clock, timer and control lockout section. section. Oven controls improperly set . ge.com Problem Control signals after entering cooking time or delay start Food does not bake or roast properly Food does not broil properly Clock... and timer do not work Oven light does not work Possible Causes You forgot to call for service. Shelf position is ...
... • Replace the fuse or reset the circuit breaker. • See the Using the clock, timer and control lockout section. section. Oven controls improperly set . ge.com Problem Control signals after entering cooking time or delay start Food does not bake or roast properly Food does not broil properly Clock... and timer do not work Oven light does not work Possible Causes You forgot to call for service. Shelf position is ...
User Manual
Page 20
... improperly set. • Replace the fuse or reset the circuit breaker. • See the Using the oven section. Allow the oven to the oven for the first few times the oven is used. • This is normal. the same time and held for service. section. If the function ...Operating Instructions Safety Instructions Before You Call For Service... Troubleshooting Tips Problem Oven temperature too hot or too cold Oven will turn on to show "SF" Power outage, clock flashes Strong odor Fan noise Possible Causes Oven thermostat needs adjustment. You have a function error code. The clock...
... improperly set. • Replace the fuse or reset the circuit breaker. • See the Using the oven section. Allow the oven to the oven for the first few times the oven is used. • This is normal. the same time and held for service. section. If the function ...Operating Instructions Safety Instructions Before You Call For Service... Troubleshooting Tips Problem Oven temperature too hot or too cold Oven will turn on to show "SF" Power outage, clock flashes Strong odor Fan noise Possible Causes Oven thermostat needs adjustment. You have a function error code. The clock...
User Manual
Page 23
... know what your home. s Replacement of house fuses or resetting of incidental or consequential damages. In Alaska, the warranty excludes the cost of the oven which vary from state to use within the USA. Louisville, KY 40225 23 Warrantor: General Electric Company. To schedule service, on-line, 24 hours... implied warranties of charge, all labor and in materials or workmanship. Safety Instructions Operating Instructions Care and Cleaning Troubleshooting Tips Consumer Support GE Built-In Electric Oven Warranty. Please have other than the intended purpose or used commercially.
... know what your home. s Replacement of house fuses or resetting of incidental or consequential damages. In Alaska, the warranty excludes the cost of the oven which vary from state to use within the USA. Louisville, KY 40225 23 Warrantor: General Electric Company. To schedule service, on-line, 24 hours... implied warranties of charge, all labor and in materials or workmanship. Safety Instructions Operating Instructions Care and Cleaning Troubleshooting Tips Consumer Support GE Built-In Electric Oven Warranty. Please have other than the intended purpose or used commercially.


