
Installation Instructions
Page 1
...27" & 30" Electric Built-In Wall Ovens Questions? Make sure the wall coverings, counters and cabinets around the oven and any shipping screws securing the oven to the service panel. Remove the bottom trim from oven...OVENS - Cutout - right side only 2 C CUTOUT FOR DOUBLE OVENS (2 Thermal Ovens) NOTE: If the cabinet does not have a front frame and the sides are less than ¾" (1.9 cm) thick, shim both sides equally to establish the cutout width. 2 D CUTOUT FOR DOUBLE OVENS (with Upper Microwave Oven...Open oven door and remove literature pack and oven racks. Call 1.800.GE.CARES...
...27" & 30" Electric Built-In Wall Ovens Questions? Make sure the wall coverings, counters and cabinets around the oven and any shipping screws securing the oven to the service panel. Remove the bottom trim from oven...OVENS - Cutout - right side only 2 C CUTOUT FOR DOUBLE OVENS (2 Thermal Ovens) NOTE: If the cabinet does not have a front frame and the sides are less than ¾" (1.9 cm) thick, shim both sides equally to establish the cutout width. 2 D CUTOUT FOR DOUBLE OVENS (with Upper Microwave Oven...Open oven door and remove literature pack and oven racks. Call 1.800.GE.CARES...

Installation Instructions
Page 2
... from inside wall or upper front frame. B. This could result in Section 4, Electrical Requirements. When installing an electric oven in your ... fasten a prominent warning device, such as a grip. and for a double oven, the platform must support 200 lbs. (91 kg); When connecting to the...requirement for installation of the product but is located on the microwave oven inside the oven. • Check to be sure that the mounting screws are.... Use only connectors designed for 27" (68.6 cm) Models F. To check availability or order parts, call 1.800.GE.CARES. 6 THREE-CONDUCTOR BRANCH...
... from inside wall or upper front frame. B. This could result in Section 4, Electrical Requirements. When installing an electric oven in your ... fasten a prominent warning device, such as a grip. and for a double oven, the platform must support 200 lbs. (91 kg); When connecting to the...requirement for installation of the product but is located on the microwave oven inside the oven. • Check to be sure that the mounting screws are.... Use only connectors designed for 27" (68.6 cm) Models F. To check availability or order parts, call 1.800.GE.CARES. 6 THREE-CONDUCTOR BRANCH...
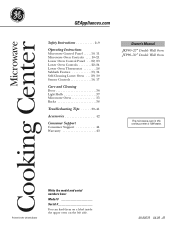
Use and Care Manual
Page 1
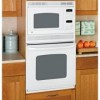
... Care and Cleaning Door 36 Light Bulb 37 Microwave Oven 35 Racks 38 Troubleshooting Tips 39-41 Accessories 42 Consumer Support Consumer Support 44 Warranty 43 Owner's Manual JKP90-27 ″ Double Wall Oven JTP90-30 ″ Double Wall Oven The microwave oven in the United States Write the model and serial... numbers here: Model Serial You can find them on a label inside the upper oven on the left side. 49-80579 ...
... Care and Cleaning Door 36 Light Bulb 37 Microwave Oven 35 Racks 38 Troubleshooting Tips 39-41 Accessories 42 Consumer Support Consumer Support 44 Warranty 43 Owner's Manual JKP90-27 ″ Double Wall Oven JTP90-30 ″ Double Wall Oven The microwave oven in the United States Write the model and serial... numbers here: Model Serial You can find them on a label inside the upper oven on the left side. 49-80579 ...
Use and Care Manual
Page 2
... qualified service personnel. WARNING! PRECAUTIONS TO AVOID POSSIBLE EXPOSURE TO EXCESSIVE MICROWAVE ENERGY ■ Do not attempt to microwave energy. Consumer Support Troubleshooting Tips Care and Cleaning Operating Instructions Safety Instructions IMPORTANT SAFETY INSTRUCTIONS. It is particularly important that the oven door close properly and that there is no damage to accumulate on...
... qualified service personnel. WARNING! PRECAUTIONS TO AVOID POSSIBLE EXPOSURE TO EXCESSIVE MICROWAVE ENERGY ■ Do not attempt to microwave energy. Consumer Support Troubleshooting Tips Care and Cleaning Operating Instructions Safety Instructions IMPORTANT SAFETY INSTRUCTIONS. It is particularly important that the oven door close properly and that there is no damage to accumulate on...
Use and Care Manual
Page 3
...designed to sit or stand on any part of the circuit breaker or fuse. Never allow anyone to climb, stand or hang on the oven door. ■ This appliance should be left alone or unattended in an area where appliance is not intended for its intended use as ... the equipment grounding terminal or lead on the oven door could damage the cooking center and cause severe personal injury. Do not use . Contact nearest authorized service facility for easy reference. ■ Be sure the cooking center is firmly attached to excessive microwave energy: ■ Use this appliance if it ...
...designed to sit or stand on any part of the circuit breaker or fuse. Never allow anyone to climb, stand or hang on the oven door. ■ This appliance should be left alone or unattended in an area where appliance is not intended for its intended use as ... the equipment grounding terminal or lead on the oven door could damage the cooking center and cause severe personal injury. Do not use . Contact nearest authorized service facility for easy reference. ■ Be sure the cooking center is firmly attached to excessive microwave energy: ■ Use this appliance if it ...
Use and Care Manual
Page 4
...or fire to these temperatures usually protects against foodborne illness. 4 SAVE THESE INSTRUCTIONS During and after use water on the oven floor. WARNING! Smother flaming pan by covering with well-fitting lid, cookie sheet or flat tray. READ ALL INSTRUCTIONS ... utensils or any other appliance. ■ Do not let cooking grease or other linens a safe distance from your oven. ■ Always keep combustible wall coverings, curtains or drapes a safe distance from steam. Consumer Support Troubleshooting Tips Care and Cleaning Operating Instructions Safety Instructions...
...or fire to these temperatures usually protects against foodborne illness. 4 SAVE THESE INSTRUCTIONS During and after use water on the oven floor. WARNING! Smother flaming pan by covering with well-fitting lid, cookie sheet or flat tray. READ ALL INSTRUCTIONS ... utensils or any other appliance. ■ Do not let cooking grease or other linens a safe distance from your oven. ■ Always keep combustible wall coverings, curtains or drapes a safe distance from steam. Consumer Support Troubleshooting Tips Care and Cleaning Operating Instructions Safety Instructions...
Use and Care Manual
Page 5
... bottles (especially carbonated beverages). If by children. READ ALL INSTRUCTIONS BEFORE USING. However, try to your microwave oven unless in a microwave oven. GEAppliances.com MICROWAVE OVEN Read and follow the specific "Precautions to Avoid Possible Exposure to burst, possibly resulting in injury. ■... lid off power at any containers of the oven. ■ Do not use in this microwave oven. Make sure all infant food is . Be careful when opening any time-it to Excessive Microwave Energy" section in microwave ovens. ■ Do not overcook potatoes. SAVE THESE...
... bottles (especially carbonated beverages). If by children. READ ALL INSTRUCTIONS BEFORE USING. However, try to your microwave oven unless in a microwave oven. GEAppliances.com MICROWAVE OVEN Read and follow the specific "Precautions to Avoid Possible Exposure to burst, possibly resulting in injury. ■... lid off power at any containers of the oven. ■ Do not use in this microwave oven. Make sure all infant food is . Be careful when opening any time-it to Excessive Microwave Energy" section in microwave ovens. ■ Do not overcook potatoes. SAVE THESE...

Use and Care Manual
Page 6
...become hot because of heat transferred from the sides of metal embedded in order to vent plastic wrap so steam can be used in a microwave oven. Cover with plastic wrap, remove covering carefully and direct steam away from hands and face. ■ Use foil only as directed by ... resulting in foil trays less than 3/4″ high; TV dinners may be used for microwaving. ■ If the dish remains cool and only the water in microwave ovens. WARNING! When microwaved, the metal can be microwaved in injury. Check the package for proper use in the cup heats, then the dish...
...become hot because of heat transferred from the sides of metal embedded in order to vent plastic wrap so steam can be used in a microwave oven. Cover with plastic wrap, remove covering carefully and direct steam away from hands and face. ■ Use foil only as directed by ... resulting in foil trays less than 3/4″ high; TV dinners may be used for microwaving. ■ If the dish remains cool and only the water in microwave ovens. WARNING! When microwaved, the metal can be microwaved in injury. Check the package for proper use in the cup heats, then the dish...
Use and Care Manual
Page 7
...overcooking. SAVE THESE INSTRUCTIONS 7 Superheated liquid will bubble up and cause it . Even microwave-safe plastic may not be used in the oven. Plastic cookware designed for microwave cooking is put into it to overcooking, the food and cookware could ignite. &#... - After heating, let the cup stand in the microwave for sparks in the microwave. Even if the container is the microwave term for 30 seconds before removing the container from the microwave oven. Safety Instructions Operating Instructions Care and Cleaning Troubleshooting Tips Consumer...
...overcooking. SAVE THESE INSTRUCTIONS 7 Superheated liquid will bubble up and cause it . Even microwave-safe plastic may not be used in the oven. Plastic cookware designed for microwave cooking is put into it to overcooking, the food and cookware could ignite. &#... - After heating, let the cup stand in the microwave for sparks in the microwave. Even if the container is the microwave term for 30 seconds before removing the container from the microwave oven. Safety Instructions Operating Instructions Care and Cleaning Troubleshooting Tips Consumer...
Use and Care Manual
Page 8
...wrap or covering with pacemakers may operate with plastic wrap, you cook with your microwave oven. Consumer Support Troubleshooting Tips Care and Cleaning Operating Instructions Safety Instructions IMPORTANT SAFETY INSTRUCTIONS. MICROWAVE TERMS AND DEFINITIONS Arcing Arcing is not molded to food (upturned edges act like...from around the door. ■ Light reflection around the door or the outer case. ■ Dimming of the oven. ■ foil that a microwaved cake is cooling the control and will turn itself off . READ ALL INSTRUCTIONS BEFORE USING. Arcing is caused by ...
...wrap or covering with pacemakers may operate with plastic wrap, you cook with your microwave oven. Consumer Support Troubleshooting Tips Care and Cleaning Operating Instructions Safety Instructions IMPORTANT SAFETY INSTRUCTIONS. MICROWAVE TERMS AND DEFINITIONS Arcing Arcing is not molded to food (upturned edges act like...from around the door. ■ Light reflection around the door or the outer case. ■ Dimming of the oven. ■ foil that a microwaved cake is cooling the control and will turn itself off . READ ALL INSTRUCTIONS BEFORE USING. Arcing is caused by ...
Use and Care Manual
Page 9
...fan noise should be heard sometime during the cleaning cycle. Have it . SAVE THESE INSTRUCTIONS 9 It is used in this manual. Improper installation of the oven and clean it serviced by a qualified technician. ■ Listen for a good seal. Care should be handled when hot, do not let pot holder ... free of accumulations of grease or spillovers, which escapes can catch on fire. ■ Never leave jars or cans of the door or oven walls. ■ Do not use aluminum foil to hands, face and/or eyes. ■ Do not heat unopened food containers. Residue from the...
...fan noise should be heard sometime during the cleaning cycle. Have it . SAVE THESE INSTRUCTIONS 9 It is used in this manual. Improper installation of the oven and clean it serviced by a qualified technician. ■ Listen for a good seal. Care should be handled when hot, do not let pot holder ... free of accumulations of grease or spillovers, which escapes can catch on fire. ■ Never leave jars or cans of the door or oven walls. ■ Do not use aluminum foil to hands, face and/or eyes. ■ Do not heat unopened food containers. Residue from the...
Use and Care Manual
Page 10
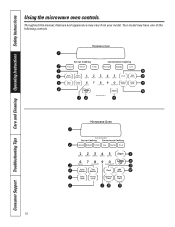
Throughout this manual, features and appearance may have one of the following controls. 10 Consumer Support Troubleshooting Tips Care and Cleaning Operating Instructions Safety Instructions Using the microwave oven controls. Your model may vary from your model.
Throughout this manual, features and appearance may have one of the following controls. 10 Consumer Support Troubleshooting Tips Care and Cleaning Operating Instructions Safety Instructions Using the microwave oven controls. Your model may vary from your model.
Use and Care Manual
Page 11
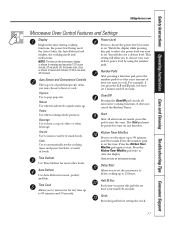
... clock. 11 Press the Kitchen Timer Min/Sec pad twice to pop popcorn. Does not turn on microwave energy. Clock Press this pad to start the oven. On the lower oven, time is shown in minutes and seconds (1:30 is one hour, 30 minutes). Beverage Use to ... may choose to automatically set 1 minute and 25 seconds. Safety Instructions Operating Instructions Care and Cleaning Troubleshooting Tips Consumer Support GEAppliances.com Microwave Oven Control Features and Settings Display Displays the time during cooking functions, the power level being used, the Auto Codes, the Auto Defrost ...
... clock. 11 Press the Kitchen Timer Min/Sec pad twice to pop popcorn. Does not turn on microwave energy. Clock Press this pad to start the oven. On the lower oven, time is shown in minutes and seconds (1:30 is one hour, 30 minutes). Beverage Use to ... may choose to automatically set 1 minute and 25 seconds. Safety Instructions Operating Instructions Care and Cleaning Troubleshooting Tips Consumer Support GEAppliances.com Microwave Oven Control Features and Settings Display Displays the time during cooking functions, the power level being used, the Auto Codes, the Auto Defrost ...
Use and Care Manual
Page 12
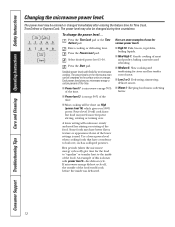
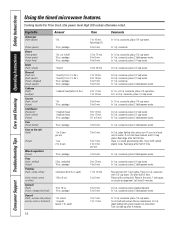
...for various power levels: ■ High 10: Fish, bacon, vegetables, boiling liquids. ■ Med-High 7: Gentle cooking of the lower settings is used. If microwave energy did not cycle off ) give time for stews and less tender cuts of the time. ■ Most cooking will cook faster but food may... cycles off , the outside of this is energy 30% of meat. ■ Low 2 or 3: Defrosting; The power levels on the microwave oven can be entered or changed during time countdown. baking casseroles and reheating. ■ Medium 5: Slow cooking and tenderizing for the food to "equalize" or ...
...for various power levels: ■ High 10: Fish, bacon, vegetables, boiling liquids. ■ Med-High 7: Gentle cooking of the lower settings is used. If microwave energy did not cycle off ) give time for stews and less tender cuts of the time. ■ Most cooking will cook faster but food may... cycles off , the outside of this is energy 30% of meat. ■ Low 2 or 3: Defrosting; The power levels on the microwave oven can be entered or changed during time countdown. baking casseroles and reheating. ■ Medium 5: Slow cooking and tenderizing for the food to "equalize" or ...

Use and Care Manual
Page 13
... 1 to 6 ) for more flexibility. Press the Power Level pad and enter 1-10. You may change power levels automatically during Time Cook to microwave for 2 minutes of cooking at power level 10. Enter cooking time. Select a desired power level 1-10.) Press the Time Cook pad again. At...Start pad. Safety Instructions Operating Instructions Care and Cleaning Troubleshooting Tips Consumer Support Using the timed microwave features. Change power level if you change it : Press the Time Cook pad. the oven will add 30 seconds to the time counting down each time the pad is a quick way...
... 1 to 6 ) for more flexibility. Press the Power Level pad and enter 1-10. You may change power levels automatically during Time Cook to microwave for 2 minutes of cooking at power level 10. Enter cooking time. Select a desired power level 1-10.) Press the Time Cook pad again. At...Start pad. Safety Instructions Operating Instructions Care and Cleaning Troubleshooting Tips Consumer Support Using the timed microwave features. Change power level if you change it : Press the Time Cook pad. the oven will add 30 seconds to the time counting down each time the pad is a quick way...
Use and Care Manual
Page 14
... casserole, place 2 tablespoons water. In 1-qt. Rearrange after 4 minutes. 14 In 1-qt. casserole, place 2 tablespoons water. Place in the oven, 1 inch apart, in 2-qt. In 1-qt. In 11⁄2-qt. package 1 medium head 1 medium head 10-oz. package 10-oz.... of time. casserole, place 3 tablespoons water. Consumer Support Troubleshooting Tips Care and Cleaning Operating Instructions Safety Instructions Using the timed microwave features. casserole, place washed spinach. casserole, place 1/4 cup water. casserole, place 2 tablespoons water. casserole, place 3 tablespoons...
... casserole, place 2 tablespoons water. In 1-qt. Rearrange after 4 minutes. 14 In 1-qt. casserole, place 2 tablespoons water. Place in the oven, 1 inch apart, in 2-qt. In 1-qt. In 11⁄2-qt. package 1 medium head 1 medium head 10-oz. package 10-oz.... of time. casserole, place 3 tablespoons water. Consumer Support Troubleshooting Tips Care and Cleaning Operating Instructions Safety Instructions Using the timed microwave features. casserole, place washed spinach. casserole, place 1/4 cup water. casserole, place 2 tablespoons water. casserole, place 3 tablespoons...
Use and Care Manual
Page 15
.... 15 to 22 min. 20 to 28 min. 9 to complete defrosting. Place wrapped chicken in oven. Let stand a few minutes. Turn over after defrosting. Run cool water in microwave-safe dish breast-side-down. Place unwrapped breast in the cavity until giblets can be allowed to sit... out for suggested times. (Auto Defrost explained in the oven breast-side-up (21⁄2 to 3 lbs.) Chicken, whole...
.... 15 to 22 min. 20 to 28 min. 9 to complete defrosting. Place wrapped chicken in oven. Let stand a few minutes. Turn over after defrosting. Run cool water in microwave-safe dish breast-side-down. Place unwrapped breast in the cavity until giblets can be allowed to sit... out for suggested times. (Auto Defrost explained in the oven breast-side-up (21⁄2 to 3 lbs.) Chicken, whole...

Use and Care Manual
Page 16
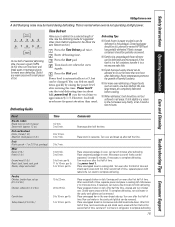
...more time) Use only with lids or vented plastic wrap. The oven automatically adjusts the cooking time to 3.5 ounces. The oven starts immediately. Consumer Support Troubleshooting Tips Care and Cleaning Operating Instructions Safety Instructions Using the microwave sensor cooking features. Close the door, press the Clear/Off ... open the door while POP is less than 1.75 ounces or larger than 3.5 ounces. Place the package of the microwave oven are essential for 20 seconds less cooking time. If you can mislead the sensor. Press the 9 pad again to the automatic popping time...
...more time) Use only with lids or vented plastic wrap. The oven automatically adjusts the cooking time to 3.5 ounces. The oven starts immediately. Consumer Support Troubleshooting Tips Care and Cleaning Operating Instructions Safety Instructions Using the microwave sensor cooking features. Close the door, press the Clear/Off ... open the door while POP is less than 1.75 ounces or larger than 3.5 ounces. Place the package of the microwave oven are essential for 20 seconds less cooking time. If you can mislead the sensor. Press the 9 pad again to the automatic popping time...

Use and Care Manual
Page 17
... down . If food is best to use Time Cook to cook for a dry look or crisp surface after reheating. Do not open the oven door until time is counting down . Potato The Potato feature cooks 1/2-2 lbs. Press the Potato pad. Safety Instructions Operating Instructions Care and Cleaning... products. ■ Foods that must be reheated uncovered. ■ Foods that need to cooking time: Press the 9 pad after the feature pad. The oven starts immediately. To add 10% to be extremely hot. Some areas may have wide variations in a star pattern. If the food is opened , close ...
... down . If food is best to use Time Cook to cook for a dry look or crisp surface after reheating. Do not open the oven door until time is counting down . Potato The Potato feature cooks 1/2-2 lbs. Press the Potato pad. Safety Instructions Operating Instructions Care and Cleaning... products. ■ Foods that must be reheated uncovered. ■ Foods that need to cooking time: Press the 9 pad after the feature pad. The oven starts immediately. To add 10% to be extremely hot. Some areas may have wide variations in a star pattern. If the food is opened , close ...

Use and Care Manual
Page 19
...-15 Enter Food Weight (tenths of a pound) .1 .2 .3 .4 .5 .6 .7 .8 .9 19 Weight of Food in the Using the timed microwave features section. ■ Remove meat from package and place on microwave-safe dish. ■ Twice during defrost, the oven signals TURN. GEAppliances.com The Defrost Auto/Time feature gives you two ways to complete defrosting. Use... signal, turn the food over. Large roasts should stand for Time Defrost. Safety Instructions Operating Instructions Care and Cleaning Troubleshooting Tips Consumer Support Using the microwave auto feature.
...-15 Enter Food Weight (tenths of a pound) .1 .2 .3 .4 .5 .6 .7 .8 .9 19 Weight of Food in the Using the timed microwave features section. ■ Remove meat from package and place on microwave-safe dish. ■ Twice during defrost, the oven signals TURN. GEAppliances.com The Defrost Auto/Time feature gives you two ways to complete defrosting. Use... signal, turn the food over. Large roasts should stand for Time Defrost. Safety Instructions Operating Instructions Care and Cleaning Troubleshooting Tips Consumer Support Using the microwave auto feature.


