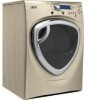

Owners Manual
Page 3
... reaction that could result from the power supply or disconnect the dryer at the household distribution panel by clothing during subsequent dryer uses. ■ To minimize the possibility of electric shock, unplug this or any maintenance or cleaning (except the removal and cleaning of the dryer during operation. ■ Do not place items exposed to cooking...
... reaction that could result from the power supply or disconnect the dryer at the household distribution panel by clothing during subsequent dryer uses. ■ To minimize the possibility of electric shock, unplug this or any maintenance or cleaning (except the removal and cleaning of the dryer during operation. ■ Do not place items exposed to cooking...

Owners Manual
Page 10
...to detach the drying rack at the household distribution panel by removing the fuse or switching off the circuit breaker. To install the Built-In Rack Dry System 1. Press the DRYER RACK button. 5. Press the START/PAUSE button. NOTE: Not all dryer models. DISPLAY BRIGHTNESS can be set from the ...left side of the display. Reach above dryer opening from HIGH, ...
...to detach the drying rack at the household distribution panel by removing the fuse or switching off the circuit breaker. To install the Built-In Rack Dry System 1. Press the DRYER RACK button. 5. Press the START/PAUSE button. NOTE: Not all dryer models. DISPLAY BRIGHTNESS can be set from the ...left side of the display. Reach above dryer opening from HIGH, ...

Owners Manual
Page 12
.... This wastes energy and causes wrinkling. Apply Stainless Steel: To clean stainless steel surfaces, use in a GE dryer. The stainless steel used to size. Run your warranty. These surface blemishes will be laundering. The Exhaust ...Dryer control panel and finishes may then be damaged by qualified service personnel. The fabric may be washed and dried normally. If the dryer drum should be scratched or dented during normal use . Remove by these products away from using dryer-added fabric softener sheets. Dry thoroughly and replace. Vacuum the lint from the dryer...
.... This wastes energy and causes wrinkling. Apply Stainless Steel: To clean stainless steel surfaces, use in a GE dryer. The stainless steel used to size. Run your warranty. These surface blemishes will be laundering. The Exhaust ...Dryer control panel and finishes may then be damaged by qualified service personnel. The fabric may be washed and dried normally. If the dryer drum should be scratched or dented during normal use . Remove by these products away from using dryer-added fabric softener sheets. Dry thoroughly and replace. Vacuum the lint from the dryer...
Owners Manual
Page 17
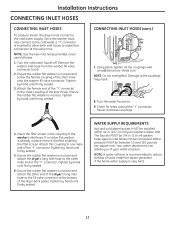
Ensure the rubber flat washer is already in place remove it before installing the filter screen. Damage to make that connection at the bottom of the dryer back panel. Ensure the rubber flat washer is very hard. 17 The faucets MUST be 3/4 in. (1.9 cm) garden hose-type so inlet hoses... water, a "Y" connector is in place and attach the other male end of your water pressure. NOTE: Use the new inlet hoses provided; Remove the washer inlet hose from the washer fill valve connector (cold). 2. NOTE: Do not overtighten. WATER SUPPLY REQUIREMENTS Hot and cold water faucets ...
Ensure the rubber flat washer is already in place remove it before installing the filter screen. Damage to make that connection at the bottom of the dryer back panel. Ensure the rubber flat washer is very hard. 17 The faucets MUST be 3/4 in. (1.9 cm) garden hose-type so inlet hoses... water, a "Y" connector is in place and attach the other male end of your water pressure. NOTE: Use the new inlet hoses provided; Remove the washer inlet hose from the washer fill valve connector (cold). 2. NOTE: Do not overtighten. WATER SUPPLY REQUIREMENTS Hot and cold water faucets ...

Owners Manual
Page 35
.... 35 Pull the door away from the dryer front panel. 1 REMOVE THE DOOR ASSEMBLY Remove the side hinge cap by opening the dryer door and removing the screw from the inner door. Installation Instructions BEFORE YOU START Unplug the dryer from its electrical outlet. 1 REMOVE THE DOOR ASSEMBLY (cont.) Hold the door and remove the 2 hinge screws (#10 x 0.75″...
.... 35 Pull the door away from the dryer front panel. 1 REMOVE THE DOOR ASSEMBLY Remove the side hinge cap by opening the dryer door and removing the screw from the inner door. Installation Instructions BEFORE YOU START Unplug the dryer from its electrical outlet. 1 REMOVE THE DOOR ASSEMBLY (cont.) Hold the door and remove the 2 hinge screws (#10 x 0.75″...

Owners Manual
Page 38
... side. Assemble the door to the front cabinet, using a putty knife or other flat tool as shown, and reinstall on the dryer front panel, making sure the latch is engaged and the hinge is facing down. Assemble the chrome cover to reverse the hinge again. 6 REVERSE ...FRONT PANEL PLUG BUTTONS AND STRIKE PLATE Remove the 2 plug buttons on the dryer front panel, using 2 screws (#10 x 0.75″ tapping screws). Flip the door assembly over and place on opposite sides...
... side. Assemble the door to the front cabinet, using a putty knife or other flat tool as shown, and reinstall on the dryer front panel, making sure the latch is engaged and the hinge is facing down. Assemble the chrome cover to reverse the hinge again. 6 REVERSE ...FRONT PANEL PLUG BUTTONS AND STRIKE PLATE Remove the 2 plug buttons on the dryer front panel, using 2 screws (#10 x 0.75″ tapping screws). Flip the door assembly over and place on opposite sides...


