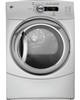
GE GFDS355GLMS Support Question
GE GFDS355GLMS Support Question
Find answers below for this question about GE GFDS355GLMS.Need a GE GFDS355GLMS manual? We have 2 online manuals for this item!
Question posted by dbjr1977 on September 24th, 2014
Remove Control Panel
how do I remove the control panel to adjust the power buttom
Current Answers
Related GE GFDS355GLMS Manual Pages
Quick Specs - Page 4
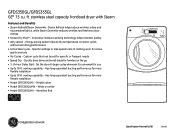
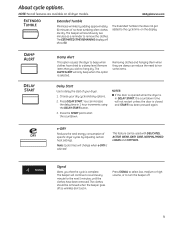
...Set the dryer to begin cycles whenever it's convenient for active sports exercise • My Cycles - venting capability - Vermillion Red
GFWS3505L
Specification Revised 10/10
360482 Energy-saving option reduces dry temperatures on white • Model GFDS355GLMV - Has long equivalent ducting performance for more flexible installation • Model GFDS355GLMS - Metallic silver...
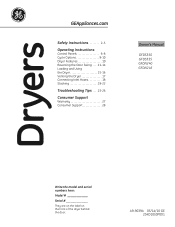
Use and Care Manual - Page 1
...
GEAppliances.com
Safety Instructions 2-5
Operating Instructions
Control Panels 6-8 Cycle Options 9-10 Dryer Features 10 Reversing the Door Swing. . . . 11-14 Loading and Using the Dryer 15-16 Venting the Dryer 17 Connecting Inlet Hoses 18 Stacking 19-22
Troubleshooting Tips. . . . 23-26
Consumer Support
Warranty 27 Consumer Support 28
Owner's Manual
GFDS350 GFDS355 GFDN240 GFDN245...
Use and Care Manual - Page 3
....com, or by calling 800.GE.CARES (800.432.2737). n Remove all sharp packing items and dispose of all governing codes and ordinances.
n Install or store where it...both the control panel and the door. n Connect to a properly rated, protected and sized power supply circuit to
prevent large amounts of the dryer (on some models).
GEAppliances.com
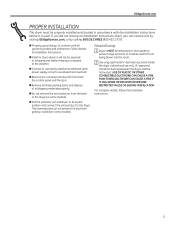
PROPER INSTALLATION
This dryer must be ...
Use and Care Manual - Page 4
... the exhaust opening and adjacent surrounding areas free from the power supply or disconnect the dryer at the building's distribution panel by clothing during operation. n Do not store plastic, paper or clothing that have been removed.
n Keep the floor around your washer or dryer during subsequent dryer uses. Before loading, unloading or adding clothes, wait until...
Use and Care Manual - Page 5
... Before discarding a dryer, or removing it from service, remove the dryer door to prevent ...light. WHEN NOT USING YOUR DRYER
n Grasp the plug firmly when... soften your dryer. SAVE THESE INSTRUCTIONS
5 n If yours is a gas dryer, it is...use of those products, or try a dryer-added product for which the manufacturer gives ...DRYER (cont.)
n Never attempt to operate this appliance if it is equipped with...
Use and Care Manual - Page 6
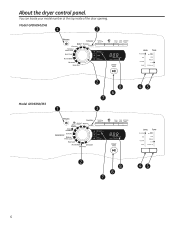
Model GFDN240/245
1
3
AIR FLUFF
NO HEAT
DEWRINKLE
COTTONS
TIME DRY
NORMAL / MIXED LOAD
EASY CARE
ACTIVE WEAR
DELICATES SPEED DRY
Model GFDS350/355
1
2 8
6 7
3
45
SENSOR DRY
2
8
45
6
7
6
You can locate your model number at the top inside of the door opening. About the dryer control panel.
Use and Care Manual - Page 7
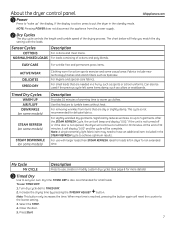
...DRY:
+ 1. Increase the drying time by pressing the TIMEDRY ADJUST
button. The chart below will continue to tumble for an ...
Description
For cottons and most linens.
For removing wrinkles from the power supply. For use with the loads.
For... and the cycle will beep and display "0:00." About the dryer control panel.
1 Power Press to "wake up to 5 garments. Timed Dry Cycles
WARM...
Use and Care Manual - Page 9
... the clothes have dried to turn the beeper off so wrinkles don't set in. Remove items that the cycle is selected.
e-DRY
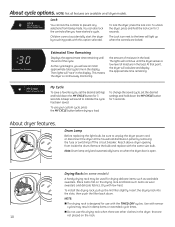
Reduces the total energy consumption of no-... LOADS and COTTONS. NOTE: Not all dryer models.
GEAppliances.com
Extended Tumble
Minimizes wrinkles by adding approximately 60 minutes of specific dryer cycles by adjusting certain heat settings. Note: Cycle times ...
Use and Care Manual - Page 10
...moisture in the display. To use with the same size bulb. Reach above dryer opening from being made. Remove the bulb and replace with the TIMED DRY cycles. To change the saved ...
You can also lock the controls after you will "race" in the load.
The Lock icon next to unplug the dryer power cord or disconnect the dryer at the household distribution panel by touching pads with low ...
Use and Care Manual - Page 11
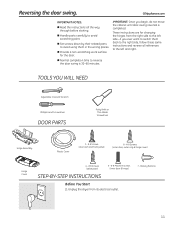
...-Blade Screwdriver
Hinge Assembly
Plastic Cover
3 - # 8 Screws (door asm and front panel)
8 - # 8 Screws (inner door, outer ring & hinge cover)
4 - # 8 Screws
6 - # 8 Machine Screws
7 -
Beauty Buttons
(strike plate)
(inner door & hinge)
Hinge
Cover STEP-BY-STEP INSTRUCTIONS
Before You Start
1. Unplug the dryer from the right side to reverse the door swing is completed...
Use and Care Manual - Page 12
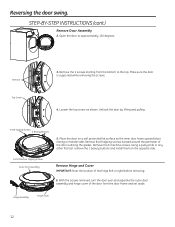
... Assembly
2. Open the door to the top. Reversing the door swing.
Make sure the door is supported while removing the screws.
4. Loosen the top screw as shown. Remove the 6 machine screws. With the screws removed, turn the door over and separate the outer door assembly and hinge cover of the door outlining the...
Use and Care Manual - Page 14
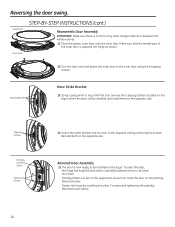
...and fasten the outer door to be installed on the partially fastened screw.
Fasten the hinge by removing the screws. Reinstall Door Assembly
15. The door is opposite the hinge as a hook.
...Move Strike Bracket
13. Hook the door on the dryer. U sing a putty knife or any other flat tool, remove the 3 beauty buttons located on the dryer where the door will be installed and install them on...
Use and Care Manual - Page 16
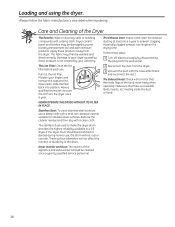
Dryer control panel and finishes may then be cleaned once a year by some laundry pretreatment soil and stain remover products.
Dryer Interior and Duct: The interior of the hood move freely when operating. The Exhaust Duct: Inspect and clean the exhaust ducting at least once a year to your dryer caused by these products is no wildlife (birds, insects...
Use and Care Manual - Page 17
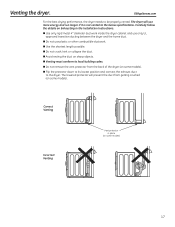
Carefully follow the details on Exhausting in place
(on some models). n Do not use only UL approved transition ducting between the dryer and the home duct.
n Do not remove the vent protector from getting crushed (on sharp objects. n Flip the protector down to its lowest position and connect the exhaust duct to local...
Use and Care Manual - Page 18
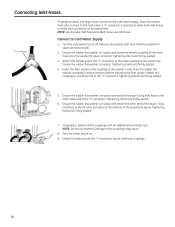
...washer fill valve connector (cold).
2. Insert the filter screen in place remove it before installing the filter screen. Damage to Cold Water Supply
1. "Y" Connector
To produce steam, the dryer must also connect to the fill valve connector at the same time. ... Ensure the rubber flat washer is in place and attach the other male end of the dryer back panel. Connecting Inlet Hoses.
Use and Care Manual - Page 20
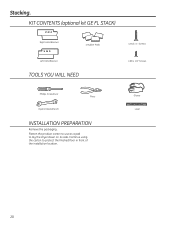
... FL STACK)
Right Hand Bracket
4 Rubber Pads
Left Hand Bracket
TOOLS YOU WILL NEED
4 #12 x 1" Screws 4 #8 x 1/2" Screws
Phillips Screwdriver
Pliers
Open-Ended Wrench
INSTALLATION PREPARATION
Remove the packaging. Continue using the carton to lay the dryer down on its side.
Use and Care Manual - Page 21
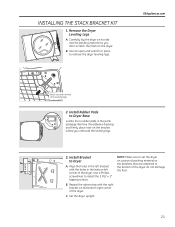
... a Phillips screwdriver to the bottom of the dryer.
INSTALLING THE STACK BRACKET KIT
1. Remove the Dryer Leveling Legs
A. Carefully lay the dryer on the bottom right corner of the dryer do not damage the floor.
21 NOTE: Make sure to set the dryer on the dryer.
GEAppliances.com
Back out and remove all 4 leveling legs
2. Install Rubber Pads...
Use and Care Manual - Page 22
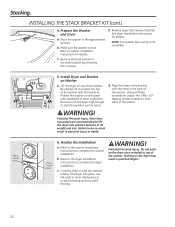
B. Make sure the washer is not reversible.
5. Install Dryer and Bracket on Washer
A. Lift the dryer on the dryer may result in the back of the control panel by removing the 3 screws. Protect the washer control panel with the brackets. B. Align the holes in the bracket with the holes in pinched fingers.
22
Place hands here
Place hands here...
Use and Care Manual - Page 23
...Dryer is unplugged
• Make sure the dryer plug is normal. • Move dryer to an even floor space, or adjust leveling legs Dryer may not need to call for 3 seconds to ensure proper tumbling.
Press START to activate the control panel...you call for service.
Press POWER to restart the countdown. Controls improperly set
• Match control settings to dry. Large ...
Use and Care Manual - Page 24
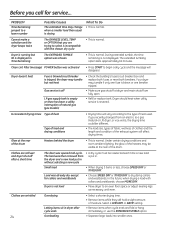
...) POWER button was already dry except • Choose SPEED DRY or TIMED DRY to an even floor space or adjust leveling legs
as necessary until even. If you are still wet and dryer shut off
• Make sure gas shutoff at dryer and main shutoff are wrinkled
Overdrying
• Select a shorter drying time.
• Remove...
Similar Questions

How To Remove The Control Panel On This Machine.
How do I remove the control panel plea
How do I remove the control panel plea
(Posted by reedyep 7 years ago)

The Control Panel For Our Ge Gfds170 Electric Dryer Flashes
The entire control panel for our GE GFDS electric dryer is flashing and we are unable to reset it. A...
The entire control panel for our GE GFDS electric dryer is flashing and we are unable to reset it. A...
(Posted by sparekitty 8 years ago)
Front Panel Removal
How do I remove the front panel in order to access the burner?
How do I remove the front panel in order to access the burner?
(Posted by bronzback 10 years ago)

How To Remove Front Panel
How do you remove the front panel of the GE pfds455gl front load dryer?
How do you remove the front panel of the GE pfds455gl front load dryer?
(Posted by richcall 11 years ago)