GE GFDN245ELMS Support Question
GE GFDN245ELMS Support Question
Find answers below for this question about GE GFDN245ELMS.Need a GE GFDN245ELMS manual? We have 2 online manuals for this item!
Question posted by reedyep on April 14th, 2017
How To Remove The Control Panel On This Machine.
How do I remove the control panel plea
Current Answers
Answer #1: Posted by BusterDoogen on April 14th, 2017 7:00 PM
BusterDoogen

Member since:
October 30th, 2011 Points: 28,565,397

Member since:
October 30th, 2011 Points: 28,565,397
Start on page 22 for the procedure.
I hope this is helpful to you!
Please respond to my effort to provide you with the best possible solution by using the "Acceptable Solution" and/or the "Helpful" buttons when the answer has proven to be helpful. Please feel free to submit further info for your question, if a solution was not provided. I appreciate the opportunity to serve you!
Related GE GFDN245ELMS Manual Pages
Use and Care Manual - Page 1
...
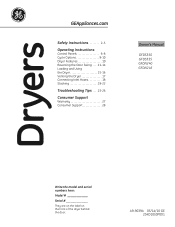
GEAppliances.com
Safety Instructions 2-5
Operating Instructions
Control Panels 6-8 Cycle Options 9-10 Dryer Features 10 Reversing the Door Swing. . . . 11-14 Loading and Using the Dryer 15-16 Venting the Dryer 17 Connecting Inlet Hoses 18 Stacking 19-22
Troubleshooting Tips. . . . 23-26
Consumer Support
Warranty 27 Consumer Support 28
Owner's Manual
GFDS350 GFDS355 GFDN240 GFDN245...
Use and Care Manual - Page 3
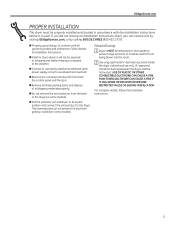
... materials properly.
n Connect to a properly rated, protected and sized power supply circuit to the dryer.
GEAppliances.com
PROPER INSTALLATION
This dryer must be properly installed and located in Installation Instructions.
n Do not remove the vent protector from both the control panel and the door. USE OF PLASTIC OR OTHER COMBUSTIBLE DUCTWORK CAN CAUSE A FIRE.
n Install...
Use and Care Manual - Page 4
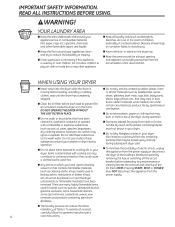
...during subsequent dryer uses.
n Do not store plastic, paper or clothing that have been removed. YOUR LAUNDRY AREA
n Keep the area underneath and around your dryer. n Close supervision is moving. DO NOT OPERATE THE DRYER WITHOUT ... from the power supply or disconnect the dryer at the building's distribution panel by or near the dryer until the drum has completely stopped.
Use and Care Manual - Page 5
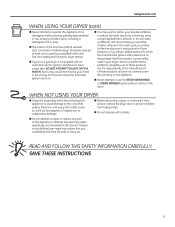
... USING YOUR DRYER
n Grasp the plug firmly when disconnecting this appliance if it is equipped with controls. n Do not attempt to repair or replace any part of the machine and the ... cord away from hiding inside the dryer should be stepped on, tripped over or subjected to damage. n Before discarding a dryer, or removing it from service, remove the dryer door to prevent children from traffic ...
Use and Care Manual - Page 6
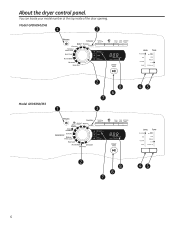
You can locate your model number at the top inside of the door opening. About the dryer control panel.
Model GFDN240/245
1
3
AIR FLUFF
NO HEAT
DEWRINKLE
COTTONS
TIME DRY
NORMAL / MIXED LOAD
EASY CARE
ACTIVE WEAR
DELICATES SPEED DRY
Model GFDS350/355
1
2 8
6 7
3
45
SENSOR DRY
2
8
45
6
7
6
Use and Care Manual - Page 7
...Dry
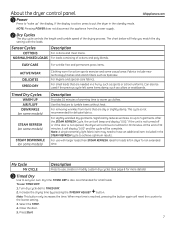
Use to warm up clothes. About the dryer control panel.
1 Power Press to "wake up to 5 garments. If the display is active, press to put the dryer in the STEAM REFRESH cycle to the lowest ... models)
STEAM DEWRINKLE (on up " the display. Use this feature to TIMED DRY.
2. For removing wrinkles from the power supply.
For slightly wrinkled dry garments. At the end of warming time to ...
Use and Care Manual - Page 9
...
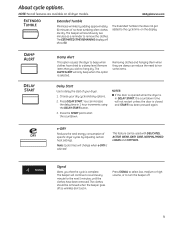
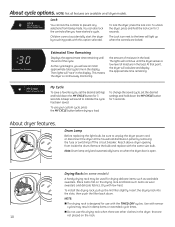
Use to delay the start the countdown. NOTE: Not all features are available on the display
Damp Alert
This option causes the dryer to beep when clothes have been removed. Removing clothes and hanging them when they are dry.
The beeper will only beep when this option is complete. e-DRY
Reduces the total...
Use and Care Manual - Page 10
.... Lock
You can also lock the controls after you will sound to unplug the dryer power cord or disconnect the dryer at the household distribution panel by touching pads with this drying rack... a load. Reach above dryer opening from being made. NOTE:
n The drying rack is open.
At that are locked.
Children cannot accidentally start the dryer by removing the fuse or switching off...
Use and Care Manual - Page 11
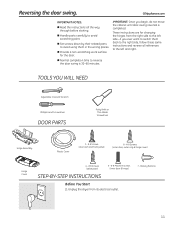
...& hinge)
Hinge
Cover STEP-BY-STEP INSTRUCTIONS
Before You Start
1. Unplug the dryer from the right side to the left and right. TOOLS YOU WILL NEED
Adjustable Crescent...Hinge Assembly
Plastic Cover
3 - # 8 Screws (door asm and front panel)
8 - # 8 Screws (inner door, outer ring & hinge cover)
4 - # 8 Screws
6 - # 8 Machine Screws
7 - n Set screws down by their related parts to reverse...
Use and Care Manual - Page 12
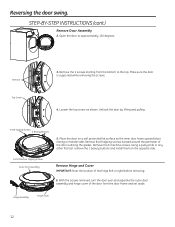
... screw as shown. Unhook the door by lifting and pulling.
8-#8 Tapping Screws 4 Beauty Buttons
5. Remove the 6 machine screws. Using a putty knife or any other flat tool, remove the 2 beauty buttons and install them on handle side). With the screws removed, turn the door over and separate the outer door assembly and hinge cover of...
Use and Care Manual - Page 14
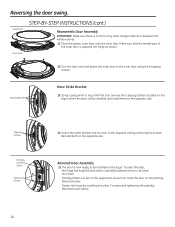
... fasten a screw to the uppermost screw hole.
Tapping Screws
Partially Inserted Screw Tighten All Screws
14
14. U sing a putty knife or any other flat tool, remove the 3 beauty buttons located on the dryer where the door will be installed and install them on the partially fastened screw.
Fasten the hinge by...
Use and Care Manual - Page 15
...dryer.
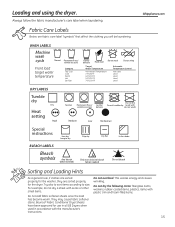
Do not dry the following items: fiberglass items, woolens, rubber-coated items, plastics, items with socks or other small items.
Do not add fabric softener sheets once the load has become warm.
WASH LABELS
Machine...°C/105°F 50°C/120°F 70°C/160°F
Automatic Temperature Control
Not used Used Used Used Used
DRY LABELS
Tumble dry
Dry
Heat setting
High
Normal...
Use and Care Manual - Page 16
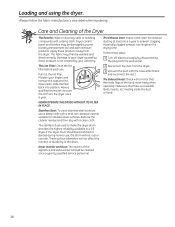
... If the dryer drum should be damaged by some laundry pretreatment soil and stain remover products.
Follow these steps:
1 Turn off electrical supply by these products away from the dryer once a year...: Check with a mild, non-abrasive cleaner suitable for stainless steel surfaces. Dryer control panel and finishes may then be scratched or dented during normal use . A partially clogged exhaust...
Use and Care Manual - Page 17
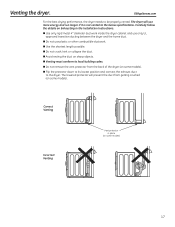
... is not vented to the dryer. n Use only rigid metal 4″ diameter ductwork inside the dryer cabinet and use plastic or other combustible ductwork. n Use the shortest length possible. V enting the dryer. n Do not use only UL approved transition ducting between the dryer and the home duct.
n Do not remove the vent protector from getting...
Use and Care Manual - Page 18
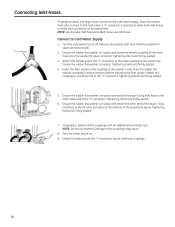
...other male end of the dryer back panel. Tighten by hand until firmly ...seated.
3. Tighten by hand until firmly seated.
7. Check for leaks around the ''Y'' connector, faucet and hose couplings.
18
Remove the washer inlet hose from the washer fill valve connector (cold).
2. Since the washer must connect to the other end of the dryer...
Use and Care Manual - Page 20
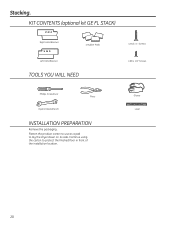
Gloves Level
20 Continue using the carton to lay the dryer down on its side. Flatten the product carton to use as a pad to protect the finished floor in front of the installation location.... Hand Bracket
4 Rubber Pads
Left Hand Bracket
TOOLS YOU WILL NEED
4 #12 x 1" Screws 4 #8 x 1/2" Screws
Phillips Screwdriver
Pliers
Open-Ended Wrench
INSTALLATION PREPARATION
Remove the packaging.
Use and Care Manual - Page 21
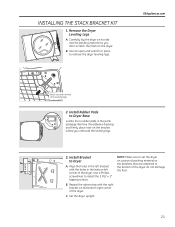
... the above step with the holes in the parts package. NOTE: Make sure to set the dryer on its side. C. Set the dryer upright. GEAppliances.com
Back out and remove all 4 leveling legs
2. Install Rubber Pads to the bottom of the dryer do not damage the floor.
21 Use the packing material so you...
Use and Care Manual - Page 22
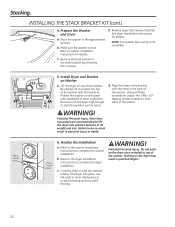
... complete the washer installation.
C. Carefully slide or walk the stacked washer and dryer into position because of the washer. C. Remove the back portion of the washer.
Repeat on the dryer once installed to lift the dryer into place.
Protect the washer control panel with cardboard or other sliding device to assist moving and to do so...
Use and Care Manual - Page 23
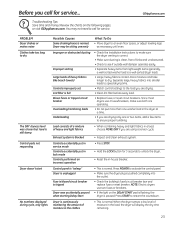
... filter before every load. Blown fuses or tripped circuit • Replace fuses or reset circuit breakers. Since most breaker dryers use two fuses or breakers. Exhaust system is normal. incorrect operation
Dryer doesn't start
Control panel is "asleep"
• This is blocked
• Inspect and clean exhaust system. You may be sitting unevenly as...
Quick Specs - Page 4
... whenever it's convenient for you easily see clothes • ADA Compliant • Model GFDN245ELMS - venting capability - Convenient interior light helps you • Up to 90 ft. Custom cycle that can be set for more
flexible installation • Interior dryer light - White on the go • 1- 24-hour Delay Start - ft. Quickly dries...
Similar Questions

The Control Panel For Our Ge Gfds170 Electric Dryer Flashes
The entire control panel for our GE GFDS electric dryer is flashing and we are unable to reset it. A...
The entire control panel for our GE GFDS electric dryer is flashing and we are unable to reset it. A...
(Posted by sparekitty 8 years ago)

Remove Control Panel
how do I remove the control panel to adjust the power buttom
how do I remove the control panel to adjust the power buttom
(Posted by dbjr1977 9 years ago)

Our Dryer Making Banging Noises When Turned On. It Isn't A Yr Old Yet
(Posted by patriotsfanlinda 11 years ago)
How To Remove Front Panel
How do you remove the front panel of the GE pfds455gl front load dryer?
How do you remove the front panel of the GE pfds455gl front load dryer?
(Posted by richcall 11 years ago)