GE DPVH890EJMG Support Question
GE DPVH890EJMG Support Question
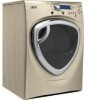
Find answers below for this question about GE DPVH890EJMG - Profile 27" Electric Dryer.Need a GE DPVH890EJMG manual? We have 1 online manual for this item!
Question posted by dough0nut on December 5th, 2014
How Is The Cover Removed?
The person who posted this question about this GE product did not include a detailed explanation. Please use the "Request More Information" button to the right if more details would help you to answer this question.
Current Answers
Answer #1: Posted by BusterDoogen on December 5th, 2014 7:51 PM
BusterDoogen

Member since:
October 30th, 2011 Points: 28,565,417

Member since:
October 30th, 2011 Points: 28,565,417
Watch the first part of this video to have some guidance to remove the top.
I hope this is helpful to you!
Please respond to my effort to provide you with the best possible solution by using the "Acceptable Solution" and/or the "Helpful" buttons when the answer has proven to be helpful. Please feel free to submit further info for your question, if a solution was not provided. I appreciate the opportunity to serve you!
Related GE DPVH890EJMG Manual Pages
Owners Manual - Page 1

GEAppliances.com
Profile Dryers
Safety Instructions 2-4
Operating Instructions
Controls 5-8 Cycle Options 9, 10 Demand Response 13 Dryer Features 10, 11 Quick Start Guide 5 Settings Option 10 Using the Dryer 12
Installation Instructions
Before You Begin 14, 15 Connecting the Inlet Hoses 17 Connecting a Gas Dryer 18-21 Connecting an Electric Dryer 22-24 Exhausting the Dryer 25-31 ...
Owners Manual - Page 2

..., or to avoid electrical overload.
■ Remove all sharp packing items and dispose of all shipping materials properly.
Installation Instructions are included in accordance with all occupants. Exhaust/Ducting
1 Dryers MUST be exposed to temperatures below freezing or exposed to water or weather.
■ Connect to a properly rated, protected and sized power supply...
Owners Manual - Page 3

... (such as cleaning cloths, mops, towels used in your dryer.
■ Do not dry fiberglass articles in homes such as acetone, denatured alcohol, gasoline, kerosene, some household cleaners, some spot removers, turpentines, waxes, wax removers and products containing petroleum distillates.
■ The laundry process can under certain circumstances produce fire by clothing during operation...
Owners Manual - Page 4

...silk, lingerie, foam products or electric blankets.
■ Do not use steam cycles on , tripped over or subjected to damage.
■ Before discarding a dryer, or removing it will not be safely ...the responsibility of the manufacturers of those products, or try a dryer-added product for those products and are not covered under the warranty of the burner when the automatic ignition turns...
Owners Manual - Page 12

...Wipe or dust any spills or washing compounds with a mirror that there is not covered by pulling straight up. The stainless steel used in this buildup, wash the lint....
A waxy buildup may be cleaned once a year by some laundry pretreatment soil and stain remover products. Vacuum the lint from the dryer. Remove the cleaner residue, and then dry with the manufacturer's instructions. ...
Owners Manual - Page 14

... installation is not covered under the Warranty. • Install the dryer where the temperature .... • Before the old dryer is removed from service or
discarded, remove the dryer door. • Service information ...dryer installation must be performed by properly venting the dryer to collapse, be exhausted to the outdoors. • Use only 4″ rigid metal ducting for local
electrical...
Owners Manual - Page 16
.... for installation in an alcove or closet, as stated on a label on the dryer back.
• The dryer MUST be
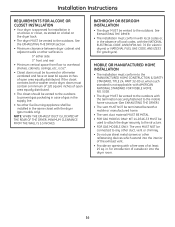
connected to any other duct, vent or chimney. • Do not...the same closet with the NATIONAL ELECTRICAL CODE, ANSI/NFPA NO. 70 (for electric dryers) or NATIONAL FUEL GAS CODE, ANSI Z223 (for gas dryers). BATHROOM OR BEDROOM INSTALLATION
• The dryer MUST be installed in the ...
Owners Manual - Page 18

...; 4″ dia. metal duct (recommended)
❒ Duct tape
18
Shut-off the circuit breaker(s) or remove the dryer's circuit fuse(s) at the electrical box. Installation Instructions CONNECTING A GAS DRYER (skip for leak detection
❒ Exhaust hood
Turn the dryer's gas shut-off valve in the supply line to the OFF position. metal elbow
❒ 4″...
Owners Manual - Page 21

...
21 Apply a soap solution. Do not cut or remove the grounding terminal from this appliance.
• The dryer must be plugged directly into a properly grounded threeprong receptacle. WARNING -
To reduce the risk of the dryer, and to an alternate established ground.
ELECTRICAL CONNECTION INFORMATION FOR GAS DRYERS
WARNING - If leaks are found, close the valve...
Owners Manual - Page 22

...
❒ Level
FOR YOUR SAFETY:
WARNING
Before making the electrical connection, turn off the circuit breaker(s) or remove the dryer's circuit fuse(s) at the electrical box. NEVER LEAVE THE ACCESS COVER OFF THE TERMINAL BLOCK.
ELECTRICAL CONNECTION INFORMATION FOR ELECTRIC DRYERS
WARNING - To reduce the risk of
fire, electrical shock and personal injury:
• Do not use an...
Owners Manual - Page 23

... secure power cord to an electric dryer. WARNING - or fourwire, single-phase, 120/240V, 60Hz, 30-amp circuit is unplugged from the wall receptacle.
3.
Turn off the circuit breaker(s) (30 amp) or remove the dryer's circuit fuse at the lower back.
4. Tighten all terminal block screws (3) completely.
8. Reinstall the cover. Connect power cord as follows...
Owners Manual - Page 24

... determined by local code, install external ground (not provided) to power cord entry hole. Reinstall the cover. WARNING - NEVER LEAVE THE
COVER OFF OF THE TERMINAL BLOCK.
24 B. Installation Instructions
CONNECTING AN ELECTRIC DRYER (cont.)
CONNECTING DRYER USING 3-WIRE CONNECTION
If required, by a qualified electrician. Bring power cord through strain relief.
5. Connect the...
Owners Manual - Page 27
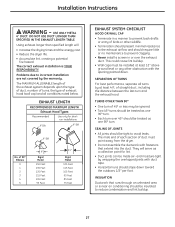
... or no maintenance to incorrect installation are not covered by at least 12″ above ground level... cause lint buildup.
• Wall caps must point away from the dryer.
• Do not assemble the ductwork with the opening pointed down toward...8226; Duct joints can be tight to reduce condensation and lint buildup.
27 USE ONLY METAL
4″ DUCT.
of birds or other obstruction with...
Owners Manual - Page 29

... is aligned with the tab in the middle of the dryer. CAUTION: Do not pull or damage the
electrical wires and do not remove the vinyl cover from the electrical components inside the dryer exhaust duct and save
Left Bottom
Remove desired knockout (one only)
Detach and remove the bottom, right or left of cabinet for Gas and...
Owners Manual - Page 30

... also
the joint between the
elbow and the side duct.
Remove screw and save
Bottom
Remove desired knockout (one only)
Remove the screw inside the dryer exhaust duct and save. Pull the duct out of cabinet for Gas and Electric models. Installation Instructions
EXHAUSTING THE DRYER (cont.)
SIDE VENTING (cont.)
ADDING ELBOW AND DUCT FOR EXHAUST...
Owners Manual - Page 31

... 1/8″ hole through the rear hole and connect it connects to pull or
damage the electrical wires inside the dryer
when inserting the duct.
• While still holding down the pipe and elbow from your...elbow and pipe. Duct tape
NOTE: Make sure the tape covers the screw hole in portion A where it to the blower
housing. ADDING COVER PLATE TO REAR OF CABINET (BOTTOM EXHAUST)
Plate (Kit...
Owners Manual - Page 32

... the POWER button.
For replacement parts and other end of the dryer.
This appliance is now ready for an extended period of Dryer
3 PLUG DRYER IN
Ensure proper ground exists before use . NOTE: If the dryer has been exposed to the back cover for electric current. Serial Port
Rear of time, allow it to the washer...
Owners Manual - Page 35

... chrome cover from its electrical outlet.
1 REMOVE THE DOOR ASSEMBLY (cont.)
Hold the door and remove the 2 hinge screws (#10 x 0.75″ tapping screws). Put the inner door aside on the handle side). Pull the door away from the dryer front panel.
1 REMOVE THE DOOR ASSEMBLY
Remove the side hinge cap by opening the dryer door and removing the...
Owners Manual - Page 42

....
❒ 4 Support pads
❒ Drawer divider
❒ 4 Mounting screws
TOOLS YOU WILL NEED
❒ Phillips-head screwdriver
❒ 7 mm Socket wrench
1 REMOVE THE LEVELING LEGS
A Carefully lay the washer or dryer on the bottom of personal injury or damage to an upright position. B Use an open-end wrench to access the leveling...
Owners Manual - Page 45

...the building's fuse/circuit breaker box and
replace fuse or reset breaker. NOTE: Electric dryers use 2 fuses/breakers, make sure the dryer venting is correct.
• Make sure ducting is clean, free of heavy ...Some shaking/noise is normal. You may be sitting unevenly
What To Do
• Move dryer to an even floor space, or adjust leveling legs as necessary until even.
Press START/...
Similar Questions

The Control Panel For Our Ge Gfds170 Electric Dryer Flashes
The entire control panel for our GE GFDS electric dryer is flashing and we are unable to reset it. A...
The entire control panel for our GE GFDS electric dryer is flashing and we are unable to reset it. A...
(Posted by sparekitty 8 years ago)


Electric Dryer Making A Squeaking Noise
Does Ge Electric Dryer Mod. Dwsr483eb2ww Have Some Type Of Felt Pads Or Plastic For Drum To Spin On ...
Does Ge Electric Dryer Mod. Dwsr483eb2ww Have Some Type Of Felt Pads Or Plastic For Drum To Spin On ...
(Posted by BELINDATIM 9 years ago)

Ge Profile Front Load Electric Dryer...model # Dpvh880ejmg.belt Replacement Help
I need help or web site (video) that can show me how to replace the belt on a GE Profile front load ...
I need help or web site (video) that can show me how to replace the belt on a GE Profile front load ...
(Posted by LDH63 9 years ago)