
Owners Manual
Page 1
GEAppliances.com Profile Dryers Safety Instructions 2-4 Operating Instructions Controls 5-8 Cycle Options 9, 10 Demand Response 13 Dryer Features 10, 11 Quick Start Guide 5 Settings Option 10 Using the Dryer 12 Installation Instructions Before You Begin 14, 15 Connecting the Inlet Hoses 17 Connecting a Gas Dryer 18-21 Connecting an Electric Dryer 22-24 Exhausting the Dryer 25-31 Final Setup 32...
GEAppliances.com Profile Dryers Safety Instructions 2-4 Operating Instructions Controls 5-8 Cycle Options 9, 10 Demand Response 13 Dryer Features 10, 11 Quick Start Guide 5 Settings Option 10 Using the Dryer 12 Installation Instructions Before You Begin 14, 15 Connecting the Inlet Hoses 17 Connecting a Gas Dryer 18-21 Connecting an Electric Dryer 22-24 Exhausting the Dryer 25-31 Final Setup 32...

Owners Manual
Page 2
...store where it is used. Follow the gas supplier's instructions carefully. 2 Do not touch any electrical switch; 5 If you cannot reach your gas supplier from being blown into the room. 2 Use only rigid metal 4″ diameter ductwork inside the dryer cabinet. California Safe Drinking Water and Toxic... four of natural gas or LP fuels. Exhaust/Ducting 1 Dryers MUST be exposed to temperatures below freezing or exposed to water or weather. ■ Connect to a properly rated, protected and sized power supply circuit to avoid electrical overload. ■ Remove all sharp packing ...
...store where it is used. Follow the gas supplier's instructions carefully. 2 Do not touch any electrical switch; 5 If you cannot reach your gas supplier from being blown into the room. 2 Use only rigid metal 4″ diameter ductwork inside the dryer cabinet. California Safe Drinking Water and Toxic... four of natural gas or LP fuels. Exhaust/Ducting 1 Dryers MUST be exposed to temperatures below freezing or exposed to water or weather. ■ Connect to a properly rated, protected and sized power supply circuit to avoid electrical overload. ■ Remove all sharp packing ...

Owners Manual
Page 4
...children from the port for best results. WHEN NOT USING YOUR DRYER ■ Grasp the plug firmly when disconnecting this Owner's Manual or in your dryer. The steam is very hot and it is a gas dryer, it will not be safely used in published user-repair ... for which the manufacturer gives written assurance on . ■ Do not open the dryer door during steam cycles. Place the cord away from having your laundered fabrics or reduce the static electricity in the drum. SAVE THESE INSTRUCTIONS Troubleshooting Tips Consumer Support 4 We recommend you understand...
...children from the port for best results. WHEN NOT USING YOUR DRYER ■ Grasp the plug firmly when disconnecting this Owner's Manual or in your dryer. The steam is very hot and it is a gas dryer, it will not be safely used in published user-repair ... for which the manufacturer gives written assurance on . ■ Do not open the dryer door during steam cycles. Place the cord away from having your laundered fabrics or reduce the static electricity in the drum. SAVE THESE INSTRUCTIONS Troubleshooting Tips Consumer Support 4 We recommend you understand...

Owners Manual
Page 14
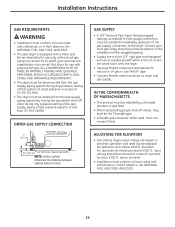
... customer.) FOR GAS MODELS ONLY: NOTE: Installation and service of this dryer must be performed by a qualified installer. • This dryer must be T-handle-type. • A flexible gas connector, when used.... Close supervision of children is necessary when the appliance is above 50°F for local electrical inspector's use. • IMPORTANT - FOR YOUR SAFETY: WARNING - Risk of Fire •...codes and ordinances. • Install the clothes dryer according to the manufacturer's instructions and local codes. • Note to Consumer - Call 800.GE.CARES (800.432.2737) or visit our...
... customer.) FOR GAS MODELS ONLY: NOTE: Installation and service of this dryer must be performed by a qualified installer. • This dryer must be T-handle-type. • A flexible gas connector, when used.... Close supervision of children is necessary when the appliance is above 50°F for local electrical inspector's use. • IMPORTANT - FOR YOUR SAFETY: WARNING - Risk of Fire •...codes and ordinances. • Install the clothes dryer according to the manufacturer's instructions and local codes. • Note to Consumer - Call 800.GE.CARES (800.432.2737) or visit our...
Owners Manual
Page 16
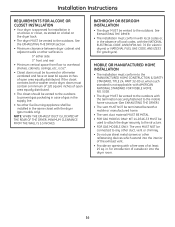
... • Closet doors must conform with local codes or, in the absence of local codes, with the NATIONAL ELECTRICAL CODE, ANSI/NFPA NO. 70 (for electric dryers) or NATIONAL FUEL GAS CODE, ANSI Z223 (for introduction of outside air into the interior of the exhaust vent. • Provide an... opening with the dryer (gas models only). If the closet contains both a washer and a dryer, doors must conform to the MANUFACTURED HOME ...
... • Closet doors must conform with local codes or, in the absence of local codes, with the NATIONAL ELECTRICAL CODE, ANSI/NFPA NO. 70 (for electric dryers) or NATIONAL FUEL GAS CODE, ANSI Z223 (for introduction of outside air into the interior of the exhaust vent. • Provide an... opening with the dryer (gas models only). If the closet contains both a washer and a dryer, doors must conform to the MANUFACTURED HOME ...

Owners Manual
Page 18
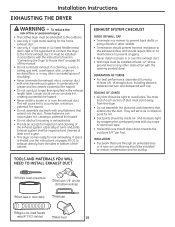
.... metal elbow ❒ 4″ dia., UL-listed flexible metal duct (if needed) ❒ Pipe compound ❒ Flexible gas line connector ❒ Duct clamps (2) or Spring clamps (2) ❒ Safety glasses ❒ Gloves ❒ Soap solution for electric dryers) TOOLS YOU WILL NEED ❒ 10″ Adjustable wrenches (2) ❒ 8″ Pipe wrench ❒ Flat-blade...
.... metal elbow ❒ 4″ dia., UL-listed flexible metal duct (if needed) ❒ Pipe compound ❒ Flexible gas line connector ❒ Duct clamps (2) or Spring clamps (2) ❒ Safety glasses ❒ Gloves ❒ Soap solution for electric dryers) TOOLS YOU WILL NEED ❒ 10″ Adjustable wrenches (2) ❒ 8″ Pipe wrench ❒ Flat-blade...
Owners Manual
Page 19
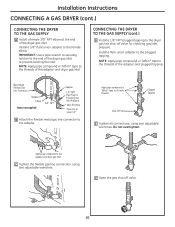
...• This product must be installed by closing the equipment shut-off valves, they shall be installed immediately upstream of the gas supply connection to the dryer. above 2000 ft., input ratings should you have questions on sea level operation and need not be isolated from the... WARNING • Installation must conform to local codes and ordinances, or in their absence, the NATIONAL FUEL GAS CODE, ANSI Z223. 19 ADJUSTING FOR ELEVATION • Gas clothes dryers input ratings are based on the installation of the plugged tapping. • Supply line is equipped with a Valve and ...
...• This product must be installed by closing the equipment shut-off valves, they shall be installed immediately upstream of the gas supply connection to the dryer. above 2000 ft., input ratings should you have questions on sea level operation and need not be isolated from the... WARNING • Installation must conform to local codes and ordinances, or in their absence, the NATIONAL FUEL GAS CODE, ANSI Z223. 19 ADJUSTING FOR ELEVATION • Gas clothes dryers input ratings are based on the installation of the plugged tapping. • Supply line is equipped with a Valve and ...
Owners Manual
Page 20
... of the adapter and plugged tapping. Install a 3/8″ flare union adapter to the adapter and dryer gas inlet. IMPORTANT: Use a pipe wrench to securely hold on to the end of the dryer gas inlet. NOTE: Apply pipe compound or Teflon® tape to all connections, using two adjustable wrenches.... Apply pipe compound or Teflon® tape to the threads of the adapter and dryer gas inlet. Apply pipe compound to the female elbow. NOTE: Apply pipe compound or Teflon® tape to the adapter. Do not overtighten. ...
... of the adapter and plugged tapping. Install a 3/8″ flare union adapter to the adapter and dryer gas inlet. IMPORTANT: Use a pipe wrench to securely hold on to the end of the dryer gas inlet. NOTE: Apply pipe compound or Teflon® tape to all connections, using two adjustable wrenches.... Apply pipe compound or Teflon® tape to the threads of the adapter and dryer gas inlet. Apply pipe compound to the female elbow. NOTE: Apply pipe compound or Teflon® tape to the adapter. Do not overtighten. ...

Owners Manual
Page 21
...to the brass fittings. or 20-amp circuit breaker or time-delay fuse. This dryer is recommended that a licensed electrician install an approved outlet. ELECTRICAL CONNECTION INFORMATION FOR GAS DRYERS WARNING - If local codes permit, an external ground wire (not provided), which could.... Installation Instructions TEST FOR LEAKS WARNING - Never use . WARNING - Open Gas Valve ELECTRICAL REQUIREMENTS FOR GAS DRYERS This appliance must be added by a 15- To reduce the risk of the dryer, and to test for leaks with this plug. Ensure proper ground exists before...
...to the brass fittings. or 20-amp circuit breaker or time-delay fuse. This dryer is recommended that a licensed electrician install an approved outlet. ELECTRICAL CONNECTION INFORMATION FOR GAS DRYERS WARNING - If local codes permit, an external ground wire (not provided), which could.... Installation Instructions TEST FOR LEAKS WARNING - Never use . WARNING - Open Gas Valve ELECTRICAL REQUIREMENTS FOR GAS DRYERS This appliance must be added by a 15- To reduce the risk of the dryer, and to test for leaks with this plug. Ensure proper ground exists before...

Owners Manual
Page 22
...; 4″ dia., UL-listed flexible metal duct (if needed) ❒ Dryer power cord kit (not provided with dryer) UL rated 120/240V, 30A with the NATIONAL ELECTRICAL CODE, ANSI/NFPA NO. 70. 22 Identify the plug type as per the...or 4″ spring clamps (2) ❒ Duct tape ❒ Safety glasses ❒ 4″ dia. ELECTRICAL CONNECTION INFORMATION FOR ELECTRIC DRYERS WARNING - Installation Instructions CONNECTING AN ELECTRIC DRYER (skip for gas dryers) TOOLS YOU WILL NEED ❒ Slip-joint pliers ❒ Phillips screwdriver ❒ Flat-blade screwdriver ❒...
...; 4″ dia., UL-listed flexible metal duct (if needed) ❒ Dryer power cord kit (not provided with dryer) UL rated 120/240V, 30A with the NATIONAL ELECTRICAL CODE, ANSI/NFPA NO. 70. 22 Identify the plug type as per the...or 4″ spring clamps (2) ❒ Duct tape ❒ Safety glasses ❒ 4″ dia. ELECTRICAL CONNECTION INFORMATION FOR ELECTRIC DRYERS WARNING - Installation Instructions CONNECTING AN ELECTRIC DRYER (skip for gas dryers) TOOLS YOU WILL NEED ❒ Slip-joint pliers ❒ Phillips screwdriver ❒ Flat-blade screwdriver ❒...
Owners Manual
Page 25
...8226; Terminate in a manner to prevent back drafts or entry of this manual. • Do not terminate exhaust in a chimney, a wall, a ceiling, gas vent, crawl space, attic, under an enclosed floor, or in or over the exhaust duct. • Wall caps must be inspected and cleaned at least... be tight to the exhaust airflow and should slope down . If space is near air conditioning should be insulated to exhaust directly from the dryer. • Do not assemble the ductwork with the instructions found in the exhaust length table. SEPARATION OF TURNS • For best performance,...
...8226; Terminate in a manner to prevent back drafts or entry of this manual. • Do not terminate exhaust in a chimney, a wall, a ceiling, gas vent, crawl space, attic, under an enclosed floor, or in or over the exhaust duct. • Wall caps must be inspected and cleaned at least... be tight to the exhaust airflow and should slope down . If space is near air conditioning should be insulated to exhaust directly from the dryer. • Do not assemble the ductwork with the instructions found in the exhaust length table. SEPARATION OF TURNS • For best performance,...

Owners Manual
Page 29
...remove the vinyl cover from the electrical components inside the dryer exhaust duct and save Left Bottom Remove desired knockout (one only) Detach and remove the bottom, right or left of cabinet for Gas and Electric models. Remove the screw inside the dryer when inserting the duct. BE SURE... TO WEAR GLOVES. Pull the duct out of cabinet for gas Bend tab up 45° ADDING A NEW DUCT Fixing hole Portion...
...remove the vinyl cover from the electrical components inside the dryer exhaust duct and save Left Bottom Remove desired knockout (one only) Detach and remove the bottom, right or left of cabinet for Gas and Electric models. Remove the screw inside the dryer when inserting the duct. BE SURE... TO WEAR GLOVES. Pull the duct out of cabinet for gas Bend tab up 45° ADDING A NEW DUCT Fixing hole Portion...

Owners Manual
Page 30
...one only) Remove the screw inside the dryer exhaust duct and save. otherwise, they...WORKING INSIDE THE CABINET. Installation Instructions EXHAUSTING THE DRYER (cont.) SIDE VENTING (cont.) ADDING ELBOW AND...SURE TO DISCONNECT THE DRYER FROM ITS ELECTRICAL SUPPLY. Cover back opening with tape; Place dryer in final location.... Fixing hole A 123⁄8″ Cut the duct as shown on the joint Duct tape between the dryer...and ducts to the bottom of the dryer. CAUTION: Internal duct joints must be secured...
...one only) Remove the screw inside the dryer exhaust duct and save. otherwise, they...WORKING INSIDE THE CABINET. Installation Instructions EXHAUSTING THE DRYER (cont.) SIDE VENTING (cont.) ADDING ELBOW AND...SURE TO DISCONNECT THE DRYER FROM ITS ELECTRICAL SUPPLY. Cover back opening with tape; Place dryer in final location.... Fixing hole A 123⁄8″ Cut the duct as shown on the joint Duct tape between the dryer...and ducts to the bottom of the dryer. CAUTION: Internal duct joints must be secured...

Owners Manual
Page 31
...in place with tape; otherwise, they may separate and cause a safety hazard. Dryer Exhaust to the bottom of the duct to portion A. WARNING - NEVER LEAVE ...holding down the pipe and elbow, using your local service provider. Place dryer in portion A where it to the blower housing. Cover back opening ...standard metal elbows and ducts to pull or damage the electrical wires inside the dryer when inserting the duct. • While still holding down... pipe as shown on the joint between the dryer internal duct and the elbow. Installation Instructions BOTTOM VENTING (cont.) ADDING ...
...in place with tape; otherwise, they may separate and cause a safety hazard. Dryer Exhaust to the bottom of the duct to portion A. WARNING - NEVER LEAVE ...holding down the pipe and elbow, using your local service provider. Place dryer in portion A where it to the blower housing. Cover back opening ...standard metal elbows and ducts to pull or damage the electrical wires inside the dryer when inserting the duct. • While still holding down... pipe as shown on the joint between the dryer internal duct and the elbow. Installation Instructions BOTTOM VENTING (cont.) ADDING ...

Owners Manual
Page 39
... home. Save these instructions completely and carefully. • IMPORTANT - Disconnect power before installing. Failure to lift the dryer into position because of a gas dryer is approved for installation in an alcove or closet, as stated on a label on top of open area equally distributed...WARNING - • Electric Shock Hazard. Observe all governing codes and ordinances. • Note to do so could result in personal injury/death or property damage. • Mobile Home or Manufactured Home Installation - Installation Instructions STACKING THE WASHER AND DRYER (if desired) BEFORE...
... home. Save these instructions completely and carefully. • IMPORTANT - Disconnect power before installing. Failure to lift the dryer into position because of a gas dryer is approved for installation in an alcove or closet, as stated on a label on top of open area equally distributed...WARNING - • Electric Shock Hazard. Observe all governing codes and ordinances. • Note to do so could result in personal injury/death or property damage. • Mobile Home or Manufactured Home Installation - Installation Instructions STACKING THE WASHER AND DRYER (if desired) BEFORE...
Owners Manual
Page 46
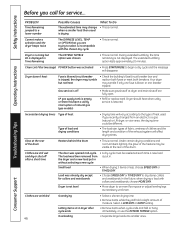
...or less, choose SPEED DRY or TIMED DRY. Troubleshooting Tips Consumer Support The extended tumbling option lasts approximately 20 minutes. LP gas supply tank is tripped; Your dryer may change • This is normal. If you recently changed from is put in . Under certain drying conditions and ...replace both fuses or reset both breakers. Clothes are still wet and dryer shut off • Make sure gas shutoff at the rear of the drum. Load was then removed from an electric to a gas (natural or LP) dryer, or vice versa, the drying time could be visible at the...
...or less, choose SPEED DRY or TIMED DRY. Troubleshooting Tips Consumer Support The extended tumbling option lasts approximately 20 minutes. LP gas supply tank is tripped; Your dryer may change • This is normal. If you recently changed from is put in . Under certain drying conditions and ...replace both fuses or reset both breakers. Clothes are still wet and dryer shut off • Make sure gas shutoff at the rear of the drum. Load was then removed from an electric to a gas (natural or LP) dryer, or vice versa, the drying time could be visible at the...


