Use and Care Manual
Page 3
...specifically designed to excessive microwave energy: SAFETY PRECAUTIONS Use this appliance only for examination, repair or adjustment. • As with the provided Installation Instructions. • Do not mount this product near a sink, or in similar locations. • Keep power cord away from ...industrial use this appliance over a sink. • This over-the-range oven was designed for installation over both gas and electric cooking equipment. • Do not operate this manual. • This appliance should be serviced only by children. • Do not store anything directly...
...specifically designed to excessive microwave energy: SAFETY PRECAUTIONS Use this appliance only for examination, repair or adjustment. • As with the provided Installation Instructions. • Do not mount this product near a sink, or in similar locations. • Keep power cord away from ...industrial use this appliance over a sink. • This over-the-range oven was designed for installation over both gas and electric cooking equipment. • Do not operate this manual. • This appliance should be serviced only by children. • Do not store anything directly...
Installation Instructions
Page 1
... - Para consultar una version en español de este manual de instrucciones, visite nuestro sitio de internet ge.com. Observe all governing codes and ordinances. • Note to improper installation is the responsibility of this appliance requires basic mechanical and electrical skills.... • Proper installation is not covered under the Warranty. For a Spanish version of the installer. • Product failure due to Installer - Keep these instructions for future reference. • Skill level - Installation of this manual, visit our Website at : ge.com BEFORE YOU BEGIN...
... - Para consultar una version en español de este manual de instrucciones, visite nuestro sitio de internet ge.com. Observe all governing codes and ordinances. • Note to improper installation is the responsibility of this appliance requires basic mechanical and electrical skills.... • Proper installation is not covered under the Warranty. For a Spanish version of the installer. • Product failure due to Installer - Keep these instructions for future reference. • Skill level - Installation of this manual, visit our Website at : ge.com BEFORE YOU BEGIN...
Installation Instructions
Page 7
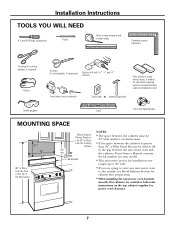
Your Owner's Manual contains the kit number for your microwave oven to the outside, see Hood Exhaust Section for exhaust duct preparation. • When installing the microwave oven beneath smooth, flat cabinets, be careful to follow the instructions on recessed bottom cabinet installations only) Saw ...the Top of the Microwave Bottom Edge of obstructions. • If the space between the cabinets is for power cord clearance. 7 Installation Instructions TOOLS YOU WILL NEED # 1 and #2 Phillips screwdriver Pencil Ruler or tape measure and straight edge Carpenter square (optional) ...
Your Owner's Manual contains the kit number for your microwave oven to the outside, see Hood Exhaust Section for exhaust duct preparation. • When installing the microwave oven beneath smooth, flat cabinets, be careful to follow the instructions on recessed bottom cabinet installations only) Saw ...the Top of the Microwave Bottom Edge of obstructions. • If the space between the cabinets is for power cord clearance. 7 Installation Instructions TOOLS YOU WILL NEED # 1 and #2 Phillips screwdriver Pencil Ruler or tape measure and straight edge Carpenter square (optional) ...
Installation Instructions
Page 11
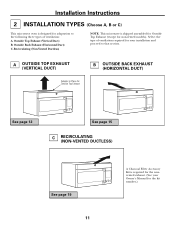
... Filter Accessory Kit is required for the nonvented exhaust. (See your installation and proceed to the following three types of ventilation required for your Owner's Manual for the kit number.) Outside Back Exhaust (Horizontal Duct) C. Select the type of ventilation: A. Installation Instructions 2 INSTALLATION TYPES (Choose A, B or C) This microwave oven is designed for adaptation to...
... Filter Accessory Kit is required for the nonvented exhaust. (See your installation and proceed to the following three types of ventilation required for your Owner's Manual for the kit number.) Outside Back Exhaust (Horizontal Duct) C. Select the type of ventilation: A. Installation Instructions 2 INSTALLATION TYPES (Choose A, B or C) This microwave oven is designed for adaptation to...

Installation Instructions
Page 14
...cabinet and adjust the exhaust adaptor to connect to the exhaust adaptor. 2 Seal exhaust duct joints using duct tape. 8 Install grease filters. See the Owner's Manual packed with the microwave. 14 A5. Turn two full turns on each screw. Blower Plate Damper Back of Cabinet Recess Self...-Aligning Screw Microwave Oven Top 4 Attach the microwave oven to -Side Adjustment, Slide the Exhaust Adaptor as Needed A6. Installation Instructions A4. ...
...cabinet and adjust the exhaust adaptor to connect to the exhaust adaptor. 2 Seal exhaust duct joints using duct tape. 8 Install grease filters. See the Owner's Manual packed with the microwave. 14 A5. Turn two full turns on each screw. Blower Plate Damper Back of Cabinet Recess Self...-Aligning Screw Microwave Oven Top 4 Attach the microwave oven to -Side Adjustment, Slide the Exhaust Adaptor as Needed A6. Installation Instructions A4. ...

Installation Instructions
Page 18
...Aligning Screw Microwave Oven Top 4 Attach the microwave oven to prevent cutting of cabinet. NOTE: If your cabinet is metal, use handle during installation. Keep it forward, and hook slots at least two full turns after the threads have engaged. (It will be completely tightened later.) ... tabs of mounting plate. 2 Rotate front of top cabinet. See the Owner's Manual packed with the microwave. 18 MOUNT THE MICROWAVE OVEN FOR EASIER INSTALLATION AND PERSONAL SAFETY, WE RECOMMEND THAT TWO PEOPLE INSTALL THIS MICROWAVE OVEN. IMPORTANT: Do not grip or use the nylon grommet around the...
...Aligning Screw Microwave Oven Top 4 Attach the microwave oven to prevent cutting of cabinet. NOTE: If your cabinet is metal, use handle during installation. Keep it forward, and hook slots at least two full turns after the threads have engaged. (It will be completely tightened later.) ... tabs of mounting plate. 2 Rotate front of top cabinet. See the Owner's Manual packed with the microwave. 18 MOUNT THE MICROWAVE OVEN FOR EASIER INSTALLATION AND PERSONAL SAFETY, WE RECOMMEND THAT TWO PEOPLE INSTALL THIS MICROWAVE OVEN. IMPORTANT: Do not grip or use the nylon grommet around the...
Installation Instructions
Page 22
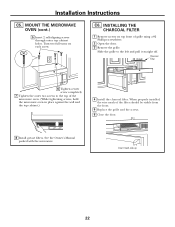
...oven. (While tightening screws, hold the microwave oven in place against the wall and the top cabinet.) 4 Install the charcoal filter. Insert mesh-side up 22 See the Owner's Manual packed with the microwave. Turn two full turns on top front of the filter should be visible from the ...front. 5 Replace the grille and the screws. 6 Close the door. 8 Install grease filters. When properly installed, the wire mesh of grille using a #2 ...
...oven. (While tightening screws, hold the microwave oven in place against the wall and the top cabinet.) 4 Install the charcoal filter. Insert mesh-side up 22 See the Owner's Manual packed with the microwave. Turn two full turns on top front of the filter should be visible from the ...front. 5 Replace the grille and the screws. 6 Close the door. 8 Install grease filters. When properly installed, the wire mesh of grille using a #2 ...

Installation Instructions
Page 23
Remove all packing material from the microwave oven. 3. Make sure the microwave oven has been installed according to 20-amp electrical outlet. Install turntable and ring in cavity. 4. Read the Owner's Manual. 2. Replace house fuse or turn breaker back on. 7. Plug power cord into a dedicated 15- Ensure proper ground exists before use 23 to instructions. 6. Installation Instructions BEFORE YOU USE YOUR MICROWAVE 1. KEEP INSTALLATION INSTRUCTIONS FOR THE LOCAL INSPECTOR'S USE. 5.
Remove all packing material from the microwave oven. 3. Make sure the microwave oven has been installed according to 20-amp electrical outlet. Install turntable and ring in cavity. 4. Read the Owner's Manual. 2. Replace house fuse or turn breaker back on. 7. Plug power cord into a dedicated 15- Ensure proper ground exists before use 23 to instructions. 6. Installation Instructions BEFORE YOU USE YOUR MICROWAVE 1. KEEP INSTALLATION INSTRUCTIONS FOR THE LOCAL INSPECTOR'S USE. 5.


