GE PVM1870SMSS Support Question
GE PVM1870SMSS Support Question
Find answers below for this question about GE PVM1870SMSS.Need a GE PVM1870SMSS manual? We have 3 online manuals for this item!
Question posted by jwc2044 on July 26th, 2010
Installation
The installation instructions did not come with my PVM1870SMSS microwave. Where can I get them?
Current Answers
Answer #1: Posted by SuburbinateHousewife on July 26th, 2010 10:24 PM
SuburbinateHousewife

Member since:
July 22nd, 2010 Points: 59,870

Member since:
July 22nd, 2010 Points: 59,870
The instruction manual for the GE PVM1870SMSS can be found here: http://products.geappliances.com/MarketingObjectRetrieval/Dispatcher?RequestType=PDF&Name=49-40538.pdf
I hope I have been helpful!
SuburbinateHousewife
Advice Blog: http://askhousewife.blogspot.com/
Related GE PVM1870SMSS Manual Pages
Use and Care Manual - Page 2
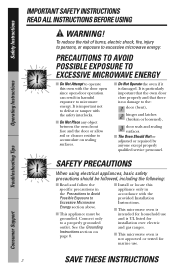
... properly and that there is no damage to accumulate on page 8.
■ Install or locate this oven with the provided Installation Instructions.
■ This microwave oven is intended for household use . See the Grounding Instructions section on sealing surfaces.
■ Do Not Operate the oven if it is not approved or tested for marine use and is UL...
Quick Specs - Page 1
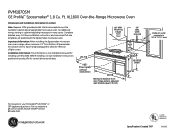
...
105° Door open
(without obstruction)
29-7/8
Minimum distance from floor
30" MIN. Important Information: When installing the Spacemaker microwave oven over a range, allow minimum of 2" from bottom of Spacemaker microwave oven to top of range backguard to -follow installation instructions and convenient full-size templates are packed with product/kit for removal of light covers. XL1800...
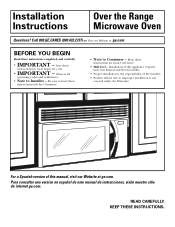
Installation Instructions - Page 1
... skills.
• Proper installation is not covered under the Warranty. Be sure to leave these
instructions for local inspector's use.
• IMPORTANT - READ CAREFULLY. Save these instructions completely and carefully.
• IMPORTANT -
Call 800.GE.CARES (800.432.2737) or Visit our Website at ge.com. Installation Instructions
Over the Range Microwave Oven
Questions?
Installation Instructions - Page 2

...-18
Preparing Rear Wall for Outside Back Exhaust 15 Remove Exhaust Adaptor 15 Attach Mounting Plate to Wall 16 Preparation of Top Cabinet 16 Adapting Microwave Blower for Outside Back Exhaust 16, 17 Mount the Microwave Oven 18
2 Installation Instructions
CONTENTS
General information
Important Safety Instructions 3 Electrical Requirements 3 Hood Exhaust 4, 5 Damage -
Installation Instructions - Page 3

... installation to insure that two people install this kilowatt rating. CAUTION: For personal safety, remove house fuse or open circuit breaker before use
3
PLEASE READ CAREFULLY.
DO NOT USE WITH AN EXTENSION CORD. The power supply cord and plug should be capable of supporting the cabinet load, in the cabinet above the microwave oven...
Installation Instructions - Page 7

Your Owner's Manual contains the kit number for your microwave oven
to the outside, see Hood Exhaust Section for exhaust duct preparation.
• When installing the microwave oven beneath
smooth, flat cabinets, be careful to follow the instructions on recessed bottom cabinet installations only)
Saw (saber, hole or keyhole)
Stud finder or Hammer (optional)
Safety goggles
Level
Duct...
Installation Instructions - Page 8

... probing the wall with a small nail to find the edges of the stud. REMOVING THE MICROWAVE
OVEN FROM THE CARTON/ REMOVING THE MOUNTING PLATE
1 Remove the installation instructions, filters, glass tray and the small hardware bag.
Stud finder - The oven should be 16″ or 24″ from the mounting plate. B. a magnetic device which locates...
Installation Instructions - Page 9

...- Use a level to make sure the cabinet bottom is level. Installation Instructions
C. beneath recessed bottom cabinet with front overhang
Mounting Plate with Tabs ...8243;
30″ to Cooktop
Your cabinets may have a front overhang only, with the microwave installation. This will keep the microwave level.
1 Measure the inside depth of the front overhang.
2 Draw a horizontal line on...
Installation Instructions - Page 11

...
11
A Charcoal Filter Accessory Kit is required for the nonvented exhaust. (See your installation and proceed to the following three types of ventilation required for your Owner's Manual for the kit number.) Installation Instructions
2 INSTALLATION TYPES (Choose A, B or C)
This microwave oven is designed for adaptation to that section. Outside Top Exhaust (Vertical Duct) B. Outside...
Installation Instructions - Page 12
Installation Instructions
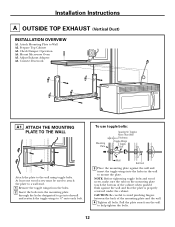
A OUTSIDE TOP EXHAUST (Vertical Duct)
INSTALLATION OVERVIEW
A1. Prepare Top Cabinet A3. Connect Ductwork
A1.
Pull the plate away from ... wings into drywall and reattach the toggle wings to 3⁄4″ onto each bolt. Check Damper Operation A4. Mount Microwave Oven A5. At least one wood screw must be used to attach the plate to a wall stud.
1 Remove the ...
Installation Instructions - Page 13
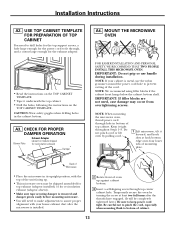
... on the
TOP CABINET TEMPLATE. NOTE: If your cabinet is installed.
2 Rotate front of oven up .
• This microwave oven may occur from overtightening screws. NOTE: When mounting the microwave oven, thread power cord through , and a cutout large enough for the exhaust adaptor.
• Read the instructions on the TOP CABINET
TEMPLATE.
• Tape it underneath the...
Installation Instructions - Page 14
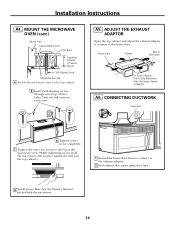
... wall and the top cabinet.)
1 Extend the house duct down to connect to -Side Adjustment, Slide the Exhaust Adaptor as Needed
A6. Installation Instructions
A4. See the Owner's Manual packed with the microwave.
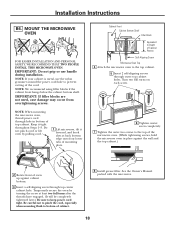
14 MOUNT THE MICROWAVE OVEN (cont.)
Cabinet Front Cabinet Bottom Shelf Filler Block
Equivalent to Depth of Cabinet Recess
Self-Aligning Screw...
Installation Instructions - Page 15
... WALL
TEMPLATE.
• Tape it .
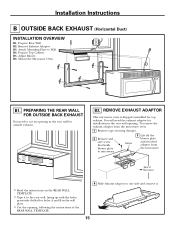
15 Mount the Microwave Oven
B1. Back of the
REAR WALL TEMPLATE.
4 Slide exhaust adaptor to microwave. Prepare Rear Wall B2.
Adjust Blower B6. Prepare Top Cabinet B5. You will need to Wall B4. Installation Instructions
B OUTSIDE BACK EXHAUST (Horizontal Duct)
INSTALLATION OVERVIEW
B1. B2. To remove the exhaust adaptor from...
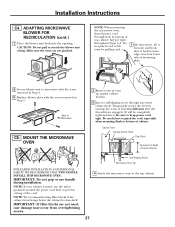
Installation Instructions - Page 17

... wires from Step 1.
AFTER: Fan Blade Openings Facing Back
End A
End B
Back of Microwave
Back of the blower unit.
Installation Instructions
B5.
Back of Microwave
Back of Microwave
Adaptor
Back of the oven. Take care to assure that the damper hinge is installed so that the damper swings freely.
17
Before Rotation
After Rotation
6 Place the blower...
Installation Instructions - Page 18
... around the power cord hole to prevent cutting of the cord.
See the Owner's Manual packed with the microwave.
18 MOUNT THE MICROWAVE OVEN
FOR EASIER INSTALLATION AND PERSONAL SAFETY, WE RECOMMEND THAT TWO PEOPLE INSTALL THIS MICROWAVE OVEN.
Turn two full turns on each screw.
6 Tighten center screw completely.
7 Tighten the outer two screws to the...
Installation Instructions - Page 19

...Microwave Oven C6. To use toggle bolts:
Mounting Plate
Spacing for the power cord to fit through the holes designated to go into the holes in the cabinet bottom.
19 Prepare Top Cabinet C3. Install... that the plate is properly centered under the cabinet.
Installation Instructions
C RECIRCULATING (Non-Vented Ductless)
INSTALLATION OVERVIEW
C1. Attach Mounting Plate to the wall using ...
Installation Instructions - Page 20

Installation Instructions
C3.
Damper
2 Lift off the blower plate and attached adaptor from the microwave.
Blower Plate
NOTE: Make sure wires remain ...microwave. Back of the unit facing up.
• The microwave oven may want to C5.
C4. You may be shipped assembled for
top exhaust (adaptor installed) or for recirculation exhaust (adaptor absent).
• If the microwave...
Installation Instructions - Page 21
... later.) Be sure to the top cabinet.
21 Installation Instructions
C4. Make sure the wires are not used, case damage may occur from overtightening screws.
Do not pinch cord or lift oven by turning the screw at back bottom edge onto four lower tabs of Microwave
C5. Back of mounting plate.
8 Secure blower unit...
Installation Instructions - Page 22

Turn two full turns on front of the microwave oven. (While tightening screws, hold the microwave oven in place against the wall and the top cabinet.)
8 Install grease filter. INSTALLING THE CHARCOAL FILTER
1 On 1400 and 1600 Series models, remove screws on each screw.
6 Tighten center screw completely.
7 Tighten the outer two screws to the ...
Installation Instructions - Page 23
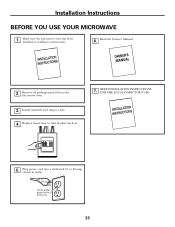
... cord into a dedicated 15- Install turntable and ring in cavity. 4.
Remove all packing material from the
microwave oven.
3. Installation Instructions
BEFORE YOU USE YOUR MICROWAVE
1. Replace house fuse or turn breaker back on.
7.
Ensure proper ground exists before use
23 to instructions.
6. Read the Owner's Manual.
2. KEEP INSTALLATION INSTRUCTIONS FOR THE LOCAL INSPECTOR...
Similar Questions

Is This Microwave Vent Free
(Posted by edwardstncm 10 months ago)

Installation Template
We bought a floor model of this microwave from the store. I was able to print installation instructi...
We bought a floor model of this microwave from the store. I was able to print installation instructi...
(Posted by marydeehen 10 years ago)

Do U Carry Mounting Kit For Ge Spacemaker Xl 1800 Overhead Microwave
(Posted by emailgeo33 10 years ago)

Oven Operates Briefly While Opening Door To Remove Contents.
When I pull the door open on my microwave oven, it begins to run. I am able to reproduce the problem...
When I pull the door open on my microwave oven, it begins to run. I am able to reproduce the problem...
(Posted by dmendelson 12 years ago)

Can You Please Locate A Manual Or User Guide For The Ge Pvm1870smss?
(Posted by danalynntomko 13 years ago)