GE PVM1870SMSS Support Question
GE PVM1870SMSS Support Question
Find answers below for this question about GE PVM1870SMSS.Need a GE PVM1870SMSS manual? We have 3 online manuals for this item!
Question posted by emailgeo33 on July 17th, 2013
Do U Carry Mounting Kit For Ge Spacemaker Xl 1800 Overhead Microwave
The person who posted this question about this GE product did not include a detailed explanation. Please use the "Request More Information" button to the right if more details would help you to answer this question.
Current Answers
Answer #1: Posted by BusterDoogen on July 17th, 2013 2:14 PM
BusterDoogen

Member since:
October 30th, 2011 Points: 28,565,407

Member since:
October 30th, 2011 Points: 28,565,407
Related GE PVM1870SMSS Manual Pages
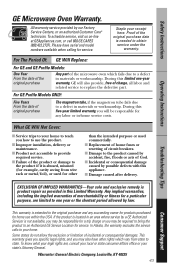
Use and Care Manual - Page 1
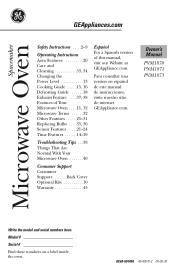
...Find these numbers on a label inside the oven. Microwave Spacemaker Oven
GEAppliances.com
Safety Instructions . . . .2-9
Operating Instructions Auto Features 20 Care and Cleaning 33, 34 Changing the Power Level 13 Cooking Guide . . . . .15, 16 Defrosting Guide . . . . . .18 Exhaust Feature . . . .37, 38 Features of Your Microwave Oven . . . .11, 12 Microwave Terms . . . . . .32 Other Features...
Use and Care Manual - Page 3
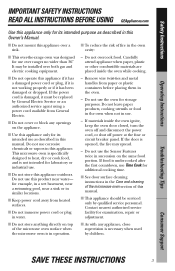
... time.
■ See door surface cleaning instructions in the Care and cleaning of the microwave oven section of this manual.
■ This appliance should be replaced by General Electric Service or...Manual.
■ Do not mount this appliance over a sink.
■ To reduce the risk of the microwave oven surface when the microwave oven is necessary when used by qualified service personnel.
Use and Care Manual - Page 10
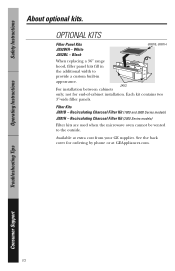
... the microwave oven cannot be vented to provide a custom built-in the additional width to the outside. Operating Instructions
Troubleshooting Tips
Consumer Support
10 Recirculating Charcoal Filter Kit (1800 and 3600 Series models)
JX81H - See the back cover for end-of-cabinet installation. not for ordering by phone or at extra cost from your GE...
Use and Care Manual - Page 43
... magnetron tube, if the magnetron tube fails due to use within the USA.
What GE Will Not Cover:
■ Service trips to replace the defective part. For GE Profile Models ONLY:
Five Years From the date of the microwave oven which vary from wire rack or metal/foil), or used commercially.
■ Replacement of...
Quick Specs - Page 1
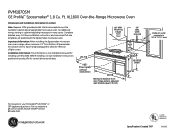
... outlet. Before installing, consult installation instructions packed with the Spacemaker microwave oven.
Mounting
height from door hinge side to adjacent wall should equal ...kit for current dimensional data.
66" MIN. XL1800
Over-the-Range Microwave Oven
ODvimeer-ntshioen-sR(ainningceheMs)icrowave
Oven
Dimensions and Installation Information (in cabinet above Spacemaker microwave oven...
Quick Specs - Page 2
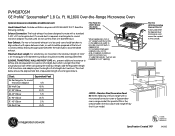
... a 42" opening. Decorative Panel Kits
Duct
Equivalent Feet
A. Rectangular-To-round
Transition Adaptor
5 ft.
PVM1870SM
GE Profile™ Spacemaker® 1.8 Cu.
The chart below shows the approximate feet of equivalent length of all transitions and adaptors plus the lengths of some typical ducts.
XL1800 Over-the-Range Microwave Oven
Optional Accessories (Available at the...
Quick Specs - Page 3
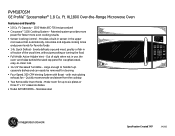
... Defrost - casserole dishes and can easily be removed for up to handle 5-qt. XL1800 Over-the-Range Microwave Oven
Features and Benefits
• 1.8 Cu. Large enough to six plates or three 9" x 13" casserole dishes
• Model PVM1870SMSS - Stainless steel
PVM1870SM
Specification Created 7/07
240263 Make room for cleaning
• Four-Speed, 300-CFM...
Installation Instructions - Page 1
... covered under the Warranty. Keep these
instructions with the Consumer.
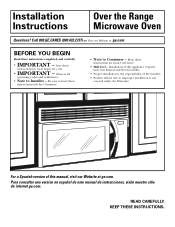
• Note to Installer - Installation Instructions
Over the Range Microwave Oven
Questions? Call 800.GE.CARES (800.432.2737) or Visit our Website at ge.com. Para consultar una version en español de este manual de instrucciones, visite nuestro sitio de internet...
Installation Instructions - Page 2

... Requirements 3 Hood Exhaust 4, 5 Damage - Shipment/Installation 6 Parts Included 6 Tools You Will Need 7 Mounting Space 7
C Recirculating 19-22
Attach Mounting Plate to Wall 19 Preparation of Top Cabinet 19 Check Microwave Assembly 20 Adapting Microwave Blower for Recirculation 20, 21 Mount the Microwave Oven ..........21, 22 Installing the Charcoal Filter 22 Before You Use Your...
Installation Instructions - Page 3

... avoid severe or fatal shock injury. The outlet box and supply circuit should be mounted to insure that two people install this product. Ensure proper ground exists before beginning ... the power outlet box before use
3
It must be located in the cabinet above the microwave oven. PLEASE READ CAREFULLY. Where a standard two-prong wall receptacle is encountered, it is properly...
Installation Instructions - Page 7

...Owner's Manual contains the kit number for your model.
• This microwave oven is greater
than 30″, a Filler Panel Kit may be used on ...microwave oven beneath
smooth, flat cabinets, be careful to follow the instructions on recessed bottom cabinet installations only)
Saw (saber, hole or keyhole)
Stud finder or Hammer (optional)
Safety goggles
Level
Duct and masking tape
MOUNTING...
Installation Instructions - Page 8

... all 4 carton flaps fully against carton sides.
This will be resting in the Styrofoam. Then place a mark halfway between the edges. REMOVING THE MICROWAVE
OVEN FROM THE CARTON/ REMOVING THE MOUNTING PLATE
1 Remove the installation instructions, filters, glass tray and the small hardware bag. a magnetic device which locates nails. The center of the...
Installation Instructions - Page 11

...RECIRCULATING (NON-VENTED DUCTLESS)
See page 19
11
A Charcoal Filter Accessory Kit is required for the kit number.) Outside Back Exhaust (Horizontal Duct) C. Select the type of ...
NOTE: This microwave is shipped assembled for Outside Top Exhaust (except for adaptation to that section. Installation Instructions
2 INSTALLATION TYPES (Choose A, B or C)
This microwave oven is designed for...
Installation Instructions - Page 12
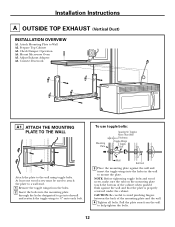
... wall and insert the toggle wings into drywall and reattach the toggle wings to mount the plate.
CAUTION: Be careful to the wall using toggle bolts. Mount Microwave Oven A5.
Installation Instructions
A OUTSIDE TOP EXHAUST (Vertical Duct)
INSTALLATION OVERVIEW
A1. Attach Mounting Plate to help tighten the bolts.
12 NOTE: Before tightening toggle bolts and...
Installation Instructions - Page 13
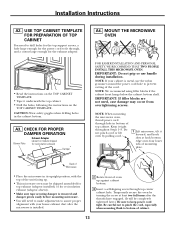
... in bottom of cabinet.
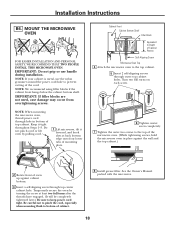
13 Be careful not to pinch the cord, especially when mounting flush to fit through top center cabinet hole. MOUNT THE MICROWAVE OVEN
FOR EASIER INSTALLATION AND PERSONAL SAFETY, WE RECOMMEND THAT TWO PEOPLE INSTALL THIS MICROWAVE OVEN.
NOTE: We recommend using filler blocks if the cabinet front hangs below the cabinet...
Installation Instructions - Page 14
....
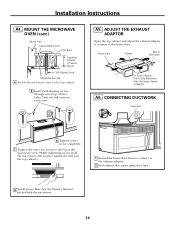
8 Install grease filter. Blower Plate
Damper
Back of the microwave oven. (While tightening screws, hold the microwave oven in place against the wall and the top cabinet.)
1 Extend the house duct down to connect to -Side Adjustment, Slide the Exhaust Adaptor as Needed
A6.
MOUNT THE MICROWAVE OVEN (cont.)
Cabinet Front Cabinet Bottom Shelf Filler Block
Equivalent...
Installation Instructions - Page 15
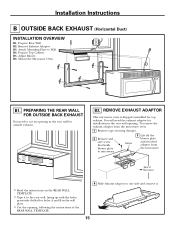
... for holes A and B in the rear wall for outside exhaust. Installation Instructions
B OUTSIDE BACK EXHAUST (Horizontal Duct)
INSTALLATION OVERVIEW
B1. Prepare Rear Wall B2. Mount the Microwave Oven
B1. PREPARING THE REAR WALL FOR OUTSIDE BACK EXHAUST
You need the exhaust adaptor for top exhaust. Back of the
REAR WALL TEMPLATE.
4 Slide exhaust...
Installation Instructions - Page 18
... Front Cabinet Bottom Shelf Filler Block
Equivalent to the top of the microwave oven. (While tightening screws, hold the microwave oven in bottom of Cabinet Recess Self-Aligning Screw Microwave Oven Top 4 Attach the microwave oven to bottom of mounting plate. See the Owner's Manual packed with the microwave.
18
Turn two full turns on each screw.
6 Tighten center screw...
Installation Instructions - Page 19

... cabinet when pushed flush against the wall and insert the toggle wings into drywall and reattach the toggle wings to 3⁄4″ onto each bolt. Mount the Microwave Oven C6.
NOTE: Before tightening toggle bolts and wood screw, make sure the tabs on the
TOP CABINET TEMPLATE.
CAUTION: Be careful to Wall C2...
Installation Instructions - Page 22

... Filter
4 Install the charcoal filter. Installation Instructions
C5. On 1800 Series models, remove screws on top front of the microwave oven. (While tightening screws, hold the microwave oven in place against the wall and the top cabinet.)
8 Install... grille and the screws. 6 Close the door. MOUNT THE MICROWAVE OVEN (cont.)
5 Insert 2 self-aligning screws through outer top cabinet holes.
Similar Questions

How Much Height Added To Unit With Mounting Kit Installed (i.e 1/4 Of An Inch )
(Posted by utica 8 years ago)

Ge Spacemaker Microwave Oven
I have General Electric Spacemaker Microwave Oven model replace general electric Model JVM 1730, ...
I have General Electric Spacemaker Microwave Oven model replace general electric Model JVM 1730, ...
(Posted by snissim1 11 years ago)


Can You Please Locate A Manual Or User Guide For The Ge Pvm1870smss?
(Posted by danalynntomko 13 years ago)