Quick Specs
Page 1
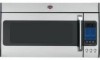
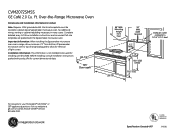
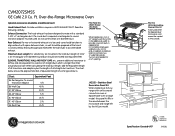
... cabinet above Spacemaker microwave oven. Electrical receptacle must be used for current dimensional data. 24-1/2 105° Door open 66" MIN. Important Information: When installing the Spacemaker microwave oven over a range, allow for removal of 2" from floor 30" MIN. Ft. Listed by Underwriters Laboratories Specification Created 4/07 240261 Installation Information: This information is not intended to -follow installation instructions and convenient full-size templates are packed with product/kit for installing unit described. CVM2072SMSS GE...
... cabinet above Spacemaker microwave oven. Electrical receptacle must be used for current dimensional data. 24-1/2 105° Door open 66" MIN. Important Information: When installing the Spacemaker microwave oven over a range, allow for removal of 2" from floor 30" MIN. Ft. Listed by Underwriters Laboratories Specification Created 4/07 240261 Installation Information: This information is not intended to -follow installation instructions and convenient full-size templates are packed with product/kit for installing unit described. CVM2072SMSS GE...
Quick Specs
Page 2
... with a microwave/ convection oven or Spacemaker over a range model, this kit fills in the additional width to provide a custom built-in the area between the microwave and range left by the Hi/Low model. 3/8" depth Filter Kits JX81H-Recirculating Charcoal Filter Kit To be used when the Spacemaker microwave oven cannot be vented to be prepared at additional cost) Hood Exhaust Duct: Outside ventilation requires a HOOD EXHAUST DUCT. Rear Exhaust: If a rear or horizontal exhaust is longer than a 6" diameter duct. Filler Panel Kits JX40CT-Bisque...
... with a microwave/ convection oven or Spacemaker over a range model, this kit fills in the additional width to provide a custom built-in the area between the microwave and range left by the Hi/Low model. 3/8" depth Filter Kits JX81H-Recirculating Charcoal Filter Kit To be used when the Spacemaker microwave oven cannot be vented to be prepared at additional cost) Hood Exhaust Duct: Outside ventilation requires a HOOD EXHAUST DUCT. Rear Exhaust: If a rear or horizontal exhaust is longer than a 6" diameter duct. Filler Panel Kits JX40CT-Bisque...
Use and Care Manual
Page 3
... cooking time. • See door surface cleaning instructions in the oven cavity: - This microwave oven is specifically designed to excessive microwave energy: SAFETY PRECAUTIONS Use this appliance only for use corrosive chemicals or vapors in this product near a sink, or in similar locations. • Keep power cord away from General Electric. • Do not cover or block any appliance, close supervision is necessary when used by qualified service personnel. If food...
... cooking time. • See door surface cleaning instructions in the oven cavity: - This microwave oven is specifically designed to excessive microwave energy: SAFETY PRECAUTIONS Use this appliance only for use corrosive chemicals or vapors in this product near a sink, or in similar locations. • Keep power cord away from General Electric. • Do not cover or block any appliance, close supervision is necessary when used by qualified service personnel. If food...

Use and Care Manual
Page 4
... covering the pan completely with a lid, cookie sheet or flat tray. • Use care when cleaning the vent fan filters. VENT FAN The fan will operate automatically under the microwave, turn the fan on. • Never leave surface units beneath your microwave oven unattended at high heat settings. Arcing is the microwave term for sparks in the oven. Boilovers cause smoking and greasy spillovers that may damage the filters. • When preparing flaming foods...
... covering the pan completely with a lid, cookie sheet or flat tray. • Use care when cleaning the vent fan filters. VENT FAN The fan will operate automatically under the microwave, turn the fan on. • Never leave surface units beneath your microwave oven unattended at high heat settings. Arcing is the microwave term for sparks in the oven. Boilovers cause smoking and greasy spillovers that may damage the filters. • When preparing flaming foods...
Use and Care Manual
Page 7
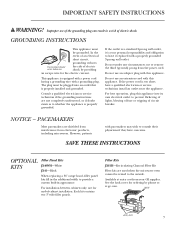
... to the outside. For installation between cabinets only; the risk of circuit breaker. If the outlet is a standard 2-prong wall outlet, it is your GE supplier. If the power cord is equipped with a power cord having a grounding wire with a grounding plug. Filter Kits JX81H-Recirculating Charcoal Filter Kit Filter kits are used when the microwave oven cannot be vented to have concerns. Consult a qualified electrician or service technician if the grounding instructions are shielded...
... to the outside. For installation between cabinets only; the risk of circuit breaker. If the outlet is a standard 2-prong wall outlet, it is your GE supplier. If the power cord is equipped with a power cord having a grounding wire with a grounding plug. Filter Kits JX81H-Recirculating Charcoal Filter Kit Filter kits are used when the microwave oven cannot be vented to have concerns. Consult a qualified electrician or service technician if the grounding instructions are shielded...
Use and Care Manual
Page 8
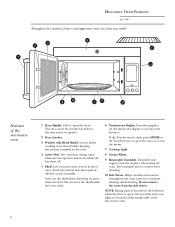
... one level. Press the graphics on the inside the oven cavity. 6 Touchscreen Display. If the Touchscreen is dark, press HOME or the Touchscreen, or open the door. Helps circulate microwaves throughout the oven cavity for consistent heating and defrosting. The door must be in the oven. 4 Active Vent. The vent door swings open . Oven vent(s) and oven light are located on the interactive display to access the menu. 7 Cooktop Light. 8 Grease Filters. 9 Removable Turntable. Food microwaves best when placed directly on...
... one level. Press the graphics on the inside the oven cavity. 6 Touchscreen Display. If the Touchscreen is dark, press HOME or the Touchscreen, or open the door. Helps circulate microwaves throughout the oven cavity for consistent heating and defrosting. The door must be in the oven. 4 Active Vent. The vent door swings open . Oven vent(s) and oven light are located on the interactive display to access the menu. 7 Cooktop Light. 8 Grease Filters. 9 Removable Turntable. Food microwaves best when placed directly on...
Use and Care Manual
Page 10
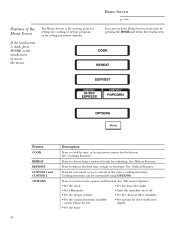
... Auto Nite Light • Set a Reminder • Turn the turntable on or off • Set the beeper volume • Set the charcoal filter reminder • Set the custom functions available on the Home Screen • Set options for one-touch access to cook by time, or by time, weight or food type. Feature COOK REHEAT DEFROST CUSTOM 1 and CUSTOM 2 OPTIONS Description Press to several of foods for setting microwave options. Home Screen ge...
... Auto Nite Light • Set a Reminder • Turn the turntable on or off • Set the beeper volume • Set the charcoal filter reminder • Set the custom functions available on the Home Screen • Set options for one-touch access to cook by time, or by time, weight or food type. Feature COOK REHEAT DEFROST CUSTOM 1 and CUSTOM 2 OPTIONS Description Press to several of foods for setting microwave options. Home Screen ge...

Use and Care Manual
Page 11
... less tender cuts of the time. A lower setting will be done on a range. POWER LEVEL HIGHER LOWER 10 CANCEL ENTER Here are some examples of the time. Rest periods (when the microwave energy cycles off , the outside of the food would cook before the inside of the lower settings is shown with power level 3- Gentle cooking of this is used. Changing the Power Level ge.com Variable Power Levels 1-10 The power level may be...
... less tender cuts of the time. A lower setting will be done on a range. POWER LEVEL HIGHER LOWER 10 CANCEL ENTER Here are some examples of the time. Rest periods (when the microwave energy cycles off , the outside of the food would cook before the inside of the lower settings is shown with power level 3- Gentle cooking of this is used. Changing the Power Level ge.com Variable Power Levels 1-10 The power level may be...

Use and Care Manual
Page 14
... 2 to 6 ears 3 to 10 min. If corn is in 2-qt. Place in husk, use no water; casserole, place 2 tablespoons water. 4 potatoes (6 to 8 oz each ) 5 to 7 min. 8 to 11 min. casserole with vented plastic wrap. each ) 1 (6 to 8 oz) 9 to 12 min. 3 to 4 min...cup water. Place in half and remove fibrous membranes. casserole, place washed spinach. Cut in 2-qt. oblong glass baking dish, place corn. Stir after half of time. Turn cut into 1 inch cubes. Peel and cut -side-up after half of the oven. Pierce with cooking fork. cut ) (fresh spears) (frozen, ...
... 2 to 6 ears 3 to 10 min. If corn is in 2-qt. Place in husk, use no water; casserole, place 2 tablespoons water. 4 potatoes (6 to 8 oz each ) 5 to 7 min. 8 to 11 min. casserole with vented plastic wrap. each ) 1 (6 to 8 oz) 9 to 12 min. 3 to 4 min...cup water. Place in half and remove fibrous membranes. casserole, place washed spinach. Cut in 2-qt. oblong glass baking dish, place corn. Stir after half of time. Turn cut into 1 inch cubes. Peel and cut -side-up after half of the oven. Pierce with cooking fork. cut ) (fresh spears) (frozen, ...

Use and Care Manual
Page 37
... water just after cooking. Do not use a commercial oven cleaner on oven walls. The turntable and support can be broken if dropped. Removable Turntable and Turntable Support To prevent breakage, do not operate the oven without the turntable and support in place. Do not clean in the dishwasher. others may require a damp cloth. Wash it carefully in warm, sudsy water or in a self-cleaning oven. 37 Shelf Clean with a solution...
... water just after cooking. Do not use a commercial oven cleaner on oven walls. The turntable and support can be broken if dropped. Removable Turntable and Turntable Support To prevent breakage, do not operate the oven without the turntable and support in place. Do not clean in the dishwasher. others may require a damp cloth. Wash it carefully in warm, sudsy water or in a self-cleaning oven. 37 Shelf Clean with a solution...
Use and Care Manual
Page 39
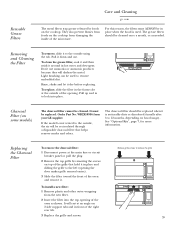
... Kits", page 7, for more information. It will darken the metal. Don't use ammonia or ammonia products because they will rest at the main fuse or circuit breaker panel or pull the plug. 2 Remove the top grille by foods on some models) The charcoal filter cannot be used . To replace, slide the filter in front of the right rear tab. 3 Replace the grille and screws. Order Part No. To install a new filter: 1 Remove...
... Kits", page 7, for more information. It will darken the metal. Don't use ammonia or ammonia products because they will rest at the main fuse or circuit breaker panel or pull the plug. 2 Remove the top grille by foods on some models) The charcoal filter cannot be used . To replace, slide the filter in front of the right rear tab. 3 Replace the grille and screws. Order Part No. To install a new filter: 1 Remove...

Use and Care Manual
Page 40
... circuit breaker panel or pull the plug. 2 Remove the top grille by taking out the screws on the left of the top opening the door makes grille removal easier). 3 Lift off the light cover at the right edge of the light cover and push on top of the cover to open. 3 Be sure the bulb(s) to be replaced are cool before removing. Connect electrical power to the oven. Care and Cleaning ge.com Cooktop Light/ Night Light Replace...
... circuit breaker panel or pull the plug. 2 Remove the top grille by taking out the screws on the left of the top opening the door makes grille removal easier). 3 Lift off the light cover at the right edge of the light cover and push on top of the cover to open. 3 Be sure the bulb(s) to be replaced are cool before removing. Connect electrical power to the oven. Care and Cleaning ge.com Cooktop Light/ Night Light Replace...

Use and Care Manual
Page 42
... also have serial and model numbers available when calling for any succeeding owner for products purchased for other than the intended purpose or used commercially. ■ Replacement of the cooktop light bulb. ■ Replacement of house fuses or resetting of incidental or consequential damages. Any implied warranties, including the implied warranties of God. ■ Incidental or consequential damage caused by our Factory Service Centers or...
... also have serial and model numbers available when calling for any succeeding owner for products purchased for other than the intended purpose or used commercially. ■ Replacement of the cooktop light bulb. ■ Replacement of house fuses or resetting of incidental or consequential damages. Any implied warranties, including the implied warranties of God. ■ Incidental or consequential damage caused by our Factory Service Centers or...
Installation Instructions
Page 2
... Attach Mounting Plate to Wall 12 Preparation of Top Cabinet 13 Checking for Proper Damper Operation 13 Mount the Microwave Oven 13 Adjust the Exhaust Adaptor 14 Connecting Ductwork 14 B Outside Back Exhaust 15-18 Preparing Rear Wall for Outside Back Exhaust 15 Remove Exhaust Adaptor 15 Attach Mounting Plate to Wall 16 Preparation of Top Cabinet 16 Adapting Microwave Blower for Outside Back Exhaust 16, 17 Mount the Microwave Oven 18 2 Installation Instructions CONTENTS General information Important Safety Instructions 3 Electrical Requirements 3 Hood Exhaust 4, 5 Damage...
... Attach Mounting Plate to Wall 12 Preparation of Top Cabinet 13 Checking for Proper Damper Operation 13 Mount the Microwave Oven 13 Adjust the Exhaust Adaptor 14 Connecting Ductwork 14 B Outside Back Exhaust 15-18 Preparing Rear Wall for Outside Back Exhaust 15 Remove Exhaust Adaptor 15 Attach Mounting Plate to Wall 16 Preparation of Top Cabinet 16 Adapting Microwave Blower for Outside Back Exhaust 16, 17 Mount the Microwave Oven 18 2 Installation Instructions CONTENTS General information Important Safety Instructions 3 Electrical Requirements 3 Hood Exhaust 4, 5 Damage...

Installation Instructions
Page 3
... personal safety, remove house fuse or open circuit breaker before use 3 PLEASE READ CAREFULLY. It must be connected to the added weight of the National Electrical Code or the prevailing local code for this appliance. IMPORTANT - This product must conform to BOTH a top cabinet AND a wall. Wire size must be mounted to the requirements of this product. Ensure proper ground exists before beginning installation to 50...
... personal safety, remove house fuse or open circuit breaker before use 3 PLEASE READ CAREFULLY. It must be connected to the added weight of the National Electrical Code or the prevailing local code for this appliance. IMPORTANT - This product must conform to BOTH a top cabinet AND a wall. Wire size must be mounted to the requirements of this product. Ensure proper ground exists before beginning installation to 50...
Installation Instructions
Page 7
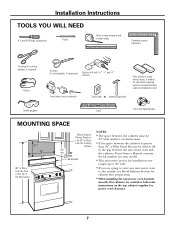
... for installation over ranges up to 36″ wide. • If you are going to vent your microwave oven to the outside, see Hood Exhaust Section for exhaust duct preparation. • When installing the microwave oven beneath smooth, flat cabinets, be 30″ or More from the Cooking Surface 30″ min. Your Owner's Manual contains the kit number for your model. • This microwave oven is greater than 30″, a Filler Panel Kit...
... for installation over ranges up to 36″ wide. • If you are going to vent your microwave oven to the outside, see Hood Exhaust Section for exhaust duct preparation. • When installing the microwave oven beneath smooth, flat cabinets, be 30″ or More from the Cooking Surface 30″ min. Your Owner's Manual contains the kit number for your model. • This microwave oven is greater than 30″, a Filler Panel Kit...
Installation Instructions
Page 11
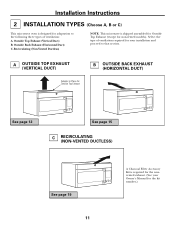
... for Outside Top Exhaust B OUTSIDE BACK EXHAUST (HORIZONTAL DUCT) See page 12 See page 15 C RECIRCULATING (NON-VENTED DUCTLESS) See page 19 11 A Charcoal Filter Accessory Kit is required for the nonvented exhaust. (See your installation and proceed to the following three types of ventilation required for your Owner's Manual for the kit number.) Outside Back Exhaust (Horizontal Duct) C. Select the type of ventilation: A. Installation Instructions 2 INSTALLATION TYPES (Choose A, B or C) This microwave oven...
... for Outside Top Exhaust B OUTSIDE BACK EXHAUST (HORIZONTAL DUCT) See page 12 See page 15 C RECIRCULATING (NON-VENTED DUCTLESS) See page 19 11 A Charcoal Filter Accessory Kit is required for the nonvented exhaust. (See your installation and proceed to the following three types of ventilation required for your Owner's Manual for the kit number.) Outside Back Exhaust (Horizontal Duct) C. Select the type of ventilation: A. Installation Instructions 2 INSTALLATION TYPES (Choose A, B or C) This microwave oven...

Installation Instructions
Page 14
... house duct. Installation Instructions A4. ADJUST THE EXHAUST ADAPTOR Open the top cabinet and adjust the exhaust adaptor to connect to the exhaust adaptor. 2 Seal exhaust duct joints using duct tape. 8 Install grease filters. Blower Plate Damper Back of Cabinet Recess Self-Aligning Screw Microwave Oven Top 4 Attach the microwave oven to -Side Adjustment, Slide the Exhaust Adaptor as Needed A6. Turn two full turns on each screw. See the Owner's Manual packed with the microwave. 14 MOUNT THE MICROWAVE OVEN (cont.) Cabinet Front Cabinet Bottom...
... house duct. Installation Instructions A4. ADJUST THE EXHAUST ADAPTOR Open the top cabinet and adjust the exhaust adaptor to connect to the exhaust adaptor. 2 Seal exhaust duct joints using duct tape. 8 Install grease filters. Blower Plate Damper Back of Cabinet Recess Self-Aligning Screw Microwave Oven Top 4 Attach the microwave oven to -Side Adjustment, Slide the Exhaust Adaptor as Needed A6. Turn two full turns on each screw. See the Owner's Manual packed with the microwave. 14 MOUNT THE MICROWAVE OVEN (cont.) Cabinet Front Cabinet Bottom...

Installation Instructions
Page 15
... the rear wall opening in the wall plate. • Cut the opening, following the instructions of Microwave • Read the instructions on the REAR WALL TEMPLATE. • Tape it . 15 Back of the REAR WALL TEMPLATE. 4 Slide exhaust adaptor to one side and remove it to microwave. PREPARING THE REAR WALL FOR OUTSIDE BACK EXHAUST You need the exhaust adaptor for holes A and B in the rear wall for top exhaust. Prepare Top Cabinet B5. REMOVE EXHAUST ADAPTOR This microwave oven is shipped assembled for outside exhaust...
... the rear wall opening in the wall plate. • Cut the opening, following the instructions of Microwave • Read the instructions on the REAR WALL TEMPLATE. • Tape it . 15 Back of the REAR WALL TEMPLATE. 4 Slide exhaust adaptor to one side and remove it to microwave. PREPARING THE REAR WALL FOR OUTSIDE BACK EXHAUST You need the exhaust adaptor for holes A and B in the rear wall for top exhaust. Prepare Top Cabinet B5. REMOVE EXHAUST ADAPTOR This microwave oven is shipped assembled for outside exhaust...
Installation Instructions
Page 22
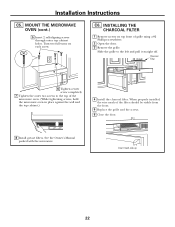
.... 2 Open the door. 3 Remove the grille. Insert mesh-side up 22 C6. See the Owner's Manual packed with the microwave. Turn two full turns on top front of the filter should be visible from the front. 5 Replace the grille and the screws. 6 Close the door. 8 Install grease filters. Slide the grille to the top of the microwave oven. (While tightening screws, hold the microwave oven in place against the wall and the top cabinet.) 4 Install the charcoal filter. Charcoal Filter...
.... 2 Open the door. 3 Remove the grille. Insert mesh-side up 22 C6. See the Owner's Manual packed with the microwave. Turn two full turns on top front of the filter should be visible from the front. 5 Replace the grille and the screws. 6 Close the door. 8 Install grease filters. Slide the grille to the top of the microwave oven. (While tightening screws, hold the microwave oven in place against the wall and the top cabinet.) 4 Install the charcoal filter. Charcoal Filter...


