User Guide
Page 2
...operation of its business and not inconsistent with FCC Rules and Regulations. If these devices ring when your telephone company or a qualified installer. A compliant telephone cord and modular plug is provided with this product. US Number is located on a party line. Equipment Approval... Information Your telephone equipment is approved for connection to the Public Switched Telephone Network and is in compliance with parts 15 and...
...operation of its business and not inconsistent with FCC Rules and Regulations. If these devices ring when your telephone company or a qualified installer. A compliant telephone cord and modular plug is provided with this product. US Number is located on a party line. Equipment Approval... Information Your telephone equipment is approved for connection to the Public Switched Telephone Network and is in compliance with parts 15 and...
User Guide
Page 4
... and Charge Cradle Layout 8 Base Layout 8 Installing the Phone 9 Installing the Handset Battery 9 Installing the Phone 10 Connecting the AC (Electrical) Power 10 Connecting the Telephone Line 10 Connecting the Corded Handset........... 10 Wall Mounting the Base 11 Answering System Set Up ...Base to Cordless Handset 21 Transferring Call from Cordless Handset to Another Cordless Handset/Base..... 22 Last Number Redial 22 Base Speakerphone 22 Corded Handset 23 Cordless Handset 23 Hold 23 Paging the Cordless Handset 23 Mute 24 Volume 24 Speakerphone 24 Corded Handset 24 Cordless...
... and Charge Cradle Layout 8 Base Layout 8 Installing the Phone 9 Installing the Handset Battery 9 Installing the Phone 10 Connecting the AC (Electrical) Power 10 Connecting the Telephone Line 10 Connecting the Corded Handset........... 10 Wall Mounting the Base 11 Answering System Set Up ...Base to Cordless Handset 21 Transferring Call from Cordless Handset to Another Cordless Handset/Base..... 22 Last Number Redial 22 Base Speakerphone 22 Corded Handset 23 Cordless Handset 23 Hold 23 Paging the Cordless Handset 23 Mute 24 Volume 24 Speakerphone 24 Corded Handset 24 Cordless...

User Guide
Page 6
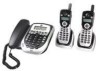
Base Base Coiled Desktop/Wall AC power 2 Handset Handset handset cord Mounting pedestal adaptor batteries 2 Cordless handset charge cradles 2 cordless handsets 2 Battery 2 Belt clips compartment doors Telephone line cord Telephone Jack Requirements Wall plate To use this phone, you don't have a modular jack, call your local phone telephone company to find out how to the IMPORTANT SAFETY INSTRUCTIONS provided with this product...
Base Base Coiled Desktop/Wall AC power 2 Handset Handset handset cord Mounting pedestal adaptor batteries 2 Cordless handset charge cradles 2 cordless handsets 2 Battery 2 Belt clips compartment doors Telephone line cord Telephone Jack Requirements Wall plate To use this phone, you don't have a modular jack, call your local phone telephone company to find out how to the IMPORTANT SAFETY INSTRUCTIONS provided with this product...
User Guide
Page 10
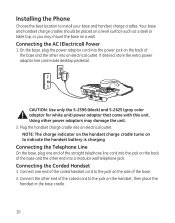
... turns on to indicate the handset battery is charging Connecting the Telephone Line On the base, plug one end of the coiled handset cord to the jack on the side of the base and the other into an electrical outlet. Your base and handset charge cradles should be placed on a level surface... top, or you may damage the unit. 2. Installing the Phone Choose the best location to the jack on the handset, then place the handset in the base cradle. 10 Connecting the Corded Handset 1. Connect one end of the straight telephone line cord into the jack on a wall. Connect the other end of...
... turns on to indicate the handset battery is charging Connecting the Telephone Line On the base, plug one end of the coiled handset cord to the jack on the side of the base and the other into an electrical outlet. Your base and handset charge cradles should be placed on a level surface... top, or you may damage the unit. 2. Installing the Phone Choose the best location to the jack on the handset, then place the handset in the base cradle. 10 Connecting the Corded Handset 1. Connect one end of the straight telephone line cord into the jack on a wall. Connect the other end of...
User Guide
Page 11
...the pedestal a half turn, and align it back in the slot. Plug the telephone line cord into the jack marked PHONE LINE on the back of the base. 3. The default status is packaged with the bottom of the base and the other end into place. (Wall plate not included.) 7. Remove the ...the answering system on and off . Turn the base over the wall plate posts and firmly slide the unit into a modular phone jack. 5. Place the corded handset in desktop mode. NOTE: If desired, gather the extra telephone line and power adaptor cord together and store inside the wall mounting pedestal. ...
...the pedestal a half turn, and align it back in the slot. Plug the telephone line cord into the jack marked PHONE LINE on the back of the base. 3. The default status is packaged with the bottom of the base and the other end into place. (Wall plate not included.) 7. Remove the ...the answering system on and off . Turn the base over the wall plate posts and firmly slide the unit into a modular phone jack. 5. Place the corded handset in desktop mode. NOTE: If desired, gather the extra telephone line and power adaptor cord together and store inside the wall mounting pedestal. ...
User Guide
Page 21
...the cordless handset (or lift the corded handset, or press the speaker/call back button on the base), the built-in call timer shows in the ON position for more information. Ringer Volume Control Handset Use the two-position switch on the cordless handset to Telephone Set Up for the cordless handset...time of the call. NOTE: To cancel the call ) automatically hangs up the phone. Auto Standby Placing the cordless handset in the charge cradle while the handset is set through your local phone company. Base Unit The base ringer volume is off the hook (or during a call transfer, you may ...
...the cordless handset (or lift the corded handset, or press the speaker/call back button on the base), the built-in call timer shows in the ON position for more information. Ringer Volume Control Handset Use the two-position switch on the cordless handset to Telephone Set Up for the cordless handset...time of the call. NOTE: To cancel the call ) automatically hangs up the phone. Auto Standby Placing the cordless handset in the charge cradle while the handset is set through your local phone company. Base Unit The base ringer volume is off the hook (or during a call transfer, you may ...
User Guide
Page 26
... talk/end/call back. (The intercom connection is discontinued.) Base - NOTE: There is no conference and intercom features between the base and cordless handset without tying up the telephone line and since the telephone line is not used, you receive a telephone call back button or trans button. 2. Press the page/...call , press page/intercom on base or transfer button on hold when the INTERCOM button is pressed. NOTE: To cancel the intercom call is placed with the corded handset, the line is OFF (not in TALK mode). 2. Answering an Intercom Call Cordless Handset1. Press the speaker/call ...
... talk/end/call back. (The intercom connection is discontinued.) Base - NOTE: There is no conference and intercom features between the base and cordless handset without tying up the telephone line and since the telephone line is not used, you receive a telephone call back button or trans button. 2. Press the page/...call , press page/intercom on base or transfer button on hold when the INTERCOM button is pressed. NOTE: To cancel the intercom call is placed with the corded handset, the line is OFF (not in TALK mode). 2. Answering an Intercom Call Cordless Handset1. Press the speaker/call ...
User Guide
Page 30
.... Press the desired memory location (0-9). Dialing a Stored Number Handset: Make sure the phone is OFF (not in TALK mode). 2. The stored telephone number dials automatically. Press the speaker/call back button. Chain Dialing from Memory Use...Base: Press the speaker/call back button on the cordless handset. 1. Press the desired memory location button (0-9), or use the caller id (- Make sure the phone is ON by pressing the talk/end/call back button, or lift the corded handset. 1. The number dials automatically. -Or1. or +) button to scroll to the desired telephone...
.... Press the desired memory location (0-9). Dialing a Stored Number Handset: Make sure the phone is OFF (not in TALK mode). 2. The stored telephone number dials automatically. Press the speaker/call back button. Chain Dialing from Memory Use...Base: Press the speaker/call back button on the cordless handset. 1. Press the desired memory location button (0-9), or use the caller id (- Make sure the phone is ON by pressing the talk/end/call back button, or lift the corded handset. 1. The number dials automatically. -Or1. or +) button to scroll to the desired telephone...

User Guide
Page 31
...unit receives and displays CID information transmitted by your call back button, or lift the corded handset. 1. This information can include the phone number, date and time; or the name, phone number, and date and time. Base: Press the speaker/call might not go through. Time Date New/Repeat Caller ID... calling while you are on the phone, you must subscribe to Call Waiting Caller ID Service. TIP: Wait for the access tones before pressing the memory button or your local telephone company. At the next access tone, press mem/conf and then press 9. Press memory and then press 7. ...
...unit receives and displays CID information transmitted by your call back button, or lift the corded handset. 1. This information can include the phone number, date and time; or the name, phone number, and date and time. Base: Press the speaker/call might not go through. Time Date New/Repeat Caller ID... calling while you are on the phone, you must subscribe to Call Waiting Caller ID Service. TIP: Wait for the access tones before pressing the memory button or your local telephone company. At the next access tone, press mem/conf and then press 9. Press memory and then press 7. ...
User Guide
Page 41
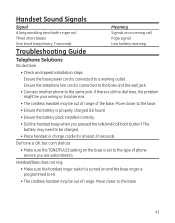
...; Ensure the battery is programmed to HI. • The cordless handset may be out of phone service you pressed the talk/end/call Page signal Low battery warning Troubleshooting Guide Telephone Solutions No dial tone • Check and repeat installation steps: Ensure the base power cord is still no dial tone, the problem might be...
...; Ensure the battery is programmed to HI. • The cordless handset may be out of phone service you pressed the talk/end/call Page signal Low battery warning Troubleshooting Guide Telephone Solutions No dial tone • Check and repeat installation steps: Ensure the base power cord is still no dial tone, the problem might be...
User Guide
Page 45
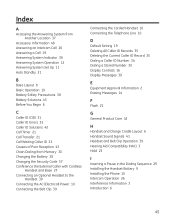
...Call 19 Answering System Indicator 36 Answering System Operation 12 Answering System Set Up 11 Auto Standby 21 B Base Layout 8 Basic Operation 19 Battery Safety Precautions 38 Battery Solutions 43 Before You Begin 6 C Caller ... Caller with Cordless Handset and Base 27 Connecting an Optional Headset to the Handset 39 Connecting the AC (Electrical) Power 10 Connecting the Belt Clip 39 Connecting the Corded Handset 10 Connecting the Telephone Line 10 ... the Dialing Sequence 29 Installing the Handset Battery 9 Installing the Phone 10 Intercom Operation 26 Interference Information 3 Introduction 6 45
...Call 19 Answering System Indicator 36 Answering System Operation 12 Answering System Set Up 11 Auto Standby 21 B Base Layout 8 Basic Operation 19 Battery Safety Precautions 38 Battery Solutions 43 Before You Begin 6 C Caller ... Caller with Cordless Handset and Base 27 Connecting an Optional Headset to the Handset 39 Connecting the AC (Electrical) Power 10 Connecting the Belt Clip 39 Connecting the Corded Handset 10 Connecting the Telephone Line 10 ... the Dialing Sequence 29 Installing the Handset Battery 9 Installing the Phone 10 Intercom Operation 26 Interference Information 3 Introduction 6 45


