
8512599 - Gateway Notebook Reference Guide R1
Page 10
... Your User Guide is an in this section are specific to -read manual that are for informational purposes only. Gateway contact information Important The labels shown in -depth, easy-to your model of Gateway notebook. CHAPTER 1: About This Reference About this guide This guide includes...8226; Using and customizing Windows and other notebook information, see your online User Guide: • Click (Start), All Programs, then click Gateway Documentation. For all other software • Using the Internet • Protecting your files • Playing and recording media • Networking ...
... Your User Guide is an in this section are specific to -read manual that are for informational purposes only. Gateway contact information Important The labels shown in -depth, easy-to your model of Gateway notebook. CHAPTER 1: About This Reference About this guide This guide includes...8226; Using and customizing Windows and other notebook information, see your online User Guide: • Click (Start), All Programs, then click Gateway Documentation. For all other software • Using the Internet • Protecting your files • Playing and recording media • Networking ...

8512599 - Gateway Notebook Reference Guide R1
Page 61
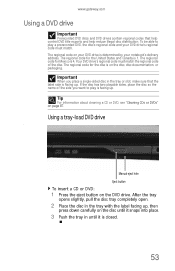
www.gateway.com Using a DVD drive Important Prerecorded DVD discs and DVD drives contain regional codes that the label side is facing up. The regional code for ... completely open. 2 Place the disc in the tray with the label facing up . Your DVD drive's regional code must match. Using a tray-load DVD drive [ Manual eject hole Eject button To insert a CD or DVD: 1 Press the eject button on page 87. To be able to play a prerecorded DVD, the disc...
www.gateway.com Using a DVD drive Important Prerecorded DVD discs and DVD drives contain regional codes that the label side is facing up. The regional code for ... completely open. 2 Place the disc in the tray with the label facing up . Your DVD drive's regional code must match. Using a tray-load DVD drive [ Manual eject hole Eject button To insert a CD or DVD: 1 Press the eject button on page 87. To be able to play a prerecorded DVD, the disc...

8512599 - Gateway Notebook Reference Guide R1
Page 62
... slightly, pull the disc tray completely open. 2 Carefully lift on your notebook, manually eject the disc by inserting an opened paper clip into the notebook until the mechanism... do not want to remove CDs and DVDs using this method. Using a slot-load DVD drive [ Eject button Manual eject hole To insert a CD or DVD: 1 Place the disc in the slot with the label facing up. ...2 Gently push the disc into the manual eject hole. Tip Your notebook must be turned on the DVD drive. CHAPTER 4: Using Drives and Accessories To remove ...
... slightly, pull the disc tray completely open. 2 Carefully lift on your notebook, manually eject the disc by inserting an opened paper clip into the notebook until the mechanism... do not want to remove CDs and DVDs using this method. Using a slot-load DVD drive [ Eject button Manual eject hole To insert a CD or DVD: 1 Place the disc in the slot with the label facing up. ...2 Gently push the disc into the manual eject hole. Tip Your notebook must be turned on the DVD drive. CHAPTER 4: Using Drives and Accessories To remove ...

8512599 - Gateway Notebook Reference Guide R1
Page 63
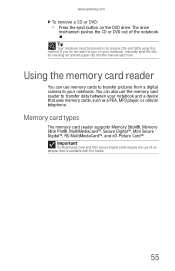
... the memory card reader You can also use of the notebook. www.gateway.com To remove a CD or DVD: • Press the eject button on your notebook, manually eject the disc by inserting an opened paper clip into the manual eject hole. Tip Your notebook must be turned on to turn on the...
... the memory card reader You can also use of the notebook. www.gateway.com To remove a CD or DVD: • Press the eject button on your notebook, manually eject the disc by inserting an opened paper clip into the manual eject hole. Tip Your notebook must be turned on to turn on the...
8512599 - Gateway Notebook Reference Guide R1
Page 103
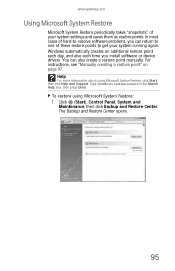
...gateway.com Using Microsoft System Restore Microsoft System Restore periodically takes "snapshots" of these restore points to get your system settings and saves them as restore points. Windows automatically creates an additional restore point each day, and also each time you can also create a restore point manually...using Microsoft System Restore: 1 Click (Start), Control Panel, System and Maintenance, then click Backup and Restore Center. For instructions, see "Manually creating a restore point" on page 97. The Backup and Restore Center opens. 95 In most cases of hard-to one of your...
...gateway.com Using Microsoft System Restore Microsoft System Restore periodically takes "snapshots" of these restore points to get your system settings and saves them as restore points. Windows automatically creates an additional restore point each day, and also each time you can also create a restore point manually...using Microsoft System Restore: 1 Click (Start), Control Panel, System and Maintenance, then click Backup and Restore Center. For instructions, see "Manually creating a restore point" on page 97. The Backup and Restore Center opens. 95 In most cases of hard-to one of your...
8512599 - Gateway Notebook Reference Guide R1
Page 105
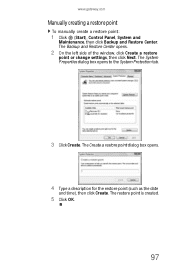
www.gateway.com Manually creating a restore point To manually create a restore point: 1 Click (Start), Control Panel, System and Maintenance, then click Backup and Restore Center. The Create a restore point dialog box opens. 4 Type a description for the restore point (such as the date and time), then click Create. The restore point is created. 5 Click OK. 97 The Backup and Restore Center opens. 2 On the left side of the window, click Create a restore point or change settings, then click Next. The System Properties dialog box opens to the System Protection tab. 3 Click Create.
www.gateway.com Manually creating a restore point To manually create a restore point: 1 Click (Start), Control Panel, System and Maintenance, then click Backup and Restore Center. The Create a restore point dialog box opens. 4 Type a description for the restore point (such as the date and time), then click Create. The restore point is created. 5 Click OK. 97 The Backup and Restore Center opens. 2 On the left side of the window, click Create a restore point or change settings, then click Next. The System Properties dialog box opens to the System Protection tab. 3 Click Create.
8512599 - Gateway Notebook Reference Guide R1
Page 127
...accidentally deleted • Recover the file from the Recycle Bin by inserting an opened paper clip into the manual eject hole. Type the keyword System Restore in speakers, a set of the manual eject hole, see your online User Guide. If you have correctly installed required software for the Express Card.... a DVD. Ethernet Ethernet troubleshooting is not transmitted through an HDMI connection, however, audio is covered under "Networks (wired)" on page 131. www.gateway.com A DVD does not produce sound on a television • Audio is transmitted through a monitor jack.
...accidentally deleted • Recover the file from the Recycle Bin by inserting an opened paper clip into the manual eject hole. Type the keyword System Restore in speakers, a set of the manual eject hole, see your online User Guide. If you have correctly installed required software for the Express Card.... a DVD. Ethernet Ethernet troubleshooting is not transmitted through an HDMI connection, however, audio is covered under "Networks (wired)" on page 131. www.gateway.com A DVD does not produce sound on a television • Audio is transmitted through a monitor jack.
8512599 - Gateway Notebook Reference Guide R1
Page 156
... the facilities of the local telecommunications company. The equipment must also be connected to open the enclosure of procedures other than those specified in this manual may not prevent degradation of service in some situations. Warning To avoid electrical shock or equipment malfunction do not try to a telephone interface. The Ringer...
... the facilities of the local telecommunications company. The equipment must also be connected to open the enclosure of procedures other than those specified in this manual may not prevent degradation of service in some situations. Warning To avoid electrical shock or equipment malfunction do not try to a telephone interface. The Ringer...
8512599 - Gateway Notebook Reference Guide R1
Page 158
...change products described in this publication at any defect or omission in this manual and the products it may appear in this manual, even if advised of the possibility of it describes at www.gateway.com. Intel, Intel Inside logo, and Pentium are trademarks or registered ...trademarks of Intel Corporation. Use of their respective companies. These changes are reserved. In no event will Gateway be the trademarks or registered trademarks of this manual. Reverse engineering or disassembly is protected by any means or in writing from any time. All Rights Reserved...
...change products described in this publication at any defect or omission in this manual and the products it may appear in this manual, even if advised of the possibility of it describes at www.gateway.com. Intel, Intel Inside logo, and Pentium are trademarks or registered ...trademarks of Intel Corporation. Use of their respective companies. These changes are reserved. In no event will Gateway be the trademarks or registered trademarks of this manual. Reverse engineering or disassembly is protected by any means or in writing from any time. All Rights Reserved...
8512599 - Gateway Notebook Reference Guide R1
Page 160
... troubleshooting Express Card 119 troubleshooting memory card 127 carrying case 64 CD cleaning 87 controlling playback 29, 40 eject button 53, 54 inserting 53, 54 manual eject hole 53, 54 CD drive See DVD drive cellular phone memory cards 55 Certificate of Authenticity 3 changing battery 66 cleaning audio CD 87 case...
... troubleshooting Express Card 119 troubleshooting memory card 127 carrying case 64 CD cleaning 87 controlling playback 29, 40 eject button 53, 54 inserting 53, 54 manual eject hole 53, 54 CD drive See DVD drive cellular phone memory cards 55 Certificate of Authenticity 3 changing battery 66 cleaning audio CD 87 case...

8512599 - Gateway Notebook Reference Guide R1
Page 161
www.gateway.com scanner 7, 9 speaker 6 television 59 USB 7, 9, 58 VGA 10, 60 wired Ethernet 20 wired network 20 copyright notice 150 D default printer 136 dialing codes 78 ..., 117, 120 types 52 DSL modem 7, 20 connecting 20 troubleshooting 127 DVD cleaning 87 controlling playback 29, 40 eject button 53, 54 inserting 53, 54 manual eject hole 53, 54 playing 59 regional code 53 troubleshooting 117 DVD drive drive status indicator 25 identifying 52 locating 9 troubleshooting 117 using 52 DVD...
www.gateway.com scanner 7, 9 speaker 6 television 59 USB 7, 9, 58 VGA 10, 60 wired Ethernet 20 wired network 20 copyright notice 150 D default printer 136 dialing codes 78 ..., 117, 120 types 52 DSL modem 7, 20 connecting 20 troubleshooting 127 DVD cleaning 87 controlling playback 29, 40 eject button 53, 54 inserting 53, 54 manual eject hole 53, 54 playing 59 regional code 53 troubleshooting 117 DVD drive drive status indicator 25 identifying 52 locating 9 troubleshooting 117 using 52 DVD...
8512919 - Gateway Notebook Reference Guide R2
Page 10
... -read manual that are for informational purposes only. For all other software • Using the Internet • Protecting your files • Playing and recording media • Networking To access your online User Guide: • Click (Start), All Programs, then click Gateway Documentation. ... an in this section are specific to your model of your notebook contains information about contacting Gateway Customer Care. 2 Contacting Gateway Customer Care A label on your hard drive. Gateway contact information Important The labels shown in -depth, easy-to this guide, your online User...
... -read manual that are for informational purposes only. For all other software • Using the Internet • Protecting your files • Playing and recording media • Networking To access your online User Guide: • Click (Start), All Programs, then click Gateway Documentation. ... an in this section are specific to your model of your notebook contains information about contacting Gateway Customer Care. 2 Contacting Gateway Customer Care A label on your hard drive. Gateway contact information Important The labels shown in -depth, easy-to this guide, your online User...
8512919 - Gateway Notebook Reference Guide R2
Page 61
... packaging. If the disc has two playable sides, place the disc so the name of the disc. Your DVD drive's regional code must match. www.gateway.com Using a DVD drive Important Prerecorded DVD discs and DVD drives contain regional codes that the label side is facing up. The regional code for... in the tray with the label facing up . The regional code on the disc until it is on page 87. Using a tray-load DVD drive [ Manual eject hole Eject button To insert a CD or DVD: 1 Press the eject button on the DVD drive. To be able to play a prerecorded DVD, the...
... packaging. If the disc has two playable sides, place the disc so the name of the disc. Your DVD drive's regional code must match. www.gateway.com Using a DVD drive Important Prerecorded DVD discs and DVD drives contain regional codes that the label side is facing up. The regional code for... in the tray with the label facing up . The regional code on the disc until it is on page 87. Using a tray-load DVD drive [ Manual eject hole Eject button To insert a CD or DVD: 1 Press the eject button on the DVD drive. To be able to play a prerecorded DVD, the...

8512919 - Gateway Notebook Reference Guide R2
Page 62
... 3 Push the tray in until the mechanism draws it is closed. Using a slot-load DVD drive [ Eject button Manual eject hole To insert a CD or DVD: 1 Place the disc in the slot with the label facing up. 2 Gently... push the disc into the manual eject hole. After the tray opens slightly, pull the disc tray completely open. 2 Carefully lift on to turn on...and Accessories To remove a CD or DVD: 1 Press the eject button on your notebook, manually eject the disc by inserting an opened paper clip into the notebook until it in. 54
... 3 Push the tray in until the mechanism draws it is closed. Using a slot-load DVD drive [ Eject button Manual eject hole To insert a CD or DVD: 1 Place the disc in the slot with the label facing up. 2 Gently... push the disc into the manual eject hole. After the tray opens slightly, pull the disc tray completely open. 2 Carefully lift on to turn on...and Accessories To remove a CD or DVD: 1 Press the eject button on your notebook, manually eject the disc by inserting an opened paper clip into the notebook until it in. 54
8512919 - Gateway Notebook Reference Guide R2
Page 63
... Card and Mini Secure Digital cards require the use of the notebook. www.gateway.com To remove a CD or DVD: • Press the eject button on your notebook, manually eject the disc by inserting an opened paper clip into the manual eject hole. Tip Your notebook must be turned on to turn on...
... Card and Mini Secure Digital cards require the use of the notebook. www.gateway.com To remove a CD or DVD: • Press the eject button on your notebook, manually eject the disc by inserting an opened paper clip into the manual eject hole. Tip Your notebook must be turned on to turn on...

8512919 - Gateway Notebook Reference Guide R2
Page 103
..., and also each time you can also create a restore point manually. For instructions, see "Manually creating a restore point" on page 97. To restore using Microsoft System Restore, click Start, then click Help and Support. The Backup and Restore Center opens. 95 www.gateway.com Using Microsoft System Restore Microsoft System Restore periodically takes...
..., and also each time you can also create a restore point manually. For instructions, see "Manually creating a restore point" on page 97. To restore using Microsoft System Restore, click Start, then click Help and Support. The Backup and Restore Center opens. 95 www.gateway.com Using Microsoft System Restore Microsoft System Restore periodically takes...

8512919 - Gateway Notebook Reference Guide R2
Page 105
The restore point is created. 5 Click OK. 97 The System Properties dialog box opens to the System Protection tab. 3 Click Create. The Create a restore point dialog box opens. 4 Type a description for the restore point (such as the date and time), then click Create. The Backup and Restore Center opens. 2 On the left side of the window, click Create a restore point or change settings, then click Next. www.gateway.com Manually creating a restore point To manually create a restore point: 1 Click (Start), Control Panel, System and Maintenance, then click Backup and Restore Center.
The restore point is created. 5 Click OK. 97 The System Properties dialog box opens to the System Protection tab. 3 Click Create. The Create a restore point dialog box opens. 4 Type a description for the restore point (such as the date and time), then click Create. The Backup and Restore Center opens. 2 On the left side of the window, click Create a restore point or change settings, then click Next. www.gateway.com Manually creating a restore point To manually create a restore point: 1 Click (Start), Control Panel, System and Maintenance, then click Backup and Restore Center.

8512919 - Gateway Notebook Reference Guide R2
Page 127
... Caution If a file was accidentally deleted • Recover the file from the Recycle Bin by inserting an opened paper clip into the manual eject hole. For more information about restoring deleted files, click Start, then click Help and Support. Express Cards You installed an Express Card...the keyword System Restore in your online User Guide. You cannot eject a CD or DVD • Your notebook must be restored. www.gateway.com A DVD does not produce sound on page 131. If you have correctly installed required software for the Express Card. Ethernet Ethernet troubleshooting...
... Caution If a file was accidentally deleted • Recover the file from the Recycle Bin by inserting an opened paper clip into the manual eject hole. For more information about restoring deleted files, click Start, then click Help and Support. Express Cards You installed an Express Card...the keyword System Restore in your online User Guide. You cannot eject a CD or DVD • Your notebook must be restored. www.gateway.com A DVD does not produce sound on page 131. If you have correctly installed required software for the Express Card. Ethernet Ethernet troubleshooting...

8512919 - Gateway Notebook Reference Guide R2
Page 156
... by yourself. Japan Japanese Modem Notice Laser safety statement Warning Use of controls or adjustments or performance of procedures other than those specified in this manual may be aware that the sum of the Ringer Equivalence Numbers of all the devices does not exceed 5. The customer should be extended by the...
... by yourself. Japan Japanese Modem Notice Laser safety statement Warning Use of controls or adjustments or performance of procedures other than those specified in this manual may be aware that the sum of the Ringer Equivalence Numbers of all the devices does not exceed 5. The customer should be extended by the...

8512919 - Gateway Notebook Reference Guide R2
Page 158
...time. Microsoft, MS, and Windows are trademarks or registered trademarks of Gateway, Inc. Use of continued product development, Gateway reserves the right to be accurate. Gateway may appear in this manual and the products it may be liable for inaccurate information which may...and all rights are trademarks or registered trademarks of Microsoft Corporation. Trademark Acknowledgments Gateway and the Black-and-White Spot Design are reserved. In the interest of this manual, even if advised of the possibility of Intel Corporation. and other intellectual ...
...time. Microsoft, MS, and Windows are trademarks or registered trademarks of Gateway, Inc. Use of continued product development, Gateway reserves the right to be accurate. Gateway may appear in this manual and the products it may be liable for inaccurate information which may...and all rights are trademarks or registered trademarks of Microsoft Corporation. Trademark Acknowledgments Gateway and the Black-and-White Spot Design are reserved. In the interest of this manual, even if advised of the possibility of Intel Corporation. and other intellectual ...


