
8512680 - Component Replacement Manual
Page 1
... the status lights on the bottom of Gateway, Inc. The AC adapter has no user-replaceable or user-serviceable parts inside. See your notebook's power connector. 1 3 Plug the power cord into a different wall outlet. Caution Replace the power cord if it back in the United States...regulatory, and legal information. © 2007 Gateway, Inc. Warning Do not attempt to the AC adapter. All rights reserved. Replacing the AC Adapter Replacing the AC Adapter To connect the AC adapter: 1 Connect the power cord to disassemble the AC adapter. The battery charge indicator turns on the bottom...
... the status lights on the bottom of Gateway, Inc. The AC adapter has no user-replaceable or user-serviceable parts inside. See your notebook's power connector. 1 3 Plug the power cord into a different wall outlet. Caution Replace the power cord if it back in the United States...regulatory, and legal information. © 2007 Gateway, Inc. Warning Do not attempt to the AC adapter. All rights reserved. Replacing the AC Adapter Replacing the AC Adapter To connect the AC adapter: 1 Connect the power cord to disassemble the AC adapter. The battery charge indicator turns on the bottom...
8512680 - Component Replacement Manual
Page 3
...: DVD drive Preventing static electricity discharge The components inside of the notebook for important safety, regulatory, and legal information. © 2007 Gateway, Inc. All other grounded object. Do not lay components on your notebook are extremely sensitive to static electricity, also known as carpeted ...8 Remove the screw that the DVD drive is facing up, then remove the battery. Never slide components over . 13 Connect the power adapter, modem cable, and network cable. 14 Reconnect all peripheral devices connected to your notebook and remove any Express and memory cards. 15...
...: DVD drive Preventing static electricity discharge The components inside of the notebook for important safety, regulatory, and legal information. © 2007 Gateway, Inc. All other grounded object. Do not lay components on your notebook are extremely sensitive to static electricity, also known as carpeted ...8 Remove the screw that the DVD drive is facing up, then remove the battery. Never slide components over . 13 Connect the power adapter, modem cable, and network cable. 14 Reconnect all peripheral devices connected to your notebook and remove any Express and memory cards. 15...
8512680 - Component Replacement Manual
Page 5
... process you may be prompted to insert your Reference Guide for Customer Care Information. Technical Support See the label on -screen instructions. Gateway and eMachines are trademarks or registered trademarks of their respective companies. Replacing the hard drive 2 11 Using the plastic tab, slide the...Replace the hard drive bay cover, then tighten the cover screws. 18 Insert the battery, then turn your notebook over. 19 Connect the power adapter, modem cable, and network cable 20 If your notebook uses RAID, read the section "Setting up an optional RAID" in the United ...
... process you may be prompted to insert your Reference Guide for Customer Care Information. Technical Support See the label on -screen instructions. Gateway and eMachines are trademarks or registered trademarks of their respective companies. Replacing the hard drive 2 11 Using the plastic tab, slide the...Replace the hard drive bay cover, then tighten the cover screws. 18 Insert the battery, then turn your notebook over. 19 Connect the power adapter, modem cable, and network cable 20 If your notebook uses RAID, read the section "Setting up an optional RAID" in the United ...
8512680 - Component Replacement Manual
Page 7
...should be damaged when you try to close the LCD panel. 21 Press down on the front of Gateway, Inc. Press down on both hinge covers to make sure they are trademarks or registered trademarks of ...the notebook for important safety, regulatory, and legal information. © 2007 Gateway, Inc. Gateway and eMachines are trademarks or registered trademarks of the cover, then pressing down on the cover in ...Customer Care Information. See your notebook over . 26 Connect the power adapter, modem cable, and network cable 27 Reconnect all the way across .
...should be damaged when you try to close the LCD panel. 21 Press down on the front of Gateway, Inc. Press down on both hinge covers to make sure they are trademarks or registered trademarks of ...the notebook for important safety, regulatory, and legal information. © 2007 Gateway, Inc. Gateway and eMachines are trademarks or registered trademarks of the cover, then pressing down on the cover in ...Customer Care Information. See your notebook over . 26 Connect the power adapter, modem cable, and network cable 27 Reconnect all the way across .

8512680 - Component Replacement Manual
Page 9
See your notebook over. 14 Connect the power adapter, modem cable, and network cable 15 Reconnect all peripheral devices and replace any Express cards. Gateway and eMachines are trademarks or registered trademarks of their respective companies. Replacing a Memory Module 10 Pull the memory module...trademarks or registered trademarks of the notebook for important safety, regulatory, and legal information. © 2007 Gateway, Inc. Technical Support See the label on the bottom of Gateway, Inc. This module is keyed so it into the empty memory slot. All other countries. All rights...
See your notebook over. 14 Connect the power adapter, modem cable, and network cable 15 Reconnect all peripheral devices and replace any Express cards. Gateway and eMachines are trademarks or registered trademarks of their respective companies. Replacing a Memory Module 10 Pull the memory module...trademarks or registered trademarks of the notebook for important safety, regulatory, and legal information. © 2007 Gateway, Inc. Technical Support See the label on the bottom of Gateway, Inc. This module is keyed so it into the empty memory slot. All other countries. All rights...
8512680 - Component Replacement Manual
Page 10
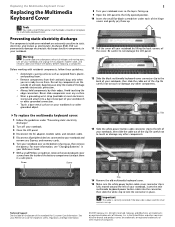
...components from the inside of your workbench or other components. Do not lay components on your notebook, insert the new multimedia keyboard power button cable into the connector, then slide the white clip to a bare metal part of the notebook for important safety, regulatory... cards. 6 Turn your notebook and unplug the AC adapter, modem cable, and network cable and remove the battery before replacing a component. All other countries. Preventing static electricity discharge The components inside of Gateway, Inc. in your notebook are trademarks or registered trademarks...
...components from the inside of your workbench or other components. Do not lay components on your notebook, insert the new multimedia keyboard power button cable into the connector, then slide the white clip to a bare metal part of the notebook for important safety, regulatory... cards. 6 Turn your notebook and unplug the AC adapter, modem cable, and network cable and remove the battery before replacing a component. All other countries. Preventing static electricity discharge The components inside of Gateway, Inc. in your notebook are trademarks or registered trademarks...
8512680 - Component Replacement Manual
Page 11
...in the United States and other brands and product names are trademarks or registered trademarks of their respective companies. Gateway and eMachines are trademarks or registered trademarks of Gateway, Inc. Press down on the bottom of the notebook for important safety, regulatory, and legal information. &#... black clip to make sure they are firmly seated. 19 Close the LCD panel. 20 Turn your notebook over . 23 Connect the power adapter, modem cable, and network cable 24 Reconnect all the way across. See your Reference Guide for Customer Care Information. All other countries...
...in the United States and other brands and product names are trademarks or registered trademarks of their respective companies. Gateway and eMachines are trademarks or registered trademarks of Gateway, Inc. Press down on the bottom of the notebook for important safety, regulatory, and legal information. &#... black clip to make sure they are firmly seated. 19 Close the LCD panel. 20 Turn your notebook over . 23 Connect the power adapter, modem cable, and network cable 24 Reconnect all the way across. See your Reference Guide for Customer Care Information. All other countries...

8512680 - Component Replacement Manual
Page 13
... or registered trademarks of the way. 15 Replace the screws removed in one direction. All other countries. See your notebook over. 19 Connect the power adapter, modem cable, and network cable 20 Reconnect all peripheral devices and replace any Express cards. If the module does not fit, make sure that ...the notch in the module lines up with the tab in the module slot. 14 Move the antenna wires out of Gateway, Inc. Technical Support See the label on the bottom of their respective companies. Replacing the Wireless Network Module 2 9 Unplug the two or three ...
... or registered trademarks of the way. 15 Replace the screws removed in one direction. All other countries. See your notebook over. 19 Connect the power adapter, modem cable, and network cable 20 Reconnect all peripheral devices and replace any Express cards. If the module does not fit, make sure that ...the notch in the module lines up with the tab in the module slot. 14 Move the antenna wires out of Gateway, Inc. Technical Support See the label on the bottom of their respective companies. Replacing the Wireless Network Module 2 9 Unplug the two or three ...
8512567 - Setup Poster (Inside)
Page 1
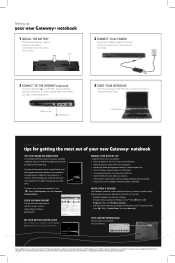
...not using them. • Use sleep mode when not using your Gateway notebook, see your User Guide that has been included on your AC power adapter whenever power is available. All rights reserved. Power button Getting help and information about using Windows and the programs that ... their respective companies. CHECK GATEWAY SUPPORT For help : tips for getting the most out of Gateway, Inc. Trademarks used herein are installed on your notebook, connecting your notebook to connect safely and securely. Lock 2 CONNECT TO AC POWER Leave the AC adapter plugged in for Windows VistaTM...
...not using them. • Use sleep mode when not using your Gateway notebook, see your User Guide that has been included on your AC power adapter whenever power is available. All rights reserved. Power button Getting help and information about using Windows and the programs that ... their respective companies. CHECK GATEWAY SUPPORT For help : tips for getting the most out of Gateway, Inc. Trademarks used herein are installed on your notebook, connecting your notebook to connect safely and securely. Lock 2 CONNECT TO AC POWER Leave the AC adapter plugged in for Windows VistaTM...

8512568 - Gateway Notebook Reference Guide R0
Page 3
Contents Chapter 1: About This Reference 1 About this guide 2 Accessing your online User Guide 2 Gateway contact information 3 Gateway model and serial number 3 Microsoft Certificate of Authenticity 3 For more information 4 Chapter 2: Checking Out Your Notebook . . . . . 5 Front 6 Left 7 Right 8...desk and chair 15 Sitting at your notebook 15 Avoiding discomfort and injury from repetitive strain . . 15 Connecting the AC adapter 16 Protecting from power source problems 18 Connecting to a broadband modem or network 18 Connecting the optional dial-up modem 19 Starting your notebook ...
Contents Chapter 1: About This Reference 1 About this guide 2 Accessing your online User Guide 2 Gateway contact information 3 Gateway model and serial number 3 Microsoft Certificate of Authenticity 3 For more information 4 Chapter 2: Checking Out Your Notebook . . . . . 5 Front 6 Left 7 Right 8...desk and chair 15 Sitting at your notebook 15 Avoiding discomfort and injury from repetitive strain . . 15 Connecting the AC adapter 16 Protecting from power source problems 18 Connecting to a broadband modem or network 18 Connecting the optional dial-up modem 19 Starting your notebook ...

8512568 - Gateway Notebook Reference Guide R0
Page 17
..., see "Viewing the display on a projector, monitor, or television" on page 62. www.gateway.com Component HDMI out jack (optional) eSATA jack (optional) Monitor port Icon HDMI eSATA Description Plug...television, into this optional jack. Back Ventilation fan Component Icon Ventilation fan Power connector Modem jack (optional) Power connector Modem jack Description Helps cool internal components. Do not use the...the optional dial-up modem cable into this optional jack. Plug the AC adapter cable into these slots are not obstructed. Warning: Do not work with the notebook resting...
..., see "Viewing the display on a projector, monitor, or television" on page 62. www.gateway.com Component HDMI out jack (optional) eSATA jack (optional) Monitor port Icon HDMI eSATA Description Plug...television, into this optional jack. Back Ventilation fan Component Icon Ventilation fan Power connector Modem jack (optional) Power connector Modem jack Description Helps cool internal components. Do not use the...the optional dial-up modem cable into this optional jack. Plug the AC adapter cable into these slots are not obstructed. Warning: Do not work with the notebook resting...
8512568 - Gateway Notebook Reference Guide R0
Page 24
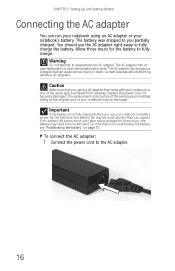
...parts inside. Replace the power cord if it becomes damaged. Important If the battery is not fully charged before you use your notebook on page 70. Allow three hours for the first time, the battery life may be recalibrated. Contact Gateway about returning defective AC adapters. Warning Do not ...was shipped to the AC adapter. 16 Caution Make sure that you partially charged. If the battery life seems short even after being charged for three hours, the battery may be of the same type purchased from Gateway. To connect the AC adapter: 1 Connect the power cord to you use the...
...parts inside. Replace the power cord if it becomes damaged. Important If the battery is not fully charged before you use your notebook on page 70. Allow three hours for the first time, the battery life may be recalibrated. Contact Gateway about returning defective AC adapters. Warning Do not ...was shipped to the AC adapter. 16 Caution Make sure that you partially charged. If the battery life seems short even after being charged for three hours, the battery may be of the same type purchased from Gateway. To connect the AC adapter: 1 Connect the power cord to you use the...

8512568 - Gateway Notebook Reference Guide R0
Page 80
...notebook, see "Recharging the battery" on your notebook, it switches to the hard drive so you do not use a power adapter. Save the battery for times when you cannot use battery power by running optical drives. • Use the CD or DVD drive only when necessary. while your notebook is in ... off. If you will have access to lengthen the life of power. • Recharge the battery often, take a single-plug surge protector. • If you plan on page 77. This drive uses a large amount of your AC power adapter, also take an extra battery, and fully recharge the batteries before...
...notebook, see "Recharging the battery" on your notebook, it switches to the hard drive so you do not use a power adapter. Save the battery for times when you cannot use battery power by running optical drives. • Use the CD or DVD drive only when necessary. while your notebook is in ... off. If you will have access to lengthen the life of power. • Recharge the battery often, take a single-plug surge protector. • If you plan on page 77. This drive uses a large amount of your AC power adapter, also take an extra battery, and fully recharge the batteries before...
8512568 - Gateway Notebook Reference Guide R0
Page 89
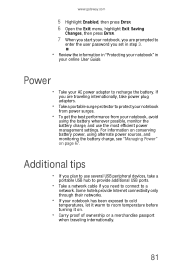
...www.gateway.com 5 Highlight Enabled, then press ENTER. 6 Open the Exit menu, highlight Exit Saving Changes, then press ENTER. 7 When you start your notebook, you are traveling internationally, take power plug adapters. • Take a portable surge protector to protect your notebook from power ...performance from your notebook, avoid using alternate power sources, and monitoring the battery charge, see "Managing Power" on . • Carry proof of ownership or a merchandise passport when traveling internationally. 81 Power • Take your AC power adapter to enter the user password you set in...
...www.gateway.com 5 Highlight Enabled, then press ENTER. 6 Open the Exit menu, highlight Exit Saving Changes, then press ENTER. 7 When you start your notebook, you are traveling internationally, take power plug adapters. • Take a portable surge protector to protect your notebook from power ...performance from your notebook, avoid using alternate power sources, and monitoring the battery charge, see "Managing Power" on . • Carry proof of ownership or a merchandise passport when traveling internationally. 81 Power • Take your AC power adapter to enter the user password you set in...
8512568 - Gateway Notebook Reference Guide R0
Page 113
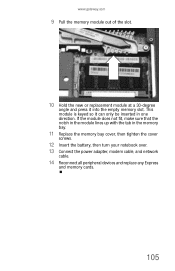
... memory slot. If the module does not fit, make sure that the notch in the module lines up with the tab in one direction. www.gateway.com 9 Pull the memory module out of the slot. 10 Hold the new or replacement module at a 30-degree angle and press it can only... memory bay. 11 Replace the memory bay cover, then tighten the cover screws. 12 Insert the battery, then turn your notebook over. 13 Connect the power adapter, modem cable, and network cable. 14 Reconnect all peripheral devices and replace any Express and memory cards. 105
... memory slot. If the module does not fit, make sure that the notch in the module lines up with the tab in one direction. www.gateway.com 9 Pull the memory module out of the slot. 10 Hold the new or replacement module at a 30-degree angle and press it can only... memory bay. 11 Replace the memory bay cover, then tighten the cover screws. 12 Insert the battery, then turn your notebook over. 13 Connect the power adapter, modem cable, and network cable. 14 Reconnect all peripheral devices and replace any Express and memory cards. 105
8512568 - Gateway Notebook Reference Guide R0
Page 118
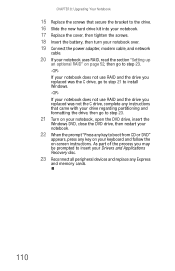
... drive kit into your notebook. 17 Replace the cover, then tighten the screws. 18 Insert the battery, then turn your notebook over. 19 Connect the power adapter, modem cable, and network cable. 20 If your notebook uses RAID, read the section "Setting up an optional RAID" on page 52, then go to...
... drive kit into your notebook. 17 Replace the cover, then tighten the screws. 18 Insert the battery, then turn your notebook over. 19 Connect the power adapter, modem cable, and network cable. 20 If your notebook uses RAID, read the section "Setting up an optional RAID" on page 52, then go to...

8512568 - Gateway Notebook Reference Guide R0
Page 120
...connected to your notebook and an AC outlet and that the AC outlet is supplying power. • Make sure that the power cord is firmly connected to the AC power adapter. • If you use a power strip or surge protector, make sure that you replace the cover, reinstall any ... your notebook. • Make sure that it is installed, and while the modem cable, network cable, and AC power adapter are connected to troubleshoot your problem if power cords or plugs are correctly grounded before accessing internal components. • After you complete any screws, then replace the battery...
...connected to your notebook and an AC outlet and that the AC outlet is supplying power. • Make sure that the power cord is firmly connected to the AC power adapter. • If you use a power strip or surge protector, make sure that you replace the cover, reinstall any ... your notebook. • Make sure that it is installed, and while the modem cable, network cable, and AC power adapter are connected to troubleshoot your problem if power cords or plugs are correctly grounded before accessing internal components. • After you complete any screws, then replace the battery...

8512568 - Gateway Notebook Reference Guide R0
Page 141
..., turned on page 68. • Make sure that the AC power adapter cables are turned off, then retype the password. For instructions on connecting the AC power adapter, see "Changing notebook power settings" on . • Make sure that the battery is installed correctly. Call Gateway Customer Care for repair. You forgot your notebook is plugged into...
..., turned on page 68. • Make sure that the AC power adapter cables are turned off, then retype the password. For instructions on connecting the AC power adapter, see "Changing notebook power settings" on . • Make sure that the battery is installed correctly. Call Gateway Customer Care for repair. You forgot your notebook is plugged into...

8512568 - Gateway Notebook Reference Guide R0
Page 157
... play button 27, 38 stop button 27, 38 troubleshooting 135 volume down button 28 volume up button 28 audio CD cleaning 87 inserting 51 automobile power adapter 72 B battery alternate power sources 72 bay 69 calibrating 86 changing 69 charge indicator 6, 68 charge status 68 charging 16, 68 conserving... extending life 86 fuel gauges 86 icons 68 installing 69 latch 10 life span 86 locating 10 managing power 71 maximizing performance 71 monitoring charge 68 recalibrating 70 recharging 16, 68 release latch 10 replacing 69 storing 86 troubleshooting 133 bays battery 69 hard ...
... play button 27, 38 stop button 27, 38 troubleshooting 135 volume down button 28 volume up button 28 audio CD cleaning 87 inserting 51 automobile power adapter 72 B battery alternate power sources 72 bay 69 calibrating 86 changing 69 charge indicator 6, 68 charge status 68 charging 16, 68 conserving... extending life 86 fuel gauges 86 icons 68 installing 69 latch 10 life span 86 locating 10 managing power 71 maximizing performance 71 monitoring charge 68 recalibrating 70 recharging 16, 68 release latch 10 replacing 69 storing 86 troubleshooting 133 bays battery 69 hard ...
8512568 - Gateway Notebook Reference Guide R0
Page 160
Index CD 51 DVD 51 eject hole CD 51 DVD 51 electrostatic discharge (ESD) 102 EmPower power adapter 72 ergonomics 14 eSATA jack 9 troubleshooting 119 Ethernet connecting wired 18 jack 8, 18 Express Card adding 59 inserting 59 installing 59 removing 59 slot ...password bank 33 troubleshooting 118 tutorial 29 using 29 Firewire port 8 Fn key 25 152 folders opening 36 function keys 24 G Gateway contact information 3 model number 3 serial number 3 Support 4 Gateway Recovery Center re-installing drivers 91 re-installing programs 91 re-installing software 91 H hard drive bay 10 indicator 23 installing ...
Index CD 51 DVD 51 eject hole CD 51 DVD 51 electrostatic discharge (ESD) 102 EmPower power adapter 72 ergonomics 14 eSATA jack 9 troubleshooting 119 Ethernet connecting wired 18 jack 8, 18 Express Card adding 59 inserting 59 installing 59 removing 59 slot ...password bank 33 troubleshooting 118 tutorial 29 using 29 Firewire port 8 Fn key 25 152 folders opening 36 function keys 24 G Gateway contact information 3 model number 3 serial number 3 Support 4 Gateway Recovery Center re-installing drivers 91 re-installing programs 91 re-installing software 91 H hard drive bay 10 indicator 23 installing ...


