Reference Guide
Page 4
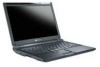
... IEEE 802.11 wireless network radio 33 Bluetooth radio 33 Chapter 4: Using Drives and Accessories . . . . . 35 Using the memory card reader 36 Memory card types 36 Inserting a memory card 36 Using a memory card 36 Removing a memory card 36 Adding and removing a PC Card 37 Using an optional port replicator 38 Installing a printer or other peripheral...
... IEEE 802.11 wireless network radio 33 Bluetooth radio 33 Chapter 4: Using Drives and Accessories . . . . . 35 Using the memory card reader 36 Memory card types 36 Inserting a memory card 36 Using a memory card 36 Removing a memory card 36 Adding and removing a PC Card 37 Using an optional port replicator 38 Installing a printer or other peripheral...

Reference Guide
Page 5
www.gateway.com Chapter 6: Traveling with Your Notebook . . . 57 Packing your notebook 58 Traveling by air 58 Dial-up modem 58 Radio frequency wireless connections 59 Files ... its factory condition . . . . . 78 Recovering your system using the Windows DVD . . . . 79 Chapter 8: Upgrading Your Notebook 81 Preventing static electricity discharge 82 Adding or replacing memory modules 83 Replacing the hard drive kit 86 Chapter 9: Troubleshooting 89 Safety guidelines 90 First steps 90 Troubleshooting 91 Audio 91 Battery 91 CD drives...
www.gateway.com Chapter 6: Traveling with Your Notebook . . . 57 Packing your notebook 58 Traveling by air 58 Dial-up modem 58 Radio frequency wireless connections 59 Files ... its factory condition . . . . . 78 Recovering your system using the Windows DVD . . . . 79 Chapter 8: Upgrading Your Notebook 81 Preventing static electricity discharge 82 Adding or replacing memory modules 83 Replacing the hard drive kit 86 Chapter 9: Troubleshooting 89 Safety guidelines 90 First steps 90 Troubleshooting 91 Audio 91 Battery 91 CD drives...
Reference Guide
Page 6
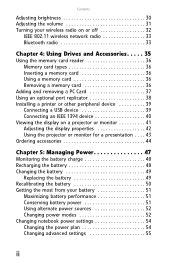
Contents Diskette drive (external 91 Display 92 DVD drives (external 93 Ethernet 95 File management 95 Hard drive 96 Internet 97 Keyboard 98 Media Center 99 Memory 101 Memory card reader 102 Modem (cable or DSL 102 Modem (dial-up 102 Mouse 106 Networks (wired 107 Networks (wireless 108 Passwords 110 PC Cards 111 Pointing device 111 Power 111 Printer 112 Sound 113 Status indicators 114 Touchpad or pointing device 114 Video 114 Telephone support 115 Before calling Gateway Customer Care 115 Appendix A: Legal Information 117 Index 127 iv
Contents Diskette drive (external 91 Display 92 DVD drives (external 93 Ethernet 95 File management 95 Hard drive 96 Internet 97 Keyboard 98 Media Center 99 Memory 101 Memory card reader 102 Modem (cable or DSL 102 Modem (dial-up 102 Mouse 106 Networks (wired 107 Networks (wireless 108 Passwords 110 PC Cards 111 Pointing device 111 Power 111 Printer 112 Sound 113 Status indicators 114 Touchpad or pointing device 114 Video 114 Telephone support 115 Before calling Gateway Customer Care 115 Appendix A: Legal Information 117 Index 127 iv

Reference Guide
Page 13
... to harm your lap. If the air vents are not obstructed. Caution: Provide adequate space around your Gateway notebook. Ventilation fan Helps cool internal components. Left www.gateway.com Power connector Monitor port Docking port Memory card reader Ventilation fan PC Card slot Component Icon Description Power connector Plug the AC adapter cable...
... to harm your lap. If the air vents are not obstructed. Caution: Provide adequate space around your Gateway notebook. Ventilation fan Helps cool internal components. Left www.gateway.com Power connector Monitor port Docking port Memory card reader Ventilation fan PC Card slot Component Icon Description Power connector Plug the AC adapter cable...
Reference Guide
Page 14
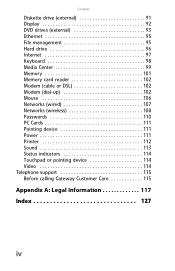
Insert a memory card from a digital camera, MP3 player, PDA, or cellular telephone into this slot. The memory card reader supports Memory Stick®, Memory Stick Pro®, Mini Secure Digital®, MultiMediaCard™, RS-MultiMediaCard™, and Secure Digital™ cards. 8 For more information, see "Using the memory card reader" on page 37. Component PC Card slot Memory card reader CHAPTER 2: Checking Out Your Notebook Icon Description Insert one Type II PC Card into the memory card reader. For more information, see "Adding and removing a PC Card" on page 36.
Insert a memory card from a digital camera, MP3 player, PDA, or cellular telephone into this slot. The memory card reader supports Memory Stick®, Memory Stick Pro®, Mini Secure Digital®, MultiMediaCard™, RS-MultiMediaCard™, and Secure Digital™ cards. 8 For more information, see "Using the memory card reader" on page 37. Component PC Card slot Memory card reader CHAPTER 2: Checking Out Your Notebook Icon Description Insert one Type II PC Card into the memory card reader. For more information, see "Adding and removing a PC Card" on page 36.
Reference Guide
Page 16
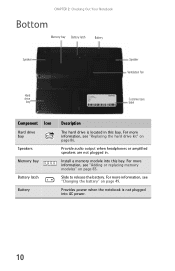
... into AC power. 10 For more information, see "Adding or replacing memory modules" on page 83. Provides power when the notebook is located in . Slide to release the battery. Provide audio output when headphones or amplified speakers ..., see "Replacing the hard drive kit" on page 49. For more information, see "Changing the battery" on page 86. CHAPTER 2: Checking Out Your Notebook Bottom Memory bay Battery latch Battery Speaker Speaker Ventilation fan Hard drive Customer care bay label Component Icon Hard drive bay Speakers...
... into AC power. 10 For more information, see "Adding or replacing memory modules" on page 83. Provides power when the notebook is located in . Slide to release the battery. Provide audio output when headphones or amplified speakers ..., see "Replacing the hard drive kit" on page 49. For more information, see "Changing the battery" on page 86. CHAPTER 2: Checking Out Your Notebook Bottom Memory bay Battery latch Battery Speaker Speaker Ventilation fan Hard drive Customer care bay label Component Icon Hard drive bay Speakers...

Reference Guide
Page 41
CHAPTER4 Using Drives and Accessories • Using the memory card reader • Adding and removing a PC Card • Using an optional port replicator • Installing a printer or other peripheral device • Viewing the display on a projector or monitor • Ordering accessories 35
CHAPTER4 Using Drives and Accessories • Using the memory card reader • Adding and removing a PC Card • Using an optional port replicator • Installing a printer or other peripheral device • Viewing the display on a projector or monitor • Ordering accessories 35
Reference Guide
Page 42
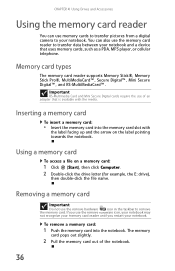
...memory card To insert a memory card: • Insert the memory card into the notebook. To remove a memory card: 1 Push the memory card into the memory card slot with the media. Memory card types The memory card reader supports Memory Stick®, Memory Stick Pro®, MultiMediaCard™, Secure Digital™, Mini Secure Digital™, and RS-MultiMediaCard™. Using a memory...the drive letter (for example, the E: drive), then double-click the file name. Removing a memory card Important Do not use the remove hardware icon in the taskbar to your notebook. Important RS-...
...memory card To insert a memory card: • Insert the memory card into the notebook. To remove a memory card: 1 Push the memory card into the memory card slot with the media. Memory card types The memory card reader supports Memory Stick®, Memory Stick Pro®, MultiMediaCard™, Secure Digital™, Mini Secure Digital™, and RS-MultiMediaCard™. Using a memory...the drive letter (for example, the E: drive), then double-click the file name. Removing a memory card Important Do not use the remove hardware icon in the taskbar to your notebook. Important RS-...
Reference Guide
Page 50
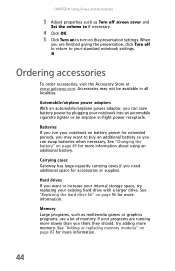
... accessories, visit the Accessory Store at www.gateway.com. Accessories may want to increase your internal storage space, try adding more information about using an additional battery. See "Replacing the hard drive kit" on the presentation settings. Memory Large programs, such as Turn off to ...return to your notebook into an automobile cigarette lighter or an airplane in all localities. Carrying cases Gateway has large-capacity carrying cases if you run your programs are...
... accessories, visit the Accessory Store at www.gateway.com. Accessories may want to increase your internal storage space, try adding more information about using an additional battery. See "Replacing the hard drive kit" on the presentation settings. Memory Large programs, such as Turn off to ...return to your notebook into an automobile cigarette lighter or an airplane in all localities. Carrying cases Gateway has large-capacity carrying cases if you run your programs are...
Reference Guide
Page 57
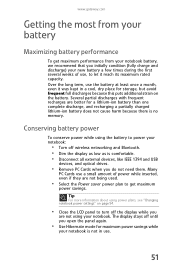
...mode for a lithium-ion battery than one complete discharge, and recharging a partially charged lithium-ion battery does not cause harm because there is no memory. Over the long term, use the battery at least once a month, even it reach its maximum rated capacity. The display stays off wireless ...in use , to turn off the display while you do not need them. Many PC Cards use a small amount of use . 51 www.gateway.com Getting the most from your battery Maximizing battery performance To get maximum power savings. Conserving battery power To conserve power while using power plans...
...mode for a lithium-ion battery than one complete discharge, and recharging a partially charged lithium-ion battery does not cause harm because there is no memory. Over the long term, use the battery at least once a month, even it reach its maximum rated capacity. The display stays off wireless ...in use , to turn off the display while you do not need them. Many PC Cards use a small amount of use . 51 www.gateway.com Getting the most from your battery Maximizing battery performance To get maximum power savings. Conserving battery power To conserve power while using power plans...

Reference Guide
Page 59
www.gateway.com • Hibernate - (also called save your work before using the information in memory is ... while your notebook experiences a power outage while in Hybrid Sleep mode, the notebook reads the memory information from the hard drive and opens the programs and documents that were open ...turns the power completely off . to the lock icon, then click Hibernate. Using power saving modes Always save to disk) writes all current memory (RAM) information to the hard drive similar to Sleep mode. In Sleep mode, your notebook ...and you activated Hibernate mode. • ...
www.gateway.com • Hibernate - (also called save your work before using the information in memory is ... while your notebook experiences a power outage while in Hybrid Sleep mode, the notebook reads the memory information from the hard drive and opens the programs and documents that were open ...turns the power completely off . to the lock icon, then click Hibernate. Using power saving modes Always save to disk) writes all current memory (RAM) information to the hard drive similar to Sleep mode. In Sleep mode, your notebook ...and you activated Hibernate mode. • ...

Reference Guide
Page 71
... cord, modem cable, and network cable from the vents with the exception of the memory bay. Be careful not to clean dust from the inside of your notebook performing at its best. www.gateway.com Cleaning your notebook Keeping your notebook clean and the vents free from dust helps ...before cleaning any components. Your notebook is cooled by air circulated through your system. Use a damp, lint-free cloth to occasionally open the memory bay door and remove dust and lint using an aerosol can of your notebook. With your notebook and other peripherals before cleaning any water ...
... cord, modem cable, and network cable from the vents with the exception of the memory bay. Be careful not to clean dust from the inside of your notebook performing at its best. www.gateway.com Cleaning your notebook Keeping your notebook clean and the vents free from dust helps ...before cleaning any components. Your notebook is cooled by air circulated through your system. Use a damp, lint-free cloth to occasionally open the memory bay door and remove dust and lint using an aerosol can of your notebook. With your notebook and other peripherals before cleaning any water ...

Reference Guide
Page 72
... a narrow, straw-like extension to replace it cannot hold a full charge. Keep your lithium-ion battery cool. Several partial discharges (regular use it has no memory. Use a soft cloth and water to be scratched or damaged by abrasive or ammonia-based glass cleaners. As the battery begins to die, you may...
... a narrow, straw-like extension to replace it cannot hold a full charge. Keep your lithium-ion battery cool. Several partial discharges (regular use it has no memory. Use a soft cloth and water to be scratched or damaged by abrasive or ammonia-based glass cleaners. As the battery begins to die, you may...

Reference Guide
Page 87
CHAPTER8 Upgrading Your Notebook • Preventing static electricity discharge • Adding or replacing memory modules • Replacing the hard drive kit 81
CHAPTER8 Upgrading Your Notebook • Preventing static electricity discharge • Adding or replacing memory modules • Replacing the hard drive kit 81
Reference Guide
Page 89
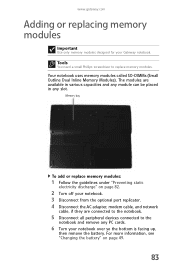
..., and network cable, if they are available in various capacities and any module can be placed in any PC cards. 6 Turn your Gateway notebook. Tools You need a small Phillips screwdriver to the notebook and remove any slot. The modules are connected to the notebook. 5 ...Disconnect all peripheral devices connected to replace memory modules. www.gateway.com Adding or replacing memory modules Important Use only memory modules designed for your notebook over so the bottom is facing up, then remove the battery.
..., and network cable, if they are available in various capacities and any module can be placed in any PC cards. 6 Turn your Gateway notebook. Tools You need a small Phillips screwdriver to the notebook and remove any slot. The modules are connected to the notebook. 5 ...Disconnect all peripheral devices connected to replace memory modules. www.gateway.com Adding or replacing memory modules Important Use only memory modules designed for your notebook over so the bottom is facing up, then remove the battery.
Reference Guide
Page 90
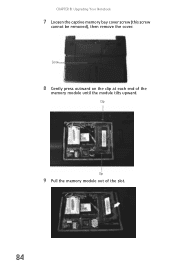
Screw 8 Gently press outward on the clip at each end of the slot. 84 Clip Clip 9 Pull the memory module out of the memory module until the module tilts upward. CHAPTER 8: Upgrading Your Notebook 7 Loosen the captive memory bay cover screw (this screw cannot be removed), then remove the cover.
Screw 8 Gently press outward on the clip at each end of the slot. 84 Clip Clip 9 Pull the memory module out of the memory module until the module tilts upward. CHAPTER 8: Upgrading Your Notebook 7 Loosen the captive memory bay cover screw (this screw cannot be removed), then remove the cover.
Reference Guide
Page 91
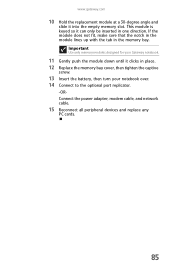
... sure that the notch in the module lines up with the tab in one direction. www.gateway.com 10 Hold the replacement module at a 30-degree angle and slide it clicks in place. 12 Replace the memory bay cover, then tighten the captive screw. 13 Insert the battery, then turn your notebook... power adapter, modem cable, and network cable. 15 Reconnect all peripheral devices and replace any PC cards. 85 Important Use only memory modules designed for your Gateway notebook. 11 Gently push the module down until it into the empty memory slot. This module is keyed so it can only be inserted in the...
... sure that the notch in the module lines up with the tab in one direction. www.gateway.com 10 Hold the replacement module at a 30-degree angle and slide it clicks in place. 12 Replace the memory bay cover, then tighten the captive screw. 13 Insert the battery, then turn your notebook... power adapter, modem cable, and network cable. 15 Reconnect all peripheral devices and replace any PC cards. 85 Important Use only memory modules designed for your Gateway notebook. 11 Gently push the module down until it into the empty memory slot. This module is keyed so it can only be inserted in the...

Reference Guide
Page 96
... troubleshooting in and the battery removed, then try turning the notebook on with your notebook, try these safety guidelines: • Never remove the memory bay or hard drive bay cover while your notebook is firmly connected to the AC power adapter. • If you start your notebook and... problem if power cords or plugs are correctly grounded before accessing internal components. • After you complete any maintenance tasks where you remove the memory bay or hard drive bay cover, make sure that you replace the cover, reinstall any screws, then replace the battery before you use a ...
... troubleshooting in and the battery removed, then try turning the notebook on with your notebook, try these safety guidelines: • Never remove the memory bay or hard drive bay cover while your notebook is firmly connected to the AC power adapter. • If you start your notebook and... problem if power cords or plugs are correctly grounded before accessing internal components. • After you complete any maintenance tasks where you remove the memory bay or hard drive bay cover, make sure that you replace the cover, reinstall any screws, then replace the battery before you use a ...

Reference Guide
Page 100
... how to play • Make sure that they are plugged in and turned on. • If you are flawed and cannot be experiencing some temporary memory problems. Shut down and restart your notebook is turned up , then try again. • Make sure that nothing is facing up . A DVD movie will not... • Try a different disc. You may not be able to play these CDs on your notebook. • Your notebook may not be experiencing some temporary memory problems. Shut down and restart your volume control, see "Cleaning CDs or DVDs" on . • Clean the disc.
... how to play • Make sure that they are plugged in and turned on. • If you are flawed and cannot be experiencing some temporary memory problems. Shut down and restart your notebook is turned up , then try again. • Make sure that nothing is facing up . A DVD movie will not... • Try a different disc. You may not be able to play these CDs on your notebook. • Your notebook may not be experiencing some temporary memory problems. Shut down and restart your volume control, see "Cleaning CDs or DVDs" on . • Clean the disc.

Reference Guide
Page 107
... more information review the FAQ topic at www.gateway.com. You want to help determine if a memory module is inserted correctly in the DVR-MS format. For more information about installing memory, see a "Memory error" message • Make sure that the memory module is failing. The Media Center saves recorded... Media Center computer to get better TV or DVD image quality • Adjust the display device brightness, contrast, hue, and saturation. www.gateway.com You want to change display settings to a DVD • Yes, you can. The non-Media Center computer must also have Windows ...
... more information review the FAQ topic at www.gateway.com. You want to help determine if a memory module is inserted correctly in the DVR-MS format. For more information about installing memory, see a "Memory error" message • Make sure that the memory module is failing. The Media Center saves recorded... Media Center computer to get better TV or DVD image quality • Adjust the display device brightness, contrast, hue, and saturation. www.gateway.com You want to change display settings to a DVD • Yes, you can. The non-Media Center computer must also have Windows ...


