8512055 - Component Replacement Manual
Page 1
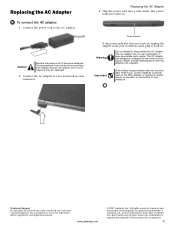
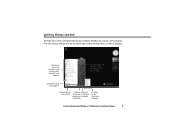
... power indicator turns on , unplug the adapter from your notebook's power connector. The AC adapter has no user-replaceable or user-serviceable parts inside. www.gateway.com © 2007 Gateway, Inc. All other countries. The replacement cord must be of the same type and voltage rating as the original cord or your notebook may be damaged. 2 Connect the AC adapter to your notebook, then plug it becomes damaged. Technical Support See...
... power indicator turns on , unplug the adapter from your notebook's power connector. The AC adapter has no user-replaceable or user-serviceable parts inside. www.gateway.com © 2007 Gateway, Inc. All other countries. The replacement cord must be of the same type and voltage rating as the original cord or your notebook may be damaged. 2 Connect the AC adapter to your notebook, then plug it becomes damaged. Technical Support See...
8512055 - Component Replacement Manual
Page 2
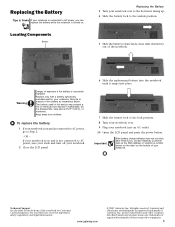
... replacement battery into the notebook until it snaps into an AC outlet. 10 Open the LCD panel and press the power button. Gateway and eMachines are trademarks or registered trademarks of the notebook. Replacing the Battery Tips & Tricks If your notebook into place. 7 Slide the battery lock to the lock position. 8 Turn your notebook over so the bottom is connected to Step 2. - Technical Support See the label on . Do not disassemble...
... replacement battery into the notebook until it snaps into an AC outlet. 10 Open the LCD panel and press the power button. Gateway and eMachines are trademarks or registered trademarks of the notebook. Replacing the Battery Tips & Tricks If your notebook into place. 7 Slide the battery lock to the lock position. 8 Turn your notebook over so the bottom is connected to Step 2. - Technical Support See the label on . Do not disassemble...
8512055 - Component Replacement Manual
Page 3
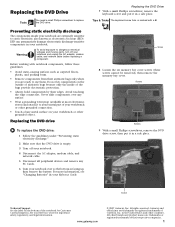
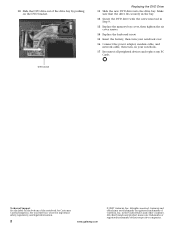
... discharge." 2 Make sure that the DVD drive is empty. 3 Turn off your Reference Guide. Avoid touching the edge connectors. See your notebook over any PC Cards. 6 Turn your Reference Guide for Customer Care Information. All other countries. Before working with a K. Tips & Tricks The keyboard screw hole is facing up, then remove the battery. Replacing the DVD Drive Tools You need a small Phillips screwdriver to a bare metal part of their...
... discharge." 2 Make sure that the DVD drive is empty. 3 Turn off your Reference Guide. Avoid touching the edge connectors. See your notebook over any PC Cards. 6 Turn your Reference Guide for Customer Care Information. All other countries. Before working with a K. Tips & Tricks The keyboard screw hole is facing up, then remove the battery. Replacing the DVD Drive Tools You need a small Phillips screwdriver to a bare metal part of their...
8512055 - Component Replacement Manual
Page 4
... Replace the memory bay cover, then tighten the six cover screws. 14 Replace the keyboard screw. 15 Insert the battery, then turn your notebook over. 16 Connect the power adapter, modem cable, and network cable, then turn on the DVD bracket. Technical Support See the label on the bottom of the drive bay by pushing on your Reference Guide for Customer Care Information. DVD bracket Replacing the DVD Drive 11 Slide the new DVD drive into the drive...
... Replace the memory bay cover, then tighten the six cover screws. 14 Replace the keyboard screw. 15 Insert the battery, then turn your notebook over. 16 Connect the power adapter, modem cable, and network cable, then turn on the DVD bracket. Technical Support See the label on the bottom of the drive bay by pushing on your Reference Guide for Customer Care Information. DVD bracket Replacing the DVD Drive 11 Slide the new DVD drive into the drive...
8512055 - Component Replacement Manual
Page 5
... moving parts, turn off your notebook. 4 Disconnect the AC adapter, modem cable, and network cable. 5 Disconnect all peripheral devices and remove any PC Cards. 6 Turn your notebook over any surface. • Wear a grounding wrist strap (available at the Web address or telephone number shown on the label on your notebook. Important If you cannot create a Drivers and Applications Recovery disc, Gateway may need a small Phillips screwdriver to use them. Contact Gateway Customer...
... moving parts, turn off your notebook. 4 Disconnect the AC adapter, modem cable, and network cable. 5 Disconnect all peripheral devices and remove any PC Cards. 6 Turn your notebook over any surface. • Wear a grounding wrist strap (available at the Web address or telephone number shown on the label on your notebook. Important If you cannot create a Drivers and Applications Recovery disc, Gateway may need a small Phillips screwdriver to use them. Contact Gateway Customer...

8512055 - Component Replacement Manual
Page 6
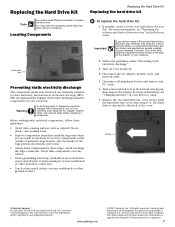
... power adapter, modem cable, and network cable. 15 Turn on -screen instructions. 19 After Windows is completely re-installed, use the software and driver recovery discs you will see the Windows startup screen. Gateway and eMachines are trademarks or registered trademarks of Gateway, Inc. 8 Remove the four screws that secure the cover to the drive. 12 Slide the new hard drive kit into your notebook's DVD drive, then restart your notebook. 17 When the prompt "Press any key to the hard drive cover. Replacing the Hard Drive...
... power adapter, modem cable, and network cable. 15 Turn on -screen instructions. 19 After Windows is completely re-installed, use the software and driver recovery discs you will see the Windows startup screen. Gateway and eMachines are trademarks or registered trademarks of Gateway, Inc. 8 Remove the four screws that secure the cover to the drive. 12 Slide the new hard drive kit into your notebook's DVD drive, then restart your notebook. 17 When the prompt "Press any key to the hard drive cover. Replacing the Hard Drive...
8512055 - Component Replacement Manual
Page 7
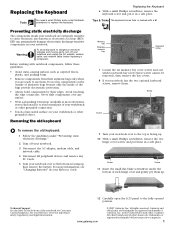
... opened position. Screw Screw 9 Turn your notebook. in a safe place. Avoid touching the edge connectors. Replacing the Keyboard 6 With a small Phillips screwdriver, remove the keyboard screw and put them . Memory bay Wireless network bay Keyboard screw 7 Loosen the six memory bay cover screws and one wireless network bay screw (these guidelines: • Avoid static-causing surfaces such as electrostatic discharge (ESD). Technical Support See the label on your notebook...
... opened position. Screw Screw 9 Turn your notebook. in a safe place. Avoid touching the edge connectors. Replacing the Keyboard 6 With a small Phillips screwdriver, remove the keyboard screw and put them . Memory bay Wireless network bay Keyboard screw 7 Loosen the six memory bay cover screws and one wireless network bay screw (these guidelines: • Avoid static-causing surfaces such as electrostatic discharge (ESD). Technical Support See the label on your notebook...
8512055 - Component Replacement Manual
Page 8
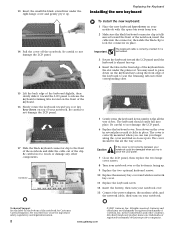
... . 2 Make sure the black keyboard connector clip is almost face-up . 14 Pull the cover off the notebook. The cover is facing up. 9 Replace the two optional keyboard screws. 10 Replace the memory bay cover and wireless network bay cover. 11 Replace the keyboard screw. 12 Insert the battery, then turn on your notebook could be flat all the way across . in place. Replacing the Keyboard Installing the new keyboard To install the new keyboard: 1 Place the new keyboard keys-down...
... . 2 Make sure the black keyboard connector clip is almost face-up . 14 Pull the cover off the notebook. The cover is facing up. 9 Replace the two optional keyboard screws. 10 Replace the memory bay cover and wireless network bay cover. 11 Replace the keyboard screw. 12 Insert the battery, then turn on your notebook could be flat all the way across . in place. Replacing the Keyboard Installing the new keyboard To install the new keyboard: 1 Place the new keyboard keys-down...
8512055 - Component Replacement Manual
Page 9
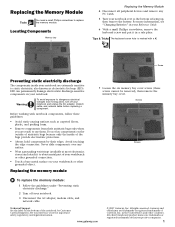
... parts, turn off your Reference Guide. 6 With a small Phillips screwdriver, remove the keyboard screw and put it to replace the memory module. Never slide components over so the bottom is marked with notebook components, follow these screws cannot be removed), then remove the memory bay cover. Technical Support See the label on the bottom of Gateway, Inc. in your notebook and unplug the AC adapter, modem cable, and network cable...
... parts, turn off your Reference Guide. 6 With a small Phillips screwdriver, remove the keyboard screw and put it to replace the memory module. Never slide components over so the bottom is marked with notebook components, follow these screws cannot be removed), then remove the memory bay cover. Technical Support See the label on the bottom of Gateway, Inc. in your notebook and unplug the AC adapter, modem cable, and network cable...
8512055 - Component Replacement Manual
Page 10
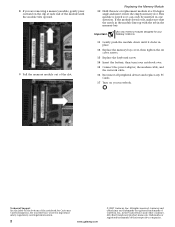
... the module down until the module tilts upward. 9 Pull the memory module out of their respective companies. in place. 12 Replace the memory bay cover, then tighten the six cover screws. 13 Replace the keyboard screw. 14 Insert the battery, then turn your notebook over. 15 Connect the power adapter, the modem cable, and the network cable. 16 Reconnect all peripheral devices and replace any PC Cards. 17 Turn on your Reference Guide for...
... the module down until the module tilts upward. 9 Pull the memory module out of their respective companies. in place. 12 Replace the memory bay cover, then tighten the six cover screws. 13 Replace the keyboard screw. 14 Insert the battery, then turn your notebook over. 15 Connect the power adapter, the modem cable, and the network cable. 16 Reconnect all peripheral devices and replace any PC Cards. 17 Turn on your Reference Guide for...
8512055 - Component Replacement Manual
Page 11
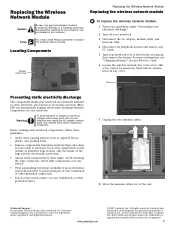
... be removed), then remove wireless network bay cover. Locating Components Wireless network bay Replacing the Wireless Network Module Replacing the wireless network module To replace the wireless network module: 1 Follow the guidelines under "Preventing static electricity discharge." 2 Turn off your notebook. 3 Disconnect the AC adapter, modem cable, and network cable. 4 Disconnect all peripheral devices and remove any surface. • Wear a grounding wrist strap (available at most electronics stores) and attach it to replace the wireless network module. Tools You need a small...
... be removed), then remove wireless network bay cover. Locating Components Wireless network bay Replacing the Wireless Network Module Replacing the wireless network module To replace the wireless network module: 1 Follow the guidelines under "Preventing static electricity discharge." 2 Turn off your notebook. 3 Disconnect the AC adapter, modem cable, and network cable. 4 Disconnect all peripheral devices and remove any surface. • Wear a grounding wrist strap (available at most electronics stores) and attach it to replace the wireless network module. Tools You need a small...
8512055 - Component Replacement Manual
Page 12
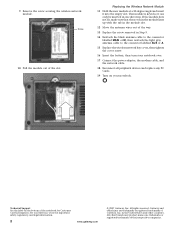
... Replace the wireless network bay cover, then tighten the cover screw. 16 Insert the battery, then turn your notebook over. 17 Connect the power adapter, the modem cable, and the network cable. 18 Reconnect all peripheral devices and replace any PC Cards. 19 Turn on the bottom of the slot. Gateway and eMachines are trademarks or registered trademarks of their respective companies. Technical Support See the label on your Reference Guide for...
... Replace the wireless network bay cover, then tighten the cover screw. 16 Insert the battery, then turn your notebook over. 17 Connect the power adapter, the modem cable, and the network cable. 18 Reconnect all peripheral devices and replace any PC Cards. 19 Turn on the bottom of the slot. Gateway and eMachines are trademarks or registered trademarks of their respective companies. Technical Support See the label on your Reference Guide for...
8511854 - Gateway Starter Guide for Windows Vista
Page 5
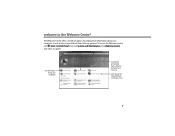
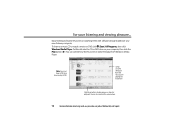
Click here to access the Internet, e-mail, and your most frequently used programs Click here to open files and folders, access networking, and to change settings, or even shut down your computer For more information about Windows, see all begins. getting things started The Start menu is where it all your programs Type here to find a file or folder Click here Click here to...
Click here to access the Internet, e-mail, and your most frequently used programs Click here to open files and folders, access networking, and to change settings, or even shut down your computer For more information about Windows, see all begins. getting things started The Start menu is where it all your programs Type here to find a file or folder Click here Click here to...
8511854 - Gateway Starter Guide for Windows Vista
Page 7
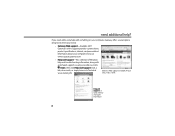
Get information about your computer, as well as links to special deals from a previous computer to the Welcome Center! welcome to a new one Learn about your computer Transfer files and settings from Gateway partners! The Welcome Center offers a wealth of options for getting more information about the newest features in Windows Vista 7 To access the Welcome Center, click (Start), Control Panel, then click System and Maintenance. Click Welcome Center and select an option.
Get information about your computer, as well as links to special deals from a previous computer to the Welcome Center! welcome to a new one Learn about your computer Transfer files and settings from Gateway partners! The Welcome Center offers a wealth of options for getting more information about the newest features in Windows Vista 7 To access the Welcome Center, click (Start), Control Panel, then click System and Maintenance. Click Welcome Center and select an option.
8511854 - Gateway Starter Guide for Windows Vista
Page 8
... help with automated support, is a quick and easy way to get information 8 Gateway's Web support is available 24 hours a day, 7 days a week Help and Support is easily accessible. Visit us at www.support.gateway.com. • Help and Support-This collection of Windows help and troubleshooting information, along with something on your computer. Just click (Start), then click Help and Support. need a little extra...
... help with automated support, is a quick and easy way to get information 8 Gateway's Web support is available 24 hours a day, 7 days a week Help and Support is easily accessible. Visit us at www.support.gateway.com. • Help and Support-This collection of Windows help and troubleshooting information, along with something on your computer. Just click (Start), then click Help and Support. need a little extra...
8511854 - Gateway Starter Guide for Windows Vista
Page 11
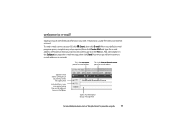
...To box [email protected] Type a short description of the person that you want to send a message to in touch with family and friends is easy with e-mail and is usually free with your ISP, click (Start), then click E-mail. To send e-mail, connect to e-mail! Your ... Subject box, type the e-mail message, then click Send. Staying in the To box. When your default e-mail program opens, complete any setup required, then click Create Mail and type the e-mail address of your message here For more information about e-mail, see"Using the Internet"in your online user guide. 11 Add ...
...To box [email protected] Type a short description of the person that you want to send a message to in touch with family and friends is easy with e-mail and is usually free with your ISP, click (Start), then click E-mail. To send e-mail, connect to e-mail! Your ... Subject box, type the e-mail message, then click Send. Staying in the To box. When your default e-mail program opens, complete any setup required, then click Create Mail and type the e-mail address of your message here For more information about e-mail, see"Using the Internet"in your online user guide. 11 Add ...
8511854 - Gateway Starter Guide for Windows Vista
Page 12
... and viewing pleasure... You can also control the volume here. 12 For more information about using media, see your computer, then click the Play button ( ). To listen to play a DVD Songs or scene selections from Windows Media Player. Enjoy listening to favorite music CDs or watching DVDs with software already installed on DVD, click (Start), All Programs, then click Windows Media Player. for your new Gateway computer.
... and viewing pleasure... You can also control the volume here. 12 For more information about using media, see your computer, then click the Play button ( ). To listen to play a DVD Songs or scene selections from Windows Media Player. Enjoy listening to favorite music CDs or watching DVDs with software already installed on DVD, click (Start), All Programs, then click Windows Media Player. for your new Gateway computer.
8511854 - Gateway Starter Guide for Windows Vista
Page 19
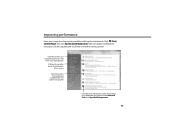
... option and follow the instructions. improving performance Keep your hard drive (click Advanced Tools, then Open Disk Defragmenter) 19 Click here to return your computer to a previous state when it was working better Click here to see details about the components of your system Click here to adjust how quickly your computer goes into power-saving modes Click here to do maintenance...
... option and follow the instructions. improving performance Keep your hard drive (click Advanced Tools, then Open Disk Defragmenter) 19 Click here to return your computer to a previous state when it was working better Click here to see details about the components of your system Click here to adjust how quickly your computer goes into power-saving modes Click here to do maintenance...
8511854 - Gateway Starter Guide for Windows Vista
Page 21
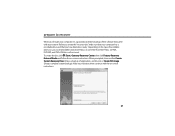
... DVD+RW discs will not work. To create the disc, click (Start), Gateway Recovery Center, then click Factory Recovery External Media and follow the on -screen instructions. 21 When prompted, choose either several CD-R discs or one DVD-R or DVD+R disc. Make your selection, then continue with your system. Depending on the type of recordable drive you use, you'll need either Create System Recovery Discs (makes a backup of the software that you have blank discs ready. Before you create this"recovery disc,"make a backup...
... DVD+RW discs will not work. To create the disc, click (Start), Gateway Recovery Center, then click Factory Recovery External Media and follow the on -screen instructions. 21 When prompted, choose either several CD-R discs or one DVD-R or DVD+R disc. Make your selection, then continue with your system. Depending on the type of recordable drive you use, you'll need either Create System Recovery Discs (makes a backup of the software that you have blank discs ready. Before you create this"recovery disc,"make a backup...
8511854 - Gateway Starter Guide for Windows Vista
Page 22
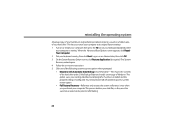
... keyboard repeatedly while your hard drive. The System Recovery wizard opens. 4 Follow the on-screen instructions. 5 Click one of hard drive space to its original factory settings. 1 Turn on or restart your computer, then press the F8 key on as it was when you restore your computer to use this restore option • Full Factory Recovery-Reformats and restores the system software as an Administrator, then click OK. 3 On the System Recovery Options screen...
... keyboard repeatedly while your hard drive. The System Recovery wizard opens. 4 Follow the on-screen instructions. 5 Click one of hard drive space to its original factory settings. 1 Turn on or restart your computer, then press the F8 key on as it was when you restore your computer to use this restore option • Full Factory Recovery-Reformats and restores the system software as an Administrator, then click OK. 3 On the System Recovery Options screen...


