
8511418 - Component Replacement Manual
Page 1
... or telephone number shown on the label on . The AC adapter has no user-replaceable or user-serviceable parts inside. All rights reserved. Gateway and eMachines are trademarks or registered trademarks of Gateway, Inc. Caution Replace the power cord if it back in... for important safety, regulatory, and legal information. Contact Gateway about returning defective AC adapters. www.gateway.com © 2006 Gateway, Inc. Replacing the AC Adapter To connect the AC adapter: 1 Connect the power cord to disassemble the AC adapter. Technical Support See the label on , unplug the...
... or telephone number shown on the label on . The AC adapter has no user-replaceable or user-serviceable parts inside. All rights reserved. Gateway and eMachines are trademarks or registered trademarks of Gateway, Inc. Caution Replace the power cord if it back in... for important safety, regulatory, and legal information. Contact Gateway about returning defective AC adapters. www.gateway.com © 2006 Gateway, Inc. Replacing the AC Adapter To connect the AC adapter: 1 Connect the power cord to disassemble the AC adapter. Technical Support See the label on , unplug the...

8511418 - Component Replacement Manual
Page 3
...label on your notebook are extremely sensitive to a bare metal part of their respective companies. 1 See your notebook and unplug the AC adapter, modem cable, and network cable before replacing a component. All rights reserved. in a safe place. Before working with a K. ...are ready to replace the DVD drive. ESD can permanently damage electrostatic discharge-sensitive components in your online hardware guide. Gateway and eMachines are trademarks or registered trademarks of the bags provide electrostatic protection. • Always hold components by their antistatic...
...label on your notebook are extremely sensitive to a bare metal part of their respective companies. 1 See your notebook and unplug the AC adapter, modem cable, and network cable before replacing a component. All rights reserved. in a safe place. Before working with a K. ...are ready to replace the DVD drive. ESD can permanently damage electrostatic discharge-sensitive components in your online hardware guide. Gateway and eMachines are trademarks or registered trademarks of the bags provide electrostatic protection. • Always hold components by their antistatic...

8511418 - Component Replacement Manual
Page 4
... the label on the bottom of Gateway, Inc. in Step 9. 13 Replace the memory bay cover, then tighten the six cover screws. 14 Replace the keyboard screw. 15 Insert the battery, then turn your notebook over. 16 Connect the power adapter, modem cable, and network cable,...and product names are trademarks or registered trademarks of the notebook for important safety, regulatory, and legal information. 2 www.gateway.com © 2006 Gateway, Inc. Gateway and eMachines are trademarks or registered trademarks of the drive bay by pushing on your hardware guide for Customer Care Information....
... the label on the bottom of Gateway, Inc. in Step 9. 13 Replace the memory bay cover, then tighten the six cover screws. 14 Replace the keyboard screw. 15 Insert the battery, then turn your notebook over. 16 Connect the power adapter, modem cable, and network cable,...and product names are trademarks or registered trademarks of the notebook for important safety, regulatory, and legal information. 2 www.gateway.com © 2006 Gateway, Inc. Gateway and eMachines are trademarks or registered trademarks of the drive bay by pushing on your hardware guide for Customer Care Information....

8511418 - Component Replacement Manual
Page 5
... from their respective companies. 1 Never slide components over so the bottom is attached to replace the hard drive. www.gateway.com © 2006 Gateway, Inc. Gateway and eMachines are ready to a bare metal part of your notebook. 2 Follow the guidelines under "Preventing static electricity ...discharge." 3 Turn off your notebook over any PC Cards. 6 Turn your notebook and unplug the AC adapter, modem cable, and ...
... from their respective companies. 1 Never slide components over so the bottom is attached to replace the hard drive. www.gateway.com © 2006 Gateway, Inc. Gateway and eMachines are ready to a bare metal part of your notebook. 2 Follow the guidelines under "Preventing static electricity ...discharge." 3 Turn off your notebook over any PC Cards. 6 Turn your notebook and unplug the AC adapter, modem cable, and ...

8511418 - Component Replacement Manual
Page 6
...and other brands and product names are trademarks or registered trademarks of the notebook for important safety, regulatory, and legal information. 2 www.gateway.com © 2006 Gateway, Inc. All other countries. 8 Remove the four screws that secure the cover to the drive. 12 Slide the new hard drive... kit into your notebook, then replace the cover screws. 13 Insert the battery and turn your notebook over. 14 Connect the power adapter, modem cable...
...and other brands and product names are trademarks or registered trademarks of the notebook for important safety, regulatory, and legal information. 2 www.gateway.com © 2006 Gateway, Inc. All other countries. 8 Remove the four screws that secure the cover to the drive. 12 Slide the new hard drive... kit into your notebook, then replace the cover screws. 13 Insert the battery and turn your notebook over. 14 Connect the power adapter, modem cable...

8511418 - Component Replacement Manual
Page 7
..., and packing foam. • Remove components from their antistatic bags only when you are extremely sensitive to replace the keyboard. Gateway and eMachines are trademarks or registered trademarks of their edges. Before working with a K. Never slide components over so the bottom ... of antistatic bags because only the inside your notebook. www.gateway.com © 2006 Gateway, Inc. All rights reserved. All other countries. in your online hardware guide. 9 Turn your notebook and unplug the AC adapter, modem cable, and network cable before replacing a component. ...
..., and packing foam. • Remove components from their antistatic bags only when you are extremely sensitive to replace the keyboard. Gateway and eMachines are trademarks or registered trademarks of their edges. Before working with a K. Never slide components over so the bottom ... of antistatic bags because only the inside your notebook. www.gateway.com © 2006 Gateway, Inc. All rights reserved. All other countries. in your online hardware guide. 9 Turn your notebook and unplug the AC adapter, modem cable, and network cable before replacing a component. ...

8511418 - Component Replacement Manual
Page 8
...the front of the notebook and slide the cable out of the notebook for important safety, regulatory, and legal information. 2 www.gateway.com © 2006 Gateway, Inc. Replacing the Keyboard Installing the new keyboard To install the new keyboard: 1 Place the new keyboard keys-down on the...countries. Important Inserting a piece of the notebook, insert the cable into their respective companies. See your notebook over . 13 Connect the power adapter, the modem cable, and the network cable, then turn on top of the keyboard into place. Press down on your notebook with the ...
...the front of the notebook and slide the cable out of the notebook for important safety, regulatory, and legal information. 2 www.gateway.com © 2006 Gateway, Inc. Replacing the Keyboard Installing the new keyboard To install the new keyboard: 1 Place the new keyboard keys-down on the...countries. Important Inserting a piece of the notebook, insert the cable into their respective companies. See your notebook over . 13 Connect the power adapter, the modem cable, and the network cable, then turn on top of the keyboard into place. Press down on your notebook with the ...

8511418 - Component Replacement Manual
Page 9
...discharge (ESD). Do not lay components on the outside of antistatic bags because only the inside your notebook. 3 Disconnect the AC adapter, modem cable, and network cable. Screws Screws To replace the memory module: 1 Follow the guidelines under "Preventing static electricity discharge."... your workbench or other grounded connection. • Touch a bare metal surface on the bottom of Gateway, Inc. www.gateway.com © 2006 Gateway, Inc. All rights reserved. Gateway and eMachines are ready to replace the memory module. See your notebook. Technical Support See the label...
...discharge (ESD). Do not lay components on the outside of antistatic bags because only the inside your notebook. 3 Disconnect the AC adapter, modem cable, and network cable. Screws Screws To replace the memory module: 1 Follow the guidelines under "Preventing static electricity discharge."... your workbench or other grounded connection. • Touch a bare metal surface on the bottom of Gateway, Inc. www.gateway.com © 2006 Gateway, Inc. All rights reserved. Gateway and eMachines are ready to replace the memory module. See your notebook. Technical Support See the label...

8511418 - Component Replacement Manual
Page 10
... new or replacement module at each end of the module until it into the empty memory slot. Important Use only memory modules designed for your Gateway notebook. 11 Gently push the module down until the module tilts upward. 9 Pull the memory module out of the slot. Technical Support See the label... cover, then tighten the six cover screws. 13 Replace the keyboard screw. 14 Insert the battery, then turn your notebook over. 15 Connect the power adapter, the modem cable, and the network cable. 16 Reconnect all peripheral devices and replace any PC Cards. 17 Turn on the bottom of...
... new or replacement module at each end of the module until it into the empty memory slot. Important Use only memory modules designed for your Gateway notebook. 11 Gently push the module down until the module tilts upward. 9 Pull the memory module out of the slot. Technical Support See the label... cover, then tighten the six cover screws. 13 Replace the keyboard screw. 14 Insert the battery, then turn your notebook over. 15 Connect the power adapter, the modem cable, and the network cable. 16 Reconnect all peripheral devices and replace any PC Cards. 17 Turn on the bottom of...
8511418 - Component Replacement Manual
Page 11
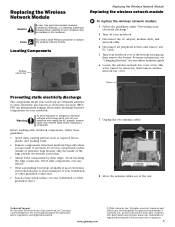
... out of the bags provide electrostatic protection. • Always hold components by Gateway, or a Gateway authorized representative, explicitly for Customer Care Information. Locating Components Wireless network bay Replacing... the Wireless Network Module Replacing the wireless network module To replace the wireless network module: 1 Follow the guidelines under "Preventing static electricity discharge." 2 Turn off your notebook and unplug the AC adapter...
... out of the bags provide electrostatic protection. • Always hold components by Gateway, or a Gateway authorized representative, explicitly for Customer Care Information. Locating Components Wireless network bay Replacing... the Wireless Network Module Replacing the wireless network module To replace the wireless network module: 1 Follow the guidelines under "Preventing static electricity discharge." 2 Turn off your notebook and unplug the AC adapter...

8511418 - Component Replacement Manual
Page 12
... © 2006 Gateway, Inc. Screw 11 Hold the new module at each side of their respective companies. This module is held by a screw, remove the screw. in one direction. All rights reserved. If your notebook over. 17 Connect the power adapter, the modem cable, and the network cable.... 18 Reconnect all peripheral devices and replace any PC Cards. 19 Turn on the bottom of Gateway, Inc. See your notebook. All other countries. Technical Support See the label...
... © 2006 Gateway, Inc. Screw 11 Hold the new module at each side of their respective companies. This module is held by a screw, remove the screw. in one direction. All rights reserved. If your notebook over. 17 Connect the power adapter, the modem cable, and the network cable.... 18 Reconnect all peripheral devices and replace any PC Cards. 19 Turn on the bottom of Gateway, Inc. See your notebook. All other countries. Technical Support See the label...
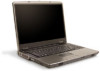
8511369 - Gateway Notebook Hardware Reference
Page 3
... and serial number 2 Microsoft Certificate of Authenticity 3 For more information 3 Chapter 2: Checking Out Your Gateway Notebook 5 Identifying features 6 Front 6 Left 7 Right 8 Back 9 Bottom 10 Keyboard area 11 Connecting the AC adapter 12 Protecting from power source problems 13 Connecting the dial-up modem 13 Connecting to a cable or DSL modem or to...
... and serial number 2 Microsoft Certificate of Authenticity 3 For more information 3 Chapter 2: Checking Out Your Gateway Notebook 5 Identifying features 6 Front 6 Left 7 Right 8 Back 9 Bottom 10 Keyboard area 11 Connecting the AC adapter 12 Protecting from power source problems 13 Connecting the dial-up modem 13 Connecting to a cable or DSL modem or to...
8511369 - Gateway Notebook Hardware Reference
Page 9
CHAPTER 2 Checking Out Your Gateway Notebook • Identifying features • Connecting the AC adapter • Connecting the dial-up modem • Connecting to a cable or DSL modem or to an Ethernet network • Starting your notebook • Turning off ...
CHAPTER 2 Checking Out Your Gateway Notebook • Identifying features • Connecting the AC adapter • Connecting the dial-up modem • Connecting to a cable or DSL modem or to an Ethernet network • Starting your notebook • Turning off ...
8511369 - Gateway Notebook Hardware Reference
Page 13
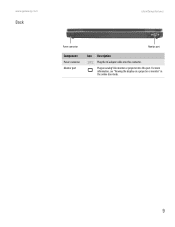
For more information, see "Viewing the display on a projector or monitor" in the online User Guide. 9 www.gateway.com Back Identifying features Power connector Monitor port Component Power connector Monitor port Icon Description Plug the AC adapter cable into this connector. Plug an analog VGA monitor or projector into this port.
For more information, see "Viewing the display on a projector or monitor" in the online User Guide. 9 www.gateway.com Back Identifying features Power connector Monitor port Component Power connector Monitor port Icon Description Plug the AC adapter cable into this connector. Plug an analog VGA monitor or projector into this port.
8511369 - Gateway Notebook Hardware Reference
Page 16
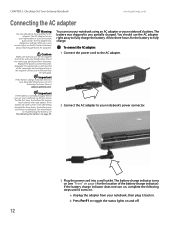
... short even after three hours, contact Gateway Customer Care at support.gateway.com. b Press FN+F1 to you expect. CHAPTER 2: Checking Out Your Gateway Notebook www.gateway.com Connecting the AC adapter Warning Do not attempt to the AC adapter. The replacement cord must be damaged.... battery. The AC adapter has no user-replaceable or user-serviceable parts inside. The AC adapter has dangerous voltages that can run your notebook using an AC adapter or your notebook on : a Unplug the adapter from Gateway. Contact Gateway about returning defective AC adapters. Caution Make sure...
... short even after three hours, contact Gateway Customer Care at support.gateway.com. b Press FN+F1 to you expect. CHAPTER 2: Checking Out Your Gateway Notebook www.gateway.com Connecting the AC adapter Warning Do not attempt to the AC adapter. The replacement cord must be damaged.... battery. The AC adapter has no user-replaceable or user-serviceable parts inside. The AC adapter has dangerous voltages that can run your notebook using an AC adapter or your notebook on : a Unplug the adapter from Gateway. Contact Gateway about returning defective AC adapters. Caution Make sure...
8511369 - Gateway Notebook Hardware Reference
Page 33
.... Ordering accessories To order accessories, visit the Accessory Store at support.gateway.com. See "Changing batteries" on page 27 for accessories or supplies. If your battery. To recalibrate the battery: 1 Connect the AC adapter, then turn on your notebook on page 32 for extended periods,...the spacebar. 5 Open the Exit menu, then highlight Exit Saving Changes and press ENTER. 6 Select Yes, then press ENTER. www.gateway.com Recalibrating the battery Recalibrating the battery Important Do not interrupt the battery recalibration process. If recalibration is not low, you may want ...
.... Ordering accessories To order accessories, visit the Accessory Store at support.gateway.com. See "Changing batteries" on page 27 for accessories or supplies. If your battery. To recalibrate the battery: 1 Connect the AC adapter, then turn on your notebook on page 32 for extended periods,...the spacebar. 5 Open the Exit menu, then highlight Exit Saving Changes and press ENTER. 6 Select Yes, then press ENTER. www.gateway.com Recalibrating the battery Recalibrating the battery Important Do not interrupt the battery recalibration process. If recalibration is not low, you may want ...
8511369 - Gateway Notebook Hardware Reference
Page 36
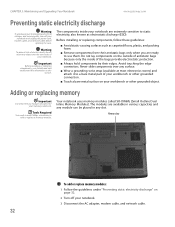
...available at most electronics stores) and attach it to dangerous electrical voltages and moving parts, turn off your notebook. 3 Disconnect the AC adapter, modem cable, and network cable. 32 The components inside of the bags provide electrostatic protection. ■ Always hold components by their... when you should read and understand the information in any object into the vent holes of your Gateway notebook. CHAPTER 3: Maintaining and Upgrading Your Notebook www.gateway.com Preventing static electricity discharge Warning To avoid exposure to a bare metal part of your workbench ...
...available at most electronics stores) and attach it to dangerous electrical voltages and moving parts, turn off your notebook. 3 Disconnect the AC adapter, modem cable, and network cable. 32 The components inside of the bags provide electrostatic protection. ■ Always hold components by their... when you should read and understand the information in any object into the vent holes of your Gateway notebook. CHAPTER 3: Maintaining and Upgrading Your Notebook www.gateway.com Preventing static electricity discharge Warning To avoid exposure to a bare metal part of your workbench ...
8511369 - Gateway Notebook Hardware Reference
Page 39
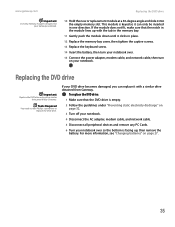
...the DVD drive is empty. 2 Follow the guidelines under "Preventing static electricity discharge" on page 32. 3 Turn off your notebook. 4 Disconnect the AC adapter, modem cable, and network cable. 5 Disconnect all peripheral devices and remove any PC Cards. 6 Turn your notebook over . 15 Connect the power...it into the empty memory slot. This module is facing up with the tab in one direction. www.gateway.com Replacing the DVD drive Important Use only memory modules designed for your Gateway notebook. 10 Hold the new or replacement module at a 30-degree angle and slide it with a ...
...the DVD drive is empty. 2 Follow the guidelines under "Preventing static electricity discharge" on page 32. 3 Turn off your notebook. 4 Disconnect the AC adapter, modem cable, and network cable. 5 Disconnect all peripheral devices and remove any PC Cards. 6 Turn your notebook over . 15 Connect the power...it into the empty memory slot. This module is facing up with the tab in one direction. www.gateway.com Replacing the DVD drive Important Use only memory modules designed for your Gateway notebook. 10 Hold the new or replacement module at a 30-degree angle and slide it with a ...
8511369 - Gateway Notebook Hardware Reference
Page 41
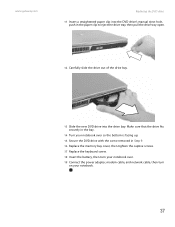
Make sure that the drive fits securely in the bay. 14 Turn your notebook over . 19 Connect the power adapter, modem cable, and network cable, then turn on your notebook. 37 www.gateway.com Replacing the DVD drive 11 Insert a straightened paper clip into the DVD drive's manual eject hole, push in Step...
Make sure that the drive fits securely in the bay. 14 Turn your notebook over . 19 Connect the power adapter, modem cable, and network cable, then turn on your notebook. 37 www.gateway.com Replacing the DVD drive 11 Insert a straightened paper clip into the DVD drive's manual eject hole, push in Step...
8511369 - Gateway Notebook Hardware Reference
Page 42
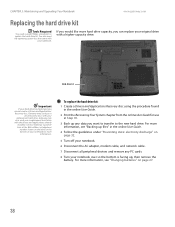
... kit Tools Required You need the operating system disc that came with the drivers and applications already installed. For more information. Contact Gateway Customer Care at the Web address or telephone number shown on the label on the bottom of recovery discs with a higher-capacity ... from the online User Guide for more information, see "Changing batteries" on page 32. 5 Turn off your notebook. 6 Disconnect the AC adapter, modem cable, and network cable. 7 Disconnect all peripheral devices and remove any data you can replace your original drive with your notebook. Hard...
... kit Tools Required You need the operating system disc that came with the drivers and applications already installed. For more information. Contact Gateway Customer Care at the Web address or telephone number shown on the label on the bottom of recovery discs with a higher-capacity ... from the online User Guide for more information, see "Changing batteries" on page 32. 5 Turn off your notebook. 6 Disconnect the AC adapter, modem cable, and network cable. 7 Disconnect all peripheral devices and remove any data you can replace your original drive with your notebook. Hard...


