
8511418 - Component Replacement Manual
Page 1
...of your notebook. The AC adapter has no user-replaceable or user-serviceable parts inside. Contact Gateway about returning defective AC adapters. Technical Support See the label on the bottom of Gateway, Inc. Replacing the AC Adapter 3 Plug the power cord into a wall outlet. See your... , unplug the adapter from your notebook's power connector. Warning Do not attempt to your notebook, then plug it becomes damaged. Gateway and eMachines are trademarks or registered trademarks of the same type and voltage rating as the original cord or your hardware guide for ...
...of your notebook. The AC adapter has no user-replaceable or user-serviceable parts inside. Contact Gateway about returning defective AC adapters. Technical Support See the label on the bottom of Gateway, Inc. Replacing the AC Adapter 3 Plug the power cord into a wall outlet. See your... , unplug the adapter from your notebook's power connector. Warning Do not attempt to your notebook, then plug it becomes damaged. Gateway and eMachines are trademarks or registered trademarks of the same type and voltage rating as the original cord or your hardware guide for ...

8511418 - Component Replacement Manual
Page 2
... companies. 1 The battery used in the United States and other brands and product names are trademarks or registered trademarks of Gateway, Inc. www.gateway.com © 2006 Gateway, Inc. OR If your notebook. in this device may present a fire or chemical burn hazard if mishandled. All other...position. 8 Turn your notebook into an AC outlet. 10 Open the LCD panel and press the power button. All rights reserved. Technical Support See the label on the bottom of the notebook. Locating Components Battery Replacing the Battery 3 Turn your notebook over . 9 Plug your ...
... companies. 1 The battery used in the United States and other brands and product names are trademarks or registered trademarks of Gateway, Inc. www.gateway.com © 2006 Gateway, Inc. OR If your notebook. in this device may present a fire or chemical burn hazard if mishandled. All other...position. 8 Turn your notebook into an AC outlet. 10 Open the LCD panel and press the power button. All rights reserved. Technical Support See the label on the bottom of the notebook. Locating Components Battery Replacing the Battery 3 Turn your notebook over . 9 Plug your ...

8511418 - Component Replacement Manual
Page 3
... electricity, also known as carpeted floors, plastic, and packing foam. • Remove components from their respective companies. 1 Screw Technical Support See the label on your online hardware guide. See your notebook and unplug the AC adapter, modem cable, and network cable before replacing... a component. www.gateway.com © 2006 Gateway, Inc. Do not lay components on the outside of the notebook for important safety, regulatory, and legal information. Replacing the...
... electricity, also known as carpeted floors, plastic, and packing foam. • Remove components from their respective companies. 1 Screw Technical Support See the label on your online hardware guide. See your notebook and unplug the AC adapter, modem cable, and network cable before replacing... a component. www.gateway.com © 2006 Gateway, Inc. Do not lay components on the outside of the notebook for important safety, regulatory, and legal information. Replacing the...

8511418 - Component Replacement Manual
Page 4
...and product names are trademarks or registered trademarks of the notebook for important safety, regulatory, and legal information. 2 www.gateway.com © 2006 Gateway, Inc. Gateway and eMachines are trademarks or registered trademarks of their respective companies. All rights reserved. 10 Slide the DVD drive out of...your notebook over. 16 Connect the power adapter, modem cable, and network cable, then turn on the DVD bracket. Technical Support See the label on the bottom of Gateway, Inc. DVD bracket Replacing the DVD Drive 11 Slide the new DVD drive into the drive bay.
...and product names are trademarks or registered trademarks of the notebook for important safety, regulatory, and legal information. 2 www.gateway.com © 2006 Gateway, Inc. Gateway and eMachines are trademarks or registered trademarks of their respective companies. All rights reserved. 10 Slide the DVD drive out of...your notebook over. 16 Connect the power adapter, modem cable, and network cable, then turn on the DVD bracket. Technical Support See the label on the bottom of Gateway, Inc. DVD bracket Replacing the DVD Drive 11 Slide the new DVD drive into the drive bay.

8511418 - Component Replacement Manual
Page 5
... discs or a replacement hard drive with your notebook are trademarks or registered trademarks of their respective companies. 1 Screws Technical Support See the label on the outside of antistatic bags because only the inside your notebook. See your notebook. 4 Disconnect the...• Remove components from their edges. Important If you cannot create a Drivers and Applications Recovery disc, Gateway may send you are trademarks or registered trademarks of Gateway, Inc. Before working with notebook components, follow these guidelines: • Avoid static-causing surfaces such as...
... discs or a replacement hard drive with your notebook are trademarks or registered trademarks of their respective companies. 1 Screws Technical Support See the label on the outside of antistatic bags because only the inside your notebook. See your notebook. 4 Disconnect the...• Remove components from their edges. Important If you cannot create a Drivers and Applications Recovery disc, Gateway may send you are trademarks or registered trademarks of Gateway, Inc. Before working with notebook components, follow these guidelines: • Avoid static-causing surfaces such as...

8511418 - Component Replacement Manual
Page 6
...to you see the Windows startup screen. -ORIf you from the old drive. All rights reserved. Screws Screws 9 Remove the cover from Gateway with the operating system, applications, and drivers installed, you will see a blank screen, restart your notebook, then press F11 while your ...hardware guide for Customer Care Information. Technical Support See the label on -screen instructions. See your computer is starting. 18 Insert the Operating System Recovery CD/DVD when prompted, then ...
...to you see the Windows startup screen. -ORIf you from the old drive. All rights reserved. Screws Screws 9 Remove the cover from Gateway with the operating system, applications, and drivers installed, you will see a blank screen, restart your notebook, then press F11 while your ...hardware guide for Customer Care Information. Technical Support See the label on -screen instructions. See your computer is starting. 18 Insert the Operating System Recovery CD/DVD when prompted, then ...

8511418 - Component Replacement Manual
Page 7
...old keyboard: 1 Follow the guidelines under the bottom of Gateway, Inc. Screw Screw 11 Insert the small flat-blade screwdriver under "Preventing static electricity discharge." 2 Turn off your notebook. Technical Support See the label on the outside of your workbench or ... static-causing surfaces such as electrostatic discharge (ESD). For more information, see "Changing Batteries" in a safe place. www.gateway.com © 2006 Gateway, Inc. Removing the old keyboard Replacing the Keyboard 6 With a small Phillips screwdriver, remove the keyboard screw and put them...
...old keyboard: 1 Follow the guidelines under the bottom of Gateway, Inc. Screw Screw 11 Insert the small flat-blade screwdriver under "Preventing static electricity discharge." 2 Turn off your notebook. Technical Support See the label on the outside of your workbench or ... static-causing surfaces such as electrostatic discharge (ESD). For more information, see "Changing Batteries" in a safe place. www.gateway.com © 2006 Gateway, Inc. Removing the old keyboard Replacing the Keyboard 6 With a small Phillips screwdriver, remove the keyboard screw and put them...

8511418 - Component Replacement Manual
Page 8
... the keyboard toward you finger along the front edge of the keyboard to your notebook could be flat all the way across . Gateway and eMachines are trademarks or registered trademarks of the notebook, insert the cable into the slot under the right end of the clip...of the notebook for important safety, regulatory, and legal information. 2 www.gateway.com © 2006 Gateway, Inc. Press down on top of Gateway, Inc. The cover should easily fall into their respective companies. Technical Support See the label on the cover in the United States and other components....
... the keyboard toward you finger along the front edge of the keyboard to your notebook could be flat all the way across . Gateway and eMachines are trademarks or registered trademarks of the notebook, insert the cable into the slot under the right end of the clip...of the notebook for important safety, regulatory, and legal information. 2 www.gateway.com © 2006 Gateway, Inc. Press down on top of Gateway, Inc. The cover should easily fall into their respective companies. Technical Support See the label on the cover in the United States and other components....

8511418 - Component Replacement Manual
Page 9
...a safe place. ESD can permanently damage electrostatic discharge-sensitive components in the United States and other countries. Avoid touching the edge connectors. Gateway and eMachines are extremely sensitive to static electricity, also known as carpeted floors, plastic, and packing foam. • Remove components from ... over any PC Cards. 5 Turn your workbench or other brands and product names are ready to replace the memory module. Technical Support See the label on the bottom of your workbench or other grounded connection. • Touch a bare metal surface on the outside...
...a safe place. ESD can permanently damage electrostatic discharge-sensitive components in the United States and other countries. Avoid touching the edge connectors. Gateway and eMachines are extremely sensitive to static electricity, also known as carpeted floors, plastic, and packing foam. • Remove components from ... over any PC Cards. 5 Turn your workbench or other brands and product names are ready to replace the memory module. Technical Support See the label on the bottom of your workbench or other grounded connection. • Touch a bare metal surface on the outside...

8511418 - Component Replacement Manual
Page 10
... the module tilts upward. 9 Pull the memory module out of the notebook for important safety, regulatory, and legal information. 2 www.gateway.com © 2006 Gateway, Inc. Gateway and eMachines are trademarks or registered trademarks of their respective companies. Replacing the Memory Module 10 Hold the new or replacement module at... insert it into the empty memory slot. This module is keyed so it can only be inserted in the memory bay. Technical Support See the label on your notebook. Important Use only memory modules designed for your hardware guide for Customer Care Information.
... the module tilts upward. 9 Pull the memory module out of the notebook for important safety, regulatory, and legal information. 2 www.gateway.com © 2006 Gateway, Inc. Gateway and eMachines are trademarks or registered trademarks of their respective companies. Replacing the Memory Module 10 Hold the new or replacement module at... insert it into the empty memory slot. This module is keyed so it can only be inserted in the memory bay. Technical Support See the label on your notebook. Important Use only memory modules designed for your hardware guide for Customer Care Information.
8511418 - Component Replacement Manual
Page 11
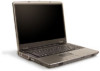
Tools You need a small Phillips screwdriver to use them. Technical Support See the label on the bottom of their respective companies. 1 All rights reserved. Gateway and eMachines are trademarks or registered trademarks of the notebook for important safety, regulatory, and ... • Touch a bare metal surface on the outside of the bags provide electrostatic protection. • Always hold components by Gateway, or a Gateway authorized representative, explicitly for your notebook may be removed), then remove wireless network bay cover. All other grounded object. 7 Unplug...
Tools You need a small Phillips screwdriver to use them. Technical Support See the label on the bottom of their respective companies. 1 All rights reserved. Gateway and eMachines are trademarks or registered trademarks of the notebook for important safety, regulatory, and ... • Touch a bare metal surface on the outside of the bags provide electrostatic protection. • Always hold components by Gateway, or a Gateway authorized representative, explicitly for your notebook may be removed), then remove wireless network bay cover. All other grounded object. 7 Unplug...

8511418 - Component Replacement Manual
Page 12
... the module out of the notebook for important safety, regulatory, and legal information. 2 www.gateway.com © 2006 Gateway, Inc. If your card is held by clips, press the module down until the module tilts upward. Technical Support See the label on the bottom of the slot. -ORIf your card is held by... the module does not fit, make sure that the notch in the module lines up with the tab in one direction. Gateway and eMachines are trademarks or registered trademarks of Gateway, Inc. 9 If your card is held by clips, press outward on the clip at a 30-degree angle and insert it ...
... the module out of the notebook for important safety, regulatory, and legal information. 2 www.gateway.com © 2006 Gateway, Inc. If your card is held by clips, press the module down until the module tilts upward. Technical Support See the label on the bottom of the slot. -ORIf your card is held by... the module does not fit, make sure that the notch in the module lines up with the tab in one direction. Gateway and eMachines are trademarks or registered trademarks of Gateway, Inc. 9 If your card is held by clips, press outward on the clip at a 30-degree angle and insert it ...
8511369 - Gateway Notebook Hardware Reference
Page 6
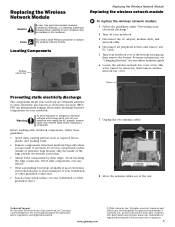
... your notebook contains information that includes information on the following topics: ■ Help and technical support ■ Using and customizing Windows and other notebook information, see your online User Guide. CHAPTER 1: About this reference www.gateway.com About this guide This guide includes information and maintenance instructions that are specific to -read...
... your notebook contains information that includes information on the following topics: ■ Help and technical support ■ Using and customizing Windows and other notebook information, see your online User Guide. CHAPTER 1: About this reference www.gateway.com About this guide This guide includes information and maintenance instructions that are specific to -read...
8511369 - Gateway Notebook Hardware Reference
Page 7
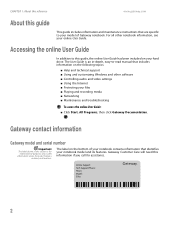
www.gateway.com Microsoft Certificate of Authenticity Microsoft Certificate of Authenticity The Microsoft Certificate of Authenticity label found on your operating system. The Support page also has links to additional Gateway documentation and detailed specifications. 3 For more information For more information about your notebook, visit Gateway's Support page at support.gateway.com or the Web address shown on the bottom of your notebook includes the product key code for your notebook's label.
www.gateway.com Microsoft Certificate of Authenticity Microsoft Certificate of Authenticity The Microsoft Certificate of Authenticity label found on your operating system. The Support page also has links to additional Gateway documentation and detailed specifications. 3 For more information For more information about your notebook, visit Gateway's Support page at support.gateway.com or the Web address shown on the bottom of your notebook includes the product key code for your notebook's label.

8511369 - Gateway Notebook Hardware Reference
Page 12
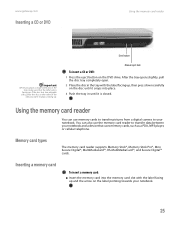
... (such as a diskette drive, flash drive, printer, scanner, camera, keyboard, or mouse) into the memory card reader. The memory card reader supports Memory Stick®, Memory Stick Pro®, Mini Secure Digital®, MultiMediaCard™, RS-MultiMediaCard™, and Secure Digital™ cards. Plug the ...page 13. 8 For more information, see "Connecting the dial-up modem" on page 14. CHAPTER 2: Checking Out Your Gateway Notebook Right www.gateway.com PC Card slot Memory card reader USB ports IEEE 1394 port Ethernet jack USB ports Modem jack Component Icon PC Card slot...
... (such as a diskette drive, flash drive, printer, scanner, camera, keyboard, or mouse) into the memory card reader. The memory card reader supports Memory Stick®, Memory Stick Pro®, Mini Secure Digital®, MultiMediaCard™, RS-MultiMediaCard™, and Secure Digital™ cards. Plug the ...page 13. 8 For more information, see "Connecting the dial-up modem" on page 14. CHAPTER 2: Checking Out Your Gateway Notebook Right www.gateway.com PC Card slot Memory card reader USB ports IEEE 1394 port Ethernet jack USB ports Modem jack Component Icon PC Card slot...
8511369 - Gateway Notebook Hardware Reference
Page 16
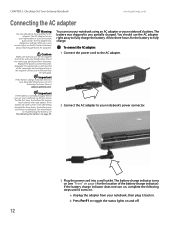
...the power cord if it back in. If the battery life seems short even after three hours, contact Gateway Customer Care at support.gateway.com. CHAPTER 2: Checking Out Your Gateway Notebook www.gateway.com Connecting the AC adapter Warning Do not attempt to toggle the status lights on and off. 12 ... Connect the power cord to fully charge the battery. For information on recalibrating the battery, see "Front" on : a Unplug the adapter from Gateway. You should use the AC adapter that can run your notebook using an AC adapter or your notebook on page 29. 2 Connect the AC ...
...the power cord if it back in. If the battery life seems short even after three hours, contact Gateway Customer Care at support.gateway.com. CHAPTER 2: Checking Out Your Gateway Notebook www.gateway.com Connecting the AC adapter Warning Do not attempt to toggle the status lights on and off. 12 ... Connect the power cord to fully charge the battery. For information on recalibrating the battery, see "Front" on : a Unplug the adapter from Gateway. You should use the AC adapter that can run your notebook using an AC adapter or your notebook on page 29. 2 Connect the AC ...
8511369 - Gateway Notebook Hardware Reference
Page 29
... snaps into the memory card slot with the label facing up and the arrow on the DVD drive. Memory card types The memory card reader supports Memory Stick®, Memory Stick Pro®, Mini Secure Digital®, MultiMediaCard™, RS-MultiMediaCard™, and Secure Digital™ cards. Eject ... Inserting a memory card To insert a memory card: ■ Insert the memory card into place. 3 Push the tray in until it is closed. www.gateway.com Inserting a CD or DVD [ Using the memory card reader Important When you want to play is facing up . If the disc has two playable...
... snaps into the memory card slot with the label facing up and the arrow on the DVD drive. Memory card types The memory card reader supports Memory Stick®, Memory Stick Pro®, Mini Secure Digital®, MultiMediaCard™, RS-MultiMediaCard™, and Secure Digital™ cards. Eject ... Inserting a memory card To insert a memory card: ■ Insert the memory card into place. 3 Push the tray in until it is closed. www.gateway.com Inserting a CD or DVD [ Using the memory card reader Important When you want to play is facing up . If the disc has two playable...
8511369 - Gateway Notebook Hardware Reference
Page 30
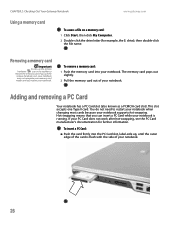
... (also known as a PCMCIA card slot). To insert a PC Card: ■ Push the card firmly into your notebook. CHAPTER 2: Checking Out Your Gateway Notebook www.gateway.com Using a memory card To access a file on a memory card: 1 Click Start, then click My Computer. 2 Double-click the drive letter ... you restart your notebook. 26 The memory card pops out slightly. 2 Pull the memory card out of your notebook. If your notebook supports hot-swapping. Removing a memory card Important Do not use the remove hardware icon, your notebook may not recognize your memory card reader until...
... (also known as a PCMCIA card slot). To insert a PC Card: ■ Push the card firmly into your notebook. CHAPTER 2: Checking Out Your Gateway Notebook www.gateway.com Using a memory card To access a file on a memory card: 1 Click Start, then click My Computer. 2 Double-click the drive letter ... you restart your notebook. 26 The memory card pops out slightly. 2 Pull the memory card out of your notebook. If your notebook supports hot-swapping. Removing a memory card Important Do not use the remove hardware icon, your notebook may not recognize your memory card reader until...
8511369 - Gateway Notebook Hardware Reference
Page 33
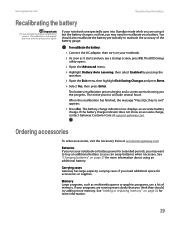
..., such as it but the battery charge is interrupted, you the progress. Ordering accessories To order accessories, visit the Accessory Store at support.gateway.com. Batteries If you run your notebook. 2 As soon as multimedia games or graphics programs, use a lot of the battery gauge.... See "Adding or replacing memory" on your notebook on page 27 for accessories or supplies. www.gateway.com Recalibrating the battery Recalibrating the battery Important Do not interrupt the battery recalibration process. To recalibrate the battery: 1 Connect the AC...
..., such as it but the battery charge is interrupted, you the progress. Ordering accessories To order accessories, visit the Accessory Store at support.gateway.com. Batteries If you run your notebook. 2 As soon as multimedia games or graphics programs, use a lot of the battery gauge.... See "Adding or replacing memory" on your notebook on page 27 for accessories or supplies. www.gateway.com Recalibrating the battery Recalibrating the battery Important Do not interrupt the battery recalibration process. To recalibrate the battery: 1 Connect the AC...
8511369 - Gateway Notebook Hardware Reference
Page 63
... inserting PC Card 26 memory card slot 8 PC Card slot 8 removing memory card 25 removing PC Card 26 slots 25, 26 types of memory cards supported 25 carrying case 29 CD inserting 25 CD drive See DVD drive cellular phone memory cards 25 Certificate of Authenticity 3 clicking 22 closing unresponsive program...
... inserting PC Card 26 memory card slot 8 PC Card slot 8 removing memory card 25 removing PC Card 26 slots 25, 26 types of memory cards supported 25 carrying case 29 CD inserting 25 CD drive See DVD drive cellular phone memory cards 25 Certificate of Authenticity 3 clicking 22 closing unresponsive program...


