
8511418 - Component Replacement Manual
Page 2
... does not turn blue after three hours, contact Gateway Customer Care at the Web address or telephone number shown on the label on and is not connected to AC power, save your work and turn off your notebook. 2 Close the LCD panel. 6 Slide the replacement battery into the notebook until it snaps into...
... does not turn blue after three hours, contact Gateway Customer Care at the Web address or telephone number shown on the label on and is not connected to AC power, save your work and turn off your notebook. 2 Close the LCD panel. 6 Slide the replacement battery into the notebook until it snaps into...

8511418 - Component Replacement Manual
Page 7
...bottom of the bags provide electrostatic protection. • Always hold components by their edges. www.gateway.com © 2006 Gateway, Inc. Avoid touching the edge connectors. Removing the old keyboard Replacing the Keyboard 6 With a small Phillips screwdriver, remove the keyboard screw and put them ....put it to a bare metal part of the notebook for important safety, regulatory, and legal information. 12 Carefully open the LCD panel to dangerous electrical voltages and moving parts, turn off your workbench or other grounded object. Memory bay Wireless network bay Keyboard...
...bottom of the bags provide electrostatic protection. • Always hold components by their edges. www.gateway.com © 2006 Gateway, Inc. Avoid touching the edge connectors. Removing the old keyboard Replacing the Keyboard 6 With a small Phillips screwdriver, remove the keyboard screw and put them ....put it to a bare metal part of the notebook for important safety, regulatory, and legal information. 12 Carefully open the LCD panel to dangerous electrical voltages and moving parts, turn off your workbench or other grounded object. Memory bay Wireless network bay Keyboard...

8511418 - Component Replacement Manual
Page 8
...the front edge of the keyboard to seat the retaining tabs into the connector, then slide the black clip to not damage the LCD panel. 6 Replace the keyboard cover. Be careful to lock the connector in several places until it lies keys-down on top of your notebook. ... Important Inserting a piece of Gateway, Inc. Be careful to not damage the LCD panel. 17 Slide the black keyboard connector clip to not damage the LCD panel. 3 Rotate the keyboard toward the LCD panel until it is not twisted. 14 Pull the cover off the notebook. Replacing the Keyboard Installing the new ...
...the front edge of the keyboard to seat the retaining tabs into the connector, then slide the black clip to not damage the LCD panel. 6 Replace the keyboard cover. Be careful to lock the connector in several places until it lies keys-down on top of your notebook. ... Important Inserting a piece of Gateway, Inc. Be careful to not damage the LCD panel. 17 Slide the black keyboard connector clip to not damage the LCD panel. 3 Rotate the keyboard toward the LCD panel until it is not twisted. 14 Pull the cover off the notebook. Replacing the Keyboard Installing the new ...

8511369 - Gateway Notebook Hardware Reference
Page 31
...AC power, go to Step 2. -OR- Turn off while changing the battery. Replace only with a battery specifically manufactured for your notebook is on . Discard used batteries according to AC power, you can change the battery: 1 If your Gateway notebook. If your notebook. 2 Release the eject button by pressing the PC Card... the battery while your notebook is turned on and is not plugged into an AC outlet, you must turn off your notebook. 2 Close the LCD panel. 3 Turn your notebook over so the bottom is not plugged into an AC outlet, save your work and turn your notebook off your ...
...AC power, go to Step 2. -OR- Turn off while changing the battery. Replace only with a battery specifically manufactured for your notebook is on . Discard used batteries according to AC power, you can change the battery: 1 If your Gateway notebook. If your notebook. 2 Release the eject button by pressing the PC Card... the battery while your notebook is turned on and is not plugged into an AC outlet, you must turn off your notebook. 2 Close the LCD panel. 3 Turn your notebook over so the bottom is not plugged into an AC outlet, save your work and turn your notebook off your ...

8511369 - Gateway Notebook Hardware Reference
Page 45
Keyboard screw 7 Turn your notebook over so the top is marked with a K. www.gateway.com Tips & Tricks The screw hole is facing up , then remove the battery. For more information, see "Changing batteries" on page 27. 6 Remove the keyboard ... in a safe place. Screw Screw 9 Insert the small flat-blade screwdriver under the bottom of each hinge cover and gently pry it in a safe place. Replacing the keyboard 5 Turn your notebook over so the bottom is facing up . 8 With a small Phillips screwdriver, remove the two hinge cover screws and put it...
Keyboard screw 7 Turn your notebook over so the top is marked with a K. www.gateway.com Tips & Tricks The screw hole is facing up , then remove the battery. For more information, see "Changing batteries" on page 27. 6 Remove the keyboard ... in a safe place. Screw Screw 9 Insert the small flat-blade screwdriver under the bottom of each hinge cover and gently pry it in a safe place. Replacing the keyboard 5 Turn your notebook over so the bottom is facing up . 8 With a small Phillips screwdriver, remove the two hinge cover screws and put it...

8511369 - Gateway Notebook Hardware Reference
Page 47
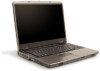
www.gateway.com Replacing the keyboard Tips & Tricks Depending on the end of the cover opposite of the thumb notch. 16 Loosen the mini-PCI bay cover screw (this screw cannot be removed). Screw Screw Screw Screw Screw Screw 15 Use the thumb notch to break off the tabs located on your model, not all screws may be captive. 14 Close the LCD panel, turn your notebook over so the bottom is facing up, then loosen the six memory bay cover screws (these screws cannot be removed), then remove the mini-PCI bay cover. 43 Be careful not to lift the memory bay cover, then remove it.
www.gateway.com Replacing the keyboard Tips & Tricks Depending on the end of the cover opposite of the thumb notch. 16 Loosen the mini-PCI bay cover screw (this screw cannot be removed). Screw Screw Screw Screw Screw Screw 15 Use the thumb notch to break off the tabs located on your model, not all screws may be captive. 14 Close the LCD panel, turn your notebook over so the bottom is facing up, then loosen the six memory bay cover screws (these screws cannot be removed), then remove the mini-PCI bay cover. 43 Be careful not to lift the memory bay cover, then remove it.

8511369 - Gateway Notebook Hardware Reference
Page 49
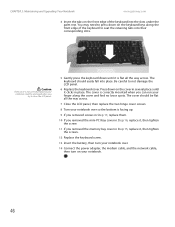
... your notebook with the space bar away from you. 2 Make sure the black keyboard connector clip is fully moved toward the LCD panel until the keyboard is not twisted. www.gateway.com Replacing the keyboard 21 Slide the black keyboard connector clip to lock the connector in place. 3 Rotate the keyboard toward the...
... your notebook with the space bar away from you. 2 Make sure the black keyboard connector clip is fully moved toward the LCD panel until the keyboard is not twisted. www.gateway.com Replacing the keyboard 21 Slide the black keyboard connector clip to lock the connector in place. 3 Rotate the keyboard toward the...
8511369 - Gateway Notebook Hardware Reference
Page 50
... their corresponding slots. CHAPTER 3: Maintaining and Upgrading Your Notebook www.gateway.com 4 Insert the tabs on the front edge of the keyboard to not damage the LCD panel. 6 Replace the keyboard cover. Caution If the cover is not correctly replaced, your notebook could be flat all the way across . 7... Close the LCD panel, then replace the two hinge cover screws. 8 Turn your notebook. 46 ...
... their corresponding slots. CHAPTER 3: Maintaining and Upgrading Your Notebook www.gateway.com 4 Insert the tabs on the front edge of the keyboard to not damage the LCD panel. 6 Replace the keyboard cover. Caution If the cover is not correctly replaced, your notebook could be flat all the way across . 7... Close the LCD panel, then replace the two hinge cover screws. 8 Turn your notebook. 46 ...

8511369 - Gateway Notebook Hardware Reference
Page 64
Index opening 22 finding specifications 3 Firewire port 8 Fn key 19 folders opening 22 function keys 18 G Gateway model number 2, 10 serial number 2, 3 Support 3 H hard drive bay 10 indicator 17 installing 38 replacing 38 headphone jack 6 hot-swapping 26 I i.Link port 8 IEEE 1394 port 8 indicators See status ...combinations 19 keyboard buttons 18 connecting 18 features 18 locating 11 replacing 40 USB port 8 keys application 18 60 www.gateway.com arrow 18 battery status 19 brightness 20 directional 18 Fn 19 function 18 LCD brightness 20 LCD/CRT 19 navigation 18 numeric keypad 19 power status 19 ...
Index opening 22 finding specifications 3 Firewire port 8 Fn key 19 folders opening 22 function keys 18 G Gateway model number 2, 10 serial number 2, 3 Support 3 H hard drive bay 10 indicator 17 installing 38 replacing 38 headphone jack 6 hot-swapping 26 I i.Link port 8 IEEE 1394 port 8 indicators See status ...combinations 19 keyboard buttons 18 connecting 18 features 18 locating 11 replacing 40 USB port 8 keys application 18 60 www.gateway.com arrow 18 battery status 19 brightness 20 directional 18 Fn 19 function 18 LCD brightness 20 LCD/CRT 19 navigation 18 numeric keypad 19 power status 19 ...

8511264 - User Guide Gateway Notebook
Page 141
...inside of air with a narrow, straw-like extension to clean your notebook and other peripherals before cleaning any water into the vents. www.gateway.com Protecting your notebook from the wall outlets. To avoid possible injury from electrical shock, unplug the power cord, modem cable, and ...the purpose. If you shut down . Cleaning the notebook screen Use a soft cloth and water to replace it again. Protecting your notebook from viruses Your notebook may need to clean the LCD screen. Also, remove the battery(ies) before cleaning any components. Do not use it . Cleaning ...
...inside of air with a narrow, straw-like extension to clean your notebook and other peripherals before cleaning any water into the vents. www.gateway.com Protecting your notebook from the wall outlets. To avoid possible injury from electrical shock, unplug the power cord, modem cable, and ...the purpose. If you shut down . Cleaning the notebook screen Use a soft cloth and water to replace it again. Protecting your notebook from viruses Your notebook may need to clean the LCD screen. Also, remove the battery(ies) before cleaning any components. Do not use it . Cleaning ...

8511264 - User Guide Gateway Notebook
Page 158
... has pixels that the diskette you feel these to identify whether a repair or replacement is too dark Adjust the brightness using the system keys. ■ Make sure the notebook is IBM-compatible. Gateway's inspection standards keep these pixels are using your keyboard, see "Changing power modes...9632; Remove the diskette from the Display Properties dialog box. Tips & Tricks For more information about using is not in active-matrix LCD screens. For instructions on changing the power modes, see the poster or hardware guide. If errors are flawed and cannot be sending...
... has pixels that the diskette you feel these to identify whether a repair or replacement is too dark Adjust the brightness using the system keys. ■ Make sure the notebook is IBM-compatible. Gateway's inspection standards keep these pixels are using your keyboard, see "Changing power modes...9632; Remove the diskette from the Display Properties dialog box. Tips & Tricks For more information about using is not in active-matrix LCD screens. For instructions on changing the power modes, see the poster or hardware guide. If errors are flawed and cannot be sending...


