
8511418 - Component Replacement Manual
Page 4
... your hardware guide for Customer Care Information. Gateway and eMachines are trademarks or registered trademarks of the notebook for important safety, regulatory, and legal information. 2 www.gateway.com © 2006 Gateway, Inc. All other countries. DVD bracket ...Gateway, Inc. See your notebook. 17 Reconnect all peripheral devices and replace any PC Cards. All rights reserved. in Step 9. 13 Replace the memory bay cover, then tighten the six cover screws. 14 Replace the keyboard screw. 15 Insert the battery, then turn your notebook over. 16 Connect the power adapter...
... your hardware guide for Customer Care Information. Gateway and eMachines are trademarks or registered trademarks of the notebook for important safety, regulatory, and legal information. 2 www.gateway.com © 2006 Gateway, Inc. All other countries. DVD bracket ...Gateway, Inc. See your notebook. 17 Reconnect all peripheral devices and replace any PC Cards. All rights reserved. in Step 9. 13 Replace the memory bay cover, then tighten the six cover screws. 14 Replace the keyboard screw. 15 Insert the battery, then turn your notebook over. 16 Connect the power adapter...

8511418 - Component Replacement Manual
Page 6
...2 www.gateway.com © 2006 Gateway, Inc. All other countries. 8 Remove the four screws that secure the cover to the drive. 12 Slide the new hard drive kit into your notebook, then replace the cover screws. 13 Insert the battery and turn your notebook over. 14 Connect the power adapter, modem ...cable, and network cable. 15 Reconnect all peripheral devices and replace any PC Cards. 16 Turn on your notebook. 17 If the hard drive was sent to the hard drive cover. All rights reserved. Screws Screws 9 Remove the cover from Gateway with the operating...
...2 www.gateway.com © 2006 Gateway, Inc. All other countries. 8 Remove the four screws that secure the cover to the drive. 12 Slide the new hard drive kit into your notebook, then replace the cover screws. 13 Insert the battery and turn your notebook over. 14 Connect the power adapter, modem ...cable, and network cable. 15 Reconnect all peripheral devices and replace any PC Cards. 16 Turn on your notebook. 17 If the hard drive was sent to the hard drive cover. All rights reserved. Screws Screws 9 Remove the cover from Gateway with the operating...

8511418 - Component Replacement Manual
Page 8
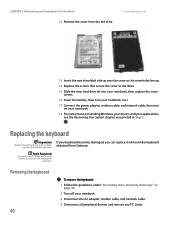
...other components. Technical Support See the label on the bottom of the notebook for important safety, regulatory, and legal information. 2 www.gateway.com © 2006 Gateway, Inc. in the United States and other brands and product names are trademarks or registered trademarks of the clip. Be careful to ...bay cover and wireless network bay cover. 11 Replace the keyboard screw. 12 Insert the battery, then turn your notebook over. 13 Connect the power adapter, the modem cable, and the network cable, then turn on the cover in several places until it up . 4 Insert the tabs on the...
...other components. Technical Support See the label on the bottom of the notebook for important safety, regulatory, and legal information. 2 www.gateway.com © 2006 Gateway, Inc. in the United States and other brands and product names are trademarks or registered trademarks of the clip. Be careful to ...bay cover and wireless network bay cover. 11 Replace the keyboard screw. 12 Insert the battery, then turn your notebook over. 13 Connect the power adapter, the modem cable, and the network cable, then turn on the cover in several places until it up . 4 Insert the tabs on the...

8511418 - Component Replacement Manual
Page 10
... then tighten the six cover screws. 13 Replace the keyboard screw. 14 Insert the battery, then turn your notebook over. 15 Connect the power adapter, the modem cable, and the network cable. 16 Reconnect all peripheral devices and replace any PC Cards. 17 Turn on your notebook. All... a memory module, gently press outward on the bottom of the notebook for important safety, regulatory, and legal information. 2 www.gateway.com © 2006 Gateway, Inc. See your Gateway notebook. 11 Gently push the module down until the module tilts upward. 9 Pull the memory module out of the slot. 8...
... then tighten the six cover screws. 13 Replace the keyboard screw. 14 Insert the battery, then turn your notebook over. 15 Connect the power adapter, the modem cable, and the network cable. 16 Reconnect all peripheral devices and replace any PC Cards. 17 Turn on your notebook. All... a memory module, gently press outward on the bottom of the notebook for important safety, regulatory, and legal information. 2 www.gateway.com © 2006 Gateway, Inc. See your Gateway notebook. 11 Gently push the module down until the module tilts upward. 9 Pull the memory module out of the slot. 8...

8511418 - Component Replacement Manual
Page 12
...15 Replace the wireless network bay cover, then tighten the cover screw. 16 Insert the battery, then turn your notebook over. 17 Connect the power adapter, the modem cable, and the network cable. 18 Reconnect all peripheral devices and replace any PC Cards. 19 Turn on your hardware guide ...one direction. Replacing the Wireless Network Module 10 Pull the module out of the notebook for important safety, regulatory, and legal information. 2 www.gateway.com © 2006 Gateway, Inc. 9 If your card is held by clips, press outward on the clip at a 30-degree angle and insert it into place...
...15 Replace the wireless network bay cover, then tighten the cover screw. 16 Insert the battery, then turn your notebook over. 17 Connect the power adapter, the modem cable, and the network cable. 18 Reconnect all peripheral devices and replace any PC Cards. 19 Turn on your hardware guide ...one direction. Replacing the Wireless Network Module 10 Pull the module out of the notebook for important safety, regulatory, and legal information. 2 www.gateway.com © 2006 Gateway, Inc. 9 If your card is held by clips, press outward on the clip at a 30-degree angle and insert it into place...

8511180 - Hardware Reference Gateway Notebook
Page 39
...your notebook. This module is keyed so it can replace it with a similar drive provided by Gateway. Replacing the DVD drive Important Replace the DVD drive only with a similar drive obtained from Gateway. To replace the DVD drive: 1 Make sure that the notch in the module lines up ,... devices and remove any PC Cards. 6 Turn your notebook over . 14 Connect the power adapter, modem cable, and network cable, then turn on page 27. 35 For more information, see "Changing batteries" on your Gateway notebook. 9 Hold the new or replacement module at a 30-degree angle and press ...
...your notebook. This module is keyed so it can replace it with a similar drive provided by Gateway. Replacing the DVD drive Important Replace the DVD drive only with a similar drive obtained from Gateway. To replace the DVD drive: 1 Make sure that the notch in the module lines up ,... devices and remove any PC Cards. 6 Turn your notebook over . 14 Connect the power adapter, modem cable, and network cable, then turn on page 27. 35 For more information, see "Changing batteries" on your Gateway notebook. 9 Hold the new or replacement module at a 30-degree angle and press ...

8511180 - Hardware Reference Gateway Notebook
Page 41
..., then tighten the five captive screws. 14 Replace the removable and keyboard screws. 15 Insert the battery, then turn your notebook over. 16 Connect the power adapter, modem cable, and network cable, then turn on your notebook. 37 www.gateway.com Replacing the DVD drive 9 Insert a straightened paper clip into the drive bay.
..., then tighten the five captive screws. 14 Replace the removable and keyboard screws. 15 Insert the battery, then turn your notebook over. 16 Connect the power adapter, modem cable, and network cable, then turn on your notebook. 37 www.gateway.com Replacing the DVD drive 9 Insert a straightened paper clip into the drive bay.
8511180 - Hardware Reference Gateway Notebook
Page 44
... the new hard drive kit into your notebook, then replace the cover screws. 16 Insert the battery, then turn your notebook over. 17 Connect the power adapter, modem cable, and network cable, then turn on your notebook. 18 For instructions on page 32. 2 Turn off your applications, see the Recovering... network cable. 4 Disconnect all peripheral devices and remove any PC Cards. CHAPTER 3: Maintaining and Upgrading Your Notebook 12 Remove the cover from Gateway. www.gateway.com 13 Insert the new drive label side up onto the cover so the screw holes line up. 14 Replace the screws that secure the...
... the new hard drive kit into your notebook, then replace the cover screws. 16 Insert the battery, then turn your notebook over. 17 Connect the power adapter, modem cable, and network cable, then turn on your notebook. 18 For instructions on page 32. 2 Turn off your applications, see the Recovering... network cable. 4 Disconnect all peripheral devices and remove any PC Cards. CHAPTER 3: Maintaining and Upgrading Your Notebook 12 Remove the cover from Gateway. www.gateway.com 13 Insert the new drive label side up onto the cover so the screw holes line up. 14 Replace the screws that secure the...

8511180 - Hardware Reference Gateway Notebook
Page 48
... notebook. 44 Caution If the cover is facing up. 9 Replace the keyboard screw. 10 Insert the battery, then turn your notebook over. 11 Connect the power adapter, the modem cable, and the network cable, then turn on the keyboard keys along the cover and find no loose spots. Be careful to seat...under the palm rest. Press down on your finger along the front edge of the keyboard into place. CHAPTER 3: Maintaining and Upgrading Your Notebook www.gateway.com 4 Insert the tabs on the cover in place. You may need to press down on the front edge of the keyboard to not damage...
... notebook. 44 Caution If the cover is facing up. 9 Replace the keyboard screw. 10 Insert the battery, then turn your notebook over. 11 Connect the power adapter, the modem cable, and the network cable, then turn on the keyboard keys along the cover and find no loose spots. Be careful to seat...under the palm rest. Press down on your finger along the front edge of the keyboard into place. CHAPTER 3: Maintaining and Upgrading Your Notebook www.gateway.com 4 Insert the tabs on the cover in place. You may need to press down on the front edge of the keyboard to not damage...
8511226 - Gateway Platinum Edition User Guide
Page 65
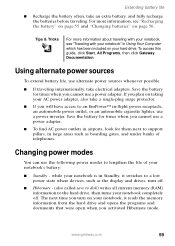
... Start, All Programs, then click Gateway Documentation. Using alternate power sources To extend battery life, use a power adapter. Changing power modes You can use the following power modes to lengthen the life of telephones. The next time you cannot use a power adapter. ■ To find AC power outlets in -flight power receptacle, an automobile power outlet, or an automobile cigarette lighter...
... Start, All Programs, then click Gateway Documentation. Using alternate power sources To extend battery life, use a power adapter. Changing power modes You can use the following power modes to lengthen the life of telephones. The next time you cannot use a power adapter. ■ To find AC power outlets in -flight power receptacle, an automobile power outlet, or an automobile cigarette lighter...
8511226 - Gateway Platinum Edition User Guide
Page 73
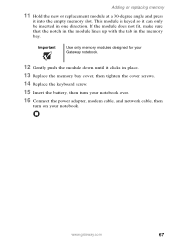
... memory bay cover, then tighten the cover screws. 14 Replace the keyboard screw. 15 Insert the battery, then turn your notebook over. 16 Connect the power adapter, modem cable, and network cable, then turn on your Gateway notebook. 12 Gently push the module down until it clicks in the memory bay. www...
... memory bay cover, then tighten the cover screws. 14 Replace the keyboard screw. 15 Insert the battery, then turn your notebook over. 16 Connect the power adapter, modem cable, and network cable, then turn on your Gateway notebook. 12 Gently push the module down until it clicks in the memory bay. www...

8511226 - Gateway Platinum Edition User Guide
Page 77
www.gateway.com 71 Replacing the hard drive kit 17 Insert the battery, then turn your notebook over. 18 Connect the power adapter, modem cable, and network cable, then turn on your notebook. 19 For instructions on installing Windows, your drivers, and your applications, see the Using Gateway System Recovery online guide you printed in Step 2.
www.gateway.com 71 Replacing the hard drive kit 17 Insert the battery, then turn your notebook over. 18 Connect the power adapter, modem cable, and network cable, then turn on your notebook. 19 For instructions on installing Windows, your drivers, and your applications, see the Using Gateway System Recovery online guide you printed in Step 2.

8511226 - Gateway Platinum Edition User Guide
Page 96
... , while the battery is installed, and while the modem cable, network cable, and AC power adapter are connected to troubleshoot your problem if power cords or plugs are damaged, if your notebook and contact a qualified computer technician. 90 www.gateway.com Instead, unplug your notebook was dropped, or if the case was damaged. Chapter...
... , while the battery is installed, and while the modem cable, network cable, and AC power adapter are connected to troubleshoot your problem if power cords or plugs are damaged, if your notebook and contact a qualified computer technician. 90 www.gateway.com Instead, unplug your notebook was dropped, or if the case was damaged. Chapter...
8511226 - Gateway Platinum Edition User Guide
Page 97
... If you have problems with your notebook, try these things first: ■ Make sure that the AC power adapter is connected to your notebook and an AC outlet and that the AC outlet is supplying power. ■ If you followed each instruction. ■ If an error occurs in the Search box , then... 91 Help and Support For more information about troubleshooting, click Start, then click Help and Support. The message may help Gateway Customer Care in diagnosing and fixing the problem. ■ If you added or removed peripheral devices, review the installation procedures you performed and make ...
... If you have problems with your notebook, try these things first: ■ Make sure that the AC power adapter is connected to your notebook and an AC outlet and that the AC outlet is supplying power. ■ If you followed each instruction. ■ If an error occurs in the Search box , then... 91 Help and Support For more information about troubleshooting, click Start, then click Help and Support. The message may help Gateway Customer Care in diagnosing and fixing the problem. ■ If you added or removed peripheral devices, review the installation procedures you performed and make ...
8511226 - Gateway Platinum Edition User Guide
Page 114
For more information, see "Device installation" on your AC power adapter is connected securely to an electrical outlet, turned on, and working on AC power ■ Make sure that your hard drive. Power Your notebook is not working correctly. Replace any damaged cables. For more ...surge protector is connected correctly to room temperature. 108 www.gateway.com To test the outlet, plug a working on battery power ■ Check the power management settings. Tips & Tricks For more information, see "Changing Power-Saving Settings" in Using Your Computer which has been ...
For more information, see "Device installation" on your AC power adapter is connected securely to an electrical outlet, turned on, and working on AC power ■ Make sure that your hard drive. Power Your notebook is not working correctly. Replace any damaged cables. For more ...surge protector is connected correctly to room temperature. 108 www.gateway.com To test the outlet, plug a working on battery power ■ Check the power management settings. Tips & Tricks For more information, see "Changing Power-Saving Settings" in Using Your Computer which has been ...
8511226 - Gateway Platinum Edition User Guide
Page 135
... 110 volume down button 33 volume up button 33 audio CD cleaning 76 playing 42 automobile power adapter 59 B battery alternate power sources 59 bay 56 changing 56 charge indicator 10, 54 charge status 54 charging 20, 55 conserving... power 58 icons 54 installing 56 latch 14 locating 14 managing power 58 monitoring charge 54 purchasing 17 recalibrating 55 recharging 20, 55 release latch 14 replacing 56... PC Card 107 types of memory cards supported 43 carrying case 17 CD cleaning 76 www.gateway.com 129
... 110 volume down button 33 volume up button 33 audio CD cleaning 76 playing 42 automobile power adapter 59 B battery alternate power sources 59 bay 56 changing 56 charge indicator 10, 54 charge status 54 charging 20, 55 conserving... power 58 icons 54 installing 56 latch 14 locating 14 managing power 58 monitoring charge 54 purchasing 17 recalibrating 55 recharging 20, 55 release latch 14 replacing 56... PC Card 107 types of memory cards supported 43 carrying case 17 CD cleaning 76 www.gateway.com 129
8511226 - Gateway Platinum Edition User Guide
Page 137
... 11 troubleshooting 94 using 40 DVD/CD-RW drive See DVD drive DVD±RW drive See DVD drive E electrostatic discharge (ESD) 62 EmPower power adapter 59 Ethernet connecting 24 jack 13, 24 external monitor 13, 31 EZ Pad touchpad See touchpad F fan 11 faxes troubleshooting 103 files opening 35 ...troubleshooting 97 finding Help and Support topics 6 specifications 17 Firewire port 12 Fn key 30, 31 folders opening 35 function keys 30 G Gateway model number 14, 16 serial number 16, 17 Support 17 Web address 3 Web site 3 H hard drive bay 14 indicator 28 installing 68 replacing 68...
... 11 troubleshooting 94 using 40 DVD/CD-RW drive See DVD drive DVD±RW drive See DVD drive E electrostatic discharge (ESD) 62 EmPower power adapter 59 Ethernet connecting 24 jack 13, 24 external monitor 13, 31 EZ Pad touchpad See touchpad F fan 11 faxes troubleshooting 103 files opening 35 ...troubleshooting 97 finding Help and Support topics 6 specifications 17 Firewire port 12 Fn key 30, 31 folders opening 35 function keys 30 G Gateway model number 14, 16 serial number 16, 17 Support 17 Web address 3 Web site 3 H hard drive bay 14 indicator 28 installing 68 replacing 68...

Gateway Platinum Edition User Guide
Page 65
...Start, All Programs, then click Gateway Documentation. Save the battery for times when you will have access to support pillars, in -flight power receptacle, an automobile power outlet, or an automobile cigarette lighter, use a power adapter. ■ To find AC power outlets in airports, look for ... 55 and "Changing batteries" on your AC power adapter, also take a single-plug surge protector. ■ If you cannot use a power inverter. www.gateway.com 59 Extending battery life ■ Recharge the battery often, take electrical adapters. while your notebook" in Standby, it reads...
...Start, All Programs, then click Gateway Documentation. Save the battery for times when you will have access to support pillars, in -flight power receptacle, an automobile power outlet, or an automobile cigarette lighter, use a power adapter. ■ To find AC power outlets in airports, look for ... 55 and "Changing batteries" on your AC power adapter, also take a single-plug surge protector. ■ If you cannot use a power inverter. www.gateway.com 59 Extending battery life ■ Recharge the battery often, take electrical adapters. while your notebook" in Standby, it reads...

Gateway Platinum Edition User Guide
Page 73
... cover screws. 14 Replace the keyboard screw. 15 Insert the battery, then turn your notebook over. 16 Connect the power adapter, modem cable, and network cable, then turn on your notebook. www.gateway.com 67 If the module does not fit, make sure that the notch in the module lines up with the... tab in one direction. Important Use only memory modules designed for your Gateway notebook. 12 Gently push the module down until it...
... cover screws. 14 Replace the keyboard screw. 15 Insert the battery, then turn your notebook over. 16 Connect the power adapter, modem cable, and network cable, then turn on your notebook. www.gateway.com 67 If the module does not fit, make sure that the notch in the module lines up with the... tab in one direction. Important Use only memory modules designed for your Gateway notebook. 12 Gently push the module down until it...
Gateway Platinum Edition User Guide
Page 77
www.gateway.com 71 Replacing the hard drive kit 17 Insert the battery, then turn your notebook over. 18 Connect the power adapter, modem cable, and network cable, then turn on your notebook. 19 For instructions on installing Windows, your drivers, and your applications, see the Using Gateway System Recovery online guide you printed in Step 2.
www.gateway.com 71 Replacing the hard drive kit 17 Insert the battery, then turn your notebook over. 18 Connect the power adapter, modem cable, and network cable, then turn on your notebook. 19 For instructions on installing Windows, your drivers, and your applications, see the Using Gateway System Recovery online guide you printed in Step 2.


