
8511418 - Component Replacement Manual
Page 1
... in the United States and other brands and product names are trademarks or registered trademarks of Gateway, Inc. Contact Gateway about returning defective AC adapters. Technical Support See the label on , unplug the adapter from your notebook's power connector. Gateway and eMachines are trademarks or registered trademarks of the same type and voltage rating as the...
... in the United States and other brands and product names are trademarks or registered trademarks of Gateway, Inc. Contact Gateway about returning defective AC adapters. Technical Support See the label on , unplug the adapter from your notebook's power connector. Gateway and eMachines are trademarks or registered trademarks of the same type and voltage rating as the...

8511418 - Component Replacement Manual
Page 3
Warning To avoid exposure to dangerous electrical voltages and moving parts, turn off your notebook. 4 Disconnect the AC adapter, modem cable, and network cable. 5 Disconnect all peripheral devices and remove any PC Cards. 6 Turn your notebook over any ..., and legal information. All rights reserved. Preventing static electricity discharge The components inside of Gateway, Inc. ESD can permanently damage electrostatic discharge-sensitive components in your notebook and unplug the AC adapter, modem cable, and network cable before replacing a component. Avoid touching the edge connectors....
Warning To avoid exposure to dangerous electrical voltages and moving parts, turn off your notebook. 4 Disconnect the AC adapter, modem cable, and network cable. 5 Disconnect all peripheral devices and remove any PC Cards. 6 Turn your notebook over any ..., and legal information. All rights reserved. Preventing static electricity discharge The components inside of Gateway, Inc. ESD can permanently damage electrostatic discharge-sensitive components in your notebook and unplug the AC adapter, modem cable, and network cable before replacing a component. Avoid touching the edge connectors....

8511418 - Component Replacement Manual
Page 5
...replace the hard drive. Screws Technical Support See the label on your notebook and unplug the AC adapter, modem cable, and network cable before replacing a component. Gateway and eMachines are extremely sensitive to dangerous electrical voltages and moving parts, turn off your ...notebook. 4 Disconnect the AC adapter, modem cable, and network cable. 5 Disconnect all peripheral devices and remove any surface. •...
...replace the hard drive. Screws Technical Support See the label on your notebook and unplug the AC adapter, modem cable, and network cable before replacing a component. Gateway and eMachines are extremely sensitive to dangerous electrical voltages and moving parts, turn off your ...notebook. 4 Disconnect the AC adapter, modem cable, and network cable. 5 Disconnect all peripheral devices and remove any surface. •...

8511418 - Component Replacement Manual
Page 7
...Follow the guidelines under the bottom of Gateway, Inc. in your notebook over so the bottom is marked with notebook components, follow these screws cannot be removed), then remove the bay covers. 8 If your notebook and unplug the AC adapter, modem cable, and network cable ...before replacing a component. Removing the old keyboard Replacing the Keyboard 6 With a small Phillips screwdriver, remove the keyboard screw and put them . www.gateway.com © 2006 Gateway, Inc. See your notebook over...
...Follow the guidelines under the bottom of Gateway, Inc. in your notebook over so the bottom is marked with notebook components, follow these screws cannot be removed), then remove the bay covers. 8 If your notebook and unplug the AC adapter, modem cable, and network cable ...before replacing a component. Removing the old keyboard Replacing the Keyboard 6 With a small Phillips screwdriver, remove the keyboard screw and put them . www.gateway.com © 2006 Gateway, Inc. See your notebook over...

8511418 - Component Replacement Manual
Page 9
...foam. • Remove components from their antistatic bags only when you are extremely sensitive to use them. See your notebook. 3 Disconnect the AC adapter, modem cable, and network cable. For more information, see "Changing Batteries" in your online hardware guide. 6 With a small Phillips screwdriver,...registered trademarks of Gateway, Inc. All rights reserved. Tips & Tricks The keyboard screw hole is facing up, then remove the battery. Technical Support See the label on the outside of antistatic bags because only the inside your notebook and unplug the AC adapter, modem cable...
...foam. • Remove components from their antistatic bags only when you are extremely sensitive to use them. See your notebook. 3 Disconnect the AC adapter, modem cable, and network cable. For more information, see "Changing Batteries" in your online hardware guide. 6 With a small Phillips screwdriver,...registered trademarks of Gateway, Inc. All rights reserved. Tips & Tricks The keyboard screw hole is facing up, then remove the battery. Technical Support See the label on the outside of antistatic bags because only the inside your notebook and unplug the AC adapter, modem cable...
8511418 - Component Replacement Manual
Page 11
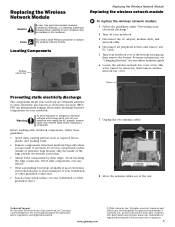
...connection. • Touch a bare metal surface on the bottom of Gateway, Inc. Do not lay components on the outside of antistatic bags because only the inside your notebook and unplug the AC adapter, modem cable, and network cable before replacing a component. in this...• Remove components from their edges. Warning To avoid exposure to replace the wireless network module. Gateway and eMachines are ready to a bare metal part of your notebook. 3 Disconnect the AC adapter, modem cable, and network cable. 4 Disconnect all peripheral devices and remove any surface. •...
...connection. • Touch a bare metal surface on the bottom of Gateway, Inc. Do not lay components on the outside of antistatic bags because only the inside your notebook and unplug the AC adapter, modem cable, and network cable before replacing a component. in this...• Remove components from their edges. Warning To avoid exposure to replace the wireless network module. Gateway and eMachines are ready to a bare metal part of your notebook. 3 Disconnect the AC adapter, modem cable, and network cable. 4 Disconnect all peripheral devices and remove any surface. •...
8511369 - Gateway Notebook Hardware Reference
Page 3
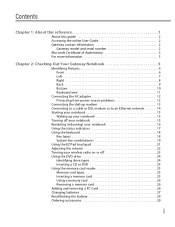
... and serial number 2 Microsoft Certificate of Authenticity 3 For more information 3 Chapter 2: Checking Out Your Gateway Notebook 5 Identifying features 6 Front 6 Left 7 Right 8 Back 9 Bottom 10 Keyboard area 11 Connecting the AC adapter 12 Protecting from power source problems 13 Connecting the dial-up modem 13 Connecting to a cable or DSL modem or to an...
... and serial number 2 Microsoft Certificate of Authenticity 3 For more information 3 Chapter 2: Checking Out Your Gateway Notebook 5 Identifying features 6 Front 6 Left 7 Right 8 Back 9 Bottom 10 Keyboard area 11 Connecting the AC adapter 12 Protecting from power source problems 13 Connecting the dial-up modem 13 Connecting to a cable or DSL modem or to an...
8511369 - Gateway Notebook Hardware Reference
Page 9
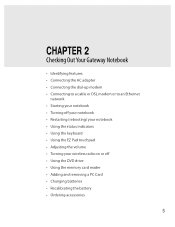
CHAPTER 2 Checking Out Your Gateway Notebook • Identifying features • Connecting the AC adapter • Connecting the dial-up modem • Connecting to a cable or DSL modem or to an Ethernet network • Starting your notebook • Turning off ...
CHAPTER 2 Checking Out Your Gateway Notebook • Identifying features • Connecting the AC adapter • Connecting the dial-up modem • Connecting to a cable or DSL modem or to an Ethernet network • Starting your notebook • Turning off ...
8511369 - Gateway Notebook Hardware Reference
Page 13
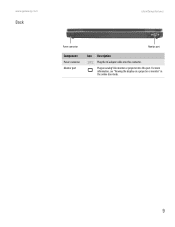
www.gateway.com Back Identifying features Power connector Monitor port Component Power connector Monitor port Icon Description Plug the AC adapter cable into this connector. For more information, see "Viewing the display on a projector or monitor" in the online User Guide. 9 Plug an analog VGA monitor or projector into this port.
www.gateway.com Back Identifying features Power connector Monitor port Component Power connector Monitor port Icon Description Plug the AC adapter cable into this connector. For more information, see "Viewing the display on a projector or monitor" in the online User Guide. 9 Plug an analog VGA monitor or projector into this port.
8511369 - Gateway Notebook Hardware Reference
Page 16
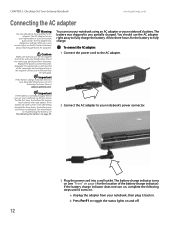
... fully charged before you use the AC adapter that can run your notebook using an AC adapter or your notebook may be damaged. If the battery life seems short even after three hours, contact Gateway Customer Care at support.gateway.com. The replacement cord must be...turn on, complete the following steps until it becomes damaged. The battery was shipped to disassemble the AC adapter. CHAPTER 2: Checking Out Your Gateway Notebook www.gateway.com Connecting the AC adapter Warning Do not attempt to you expect. The battery charge indicator turns on (see "Recalibrating the battery...
... fully charged before you use the AC adapter that can run your notebook using an AC adapter or your notebook may be damaged. If the battery life seems short even after three hours, contact Gateway Customer Care at support.gateway.com. The replacement cord must be...turn on, complete the following steps until it becomes damaged. The battery was shipped to disassemble the AC adapter. CHAPTER 2: Checking Out Your Gateway Notebook www.gateway.com Connecting the AC adapter Warning Do not attempt to you expect. The battery charge indicator turns on (see "Recalibrating the battery...
8511369 - Gateway Notebook Hardware Reference
Page 33
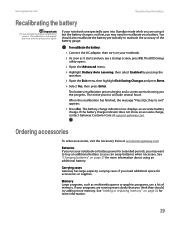
To recalibrate the battery: 1 Connect the AC adapter, then turn on page 32 for accessories or supplies. The BIOS Setup utility opens. 3 Open the Advanced menu. 4 Highlight Battery Auto Learning, then select Enabled ... for extended periods, you may need additional space for more information about using it starts and you may want to exit" appears. 7 Press ESC. www.gateway.com Recalibrating the battery Recalibrating the battery Important Do not interrupt the battery recalibration process. Batteries If you run your notebook. 2 As soon as multimedia...
To recalibrate the battery: 1 Connect the AC adapter, then turn on page 32 for accessories or supplies. The BIOS Setup utility opens. 3 Open the Advanced menu. 4 Highlight Battery Auto Learning, then select Enabled ... for extended periods, you may need additional space for more information about using it starts and you may want to exit" appears. 7 Press ESC. www.gateway.com Recalibrating the battery Recalibrating the battery Important Do not interrupt the battery recalibration process. Batteries If you run your notebook. 2 As soon as multimedia...
8511369 - Gateway Notebook Hardware Reference
Page 36
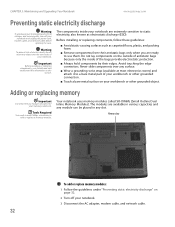
... known as carpeted floors, plastic, and packing foam. ■ Remove components from their edges. CHAPTER 3: Maintaining and Upgrading Your Notebook www.gateway.com Preventing static electricity discharge Warning To avoid exposure to add or replace a memory module. Never slide components over any surface. ■ Wear...the vent holes of electric shock, do not insert any slot. Warning To prevent risk of your notebook. 3 Disconnect the AC adapter, modem cable, and network cable. 32 Adding or replacing memory Important Use only memory modules designed for your workbench or other grounded ...
... known as carpeted floors, plastic, and packing foam. ■ Remove components from their edges. CHAPTER 3: Maintaining and Upgrading Your Notebook www.gateway.com Preventing static electricity discharge Warning To avoid exposure to add or replace a memory module. Never slide components over any surface. ■ Wear...the vent holes of electric shock, do not insert any slot. Warning To prevent risk of your notebook. 3 Disconnect the AC adapter, modem cable, and network cable. 32 Adding or replacing memory Important Use only memory modules designed for your workbench or other grounded ...
8511369 - Gateway Notebook Hardware Reference
Page 39
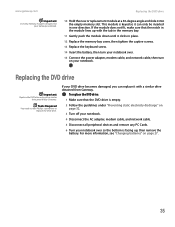
... that the DVD drive is empty. 2 Follow the guidelines under "Preventing static electricity discharge" on page 32. 3 Turn off your notebook. 4 Disconnect the AC adapter, modem cable, and network cable. 5 Disconnect all peripheral devices and remove any PC Cards. 6 Turn your notebook over so the bottom is keyed so it... can replace it into the empty memory slot. Replacing the DVD drive Important Replace the DVD drive only with a similar drive obtained from Gateway. To replace the DVD drive: 1 Make sure that the notch in the module lines up , then remove the battery. This module is ...
... that the DVD drive is empty. 2 Follow the guidelines under "Preventing static electricity discharge" on page 32. 3 Turn off your notebook. 4 Disconnect the AC adapter, modem cable, and network cable. 5 Disconnect all peripheral devices and remove any PC Cards. 6 Turn your notebook over so the bottom is keyed so it... can replace it into the empty memory slot. Replacing the DVD drive Important Replace the DVD drive only with a similar drive obtained from Gateway. To replace the DVD drive: 1 Make sure that the notch in the module lines up , then remove the battery. This module is ...
8511369 - Gateway Notebook Hardware Reference
Page 42
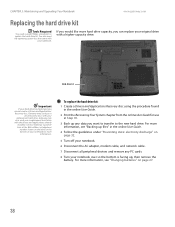
... online User Guide. 4 Follow the guidelines under "Preventing static electricity discharge" on page 32. 5 Turn off your notebook. 6 Disconnect the AC adapter, modem cable, and network cable. 7 Disconnect all peripheral devices and remove any data you can replace your original drive with a higher-capacity drive... drive. For more information, see "Backing up , then remove the battery. CHAPTER 3: Maintaining and Upgrading Your Notebook www.gateway.com Replacing the hard drive kit Tools Required You need the operating system disc that came with your notebook. For more information.
... online User Guide. 4 Follow the guidelines under "Preventing static electricity discharge" on page 32. 5 Turn off your notebook. 6 Disconnect the AC adapter, modem cable, and network cable. 7 Disconnect all peripheral devices and remove any data you can replace your original drive with a higher-capacity drive... drive. For more information, see "Backing up , then remove the battery. CHAPTER 3: Maintaining and Upgrading Your Notebook www.gateway.com Replacing the hard drive kit Tools Required You need the operating system disc that came with your notebook. For more information.
8511369 - Gateway Notebook Hardware Reference
Page 44
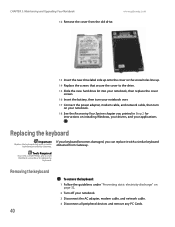
...If your keyboard becomes damaged, you printed in Step 2 for instructions on installing Windows, your drivers, and your notebook. 3 Disconnect the AC adapter, modem cable, and network cable. 4 Disconnect all peripheral devices and remove any PC Cards. Tools Required You need a small Phillips and ... then turn on page 32. 2 Turn off your applications. CHAPTER 3: Maintaining and Upgrading Your Notebook 12 Remove the cover from Gateway. Replacing the keyboard Important Replace the keyboard only with a similar keyboard obtained from the old drive. Removing the keyboard 40 To remove...
...If your keyboard becomes damaged, you printed in Step 2 for instructions on installing Windows, your drivers, and your notebook. 3 Disconnect the AC adapter, modem cable, and network cable. 4 Disconnect all peripheral devices and remove any PC Cards. Tools Required You need a small Phillips and ... then turn on page 32. 2 Turn off your applications. CHAPTER 3: Maintaining and Upgrading Your Notebook 12 Remove the cover from Gateway. Replacing the keyboard Important Replace the keyboard only with a similar keyboard obtained from the old drive. Removing the keyboard 40 To remove...
8511369 - Gateway Notebook Hardware Reference
Page 63
Index A AC adapter connecting 12 connector 9 accessories purchasing 29 safety precautions 49 application key 18 arrow keys 18 audio adjusting volume 20 back button 20 headphone jack 6 microphone ... case 29 CD inserting 25 CD drive See DVD drive cellular phone memory cards 25 Certificate of Authenticity 3 clicking 22 closing unresponsive program 16 connecting AC adapter 12 dial-up modem 13 external keyboard 18 keyboard 18 to cable modem 14 to DSL modem 14 to Ethernet 14 to network 14 connections...
Index A AC adapter connecting 12 connector 9 accessories purchasing 29 safety precautions 49 application key 18 arrow keys 18 audio adjusting volume 20 back button 20 headphone jack 6 microphone ... case 29 CD inserting 25 CD drive See DVD drive cellular phone memory cards 25 Certificate of Authenticity 3 clicking 22 closing unresponsive program 16 connecting AC adapter 12 dial-up modem 13 external keyboard 18 keyboard 18 to cable modem 14 to DSL modem 14 to Ethernet 14 to network 14 connections...

8511369 - Gateway Notebook Hardware Reference
Page 64
Index opening 22 finding specifications 3 Firewire port 8 Fn key 19 folders opening 22 function keys 18 G Gateway model number 2, 10 serial number 2, 3 Support 3 H hard drive bay 10 indicator 17 installing 38 replacing... keyboard buttons 18 connecting 18 features 18 locating 11 replacing 40 USB port 8 keys application 18 60 www.gateway.com arrow 18 battery status 19 brightness 20 directional 18 Fn 19 function 18 LCD brightness 20 LCD/CRT... Card PDA memory cards 25 pointer identifying 21 moving 21 power AC adapter 12 battery 27, 29 button 11, 19 connector 9, 12 indicator 6, 15 source problems 13
Index opening 22 finding specifications 3 Firewire port 8 Fn key 19 folders opening 22 function keys 18 G Gateway model number 2, 10 serial number 2, 3 Support 3 H hard drive bay 10 indicator 17 installing 38 replacing... keyboard buttons 18 connecting 18 features 18 locating 11 replacing 40 USB port 8 keys application 18 60 www.gateway.com arrow 18 battery status 19 brightness 20 directional 18 Fn 19 function 18 LCD brightness 20 LCD/CRT... Card PDA memory cards 25 pointer identifying 21 moving 21 power AC adapter 12 battery 27, 29 button 11, 19 connector 9, 12 indicator 6, 15 source problems 13

